J36 – THE BRIDGE OF VERDALSÖRA
Legion defending as the Allies
JP attacking as the Germans
ROAR (A:G – 18:30) – 1st April, 2007
JP finally scored some time to meet online and play a scenario. I was flipping through the Journals the other day and noticed the Norwegian Campaign scenarios (ASL Journal 3), they look like fun so with some luck I shall be able to get through them all!
Initial Thoughts
The German invaders are pushing towards the vital bridge of Verdalsöra, a bridge which my British and Norwegian fighters initially set out to defend. Unfortunately the Germans have managed to cross the river elsewhere and my Engineers have received instructions not to blow the bridge either, thus we are to hold the attackers for as long as possible. I have a hodgepodge force of Norwegians with a medium machinegun detachment and a few British Engineers of low quality (2nd line). The Germans have nearly a company and a half of crack Mountain troops with artillery support. The terrain on my side of the two-lane stone bridge (over board 8) is mostly wooden buildings (board 20).
This looks tough for the Allies. The Germans have a very strong force and despite having the difficulty of a long bridge crossing they do have 2nd Turn reinforcements coming on right into the middle of the defenders positions. The defenders have a plethora of MMG, but SSR gives them B11 – hardly very encouraging! Kindling the wooden buildings is NA. The Germans win by amassing 20VP either through CVP or Exit VP.
ROAR puts this as reasonably pro-German and I believe that from looking at the setup. My defenders can still win this and I think the key to success is delaying the Germans, though if I can cause 12CVP or more I shall automatically win. I shall be skulking as much as possible in this one!
Norwegian Setup
My men have all setup on Board 20 and all are concealed. I have tried to setup out of his LOS as much as possible with the exception of the MMG unit behind the roadblock, he will hopefully survive long enough to skulk in my turn and then move back to cover down the Bridge. Every turn his men are shooting at my (hopefully concealed) units is a turn that he is not moving towards the victory edge. If I can manage to keep my losses down I think I can slow him enough in the dense city.
T3: 3x ? – He is likely to pick this as a dummy but it is best to make him guess as this is a good position
U8: 458 – Looks like another dummy in another good defensive position
Y9: MMG 458 – To cover the bridge, he will skulk and keep covering the bridge with it’s -1 TEM
Y9/Y10: Roadblock – This is used more for it’s wall-like properties
Z4: 458
Z8: 2x 458 – They will cover the 20Z9/AA10 from enemy crossing the bridge but look like an MMG
AA1: MMG 458, 7-0 – Covers the R5-Z1 road, the leader can help portage the MMG if he needs to move
AA6: MMG 458, 8-0 – Rallying point and to cover the S10-Z6 road
BB9: 2x ? – Dummies to draw fire from the opposite bank and thus waste time
EE9: MMG 458, 9-1 – Last line of defence and rally point
German Setup
The Germans have obviously setup with a view to punishing any defenders that show themselves. They have a fairly powerful support force staring down or around the Bridge exit area:
8I2: 81mm MTR 228
8J2 (2): 3x 468, 2x LMG, MMG, 9-1, 8-0 Radio
8K5 & 8N3: 50mm MTR 468
There is also a force of troops that will use long-range fire at first before heading down the bridge (he is going to need some of these units to get across and off-board even if all the reinforcements make it off without casualty)
8F3: 3x 468, 8-1
8G4: 2x 468
Lastly he has a bunch of troops who will probably ‘test the water’ by moving down the bridge straight away.
8I4: 2x 469, 8-1
My concern for the Germans with this setup is that I think he does not have an awareness of how long it might take to get through the defence and off-board… he has a lot of men manning SW and high in the 2J2 building and they cannot run across the bridge and get off if things start to bog down. I would have put just HS with the 50mm MTRs to allow for more men to cross the bridge.
The Game
TURN 1-2
The game starts with his 81mm MTR popping SMOKE as expected – the target hex is 20Y10, right in front of the Roadblock. Also as expected JP’s SMOKE is wasted immediately with the highest possible availability roll! Under the cover of this SMOKE a 468 attempts to make it down the bridge (probably testing the ‘reality’ of my men staring them down), the result is predictable, a CR break and a 2FP FL stopping this little adventure. His men blast away from high in the building across the river and manage to strip the concealment off of my forward man in 20U8 who breaks and is forced to run for his life (he makes it to 20X6 where he is eliminated in CC in Turn 3). JP is blasting away from the Western bank at 2 units, one of whom is a dummy (20BB9) and this is fine by me… shooting ain’t moving and I want his to waste as much time as he can. Unfortunately the successful shot down the bridge also removed the concealment from my firing unit so he is forced to skulk, and though the option is there to move out to his former position, thereby keeping the bridge under fire, I choose not to, I need him alive. He pulls back to help defend the vital 20AA10 woods area.
I feel that here might be a good time to show a little picture of the main area where the battle will be fought out. I have included the positioning of my roadblock in this picture as I found it to be a good spot:
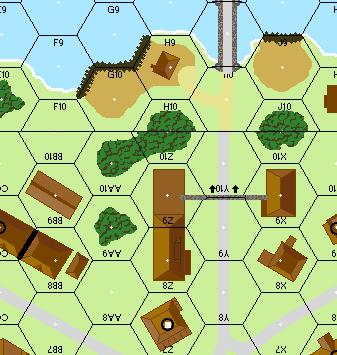
Most of the battles in the scenario will be fought out in the area around exit of the bridge (8I10), from the 8G9 hills to the 20AA10 woods and the 20Z9 building. From 20Z9 the bridge exit can be fired on with only limited LOS from the Western side of the river. Likewise 20AA10 provides an excellent blocking position while being out of German LOS. 20AA9 and 20BB8 are other positions that will help form a strong blocking line.
My reinforcements rush on-board and 2x 447, 7-0 makes for the bridge defenders, while the remaining 2x 447, 8-1 support the Eastern defenders. His reinforcements come on with about a third of them heading down the Eastern edge, the rest come through the centre (20X6 Rowhouse) and along the river bank; seeing this gave me some heart as a massed movement along the Eastern edge would have been hard to stop. I am also heartened by JPs lack of interest in the OBA, admittedly this is not a target-rich environment, I am skulking well and he would need to make a supplementary chit draw that could be a problem… but it might be better to soften the defenders rather than leave it doing nothing!
The second turn provided little action, just a lot of manoeuvre – he is obviously unsure about the 2x 458 I have in 20Z8; I bet he thinks it is another MMG MMC – just as I want him to! The only real shot of the turn is against one of his reinforcing units, an 8-1, 468 (20U2), I score a lucky hit and he just as luckily scores a HOB on the leader which hardens him and makes him a Hero! Sigh…
Allies CVP: 1
Germans: 248
TURN 3-4
The Germans are inching their way across the Bridge and he loses a 468 as this sole unit moves off the bridge in the 3rd Turn. I have setup a defensive position entirely based on containment with the MMG 458 and 2x 458 stacks combining to fire into 8I10 from 20Z9. Should he break through these same units (backed up by the British 2x 447 7-0 in 20AA9) can cover all the locations around this vital area.
Unfortunately his Sniper discovered a target from that last shot; he broke the 458 manning the 20AA6 MMG, a vital position – I would have preferred losing the leader, with this position down I have only limited FP watching over the 20Y7 road network area… and he has men here who can exploit this hole in my defence. The awful result with the Sniper is then immediately followed with the heroic German leader (now in 20U2 (2)) firing with a Pinned MMC and scoring a break on my 20AA1 458 and ELRing the 7-0; that is 2 MMG Squads broken within seconds of each other… My defence is suddenly looking very brittle, though it is still holding together. I have 2x 447, 8-1 (British) and a solitary Norwegian 458 in the 20Z2 building who have to cover almost half the board!
JP finally drops a SR (near the 20Z2 building) and also comes running off the bridge when my 3x 458, MMG defenders pull back to 20AA10 (it was starting to get VERY hot due to his reinforcements entering the 20X8/X9 buildings in force). By the end of the German 4th Turn Movement Phase the area around the roadblock and bridge exit is awash with Germans and only the solitary 2x ? I had placed in 20Z9 have held him back as JP felt sure this was a 458! He really wasted a lot of time and MP due to this solitary dummy stack and it is great to see a plan with a dummy work for once (especially against such a cluey opponent)! Unfortunately the sheer number of men and the movement of his killer MG stack from 8J2(2) to 8F3(2) mean I am going to be hard pressed to be able to skulk much more so I decide to stand and slug it out with my 3x 458, MMG… and this is where disaster strikes!
Up to this point both JP and I agree that the Allies were easily winning. He was running behind on time and had only managed to kill a solitary MMC, I had scored 5 CVP (another HS was killed due to Fate in a Rally attempt, he lost another in Turn 5 like this too!) and had not been pushed back a single hex, though I was having quite some trouble rallying my broken men. I fired my stack as 2x 458 (16FP +2 against a 468 in 20Z8) and MMG 458 (16FP +1 against a 468 in 20Z9) both shots missed by miles – he shot back and though he did not manage to kill any units he broke the entire stack! I now had only my British (2x 447, 7-0 in 20BB8) to hold the entire Riverbank against nearly 14 Squads! To make matters worse OBA was now falling in my rear areas too!
Allies: 458
CVP: 5
Germans: 468, 2x 248
VP: 2
TURN 5
Things were looking terrible for the Allies… their defence had totally crumbled… I had no options left, it was a simple matter of hoping that the few remaining unbroken units would be able to stem the tide… He was going to be able to waltz off-board with no worries, or so I thought… Suddenly it became clear to me that JP was not focussed on exiting the board, the Germans were going to attempt to capture the 3x 458 that had just run, as well as a 458 he had just broken in 20Z4… and there was very little I could do to stop him. A quick calculation showed that 4x MMC as prisoners was going to put him right on the cusp of a win.
In no time at all my British units were surrounded (their First Fire, SFF and FPF most with -2, only managed to Pin a solitary unit!) as were the 3x 458 (one of these was captured in Rout, the other 2 routed upstairs thus prolonging the agony but also giving me a chance to think of something). He crossed the now unguarded 20Y1-Y6 road with a few units and easily captured the 458 here too – I still had an unbroken 447 in this building though and this guy is important, so remember him… It looked like game over. 2x 468 jumped into CC with my 2x 447 7-0, but it turned out badly for them as I managed to CR one of the attackers for no loss.
With Turn 5’s Allied Rally Phase a British 8-1 leader (who had to Voluntarily break to escape the 8-1, LMG 468 (20Z3) now adjacent to the previously mentioned 447) HOB-rallied to become a Heroic leader… and this gave me an idea. The 447, instead of running, just stood and blazed away… remarkably his 8FP +2 ended up breaking both the leader and the 468! If I could only get men there to stop his rout I would gain enough points from Prisoners to give me the win! Sure enough my men got there, but suffered a blizzard of fire leaving both the 8-1 Hero and a 447 with him broken, only a 6+1 Norwegian leader got adjacent but this was not enough – not enough until JP kindly pointed out A20.21 RtPh, a basic rule forgotten in the heat of the moment – these broken unit had to surrender as their only options were Rout or Low Crawl through Open Ground; JP’s honesty had given me enough CVP to win the game – if I could hold onto those prisoners!
With it now being right down to the wire I did something I rarely do… I chose to run into CC. Ever since JP and I have played ASL against each other he has held a massive advantage in CC… he ALWAYS kills me, I have never killed him… it got so bad in ABtF CG III that I actually Voluntarily Routed rather than take him on when the odds were in my favour. This has started to really swing over the past few years though. In the B:RV CG my first piece of SS real-estate was won through a very lucky CC result… and tonight’s game brought the same results! My 2x 447, 7-0 already in CC against his 468, 248 managed to roll SNAKE-EYEs… scratch up 3CVP; I only needed 1CVP more to guarantee the win! I had sent my 9-1 458 in against his CX 8-1, 2x 248 (one was guarding a Squad prisoner)… he rolled first and rolled SNAKE-EYEs – he had the option, to withdraw or to take the kill (he was just attacking the 458)… he took the kill, but that meant I got my roll… roll I did and killed both of his units too! 4 more CVP and the game was over!
Allies: 9-1, 458 (4x 458 captured)
CVP: 15 (+8)
Germans: 3x 468, 2x 248, 9-1 (8-1, 458 captured)
VP: 6 (+16)
The Germans have conceded more than 11 CVP.
ALLIED VICTORY
Conclusion
This is yet another small scenario that JP and I have played that has come right down to the wire! Up until the 4th turn my Allies were writing victory letters for the folks back home before it all fell apart with just 2 DRs. Then it was the Germans who were totally ascendant until a lucky attack and some quick thinking allowed prisoners to be taken that would ensure an Allied win – and a set of fluky DRs in CC sealed the win! Wow… how exciting was those last 2 player turns!
In retrospect there is little I would change about the Norwegian setup. I would have kept the excellent Roadblock position but maybe stuck 2 MMG groups there instead of the one… infantry can hold the East edge even against the full force of the Germans entering in Turn 2 and a pair of skulking MMGs firing down the bridge might be powerful (and concealed and lucky) enough to turn that bridge into a death-trap; with a 2FP -3 firelane down that bridge ain’t nobody gonna be moving too fast nor far!
It is hard to criticise JPs tactics (as usual). I thought he was moving to slow at first, but this was proved wrong when my defence collapsed and he just waltzed on through. Perhaps the Germans might gain from bringing on the reinforcements as a solid mass focussed on moving along the East edge of the board thereby splitting the Allied Defence in two. And I would have used the OBA even if only against single units.
As I mentioned in my Initial Thoughts on this scenario it does certainly look Pre-German but this scenario is a lot more balanced that ROAR makes it out to be. With just a little Allied luck, or a bit of bad luck for the Germans this game is going to be poised on a knife-edge and for that reason I would recommend it. As the Allied (or German) player do not forget that the Axis have to keep their losses down or they automatically lose – this alone is a bonus for the Allied player as even without taking prisoners 12CVP is not hard to make since the Germans will be coming to you with limited time to get off-board.
In writing up the AAR I wonder if we played the CC rules out correctly with the 1,1 result.. does this mean that the units get to use the result in CC AND withdraw? If so then it would be a pity that the game ended without us having a chance to play out the very last part of it (JP having to attempt to release the prisoners I took – admittedly a hard task considering the paucity of units in that sector of the board and the inability to lose even a single CVP). Even if we did play this part in error I don’t think that the main result of the game – i.e. that we both had a cool chance to play an exciting scenario – was changed by this.