J37 – TRETTEN IN FLAMES
Legion defending as the British
JP attacking as the Germans
ROAR (G:B – 38:29) – 3rd April, 2007
Time to hit the second scenario in our Norwegian adventure, this time with some interesting rules that are hardly used; Alpine Hills and Ski-troops
Initial Thoughts
Deeper and deeper into Norway push the elite German’s while the Allies fall apart every time they try to make a stand (with the exception of the brave defenders of The Bridge of Verdalsöra). This time it is up to the British to cover the retreat of the Norwegian forces after the disastrous Battle of Tretten.
The British force is lightly armed and burdened with a 6+1, though there is also a British Hero available. It faces a numerically superior force with better SW. The Germans also have a sIG 33 150mm INF Gun (not to be moved from 15Y6) and a late arriving Pz IIA. To make things interesting there are even ski-equipped Elite Mountain troops. The terrain consists of the hills of Board 15 (Alpine Hills rule in effect (B10.211) – thus there is no LOS through same-level hill hexes) and part of Board 8. There is Ground Snow at level 0 and Deep Snow on the higher levels.
To win the scenario the British have to stop the Germans taking 20 of the buildings (all wooden) on/North of hexrow ‘O’, they can also win by gaining 11 or more CVP.
At first glance this is a difficult scenario to gain an overview of. I am not familiar with the skiing rules (though will be facing ski units in my SASL CG and can use this chance to learn about the rule) and I do not play Ground Snow or Deep Snow rules often. Also, the VASL map, while being quite beautiful in the snow, is hard to read – I suggest playing this scenario without the snow option on, or use the Night option to shade the map and make the hill levels stand out better.
Tactically the British are up against the wall.
British Setup
The Germans have set building 15I8 a’blaze as per SSR
Before setting up it is essential to understand that the sIG 33 has an amazing LOS across the whole of the mapboard thus the first task of the British is to setup out of its LOS – even under concealment this gun’s payload is not worth playing chicken with!
Next on the agenda is to count up the building hexes… I count 36 prior to the Building Blaze… 35 after… I must stop him gaining 20 of those in 6 German Turns. This is certainly achievable, but I must be aware that his ski troops can move pretty fast when they gain some altitude – if I was the Germans I would be sending those to take 15O3 then 15H1 prior to heading over the 15F2/E3 ridges to pick up some speed for an attack into the village. This will put enemy to my front and rear flank forcing the British to split their forces…
Finally we have to consider the Alpine Hills, they block LOS though same level Hill hexes, this helps the British as they force the Germans to move adjacent if they wish to attack, but help the Germans due to the greatly modified LOS.
15C8: 2x ? – To keep him guessing by putting dummies to the rear, this might also stop his ski troops being too bold
15E6: 447 – Reserve unit and to hold the rear flank
15G5: 447 – Reserve unit and to hold the rear flank
15H1: 6+1 – Col. Bogey is hiding here to act like an MMC!
15H5(1): ATR 237 – Anti-tank crew, this location gives me INF Gun cover and the ability to relocate
15K8: 2x 457, LMG, 7-0 – Major defensive group, to strip concealment and take cheap shots
8K1: LMG 457, 237, Hero, 9-1 – Major defensive group, looks like 2x LMG MMC
8M3: 2x 447 – Defending the river flank
15N10: 457 – To strip LOS and take cheap shots
15O3: 2x ? – Dummies using the Alpine Hills to force him to take these guys seriously
The Game
TURN 1-2
The Germans have little tactical flexibility for their setup and this means I know where to expect their attack. As it turns out they make a strong move along the River bank whilst a big stack and a single MC move through an LOS hole to enter 15R8 building. Watch out for this Defenders… if JP had moved his entire force through here I would have been unstuck from the very start of the game!
Initial fire is limited, though I manage to strip a most of his concealment. He is getting caught around the stone walls near the river (8Q2 and 8R1) and his first casualties are an ELRed 447 – my 8K1 position is invulnerable to almost any of his fire and yet it is holding him out of his initial target building (8O2) due to the open ground the Germans have to cross. Things don’t go my way entirely though, he claims 2 buildings (15O3 and 15O10) and I have an 457 & 7-0 ELR (15K8) from the stack he has put in the 15R8 building – these guys (2x MMC MMG, LMG, 8-1) have excellent LOS over the battlefield and are a real danger, this is shown by the way they eliminate a HS I moved to 15L10. Units in the second story of the 15R8 building have the ability to hit a lot of positions the sIG cannot.
British: 237
Germans Buildings: 2
TURN 3-4
My just ELRed 7-0 immediately HOBs back up and the 447 with him rallies too but then a horror turn starts for me. JP realises that he is falling behind the pace and makes a bunch of bold Dash moves to gain access to the 8O2 building… Amazingly, despite the 4FP and 2FP -2 shots, every single Dash succeeds either through missed shots or great MC rolls; if the dice had rolled the other way though it would have nearly been game over for him – this was just gutsy play that paid off big time. In fact, the end result of it all was a net gain for him as he too gains a HOB result which blesses him with a Hero! When he fires back his shots are great and they end up breaking a 457 and scoring a SAN which kills my 9-1 leader! All of a sudden I have gone from being in complete control to losing the lynch-pin of my defence (8K1). I am left with no option to withdraw across to the 8K2 building with my Hero and 457… but even here I suffer as his MMG searches me out and breaks the MMC!
It was not all bad news… He Advanced into CC against my 6+1 leader (way East in the 15H1 cabin) who continues my CC dominance by CRing the 468 MMC; CC here continued for 2 turns before JP finally shoots into his own CC to break my 6+1. My Hero is also living up to his name… he Ambushes a HS in CC and kills him and then Prep Fires at 2FP +1 to break another HS. Also JP continues his run of Fate rolls and CRs another of his units (he will do this again later making it 4 Fate results from Rallies in 2 scenarios). The other bit of good news was the Breakdown of the sIG INF Gun, but this unit was reasonably irrelevant due to my setup positions and the dominance of his MG stack in 15Q8.
The most important battle as far as the result of this game is concerned is the one that is happening in 8M3(1). I have 2x 447 here and they are holding up up nearly 3 times their number of troops… my men are firing but it is 16FP which means I only ever roll 9’s and 10’s while JP is missing too. He won’t advance into CC because I am pretty hot in CC at the movement and because he cannot afford the CVP loss if I get lucky… he cannot run past because he knows I will shoot anyone who tries… 8FP -2 is too good a chance to miss. If my men can stay alive long enough here then I can win this scenario easily!
With my Hero standing alone and there being little support for him he does what heroes do best… he Advances into 8K4 where the Pz IIA was parked… he is going to CC this guy if possible and score big CVP bonus points! Unfortunately it he misses the required 1,1!
British: 247, 9-1 (457 captured)
CVP: 3
Germans: 247, 248, 236
Germans Buildings: 7
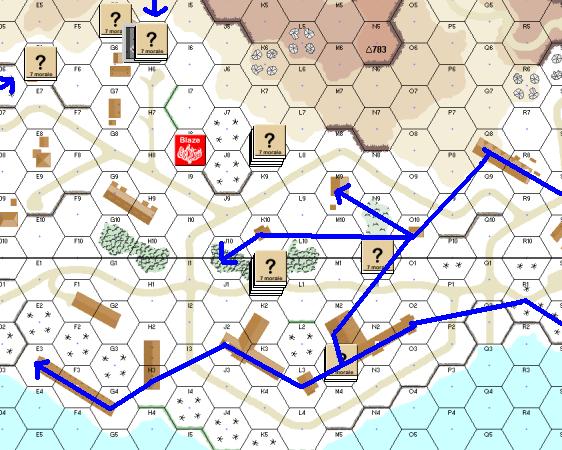
German attack flow
TURN 5-6
From the start of Turn 5 there is no doubt that my defence is now basically non-existent.
In his Turn 5 JP finally Pins my 2x 447 and then jumps into CC… he scores an Ambush and CRs one of the 447s… in my Turn 5 JP rolls low enough to eliminate all my resistance in this hex and then later kills the Hero in CC too, at least I took a HS with me. But what of the Hero… well, naturally in the very next attempt he managed to Immobilise the Panzer… Ha! How cool is that! I try to take advantage of this by rushing my ATR over as close as possible for a shot at him… there is still a tiny chance of a British win if I can get that tank… but as the manning HS runs the gauntlet of German shots he ends up Pinned and that takes away my last chance for the win!
Despite my men having some minor successes (wounding the 9-1, and eliminating an 8-0 through a 4FP -2 shot when JP got slack with his LOS) it is all over now… I watch him put CX on everything that can move and see them gobble up the remaining buildings needed for the win. It was certainly close… but without a doubt this was a hard-fought and well deserved German victory!
British: 2x 447, 247, 2x 237, Hero
CVP: 6
Germans: 248, 236, 8-0
The Germans have gained 20 building locations.
GERMAN VICTORY
Conclusion
There is no reason why the British cannot win this scenario. Their defence is brittle but initially strong and they have the advantage of beneficial terrain. When things fall apart for the British they could collapse quickly, so it is up to their commander to make sure there are fall-back positions and back-up units. I would actually go so far as saying that this is an excellent scenario for improving your skill as a defender, for learning how to use the terrain to your advantage.
The Germans have an great chance of pulling off a win in this game, but not enough so that it is unbalanced. They have the advantage and I like the historical feel of that but a bit of British pluck can turn that around quickly, our game was decided by a brave set of moves by a German commander who was not afraid to take risks.
In this game the Germans had to take risks lest they be slowed down too much. It all paid off to the detriment of the British but it could have easily been a blood-bath if the dice went the other way… 11CVP is really not hard to accumulate and until the Germans can force their way into the city the initiative is all British. Also 20 building hexes is a lot to grab in such a short time and in such a difficult tactical situation… even with my force being totally reduced by Turn 5 JP still had to hustle to grab enough territory!
So, do yourself a favour, pull this scenario out and give it a go especially if you have been playing the Attacker too much and need to hone your Defensive skills, this game will provide a great test for your abilities!