J39 – INDEED!
Legion defending as the Allies
JP attacking as the Germans
ROAR (A:G – 0:16) – 26th April, 2007
Played as Live VASL in 3 sessions @ 5½ hours total play time
The last game, J38 – Bitter Defence at Otta was a real disappointment. I am hoping that despite the poor ROAR rating with this game that JP and I shall come to an agreement about using a modification suggested by one of the assistant designers of these scenarios. Otherwise we are in for another dog!
Initial Thoughts
An interesting idea for a battle here. A small German Bridgehead is being held against a superior Allied force, but the Bridgehead is being expanded by units entering every turn for the first 4 turns. The Scenario is won by whomever Exits the most VP off the East edge of the map. Doing the maths on this we see that the allies have a maximum of 24 VP available for exit while the Germans have a maximum of 41 VP. Obviously the Allies cannot run straight off the map, they have to try to hold the Germans back for a while.
This is not going to be an easy battle, especially since the British part of the defence has to setup first, followed by the German’s bridgehead force and then finally the small Norwegian contingent. Also the ROAR rating tends to scream “Dog!” rather than “Indeed!” During the recent posting of our playing’s on the GameSquad After Action Reports forums one of the assistant designers of these scenarios, Laurent Closier, mentioned that this scenario suffers from a major balance problem that should be rectified by shortening the game by a half-turn (thus allowing the British to go last) we have decided to accept this as a half-official Errata and will end the game at the end of Turn 7.
This is another wooden city fight, again there are no Stone Buildings on the map and again the map area is very small; the Germans need travel just 14 hexes from Pier entry point to map exit! The Germans have an all-elite force although this time at least my British can match the 8ML Axis squads. Another anomaly is that the British have the superior leader (9-2) as well as a Hero while the Germans have a total of 5 leaders with -4 mods in total.
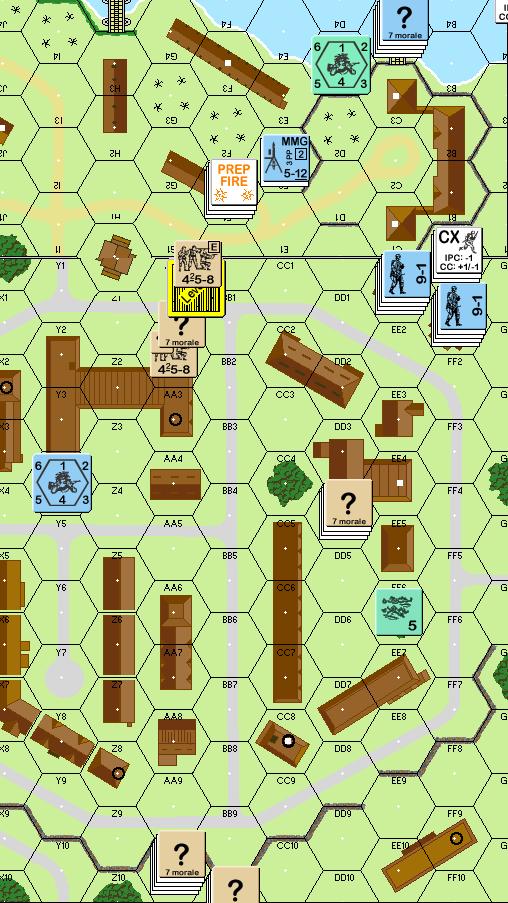
British Setup
My British are going to be set up aggressively… I really think that I need to stop him cold, at least for the first few turns – I also need to hit his units as they enter the Pier. Unfortunately this allows him to hit me right from the outset too; possibly with 16FP and a -1 ldr – I am betting a lot on this first turn. I have made the central positions equal in stacking height so that he must guess which locations have the 9-2 and Hero in them
21S3 458 Southern Flank protection
21Y2(2) 2x 458, 8-1, Hero Got to hope that these guys survive the first turn
21AA2(2) 2x 458, LMG, 9-2 The 9-2, LMG 457 will be my main defensive option!
21DD2 458 Northern Flank protection
German Setup
8K2 50mm MTR(dm) 468
8G2 LMG 4688BB2 2x 468, 8-1
I am relieved to see that he is not going to try and smash one of my initial defensive positions with an all-out attack though the 8B2 position does have the ability to hit 21AA2 with 8FP +1 in the first turn. I am wondering if the positioning of these 2 MMC this far over to the North is to draw fire away from the Southern-most Pier?
Norwegian Setup
21R2 LMG 457, 7-0 To hit any units entering on Pier #1 (8O2) and for Southern Flank protection
21DD2 2x 457 Northern Flank protection, stacked under the British 458 for ? gain purposes
Again I have used units to hide the nature of my disposition; the 7-0 (21R2) and the British 458 (21DD2) are covering the units beneath so that he will not be sure where the 2x 457 or the LMG 457 are. I was able to conceal all the flank units immediately.
My plan is quite a simple one… to delay his attack as long as possible with another skulking defence. Obviously the first turn is the most important one as far as this tactic goes, if he is able to score an important break in his Prep Fire then I might be undone right from the get-go. The positioning of strong defensive forces on my flanks allows for the ability to either blunt an attack or to reinforce towards the centre. His real strength is the number of units available to him, as well as time… he can afford to take some hits while maintaining forward pressure to create a hole in my defence. He also knows that for every British unit I lose I must kill 2 Germans to cover that loss.
The Game
TURN 1-3
The Germans have decided to land on the 8C4 pier. Their initial wave is decimated though when 2 of the 3x 468 are KIA due to both an amazing initial shot (6FP -4) and the RF (2FP -2) the 9-1 leader is also broken and a MMG(dm) is dropped by the eliminated men on 8C4 itself. These shots were from the 9-2 driven stack (21AA2(2)) which was not silenced when JPs Prep Fire fizzled out. My other British stack (21Y2(2)) managed to break the LMG 467 in 8G2 as well. One thing is sure though, he is really going to push hard down this North flank so I pull men away from the Southern side (leaving the Norwegian LMG 457, 7-0 here to cover this whole side of the board) to cross the board laterally.
Turn 2 starts off with a disaster for me when both his units (the 468 and 9-1) rally, just one more turn of them being out of business would have been magnificent. He has started to push through the 8C3 factory on the North side and he lands more men on the pier (3x 468 – 1x CR but passes 2MC and 1x Pin, MTR(dm), LMG, 8-1); the ones who are not Pinned join the very strong push through the factory. My 2x Norwegian 547 (21DD2) score another lucky break against a 468 and the 9-1 again… this leaders LLTC Pins the other 468 moving with him and again stalls the strong attack. JP is really being aggressive here and not taking Prep shots to allow for maximum movement opportunities; despite this I take a punt that will either win or lose me the game. I had moved the British 8-1 stack from the 2nd story of the 21AA2 building in my last move… I needed him to be able to react to any break-through. This left just the 9-2 stack (now in 21Y2(2)) upstairs but also facing the possibility of 4 attacks ranging from 4FP +2 to 12FP +0 – I knew JP was pushing hard, but a break (or worse) to this stack could be a disaster, so I left a single 458 behind and ran the rest for downstairs… they too would be able to react from here to his moves. I say this move could win the game (its gift of mobility is essential) but it might also lose me the game because by leaving this hex I have stopped being able to continue the Turkey Shoot as he comes on-board across the open pier. I have chosen to skulk in the hope of keeping Exit VP alive and in the hope of being able to hit and run and thus slow his men down.
He managed to recover the MMG off of the pier and used a SMOKE grenade to attempt to get this unit (and an 8-1 leader from the new reinforcements) to 8F1 where I am sure he will want to assist the LMG 468 already in this hex with his Firelane duties – this is a real danger for me as my only option to cross this Firelane is to get behind the 21S7 – GG7 Stone Wall and use its cover. It doesn’t go totally to plan for him though, the MMG unit is Pinned (8E2) and this gives me a moment of grace to move in my turn. He does score his first successful attack of the game though when he ELR breaks one of my vital defenders in 21DD2. This now Green Norwegian Squad scores a Fate roll in his Rally Phase and ends up CR-ed – great… I run my men backwards, leaving just 2x 458 in the 21AA2 building, as much as possible the rest are pulling right back to get closer to the Exit Edge and to improve my tactical position. JP has a great opportunity to push down the nearly unguarded North side of the board and I have to try to stop that. I also want to take advantage of the excellent stone wall near the Exit Edge. The men left behind in the 21AA2 building are to keep pressure on the pier and to make sure that he must move though the 8C3 factory – even if they take Prep Fire hits they are still going to be of some value!
Norwegians: 227
Germans: 2x 468, 248
Situation at the end of Turn 3
TURN 4-6
The Germans keep pushing on, this has been a flawless game by JP tactically, but things have not gone his way with the dice, not at all. He misses so many shots in the 4th Turn that it seems that the momentum has really swung to the Allied side. I miss a lot of shots too and quite a number of those misses were 4FP -2 shots. For all the movement in the open he makes and for all the supporting fire of my new defensive positions I can only manage is a single CR-break and another break. The just CRed MMC rolls Fate for his MC attempt (making this the 6th such roll in just 4 games for JP). My moves and shots are limited by his positioning in LOS shadows and by the isolation that a Norwegian 457 and a British 458 are suffering in the 21CC2-21EE7 block – amazingly, despite almost having the units here surrounded (and separated to split his fire) JP misses EVERY shot, or I pass the 1MCs… thus leaving them another turn of life and allowing them to slow or even stop his movements in the next turn.
JP cannot pull a trick at the moment, he fires with 20FP +0 (2x 468, LMG, 9-1 – 21EE7(2)) at an adjacent British unit and rolls boxcars to malfunction the LMG and totally miss this near-certain break. The shots that follow are a real litany of failure as he has the worst run of bad attacks that I can recall from all our games together – I on the other hand pass almost all my MCs with great ease! Finally a FG is able to break the Norwegian 457 here (21EE5) which leads to his capture, but the tide has truly turned, units that are firing are not moving, not positioning themselves for the final rush to the board edge, nor are they able to use their FP to attack my many defenders just a single AM away from the Exit Edge. For my turn I spread units out, trying to ensure that as many men survive as possible and also being sure I can cover all the ground he is going to have to cross to get off-board… He finally breaks the 458 I have in the top floor of the 21AA2 building (in 21AA3) which allows him to move the 2x 468, LMG, MMG, 8-1 CX to 21AA7; I am not too worried about his FP, but this is more men available for running off…
More forward moving by the Germans, but not as much as he wanted to due to the survival of the 458 (21EE6) making Open Ground movement difficult at best. He need not have worried as my shots were very poor this turn (as they have been on occasion in this game, with some notable exceptions in the first turn, but my shots have not been as essential as his). In fact the ONLY shot of that turn that hit happened to be a last-ditch attempt with a lone Hero… 1FP+1 which scores snake-eyes and ends up breaking a 468 and killing an 8-0 due to FATE… poor JP, what terrible luck he has had this scenario! JP makes a brave decision to jump into CC with 2x 468 vs my single 458 in 21EE7 – but this is a stalemate and might end up costing him dearly! My turn 6 is spent on a big skulk-fest; my men pull back to allow as few shots as possible against them, I don’t want any bad luck to ruin my final stand. His only major attack is 2x 468, 9-1 with the repaired LMG… and it immediately rolls another 6,6! The CC is resolved with each of us losing a MMC… something which I can easily afford, so I count this as a victory for me
British: 458
Norwegians: 227 (457 Surrenders)
Germans: 248, 2x 468, 8-0
TURN 7
It all comes down to the final turn and my calculations are that he needs to get 17CVP off if he doesn’t break any of my troops. Things start well for him with the rallying of a 468 well within range of the exit edge. His first move is a gusty one right down the North Edge, this guy drops SMOKE grenades (21FF8) and manages to pass a First Fire shot of 8FP -2… he succumbs to a 4FP -2 SFF shot though. I place an LMG FL down the BB9-FF7 road and though this only claims a 468 it also makes for more DRs he has to face. To be honest it all goes pear-shaped for JP after this… almost every unit ends up broken or Pinned as they all have to move within a rapidly expanding net of RF or FL. The real low-light for the Germans is a 1,1 roll when the biggest stack he moved in the whole last turn (8-1, LMG 468, 248) are moving through EE9 only to be attacked by FF9 as FPF – they are all KIA; it was here that the writing was on the wall. The rest of the turn was a flurry of shots… another 8-1 is ELR wounded, the 9-1 is Pinned and a 468 is KIA but this is really all academic now. About the only positive for JP was a SAN result from my 1,1 roll which broke a 458 thus letting me get only 14CVP off… In Advance JP moved what few men were still capable (8-0, 2x 248) off-board as well as moving in to kill my Hero in CC and the game was over.
British: Hero
Germans: 248, 3x 468, 2x 8-1 (468 surrender)
Allied Exit VP: 14
German Exit VP: 3
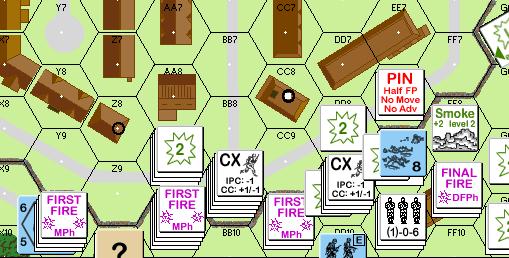
The Final Turn, all the units under CX are Pinned with the exception of DD9. EE10 is a German HS and leader.
The Allies have exited more VP.
ALLIED VICTORY
Conclusion
First and most importantly: this game was played with a 7 turn limit, not 7.5 as per the scenario card. This was done thanks to the suggestion of one of the assistant designers of these Norwegian Scenarios to counter the extreme balance problems. JP was initially reluctant to allow this change in game turn (he preferred even 6.5 turns to 7!) but eventually he relented and I thank him for that! Normally I do not like to play with any Balances… these games are not for tournaments, they are for fun and for the AAR’s sake, thus they should be played ‘vanilla’ but in this case there was such an obvious bias and such a clear message from one of the people involved in it’s design that I felt it necessary to make the change and see if this scenario can be salvaged. I VERY MUCH suggest that this scenario should be played with this balance. I don’t think that the modification of the play turns makes the game too pro-British. The game we had was most excellent and very exciting and I think the win should have rightfully been JPs, but his luck was atrocious this game, especially when it mattered most.
JPs attack was really excellent, it was hard, focussed and very aggressive. His landing positions were under heavy attack right from the beginning and he lost troops easily, but he was able to work his way to a position where I felt I could not accept the risk of staying in my main defensive position any longer; this was achieved by the 2nd turn. By the 4th Turn I was convinced that just a little luck going in his direction would allow him to steamroll my hastily created
defence but that was one of the turns when he had a horror run of attacks. He rapidly went from an overwhelmingly powerful position to having a large mass of men slowed down by just a few units. Every turn I held him back was a huge advantage for me and in the end the bad luck of turns 4 and 5 slowed him down too much.
The most important position in JPs attack was the excellent positioning of the LMG initially and thence the MMG – they ended up in 8F1 and totally stopped me laterally reinforcing due to the Fire Lane possibilities.
I don’t know if there was a better option for his pier landing, any position he chose would have positives and negatives and in the end he chose the one with most positives once the Germans exited the pier itself. The pier in 8O4 was covered by a Norwegian LMG 457, 7-0; fighting from here would have been very much decided by the possibility of movement down the 21R2-R6 buildings (not Rowhouses due to SSR). The other pier (8H4) would have been free of interdiction, but the question would then have been how to exit the 8H2 building and cross all that open ground in front of it.
My Allied defence was not bad but certainly I would make at least some minor changes should I play this again. I would have at least a few units setup way back in the defence to allow for ease of reinforcement and to stop the 8F1 firelane from being so over-powering. In retrospect my decision to pull out of the 2nd floor of the main defensive building (21AA2) proved to be a decisive move. It helped me immensely because it got my men back fast enough to affect a difference and the LMG allowed me to FL the 21BB9-GG7 road; mind you I benefited greatly from the ineffective German attacks.
The DRs in this game were decisive. Even the last turn, though it was always going to be a very difficult task for the Germans, was made impossible due to a combination of crazy DRs (2x 1,1 for the Allies 2x 6,6 for the Germans!).
All over though I would have to say that this is an excellent little scenario… I was really impressed with it and with the idea of the German bridgehead expanding against a hard-pressed defensive force. The scenario idea is so good but obviously there are some real balance problems caused by the Germans having the last turn… if my Allies had to move off first and then leave the Germans to move last then even with the commanding position I held at the end I still would have lost. I recommend this for a quick game one night but only with the proviso that the British move last.