J40 – MIGHT MAKES RIGHT
Legion defending as the Norwegians
JP attacking as the Germans
ROAR (G:N – 42:21) – 20th May, 2007
Played as Live VASL – 2 Sessions (4 hours)
Our little tour of Norway is currently standing at 2 all…
Initial Thoughts
Another game using the Alpine Hills rule, but there is no snow this time. Starting on the outskirts of a wooden village (Bd 10) my Norwegians have to try to stop a German force from claiming that village (13 or more building hexes) – or inflict enough casualties (11 or more CVP) to make its capture too expensive. I quite like these scenarios with CVP caps as I feel that it really captures the mood of both sides early in the war.
My defenders have a pair of MMGs (B# 11) and a single LMG as well as a hodge-podge force of men (2x Elite, 3x 1st Line, 3x Green) and leaders (9-2, 7-0) at least I have a fair number of ? counters (14x ?). The Germans are not as gifted with SW as one would expect but they have a full company of Elite forces and many leaders; about a quarter of their force start up on-board.
Tactically the map is split into 3 with Alpine Hills ensuring that I shall have to cover the Centre and both flanks of Bd 18. At least there are few woods and hedges meaning that I shall have the first shot in most cases with reasonable odds of success. This shall be another skulking scoot-and-shoot battle though I shall be forced to setup with some strength kept in reserve as JP will again be attacking aggressively to try to complete his Victory Conditions in the 7 turns available. One of the most tactically important considerations is the large amount of open space that the Germans will have to navigate through – they can escape this by getting on the hills though this gives me a chance to stop them at the bottlenecks.
Norwegian Setup
My plan is to have a fairly staggered defence with a couple of dummy stacks to keep him guessing. I am going to position my MMG fairly deep as I cannot afford to have them overwhelmed or bypassed. He is almost certain to attack down the North flank (better cover here and less open territory) with a strong supporting force covering the centre and the Northern hill-line.
All my men start concealed
18J3 437 – To ‘keep him honest’ with initial attacks and to strip ?
18J8 437 – To ‘keep him honest’ with initial attacks and to strip ?
18I8 2x dummy – To soak up some Prep and to make the North flank look stronger
18G9 437, 457, dummy – To give the appearance of a ldr and SW
18F2 457 – To make him aware of the open terrain down the South flank
18E5 MMG 458, 9-2 – Main defensive position for the initial stage of the game, to slow him down
10EE5 MMG 458, 7-0 – Main village defensive position
10EE7 2x dummy – These will move to ‘reinforce’ the likely attack axis into the village
10DD2 LMG 457 – These are also here to allow for village reinforcement along his most likely attack axis
I like this defence, it has flexibility and some aggression too. As with many of these Norwegian scenarios time and the fear of casualties are going to be helping me out against what I am sure will be another weighted German attack.
German Setup
JP has surprised me and seemingly not setup for a Northern attack but a more Southern one. He is taking the obvious route of probably using his MMG/LMG combo and the Lt. MTR to soften me up a little. He has already setup his forces ready for entry in Turn 1 – they appear to also be heading South.
The Game
TURN 1-3
JP Prep-ed away and as hoped it was wasteful, he didn’t even manage to strip any concealment. He fired a lot of shots at the North ridge defenders, but half of what he can see are dummies. His forces entered the board and they have their ? stripped almost immediately. His attacks seem to be fairly heavily weighted towards the South. (South: 5x 468, 2x 248, 8-1, LMG, MMG, 50mm Mtr. North: 3x 468, 248, 9-1, LMG, MMG(dm), MTR(dm)). Strangely he holds off 2 units. He also sets up his dm MTR and MMG on the 18M7 hill.
My turn is movements away from his LOS to avoid bad luck scoring any hits. I want to cover the village against attack so I start to move backwards but he has done his homework (as usual) and the MTRs have my positions fairly well covered.
The DRs for us both this game have been atrocious – this is compounded when JPs first attack of the new turn is a malfunction for his 18M6 MMG. He is again trying to expose the concealed units he can see (which is not much because most of my units have moved back to force his movement to slow down or face 8FP -2 shots as he moves adjacent) with Prep Fire but it is my men who draw first blood this game. He moves to 18J3 which causes me to fire with the 18E5 MMG 458, 9-2 – the result is a K/2 and he loses a HS… miraculously though both the HS and the 8-1 leader here pass their 2MCs. He is obviously going to be sticking to the hill tops, though he uses the 18J7-18L6 hedge to good effect and makes some fast CX moves here to cover more ground.
In my turn JP immediately fixes his MMG. I pull my men right back to make a stand just in front of the vital 18F8 and 18G3 hill bottlenecks – I initially plan to have a pair of MMC covering both these hexes but in the end I decide to run for the village with a 457 from each hill, this leaves just a 437 covering each side. I also pull back with the MMG 458, 9-2, but in doing so JP spots an excellent LOS on my bypassing units (18I8 @ 18 B5/C5/C6 vertex) and scores a K/2 (revenge!); the result is the same as he suffered with the squad being CR but both units pass their 2MC! Phew… that could have been a disaster!
Turn 3 doesn’t go well for me. Firstly JP’s excellent MTR positions had LOS to my Southern-most Hill defender, the ROF tear managed a NMC which I rolled FATE for – the result is a Disrupted HS who is immediately put out of his misery by the same MTR. My defence has enough holes in it now to drive a Dutch Truck through and JP uses that to really move fast. He CXs anyone he can to get them in close, bypassing the North Hill in the process. As for my shots… well , the as-yet unfired Norwegian MMG malfunctions with it’s first shot. Then I had an 8FP +0 shot with a 437 against an adjacent LMG 467 – a break here would almost guarantee me 2CVP since I could easy cut off his Rout paths; unfortunately JP rolled HOB for the NMC and I was faced with a Fanatic 467 and a Hero! My penultimate shot is an 8FP +1 from a single 457 surrounded by 3 enemy units/stacks… this is a miss… the return shots don’t miss and I am broken thus forcing this unit’s surrender. It is only with my final shot that I regain some pride, a German HS is KIA from the 9-2’s MMG. And just to prove it is not all one way JP’s Heroic shot with the LMG causes it’s breakdown too…
We stopped the game here for the day with both of us feeling that the scenario hung in the balance. Surely luck had not been on my side towards the end of that session and I was left with really only 3.5 MMC, 2 leaders and 1 MMG guarding the whole of the village, but the locations of the units make it hard for him to waltz right in. On the other hand he has a very large force who stand on the brink of entering the village with 4 movement turns remaining. I think that the key question hangs over the fate of the malfunctioned Norwegian MMG – if that repairs quickly then I still feel confident I can hold him out – if it doesn’t then I am going to be in trouble. The other factor is the losses he has suffered, 2CVP down leaves him with just a 7CVP buffer… 7CVP is not a lot when facing an MMG with a -2 leader and when there are 2 units roving his back lines.
Norwegians: 437, 248, 2 dummies (457 ELRs and Surrenders)
CVP: 2
Germans: 2x 248
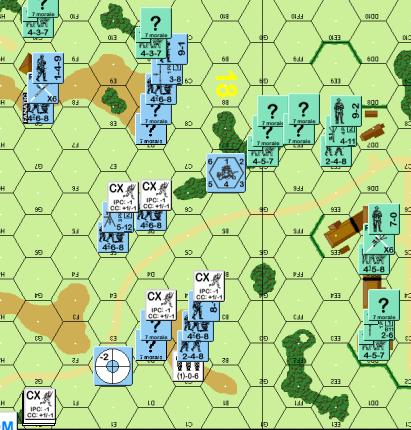
End of Turn 3: Can the valiant Norwegians (and their rubbish MMGs) hold the Germans out of the village?
TURN 4-6
Although I really have had some terrible luck in this game it is really not such a bad position that I find myself in. If you look at the maths of building control he is going to have to make it past the 10CC hexrow to be able to gain enough buildings and that is just where my MMG -2 is about to go. I think that currently the most important piece on the board is the 457 in 18A7, if he survives for a few turns I can hold him off due to the time he will waste in either bypassing this position or in attacking it – until this guy is gone JP cannot risk moving out in the open to grab the first building.
Unfortunately things continue in the same vein as before. The first DR of the new day’s play is a snake-eyes for a German 8-0’s rally – it HOBs to an Heroic 8-1. Meanwhile my MMG fails to repair. I take shots that all miss by far as he makes some minor movements, he is obviously trying to draw his men together for the next phase of the attack and has also taken the time between plays to revise his original plans – this movement phase actually saw him skulking as he brought up men from his rear lines. It is time for Defensive Fire and again the dice fall JPs way… his ONLY 2 shots are a 2FP +1 shot against the vital 457 in 18A7… it is an NMC – that NMC is passed with a snake-eyes…! Man, a Hero or Battle Hardening would be perfect! Instead my unit rolls a Surrender… sigh… what more can go wrong! Then I lose the 437 in 18D9 to another perfect attack roll and rubbish MC.
My turn is very quick. JP loses his malfunctioned LMG, while my MMG again fails to repair (2 in 6 chance = 33%). My moves are to pull back into the village, I place the MMG(malf) 458, 7-0 in 10C4 – this is in hope of the MMG repairing and thus having this position here to hold him off, I can then retreat through 10BB3. My LMG 457 goes to 10CC2 – this allows me to cover the 10DD2 building before escaping to 10BB1. Finally my MMG 348, 9-2 go to 10CC8 where they can firelane down the 10CC2-CC7 road as well as cover the flank and the nearby woods. For my final act of the turn my sole remaining 437 unit enters into CC with one of his 248s and KIAs it without loss.
The new turn comes and still my MMG fails to repair. JP starts to power up the aggression again and makes his initial moves on village. The first is a real ripper of a move, a solitary HS tries to infiltrate the village down the North side, this is on the direct opposite side to where the majority of his weight is to fall. With this unit’s move I have 2 choices… let him pass; if I do that he is certain to be able to grab the 13 building locations, or, shoot; if I shoot I have a great chance of hurting him (4FP -4) but my building location locks my CA in the wrong direction! Very sneaky JP! I shoot (of course) and the result is a measly 2MC… but then JP rolls Fate and the HS expires! Phew… and I have ROF, but that is no good for this Phase due to my locked CA. The rest of his men move to the 10DD2 and 10DD3 buildings when they are forced to take many MCs… and almost every single MC is passed with a ‘5’! Bah… in fact this whole turn had almost every MC roll a ‘5’; something JP and I both marvelled at. I am able to eliminate another 248 due to declaring No Quarter in Rout.
My MMG AGAIN fails to repair – this is getting really tedious. I take some shots (the 437 way back on the hill) but they miss, then I try to pull back with the MMG(malf) guys… naturally JP doesn’t miss and just as naturally my men fail their NMCs. Then my Green guy on the hill (18G8) is eliminated with another snake-eyes. I now have just 2 GO units to hold off about 9 German MMC.
It is turn 6 and time for JP to make the big push across the road. I have just 2 defenders; an LMG 457 in 10BB1 – he is holding the rear of the line and stopping units sneaking down the South side of the board. I also have a MMG 248, 9-2 in 10CC8 who is going to firelane that road as soon as he can. JPs first man to try the road is a Dashing 468, he scores a 1MC, but AGAIN JP gets a Fate roll and this guy is CRed and ELR broken. In fact of all the 3 MMC that try the road only one makes it across, but that one should be enough to make sure he fulfils his building quota; of the rest there are 2x 468 and an 8-0 who are broken, but critically he loses no more CVP – he has lost 5CVP to this point.
Little happens in my turn. He immediately rallies his leader and I cannot attempt to fix the MMG as my broken guys do not rally. We both blaze away at each other to no effect.
It is the final movement turn and the game hangs in the balance… He is JUST short of the men on the other side of the road needed to gobble up the remaining buildings and I am JUST short of the CVP needed for the win – it all depends on this turn!
My men again fail to rally but JP also fails to hit my MMG position with an 8FP +1 shot from adjacent, this is going to mean that he will have to run the firelane gauntlet again. The first 468 across breaks… the second across KIAs! Yes!… I am now just 2CVP away from victory and anyone moving across the road is going to suffer a 2FP-2 shot… the next unit to try is an 8-0, 248… and this is really for the game… he moves, I roll… ’11’ – breakdown AAARRRGGG… There is just one more chance for the win (that I remember, more on this later) my LMG 457 has a 6FP +2 shot as a 468 runs for the10X2 buildings but this shot misses by miles and with that there is nothing to stop him taking the rest of the buildings. I feel I cannot successfully counter attack to take enough buildings and surrender…
However, in the emotion of it all I forget I needed just 2CVP for the win… JP asked me “Are you sure you don’t want to counter-attack?” I said “No”…. sigh. As it turned out I had 2 options, one was to attempt to CC the 468 adjacent to my MMG 248, 9-2 and the other was to try to get into CC with my LMG 457.
Norwegians: 2x 457, 437, 2x dummies, 7-0 (457 HOB Surrenders)
CVP: 8
Germans: 4x 248, 468
Building Hexes: 15
The Germans have controlled 13 or more Building hexes.
GERMAN VICTORY
How could I have been foolish enough to forget the final CCs? I was just a single CC result away from victory and I had a reasonable chance of success (in 10DD7-2 for Ambush with leader and -2 on 1:2 CC attack due to the leader). The truth of the matter is that I was so freaked out by the MMG breakdown and was also aware that JP had to go to work – so it is no one’s fault by my own. Still, there is a big lesson here! For the record, I did the Ambush rolls (no Ambush) and the CC attack after JP logged off, the result was not a KIA.
Conclusion
This has been another excellent little scenario. My only complaint about it was that the DRs were absolutely shocking; there was one of the most amazing runs of Fate DRs I have seen, then a huge run of ‘5’ MC DRs and mixed with this was an unbelievable run of missed shots. I guess I feel disappointed knowing that it was the dice who influenced this game quite a lot and I felt that the scenario deserved better.
The Alpine Hills really provide a lot of changes to the way hills are usually played and it was quite useful to both sides to be able to place one’s units on the hill and be safe. It was also useful in that it stopped the Germans MTRs and MMGs from ruling supreme from their 18M7 hill positions.
Despite ROAR showing this is pro-German I think there is a reasonable chance of an Allied win if the Norwegians play to slow the Germans down. If I had not lost one of my MMG on its first shot (it did not get repaired after 6 attempts) then this would have been an easy win. Despite losing my MMG and then my hill defenders in a shocking run of low DR attacks this was still always going to be close. Even in the last 2 turns it really looked like I was going to be able to pull off a save with just the LMG 457 (10BB1) and MMG 248, 9-2 (10CC8) available to me because of the need for the Germans to cross the 10CC2-CC7 road.
Slugging it out will not save the Norwegians in this one; slow the Germans down until they reach the village outskirts and then set up to defend the road. One of the biggest advantages the Allies have is the few options available to the Germans for approaching the village without being excessively exposed to defensive fire – this will let any canny defender know where the likely bottlenecks are.
One excellent position that I was most pleased with was the positioning of the MMG 458, 9-2 in 18E5 initially, then bypassing back to 10EE7 before finally ending up in 10CC8. This is an exceptionally good way to deploy the MMG and leader as it stitches up whole sectors of the map. Just watch the bypass LOS from 18I8!
Knowing that I was nearly able to secure the win even with such a depleted force has made me sure that my defensive ideas were sound – if I played this again as the Norwegians I would try an identical setup.
We both thoroughly enjoyed this scenario, and I guess that after the miracle win to the Allies in the last game it is only fair that this one should have swung the other way! Both of us would consider this as well worth replaying, especially as it is small enough to knock off in an afternoon.