A BRIDGE TOO FAR
CGIII
Legion playing British
18PM
I had chosen an Idle Initiative chit for this game; I have more territory than I can safely hold and need to build up my forces and defences, so why not? However JP chose to Attack and this in the end suits me fine. He has to come hunting for my forces and if he fails a MC by any more than 1 his units suffer ELR breaks. Also I can sit and hold my Attack chits for when I really need them – later in the game when I might totally need to see the disposition of his forces before I setup.
Remnants
MMC 648 x25, 648 (Engineers) x9, 458 x17
HS/Crew 338 x1, 248 x4, 228 x5
Leaders 10-3, 10-2, 9-2, 9-1 x6, 8-1 x6, 8-0, 7-0
SW HMG , MMG x2, LMG x15
PIAT x7, Lt MTR x5, FT x3, DC x5
Guns 76* MTR, 57L AT
Vehicles Jeep x1
Captured LMG x2, PSK
Spread out over the entirety of the board with the exception of the North East corner my force is powerful and waiting to hit any forces that try to bust through my part of town. I have been careful to make the majority of my defence centre around Block H – keeping him out of Blocks N&O is a strategic necessity but will not win me the game in the end.
I have also placed my units with a mind towards escape… he can bring on quite some force right from the first turn, and I have to be ready. To this end I shall start placing trenches in the Block H hedgehog and along possible escape routes.
Reinforcements
Para Pltn x3
648 x4, LMG, PIAT, 8-1
648 x4, LMG, PIAT, 8-1
648 x4, LMG, PIAT, 9-2
Commando Pltn x2
648 x3, LMG, PIAT, DC, 8-1
648 x3, LMG, PIAT, DC, 9-2
MG Section
228 x3, HMG, MMG x2
Mortar Sect x2
228×3, OML 3”MTR x3
228×3, OML 3”MTR x3
Carrier Sect
228×3, Carrier A x3
40FPP
SAN +1
I bought big on infantry and started to plan my defensive positions (mines, foxholes and trenches). I have just 1 buy of infantry left and had to make sure I got as much as possible; as it turns out I will end up missing out on 3 Commando Pltns. I only rolled a 6 for the replenishment DR and this was 1 short of the amount I needed to get an AT Sect (though 2 more would have given me the AT and some more fortifications, alas).
Objectives
He will be attacking, and I want to hurt him as much as possible. I really want to drop his ELR 1 more level; and if he pushes too far or too recklessly then I should be successful.
I see 3 possible attacks forming this turn:
1 A major rush to take Block N – this is the most likely as he needs it to be able to start forming an attack on Block H, and it is essential for on-board OBA spotters.
2 An armoured thrust down the river road between Blocks S & R – second most likely scenario. R is hard to hold, as is S, but he will fear AT defences and might not be willing to take the risk.
3 FINALLY the Harder throwaway attack – ye Gods, it has to come eventually!
I also can start to turn my attention to the time when he is able to take back Block N and thence O, P, R and S. These are all expendable, though I need to make him pay for it. Most importantly I need to save as many men as I can. So for this reason I will be willing to bargain territory for my own men’s lives. The more men I have in the West of the board the stronger I shall be… I will again dig deep, to try and moderate the fierce OBA he has (I know he has 120mm MTR OBA left from last game).
I shall try to use my newly acquired MTRs with a HIP spotter, just to lob some WP and HE into his back lines and even try to take out some OT AFV’s if I am lucky.
Weather Clear, Moderate with a Mild Breeze to the South West (4)
Stat Table
(We are using Battlefield Integrity)

The Game
TURN 1
You know… a player’s worse enemy is himself sometimes and JP is no exception. He is cunning and understands from his own defensive actions that a HIP defender who is unknown at the end of the game will retain control of a Block – so Prep Fire again sees the German commander attacking buildings with his Guns in a search for AT and HIP; yet, in his initial move, he loses a Mk. IV by driving it into a building and having the cellar collapse under it – 6CVP and I have yet to shoot a round!
I have a MTR on a rooftop (O4) who has LOS to a large amount of JP’s entering troops and he starts lobbing shells at them as they enter (W1); unsuccessfully though. JP is making an attempt to take and hold Block N, with HTs and AFVs in the front line to try and stop me moving into the Block whilst the supporting infantry (4 stacks each with a leader, 3MMC and SW it appears) come running behind… I do not have the numerical strength of his troops, but I do have the firepower to stop most of his attack, and all I need is the same single trooper in the Block by the end! My first priority is to get men into the block and claim a corner of it whilst exploiting the holes in his attack to take out AFV’s. I will be happy when his men come to me!
My spotter (N7) directs his 2x 76*MTR (in M8 trench) at a nasty looking MG nest (II6), hitting with a CH and wiping out 2x HS! I then try to land SMOKE into a StuGIII’s hex (AA5) only to miss with my last SMOKE round for that MTR.
His attack has cost him 8CVP and 12BPV so far, but most of those points are through mis-adventure!
This Turn is to be known from now on as “The Big Smoke’ as I have been peppering the battlefield with WP and Smoke, even managing to set a Flame in a building (W4) with WP. A Wind Change brings hope that I can profit from the Mild Breeze blowing to the North-West, as the current South-Westerly dispersing SMOKE is blessing for him!
My MTR fire was very successful, dropping huge hindrances on MMCs and a StuG, but with 4 SAN calls as a result; eventually one of them ended had to end in tears and I lost an 8-1…
Movement is the tricky thing, I have to get a foothold in Block N, but also hold him away from O and P, whilst preparing for a possible mass attack from the roughly 16MMC he has in this Block… and I also want to blunt his attack by picking off some of his vulnerable AFVs. To this end I charge a lone FT toting engineer MMC into the bottom of Block N (BB13) – he will attack a SPW250/sMG (CC12) and I send a mass of units towards the North-Western-most tip of this block as well to attack the PzKpfwIIIL here (V2) and to exert some influence on the Block… I need it to be uncontrolled at the end of this game, and I need him to see that in the buildings I can neutralise his AFV hordes. Frosty and bunch of his boys rush to the top of Block O to take a pot shot at another SPW250/sMG (Z4) that is covering the long road here – but this attack will end up being foiled by my own spreading SMOKE – I am keeping a few units along the length of this Block O as he has a mass of MMCs charging in and I might need to hold them off.
As it turns out things go very well indeed… I have managed to take out 3 of my major objectives; destroying a SPW250/sMG (by FT even in the midst of harassing OBA) and PzKpfw IIIL (point blank PIAT – kapow!) as well as placing a solid foothold into the top of Block N. His attacking force at the top of Block N is almost totally neutralised by SMOKE and CX counters, and he actually voluntarily broke 2 units just to get them out of there – I do not chase them though… he can come to me!
TURN 2
JP has described himself as ‘counter-attacking’ which I think is kind of cute considering that at the beginning of Turn 1 he was attacking… I guess he did take quite some hits though.
Harassing OBA continues to fall, effectively pinning my units in Block P and keeping my FT unit in Block N, all other fire is ineffective. He moves to present a strong attacking front along the Z5-Z12 road with quite a large mass of concealed troops whilst also manoeuvring his many AFVs to positions where they can fire on possible spotter and MTR positions. At the top of Block N however he makes a further withdrawal and the SMOKE gives me a large enough buffer to maintain my hold.
Advancing Fire is totally ineffective, though most shots are really just sighting rounds.
I have a bit of a dilemma here:
1. There are so many targets but also I cannot take them all on at once.
2. For the time being it is clear that I can hold him out of both N and O (should he try to cross the road) – I don’t think he has the strength or the manoeuvring ability to force his attack properly.
3. The only thing I currently fear is his OBA yet both of them have pulled a Red counter; though only one has actually opened up and must be used to the limit before being lost…
In Prep there is MORE SMOKE, the board is rapidly disappearing and with it almost all his ability to shoot, many of his units are affected by SMOKE to one degree or another and as soon as he moves an AFV to a new location I immediately negate its effectiveness with +3 LOS hindrances on it! The only difficulty is the SAN as I again roll a hot one for him, and it breaks a Para MMC in the crucial Block O.
His movements give him a row of undoubtedly powerful units from AA6 – AA10 and I pull way back into Block O to avoid them… he also has set up a defensive line in the upper portion of N that I will find hard to penetrate, so I stay still, hiding in the SMOKE and keeping out of range of his massive FP.
In the end I decide to not send many more troops to this side of the board and I go StuG (Z4) hunting – missing with a PIAT shot but taking it down with a Gammon Bomb – You Beauty! I think that the loss of 4 AFV might just make JP reconsider sending them into urban environments without sufficient infantry support. He has a mass of infantry but they are quite some way away from the main danger at the top of N.
The Germans have lost 25CVP: 2xHS and 4xAFVs.

The Front Line, Blocks N and O
TURN 3
OBA falls, and this time it is the second battery opening up… so they are both used, good! There have been no hits yet and each battery has pulled a Red placing him in danger of losing them. If I was him I would pull back – he has lost too many AFVs but no men and we all know that the ‘poor bloody infantry’ are what wins CGs. To continue to attack is to risk losing men, and they will take a few games to replenish.
He has blasted away with some heavy FGs but they are not enough to penetrate the SMOKE and my troops all pass. Movement shows he is not ready to give up just yet… he rushes my Block N FT MMC (BB12), but a 658 running in the open is lucky to only get reduced to a 548 (German ELR is 1). He has another 658 drop down to a 548 when he charges the PIAT MMC (Z4) who is attacking his SPW250/sMG (Z3); though there are 2x 548 and a 9-1 still in place to CC me this turn. One unit makes it to Block O – though I do not see what a single 658 can do against the 6MMC in this Block!
The biggest, and most fun moment comes when a rogue SPW251/1, scrounged of its weapons, decides to take a fistful of amphetamines (a la Mad Max – “Road Warrior” to you Yanks) and charges a ? MMC in the street (V1) in OVR! Whilst chasing my Brits around the road a PIAT wielding MMC (under the watchful gaze of their steely-eyed 9-2) in the next-door building (U2) tries to use his 1st floor height advantage to lob a shell straight into the HT’s ammo supply, but unfortunately forgot that pointing a PIAT downwards makes the bomb fall out (C13.61) – pity, as I rolled a CH and had to settle with Stunning the crew with infantry fire instead. JP’s final moves are to re-arrange his remaining AFV, getting them out of SMOKEs way, but also obviously mindful of the placement of my (non-existent) AT Guns.
I have the good citizens of Arnhem whispering in my ear but Civilian Information only reveals a Lt. MTR carrying crew (AA9)
My aggression against the SPW250/sMG (Z3) last turn is now going to cost me as he has attacked the routing units (they broke to escape CC last turn) and a defending stack (9-1, 2x MMC, 2x LMG, DC) with quite some force… and on top of that 80mm OBA is falling right in this area.
In Prep I am able to cut the threat down by half when a nice shot gets a lucky break on a 9-1; the poor German ELR means he falls quickly to an 8-1 and the rest of his stack fail/PIN with him. Almost every break costs him unit strength and his low ELR is really hitting hard. My Block N FT finally gets a kill and this forces the first Integrity Base Check of the game. Apart from that I manage to score a few more breaks, they might be crucial as the game progresses.
Movement forces me to dress the line; pulling units deeper into block N away from his possibly lethal OBA (W5) and organising an attack on the lone unit in Block O. My boldest move is to charge the SMOKE affected AT Gun in Z0 with a Carrier A & Crew as well as a CX HS, the AT shots easily miss and I manage to park and dismount right next door, finishing the gun crew off in HtH combat. His Defensive Fire is on the whole abysmal – with the DiceBot punishing him for past glory in other CGs. I on the other hand get a token DR of 7+ once per Fire Phase, but in general both attacks and MCs are blessed! The only success he has is a PSK CH against my FT crew (BB13); they die a hero’s death!
Generally I am being forced to pull back in Block N; I have quite some forces invested here but they are now hiding behind a massive wall of SMOKE and burning buildings. My biggest danger is that Blazes might spread to my buildings, which would actually burn me out of the Block, giving him control by default.
The Germans have lost 8CVP (658, crew, SPW251/1) and 23BPV and a lot of 658 being ELRed down to 548.
The British lost a 658 (engineer) and another 8-1 to SAN (4CVP and 15BPV).
TURN 4
I do not rally the few MMC that I have broken, and this is a slight worry should he decide to charge me. I think that the fight for Block N is over, and it will remain uncontrolled at the end of the game… but his Prep shows that the Germans have teeth yet, with ANOTHER PSK snake-eyes causing the death of a 7-0 (who ended up a 6+1 and then failed a MC again) and his OBA finally makes its presence felt with a few breaks.
In movement he makes no move to directly assault me, except at the top of N where there is a single building (W1) that is not yet burning in row W – fortunately this attack is stopped cold… As JP wrote in the last email to me; “There is a lot of luck in this game, and all of it bad going one direction” (He misses the irony on how much that luck usually flows his way though – Legion) – his personal ELR is holding up well despite the rubbish MCs and miraculous attacks he is facing! God is truly British! His rush on the AT Gun (Z0) is partially successful, a 447 is reduced to a conscript, but an SS MMC gets adjacent and ready for CC – so I destroy the AT (though in the end the SS MMC decides not to CC; if he is forced into Melee I will be able to reinforce it before he can)!
The poor guy is so unlucky in this game that the only fire to spread is towards him and against the wind! Block N will be a wasteland at the end of this game.
I have decided to go on the counterattack and push into his areas… not to gain ground, I have no chance of claiming the Block even with the terrible losses he has taken – but I want to kill men, or at least keep up the ELR pressure. He has lost many 658 down to 548 and now those 548 are starting to drop to 447!
He has managed to rally a large percentage of his men (those incredible SS) but now he is getting so pinched off in terms of territory that he has few options to come at me without facing devastating PBF. I have even placed a HS behind his men to cut off their rout options… My fire attacks score a few more breaks and ELR reductions and I also have another bash at the SPW250/sMG (Z3) by charging closer to him with 2 separate MMC.
JP’s OBA finally starts getting hits; he wasted some 120mm in the early turns by using it as harassing fire and thereby reducing it’s effect by a 2 thirds, but now it is coming down on Block P with its full strength and is breaking almost everyone I have here. He has some fire attacks that score a break here and there, but nothing notable… My Advancing Fire is roughly equivalent in effect with only the odd break but the area at the top of N is becoming super cramped for him as I have troops on almost all sides of his ‘attackers’.
The Germans have lost a 658 and a 238 (3CVP, 23BPV) and again suffered many ELR failures.
The British lost a 338, 7-0 (2CVP, 8BPV).
‘
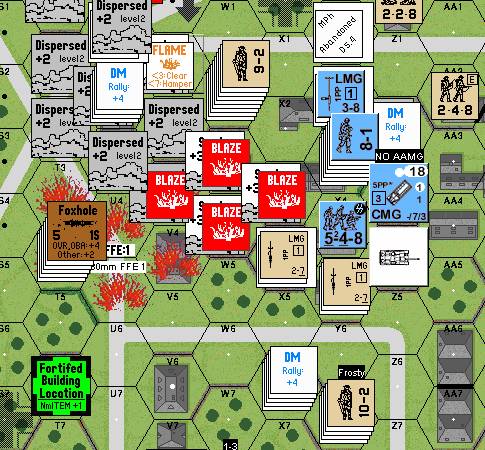
The Caldron at the top of Block N
The fire in N is spreading again, with the burning Orchard at the bottom of N catching to a nearby building (DD11) and the 3 building Blaze at the top of the Block spreading to another building (V3) – a building that is 1 away from catching to the ones I hold for certain!
TURN 5
How cute… he does have reinforcements! There are some guys coming on from KG Harder… he was probably hoping that the ferocity of the attack in Block N would make me pull guys away from this side of the board to defend. No chance though; last game my SS ran rings around him when he let me get a Block on this side so the key is to hit him immediately and make every unit that enters the board run a gauntlet of firepower! In general his turn is a retreat, there is not a doubt in the world that I have truly bloodied his nose this game… and he obviously knows when to call it quits, even the fires cannot save Block N for him now, he will just have to try again another day!
I blast away at the MMC (CC13) carrying my FT with a HMG from the second floor of a far building (O13) and the shot guided by a 9-2 scores snake-eyes! That FT is cursed, everyone who has touched it has succumbed KIA to snakes! But really that is all I had to offer… he had moved way out of LOS in most cases… It is worth noting that of the 6 attacks I rolled that turn I managed 1,1 on 3 of them… I think JP is still talking to me though. This is all compounded by the 3x 447 and an 8-0 from KG Harder losing their prey when I again roll a 1,1 and withdraw my concealed 648 from the CC (B1). The other CC that JP had attempted with 2 full MMC vs a concealed Brit HS was ambushed, again the intended target slipped away through the Dutch gardens!
Can it get any worse for the poor fellow?
After the last set of events I ask myself; is this the turn from hell for JP and his demoralised SS defenders? The counter-attack has stalled and with most of his units just trying to hold ground the British are pushing on all fronts. With this in mind I shall keep the pressure up and try to cause more casualties, I mean, what else are friends for?
I blast away in Prep with a small number of shots, and with a smaller number of hits. A rooftop MTR scores a WP hit on the massive Block N factory complex (EE8); the WP catches fire and yet another Arnhem landmark has a chance to burn down to rubble.
My men are emboldened by the lack of effective German resistance and charge at his Block A ‘reinforcements’. His SS 447s were PINned in Prep and their Defensive First Fire is so ineffective that even JP must feel a bit of comic relief – they ended up surrounded and took 3FG of hits before having 2MMC reduced to broken conscripts with a broken 8-0. The remaining 447 was swallowed up in the British CC swarm before he even knew what was happening!
It wasn’t all one-way and my men started breaking, a rare event in this game as much due to luck as lack of enemy FP. I had sent 2MMC at a crew that had claimed the cursed FT (CC13), the crew was broken during Prep and I had hoped to mop them up before they could Rout away with my FT. JPs 120mm OBA landed directly on top of his own broken crew however, eliminating them in a messy roar and breaking a 458 of mine… the other 648 rolled, you guessed it, snake-eyes and HOB-ed to Fanatic! Such craziness…
By the end of the turn another SPW251/1 had been eliminated (CC-ed by a Gammon Bomb wielding crew) and I had placed men back into Block Q and also into Block V! The fires have spread to cover vast tracts of the city in both flames and SMOKE and JP is sitting down looking over the purchases chart planning a new army!
The Germans have lost a 658, 447, crew, 238 and SPW 251/1 (10CVP 38BPV)
TURN 6
A small success (CRing a HS due to OBA – AA12) and a small failure (the 80mm OBA draws its second red chit) comes as JP starts turn 6. He is in full retreat now, with only a leader and a token force holding out in Block N – and one of those 2 MMC was ELR broken in Defensive Fire. 2 MMC rush to try and stop my Block V HS controlling this currently empty German setup area – though the concealed HS managed to ambush both these units in CC and withdrew to fight another day! Even his AFVs pull way back. I think this battle is pretty much over (bar gunning down the remnants of the KG Harder reinforcements in A1).
My turn is also pretty simple; I move my forces to consolidate my hold on Block Q (where I had destroyed a SPW251/1 in my previous CC phase) and on the newly taken Blocks W and U (courtesy of the feral HS). I pull troops out of the contested Block N and shuffle my forces to prepare for the next game (aiming for a PIAT in every Block if possible). I have given up on retrieving the cursed FT (CC13) as his 120mm OBA is around that area and I don’t want to lose any more troops (though his bloody 120MM OBA still CRs an engineer to a HS) – with luck the FT hex won’t catch fire and I shall be able to recover it first next game.
The Germans have lost a 447, 236 and an 8-0 (6CVP, 9BPV) and had a HS taken prisoner
The British lost a 328 and 248 (2CVP, 11BPV)
The game ended here
Aftermath
German Losses
An 75L AT Gun from the FF7 factory being consumed and then 7CVP of units from the escape rolls made his end of game rolls very expensive indeed and just put the final nails in the coffin. Though the compensation for this was the successful escape of ALL his remaining AFVs.
British Losses
2x 8-1 to SAN, 7-0 to OBA, a number of 658 and a 458.
I did get the HOB of an 8-0 to an 8-1 though.
Uncontrolled Units
German: LMG (CC3, CC5, CC13, DD3), PSK (BB5, CC5)
British: FT & DC (CC13), Jeep (immobilised) (U1)
Block Control
German V
British A, B, C, D, E, F, G, H, I, J, K, L, M, O, P, Q, R, S, T, U, W, X, Y, Z Blockhouse,J5, L0, Ramp (Q7), Orchard, Strip (C11)
Uncontrolled N
Stat Table

Chits Attack Idle
German 12 8
British 5 12
Yellow – No Control Points
Blue – Water
Black – German Controlled
Red – British Controlled
Purple – Uncontrolled
Conclusion
While there is no doubt that again JP was hit hard by the DRs; my attacks were rolling low and his 8ML troops couldn’t pass MCs – there were still some other factors in play here:
1. While the ‘Sitzkrieg’ of the last game allowed him to build up AFV and MMC, it also gave me the chance to move men to the defence. I think his Coup de Main might have worked last time, but it needed something special to work now.
2. The German AFVs are a phenomenal force; in the right place… in the city they are VERY vulnerable without very close infantry support. Since JP split his forces (perhaps in part due to the entry location requirements) and sent the AFVs to the top and bottom of Block N and the infantry to the middle they were not mutually supportive.
3. The German OBA can be devastating, but I really feel that my British did not present enough of a troop concentration to make its use as an offensive weapon worthwhile and the harassing fire was useless in a city – as a channelling device and to keep my troop’s heads down though it worked exceptionally well.
4. Block N is big, very big, and all it takes is a single British unit in the Block to keep it uncontrolled… Right from the outset keeping Block N out of the German’s hands is the biggest single advantage the British can work on; it allows even a German Attack chit to have its first move advantage wasted due to the LOS obstacles and movement hindrances.
5. The German ELR is dangerously low, and much of his force has been reduced in class due to failing a MC by just 2.
So between the biased DRs and the tactical difficulties presented by the objectives of the German attack it is not hard to see that it has been a disaster of a game for the SS Commander – but, the CG is long, and he can replenish his losses while every unit of mine lost is essentially gone for good… Though with the raging fires from this afternoon’s ferocious battle the terrain of Block N has been altered dramatically; rubble and shellholes replacing factories and orchards. For now both sides will rest and lick their wounds, probably wait until the night-time for the battle to resume.
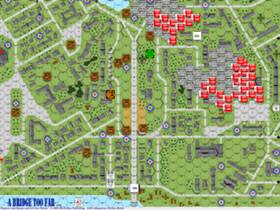
Aerial Observation View of the Burning City after the Battle
I would also point out that we did have a discussion about the final allocation of the Control of Block U due to R9.6051 which states that Crews may not participate in the Control of Strategic Locations.
The last time we played this CG we had decided that this was one of the rules that did not make sense, and though we did not re-clarify this important fact before this game JP was gracious in defeat and allowed me to claim the Block with a crew (Z0). In response it was only fair that his remnants in Block N who were obviously intending to waltz across the road to Block U should be allowed to escape for ‘free’ to his Blocks. I must admit it is hard to understand why a broken HS can Recontrol a Block by sitting in Open Ground (Broken units rally before the Block Control decisions are made) and an armed and fighting crew cannot!