A BRIDGE TOO FAR
CGIII
Legion playing British
18N
The last game gutted the SS commander’s ranks and we both knew that 18EVE would have to be an Idle game – I had nothing to gain and he did not have the strength to fight. For the 18N I had to take an Attack Chit since a defensive posture by the Brits could hand Block N to JP. Unfortunately he took an Idle and that creates another conundrum. What happens to the German reinforcements when they are the Night Defender and thus under No Move?
While we both agreed that the German’s reinforcements should be allowed to enter the map the question of what happens to them after they enter is the major problem… Since he would no doubt drive them straight into a unit of mine or draw a starshell in some way we have again agreed that the German’s reinforcements are basically allowed full movement thus for an Idle chit the SS commander gets a proxy removal of his off-board force’s No Move counters.
Remnants
MMC 648 x36, 648 (Engineers) x7, 648 (Commando) x6
458 x16, 447, 447 (WW)
HS/Crew 328 (Engineers), 328 x2, 248 x5, 228 x17
Leaders 10-3, 10-2, 9-2 x3, 9-1 x6, 8-1 x8, 8-0, 7-0
SW HMG x2, MMG x4, LMG x20
PIAT x12, Lt MTR x5, FT x2, DC x7
Guns 76* MTR x7, 57L AT
Vehicles Jeep x1, Carrier A x3
Captured HMG x2, LMG x2
I did pretty poorly with my Captured Weapons rolls though I managed to keep both HMGs (even though I destroy one of them to keep it out of his hands!)
Reinforcements
18EVE (rolled 9)
2x Commando Pltn
648 x3, LMG, PIAT, DC, 9-2
648 x3, LMG, PIAT, DC, 8-1
MG Section
228 x3, HMG, MMG x2
AT Sect
228 x3, OQF 6pdr AT x3
SAN +1
80mm MTR OBA
I bought the OBA thinking that it might keep his head down if there was to be a game and since the Brits are allowed to use only 3OBA a day and there is no point holding onto it! With all the rubble in Block N he will be totally slowed down, this will give me plenty of juicy OBA targets!
18N (rolled 8)
MTR Sect
228 x3, OML 3” MTR x3
AT Sect
228 x3, OQF 6pdr AT x3
80FPP (2x Fortified Building, 6x Trenches, 5S foxholes and 6?, 13HIP)
SAN +1
Unfortunately I rolled a lowering of my SAN so despite buying +2 SAN in these 2 buys I am still SAN 4.
Objectives
I will only move into Block N as far as I need to retake my FT and DC (as well as grabbing some of the many discarded German SW) and hold the Block as uncontrolled. My main aim is Defence – naturally he will use as strong a force as necessary to hold N, but there will be other attacks and my money is on an Armour-led assault from KG Harder to end the influence of the rule for German Attack Co-ordination (CG22).
AAR Note
As the list of unit’s placements and map changes is long I decided to not write it all down… It would take up too much time and space and be of dubious value since it is unlikely that this game will be heavily contested. Let it suffice to say that fully 1 half of Block N (top and bottom quarters) is rubble and that the centre of Block H is starting to look like a section of the Somme in World War 1 due to frantic British trench digging
Weather Clear, Moderate with a Mild Breeze to the North West (6)
Night Visibility NVR 2 Scattered Clouds, No Moon
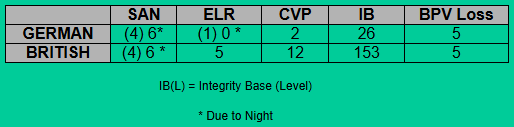
Stat Table
(We are using Battlefield Integrity)

The Game
TURN 1
No Prep except to gain Radio Contact.
Little Movement; essentially I am the defender even though I chose an Attack Chit. While I am superior to the German force at night he is pushed in tight and to take him on (unless he comes to me) would be suicide. I move into Block N and out of Block U whilst also claiming my Flame Thrower (CC13) and DC.
The NVR drops to 1, who will this help the most?
No major subtlety from JP this turn and why should there be – but no one expected kamikaze AA Trucks charging my dug-in defenders! He brings on the Harder AA Trucks (from A21 along the A21 / JJ22 road and at A13) as well as a strong move from some of Brinkmann’s infantry (JJ4, 5, 7, 17 & 19).
A SdKfz 6/2 (E21) is immobilised when it moves adjacent to a 648 and the same happens with the other SdKfz 6/2 (B12) when it also gets too close to another para in Block Strip (C13). The powerful SdKfz 7/1 is converted into a burning wreck by a 10-3 led MMC HMG as soon as it entered the board (E21) and his SAN is reduced to (4)6 by a hit on his SAN counter. The cost to me is a PIAT running out of ammo with its first shot in Defensive as it tries to finish off a SdKfz 6/2 (E21).
I hold my breath as the 2 AA trucks adjacent to units do their Advancing Fire Rolls; both hit but the MCs are passed and also bring a hero into play (E20)!
German losses this Turn: (4CVP): SdKfz 7/1, AFV crew, -1 SAN
TURN 2
Prep brings about the destruction of both SdKfz 6/2 and their crews…
I rearrange my forces, under the gorgeous light of innumerable German starshells, making sure I can replace the ammo-less PIAT covering the river road, but essentially my line remains static. I am not interested in attempting to gain control of Block N or even attempting to hold U, X, Y or Z; I am not willing to lose men over these Blocks. I have my HIP HS and HMG sitting in the Block W minefield – but again, if a shot presents itself I will take it since this Block can be easily taken by the Germans should JP chooses!
JP seems to have 2 OBA missions planned… but with a Red Chit in my turn and then another Red Chit in his, he can forget one of the missions already – I guess that ersatz coffee just don’t keep the ‘boom-boom boys’ awake! He wastes time searching Blocks X, Y and W – I don’t mean that facetiously, because with the Block Control rules and Night HIP rules my men could be anywhere – but in this case they are nowhere near!
German losses this Turn: (8CVP): 2x SdKfz 6/2, 2x AFV crew
Yellow – No Control Points
Blue – Water
Black – German Controlled
Red – British Controlled
Purple – Contested
TURN 3
There is little I can do… I try to scrounge the remains of a StuG and fail. I also manage to have my Radio malfunction! Bugger – at least it is historically accurate! I rearrange a few unit’s locations and present some scary cloaking counters on the Block Y edge of Block R (FF19, FF20), this is to get him to make a move that will expose his forces to a HIP 648 (GG19) or attempt to enter a building (GG17) that I have Set a DC in!
A few more Brinkman reinforcements (JJ7, JJ19) enter and a pretty massive miss for a spotted MTR round. The game is grinding to another stagnant end… At least my Radio is repaired straight away.
TURN 4
Naturally I am not going to attack; there is nothing to gain from holding territory that I cannot defend! And the way things are going if I were to attack I would be in Berlin by now… The SS are just content to grab the blocks that they can take without a fight and wait until they have built up enough strength for another game.
More reinforcements come on in the form of some infantry (GG1) and AFVs (DD0) from KG Knaust and more AFVs (they look like PzKpfwVIE’s eek!) from KG Brinkmann (JJ4, JJ18). Since I cannot find a starshell anywhere I hope that the reinforcements are not too noisy; they will keep my men awake!
TURN 5
I do nothing… but for some reason he starts shooting at my Cloaked guys, the chances are negligible… and he misses totally, but hopefully I can use these exposed guys (stack in II6(2) and PzKpfw VIE in JJ19) as an excuse to drop some OBA.
I see why he was shooting now… JP has decided to make a grab for Block Q… but I decline the shots offered to me as he runs through cover – I had a torrid time getting starshells and there were none that could have illuminated his move. My 248 here (BB14) is eliminated in H-to-H from an ambush.
British losses this Turn: (1CVP): 248
TURN 6
For my turn I again do little, just pull back with a view to the possible end of the game and the resultant escape rolls. I bring on my last Commando reinforcements; they head for Blocks G and I.
His turn drops the NVR to 0! This is a shock and might save Block W for me (along his partial force redeployment away from my HIP guy). His forces continue to flood on-board (mostly into Block V) and he takes advantage of the 0 NVR to redeploy them all over his controlled blocks.
TURN 7
The city is lit up like New Year’s Eve, there is so much light in the sky that all my men are nearly woken up from their inactive slumber. I have nothing to do except pull back to the fringes of Block N. I do attempt to retake a CP in Block W by charging a HS into the nearest building for some CC, but even an ambush and H-to-H attack is not able to knock off the 838 MMC waiting in here! At least I destroyed the HMG(g) first.
He re-arranged his (now reasonably substantial) forces in preparation for the next game and we mutually decide this is as far as we need to go and end the CG Date.
British losses this Turn: (1CVP): 248
Aftermath
Block N remains uncontrolled
Blocks Q, W, X, Y & Z are taken by the Germans.
There are no casualties due to escape rolls
German losses this Game: SdKfz 7/1, 2x SdKfz 6/2, 3x AFV crew, -1SAN
British losses this Game: 2x 248
Block Control
German Q, V, W, X, Y, Z
British A, B, C, D, E, F, G, H, I, J, K, L, M, O, P, R, S, T, Blockhouse, J5, L0, Ramp (Q7), Orchard, Strip (C11)
Uncontrolled N
Abandoned SW: LMG(g) – DD3
Yellow – No Control Points
Blue – Water
Black – German Controlled
Red – British Controlled
Purple – Uncontrolled
Conclusion
Unfortunately I have to say that although this game was a stand-off, something that would generally be a positive for the Brits, in reality it was more like a German marginal victory… I lost 1 squad equivalent, he lost 3 AFVs and crews; I lost 4 Blocks that I had neither hope nor interest in holding whilst losing only 1 that I had a slight interest in keeping (Q) and yet still this game probably ended up in JPs favour. He now has enough forces (at least in terms of AFVs) on the board to start laying down a serious assault on either S, R or N next game; though he will need more infantry to do that successfully.
What would I have changed about my plans? Hm… not much to tell the truth.
JP was pushed up against the wall and these are always the most dangerous opponents. Block V was a veritable hornet’s nest and there was no way I could have challenged him there. I could have put some forces up against his thrust towards Block X, Y & Z, but these Blocks are not worth losing men over. Remembering that Block H is the most important Block on the board I have actually been pulling back from this Eastern edge.
In the end it was another stand-off and non-event, a setting of the stage for the next game which promises to be a bit more violent – I think it is safe to expect major push to take Block R and possibly even S… and if either of these fall then the CG will finally start to cook!
I would say that with a third of the CG completed the balance lies with the British – but for you first-timers to the ABtF HASL remember – Water Shortage, Ammo Shortage and Campaign Exhaustion are going to start influencing all aspect of the British defences. Even without loss of men the Brits will get weaker whilst the Germans just get stronger and stronger!