PEGASUS BRIDGE
CG I
Legion playing German
NIGHT I
This will be the second time that we play this CG 1: “Coup De Main” of MMP’s Pegasus Bridge. We usually play a CG for the first time up to the point where we feel that we have grasped the map and the flow of the CG before we really get stuck into it. In this case we got as far as the Night II game. While I cannot speak of the balance of the CG as a whole, my impression so far is that like KGP and ABTF it will start off with the usual “unstoppable attack” for a few games before a serious defence can crystallize.
As for myself I have played the Germans or Japanese for the majority of my ASL life, the few times I have played units like the Russians or the US I have been so convincingly beaten that I know I have quite some work to do before I can get used to their idiosyncrasies. Most of the scenarios with Germans are a trade off of Quality vs Quantity – I find I play quality with more confidence than quantity and this CG has the superior elite British taking on poor quality German forces. My AFV’s are crap, my opponent is pumped and a wily bastard – my prospects are dim and I feel the first of many personal ELR rolls coming up.
Defending the Bridge
Elements of Grenadier Regiment 736 of the 716th Infanterie Division
Wire: W17, X17, Z18
Trench: V16, W16, X16
HIP: X16: 8-0, 436, LMG
X18: 436, LMG
Units: X20: 50L AT, 127 (CA: X/Y 21)
Z15: 436
Z17: 436, dummy
AA17: 436
Z20: 2x dummies
Z21: Pillbox (1+3+5 CA Y/Z 22), 2x dummies
Benouville Garrison: Elements of PanzerPioner Kompanie 2
HIP: L12: 7-0, 447
P11: 9-2, 447, MMG
P13: 447, LMG
Units: I12 3x dummies
K9: 447
K14: 447, dummy
L9: 447
L13: 447
N12: 447, dummy
P12: 447, dummy
Q12: 3x dummies
Le Port Garrison: Elements of PanzerPioner Kompanie 1
HIP: II13(0): 7-0, 447
JJ16: 447, MMG
KK13: 7-0, 447
Units: FF11: 447, dummy
FF12: 38H 735(f) (CA EE 12/13)
GG12: 447, dummy
GG13: 447, dummy
HH9: 447, dummy
HH10: 447, dummy
HH11: 3x dummies
HH12: 38H 735(f) (CA GG 12/13)
HH14: 447, LMG
II13(1): 2x dummies
II15: 447, dummy
JJ14: 38H 735(f) (CA II/JJ 15)
JJ15: 447, dummy
KK14: 447
KK15: 25-S 739(f) (CA: JJ/KK 16)
Initial Objectives
I did quite poorly with my DR’s for initial forces. No HMG’s and only one leader worth getting teary eyed about. I got the full compliment of AFV’s and that is at least something! From the first playing of this Night I game I am of the impression that the British are going to roll over me like a PzKpfw VIE over speed humps – it will not be fast or pleasant, but it will be pretty much unstoppable!
I have settled on the time honoured tactic of praying that my HIPs can get a reasonable result or two and that my ? guys and dummies can blend in with the scenery as much as possible. Of course the vulnerable time for him is whilst coming over the bridge so my HIP in X18 is to try and put some dust on his nice uniforms; a MC would be a bonus. I have dummies in the Pillbox, he cannot afford to ignore them and real units would be a waste – conscripts wouldn’t have a chance against even a HS in a CC. The Z20 dummies are there for the same reason.
The Garrisons in Benouville and Le Port are pretty much stuck and their chance of getting some action by choice is almost non-existent. Since the Benouville guys are stuck in their places for 2 whole games the best I can do is spread out and try to stop him gaining control points nearby. JP will usually not over-extend his attacks, and I can hope to rely on this to stop him pushing too deep into either of my villages…
The Game
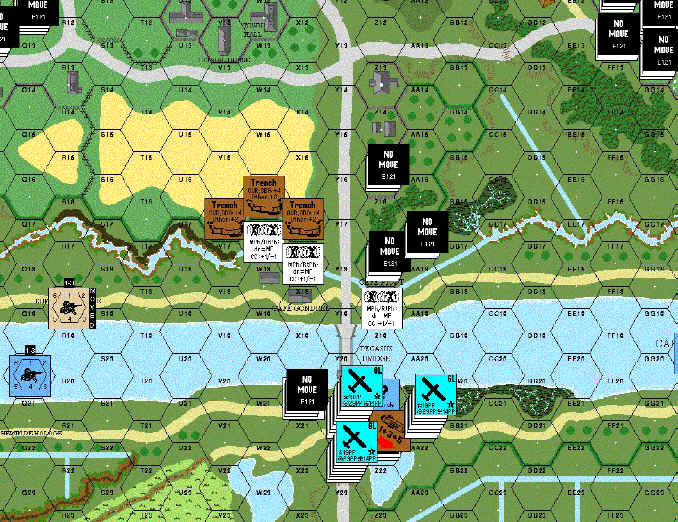
The Arrival of the British, glider landing sites and German bridge defence
Turn 1
Apart from winning the war with the first DR (we restarted after a glider crash wiped out 30% of his forces!) this has been a disaster, which is not to say it is unexpected. The swarms of gliders came down and their initial attacks were PTC on Z20 and a non-ambush CC attack on Z21 thereby exposing my dummies – very nasty indeed. He hit my unmanned 50L crew with just a HS and an 8-0 leader, the fight was short and decisive, my crew was killed and he didn’t even raise a sweat. It looks like I have not held him up in the slightest and now the nervous (and slightly drunk) conscripts on the other side of the bridge must face the brunt of the attack.
My attack starts off with a bit of fool’s gold, I get information from the French on the X20 units – the sensitive French must have been appalled by the savagery of the CC fighting there and put them up for war crimes – good on them I say! My leader in X16 gets a starshell but it goes wildly astray, illuminating nothing. I do not fire any Prep, if I pretend I am a tree he might walk by…
Fat chance of course, as a lucky starshell in the centre of the village illuminates me entirely! JP blasts away at the ? units in Z17 (PINned), and again at X18 (my HIP guy loses his No Move but not his HIP status), he is kind enough to bust his 51MTR firing at the now exposed Z17, so I shall take that as a victory for me. My only advancing fire was the PINned Z17 conscript at the massive stack on the bridge. There was no result and I ended the turn.
Turn 2
Not a good start as his 9-2 lead kill-stack on the bridge blasts away at the seemingly empty but strategically important X18 and gains a 2MC that disrupts the LMG conscripts here. At least my starshell illuminates the bridge and blinds his unfired units. Z17 causes his 3MMC and leader that individually rush across the bridge (as far as Y19) to suffer 2PIN’s on the PIAT carrying MMC’s, which strands them on the bridge. He advances a MMC and leader into the X18 building taking the disrupted units prisoner and sends all his units one more step across the bridge. I think though he might have made a mistake in allowing my AA17 units to lose their No Move.
For my turn I decide to make a run with what mobile units I have (AA17, Z17), whilst also aiming to bring the Turn 2 reinforcement (Kfz 1, 238 and 8-1) on as far as Benouville – if I have at least 1 unit here that can move (due to the difficult No Move conditions of the Germans it will be unlikely that I shall have Freedom of Movement until Night III) he will have to make some contingency plans for the old ‘dash for the bridge’ trick. I think the Kfz will make it, but it will take time, my hopes are not too high for the conscripts, but every unit I can save is a bonus! This plan came unstuck with a lucky starshell that exposed all possible escape movements: AA17 tried to run through the BB17 ditch to freedom but was disrupted by the stack on the bridge – in Defensive he was KIA-ed by snake-eyes; dice that JP always seems to have an over-abundance of. At least I managed to get the Z17 unit to AA16 and then advance to BB15 (hoping that fear of HIPs and the marsh in BB16 will keep him at a distance)
Turn 3
JP blasts away at the empty W18 and advances stacks with CX to AA17 and Z17, but makes errors with the counts and basically misses an opportunity to cut me off whilst also allowing the rest of my units Freedom of Movement. The only successful attack in Advance Phase is that my HIP guys and leader in X16 are exposed and PINned. Naturally I am going to try and run big time, so there is not a chance in the world that I will pop starshells or Prep Fire, though he, of course gets a shell again when he most needs it. It is truly a case of not what you roll but when you roll it. My leader and now exposed MMC runs along the lines of trenches appearing at V16 but are unable to move further due to the grain. The BB15 MMC assault moves to CC15 under the watchful eyes of the 9-2 killstack in BB17. Z15’s 436, finally free, goes CX and runs through AA15 where he attracts the attention of JP’s other killstack; even CX with a wall in between and only an 8-0 to lead their 16FP I still suffer a 1MC and the inevitable disruption.
His Defensive Fire phase is thankfully a non-event thanks to the judicial placement of my running troops, the use of ? counters and his own mistakes in movement. I advance deeper into the grain field (V15) with the 436, LMG and 8-0 while the ditch in DD14 is where my other remaining 436 unit is hiding out
Turn 4
The turn starts off with a surprise as his 9-2 killstack decides to run down the river road as far as II18 where his plans to take on 12MMC’s with 3 is rudely interrupted by my HIP MMG from JJ16 – there is no result, but I think he will have to reconsider the direction of this attack! The 8-0 killstack advanced along the central road as far as Y14 (then X13). Most of the 9-2 killstack retreats to HH17 leaving his PINned unit behind. The rest of his guys are busy attempting to take control points, guard prisoners and fix his recalcitrant MTR.
I again get Civilian Information, but losing a ? is not going to hurt him at all! I decline to pop flares while his newly fixed MTR lobs an IR that (with the kind of luck that sustains him in these games – though later we remember that this HS are guards and cannot fire the MTR) illuminates the grain field and my Kfz 1 that had made it to V13 and was now destroyed by the 8-0 killstack that raced up here to get it. I AM my LMG MMC to U15; his SFF with the 8-0 killstack misses poorly and I take the chance to get my leader to S16 along the far edge of the grain field. Losing the conscript wont be good, but losing ANOTHER leader would be tragic. My MMG AM’s back to JJ15 rather than risk another miracle DR.
Turn 5
Apart from the movement of a leader, MTR, HS and prisoners along the other river road to S18 the main thrust of this turn is the covering of ground and the taking of control points for the next scenario. He gains V12 and takes the first of the trenches in X16.
In the German turn he lays down a starshell in T17 but this doesn’t affect much; his units in S18 are only a guard HS, therefore they cannot fire and the rest are behind too many wheat fields to make a decent shot. My leader does manage to escape to Benouville and the 436 is not far behind.
Turn 6
More territorial grabbing for him but the dr puts an end to the game here
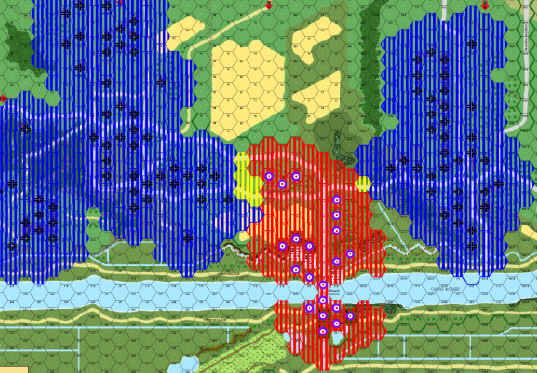
End of Night I Control Points and Zones of Control
Conclusion
RUN AWAY!
Get those men out of there, put up a token resistance and either try and stop him on the bridge (my Pin result messed him up quite a bit) or sacrifice some men for his in CC. Any losses you cause the Brits will be useful, but losing all your men against superior forces doesn’t help much!