PEGASUS BRIDGE
CG I
NIGHT 2
JP playing British
THE PLAN
This is an unusual game in as much as the British have the advantage of having HIPs and dummy stacks while the German has the cloaking counters etc. if it was a daylight scenario I would be attacking but, to attack at night means I expose my HIPs and therefore lose any advantage I have gained by defending, so I will wait to see what he does before I decide on whether to go on the offensive.
Basically I want to hold the ground I currently have (Buildings Z13 – Z17, Café Gondree, the Schoolhouse area and the trench network at W16 ) if things go badly then I will pull back and definitely hold the Café Gondree and the buildings AA17 and Z17 so that my night 3 reinforcements start on the west side of the river and I don’t have to assault the bridge again. I feel that losing a couple of MMC holding this bridgehead is a fair trade.
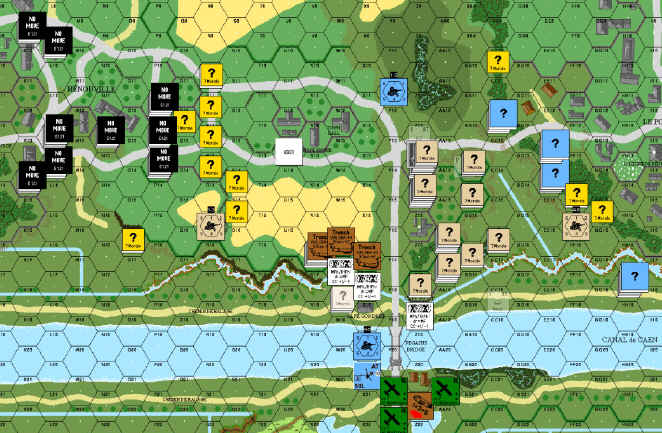
SET-UP
I have bought 3x AT mines and a ? Counter, the AT mines are placed in 3 hexes, 1 factor per hex, they are CC18 (dug into the dirt road to prevent armoured assault down the road towards the bridge), Z12 (which is placed on TOP of the paved road, he will see it on the first starshell but, with a building at Z13 and marsh Z11 it makes him think about charging armour down that road.) and BB13, (this is just a random position 2 hexes away from my main line of resistance – hopefully I will surprise any tank that moves into a firing position ).
My HIPs are 2x 458, an 8-1 ldr and a PIAT at Z13 (ground floor), if he sends men to clear the AT mine at Z12 then I can kill them OR if he risks driving a tank across the same hex I can PIAT him. I also placed 4 dummy counters in level 1 of the same hex as he would expect some troops there and I am hoping that he exposes them and then assumes that it is a bluff and sends troops in to my trap. My other HIP is a 648 and LMG in W18, I know that he has a 436 and 7-0 ldr in Benouville (they escaped from turn 1) and I don’t want them to sneak along the road and take the Café Gondree.
As for the rest of my troops I have a big FG in Z14; 2x 648, 2x LMG, a PIAT and a 9-2 leader, these guys will fire at anything and everything that moves while the rest of my troops will play it a bit more carefully. I did not bother setting anyone up in the Schoolhouse and in the trench network I have 3 dummy counters and an 8-0 leader, the idea is for the leader to roll for starshells and therefore make him think that there are MMC in the hex with the leader.
TURN 1
He did not do much this turn, he started digging foxholes in the tree line around EE14 and only assault moved troops forward.
In my turn I fired my mortar in AA16 and it broke down (AGAIN!) this mortar has fired a total of 3 times in both games and broken down twice of those 3 attempts. Other than that I pulled back my 7-0 ldr that was an observation post in BB14 (just to keep him honest while his men are out of NVR of my main line of resistance) and I was happy that the first turn was down without having exposed anything important.
TURN 2 and 3
This is where it all started getting busy, he moved all his cloaking counters from Benouville towards the school house/town hall area (I am still not sure about that, as the units south of row CC are under “no move” counters I just feel that allowing the cloaking counters to move is not the intention of the game) and sent a counter down the road toward Café Gondree and my HIP surprise. (Happy with that, either I break the 436 or if it is a dummy then my 648 is free to join the action elsewhere). He also sent troops and 1 tank along the top of the marsh area (Z8) and started digging 2 foxholes to link Benouville and Le Port into one big set-up area, he moved a cloaking counter into the town hall (W12), which completed the link, and another cloaking counter and the AFV are approaching the town hall from the marsh. (This cloaking counter MUST be infantry to hold the town hall).
During my turn I exposed my HIPs in Z13 and charged across the road to the orchard adjacent the town hall, I MUST take that hex to keep his troops in their separate set-up area’s. (Divide and conquer!!! I need Le Port and I don’t want him to have both companies there.) By the end of the third turn he had not assaulted the buildings Z12 – Z17 and I had a melee in the town hall with my 2x 458’s attacking his 447 (I got a CR result in CC so will kill them in his turn 4 CC – I am hoping he doesn’t reinforce the melee) during these turns my 648 in W18 had run up the road towards the town hall to help out. (The ? counter heading towards Café Gondree was a dummy when I fired at it point blank and I also got an intelligence DR during the weather phase which showed the ? counter at O16 to be a dummy too. This allowed my 648 to help out elsewhere as there were no more enemy counters within reach.
TURN 4
By this stage I had 2 FGs defending the Z12 – Z17 town the 1st was in Z13 (9-2 ldr, 7-0 ldr, 2x 648, 458, 2x LMG, PIAT) and my other group was in AA17 (8-0 ldr, 2x 458, 648, German LMG, PIAT and the broken mortar) the remaining 4 squads (I had joined all HS’s together by now) were clearing out the town hall area and awaiting the arrival of the tank.
During his movement phase he started pulling counters away from the town hall (I still had the melee there) and the AFV pulled back to AA9, which was good news for me. He had sent a cloaking counter to take the trench network but left it adjacent to the road so I can send a MMC down the road and CC him in my turn. Now he started a big assault on the village Z12 – Z17 and I started blasting away, I used First Fire, SFF, and even FPF (risky) but no cloaking counters survived to take any of the buildings and I have a wall of residual fire in front of my men now. (He had about 5 or 6 dummy counters revealed and 2x 447 exposed – one ended up pinned but the other is OK and both are adjacent to my FG in AA17) He also searched a few hexes and found my buried AT mine in CC18 (he still doesn’t know how big it is, and, as he hasn’t found the single AT mine in BB13 he will probably assume that it is a 2 factor.)
By the end of his turn he had been able to advance 3x 447 into AA17 (I ambushed him and, should have withdrawn and attacked in prep. But decided to stay and fight. A move I would regret, my troops are infinitely better than his but, in CC they are on a par as morale and ELR ratings etc. don’t come into the equation) and in the CC phase I killed one of his 447s and lost a 458 (pain).
During my turn I prep fired my 9-2 FG at two broken 447s and a good order 447 that were near the melee hex in AA17 (the broken ones CRed and the good order ELRed) and during movement I finished clearing out the town hall area, sent one MMC and a dummy stack to mop up the trench complex. During CC neither side was able to gain a result.
TURN 5
This game was now getting scrappy, both of us had committed more troops than we wanted but, with the melee in AA17 we had both lost too much to give the hex away to the other.
During his turn he ran men down the dirt road to the building Z17 and ran a cloaking counter upstairs in Z13 as well as having a cloaking counter in V16, and he advanced another 447 into AA17 to make it 3 counters again.
During CC neither of us was able to score a kill. (Now I am getting worried).
My turn 5 was a disaster, it started well with rain going to level 2 and I thought I would run my 9-2 FG down the road into the woods at Z16 he first fired at me on the road to no avail and, (I thought) I was safe; the idea was for the FG to fire at AA17 and hopefully break his men and then advance into Z17 BUT his SFF produced a MC and my 9-2 rolled 6,6 he was only wounded but one 648 broke and then during the +2 LLTC another 648 was pinned. So, I advanced my 2x 458s (that had been able to get adjacent as he knew I would be sending the 9-2 FG there and so waited to fire at them) into the hex Z13 (he had a 447 and a 236) I gained an ambush and killed the 236 and, in AA17 I CRed one of his 447s for no loss. I had also run a 458 and 8-1 into the ground floor of Z13 thus isolating the ? counter above (if it was a real unit then he is trapped for me to kill later so why should I risk damage to my fragile defence?) and advanced my dummy stack into V16 but failed to ambush so was exposed for the sham they are. At that point the game ended and we have a lot of melee rolls to do to wrap it up.
POST-MORTEM
The CC rolls ended up in his favour, even though he lost 4 and a half squads and I lost 3 and a half, mine are of such a better quality that he must be satisfied with the result. He also kept AA17, which will impact on my set-up, and the cloaked counter in level one Z13 was a conscript too.
Overall I would put this as a “win” for him, but, it cost him plenty too, all up he lost 5 and a half squads, had 3 more ELRed to conscripts and has 1 and a half in isolated positions adjacent to my troops. That gives him less troops/dummy stacks and HIPs next turn, which will mean I will be able to move faster and more confidently into Le Port (in theory). I think I played a good game and was able to stop his attack, but, I made a mistake by not withdrawing in AA17 which cost me dearly and, having the 9-2 roll a 6,6 also cost me a lot of troops but, I am still confident that my attack next turn will be a success, only time will tell whether he should have conserved his troops this game or not.