PEGASUS BRIDGE
CG I
Legion playing German
NIGHT II
I was not too disappointed with the end of the last game. I did lose an elite HS and a sorely needed 8-1 leader, but 2 conscripts and an 8-0 managed to escape the onslaught. This has allowed me to put into action a little plan I have been eyeing for a while… That plan revolves around there not seeming to be any restrictions on the cloaking counters (CC) moving even though the Benouville units are restricted in movement. There is nothing in the rules that say that on-board units must be covered with CC in the same way that units entering the board must (E1.41). Since I have units that can move in Benouville, even though they are rubbish, there is to my mind and with the grudging acceptance of JP, nothing that stops them being concealed amongst a bunch of dummy CC’s. Personally I think this is historically fair too. Units escaped to the Benouville garrison and it is only because JP has read Q – CG4b that he knows the whole garrison is not now rushing to the rescue.
I admit it is a long shot and if anyone can prove that it is not correct to me (I am sure I shall get 100 emails a day now) then I offer a complete apology to JP for this next game! If it is legal then I would like it to become known as the Legion Cloaking Sleaze move.
Benouville Garrison: Elements of PanzerPioner Kompanie 2
(all under No Move still)
8 cloaking counters (CC) – R10, R11, 2xR12, S14, S15, 2x O16
Q12 8-0, CC
R10 436, CC
K9 447
K14 447
L9 447
L12 7-0, 447
L13 447
N12 447
P11 9-2, 447, MMG
P12 447
P13 447, LMG
Le Port Garrison: Elements of PanzerPioner Kompanie 1
CC10 CC, 2×447
CC12 38H 735(f) (CA EE 12/13), 2x CC, 7-0, 2×447, LMG, MMG, 236
EE13 25-S 739(f) (CA: JJ/KK 16), 2x CC, 2x 447
EE14 38H 735(f) (CA GG 12/13), 2x CC, 2x 447
FF14 2x CC
GG15 2x CC, 7-0, 2x 447
HH17 38H 735(f) (CA II/JJ 15), 2x CC, 2x 447, 236
Initial Objectives
I have really not much option in this game; I must hold my villages and attempt to extend my control points by digging foxholes. At the same time I shall be hoping to actually inflict some damage on him while he is still undermanned – the next scenario he gets to attack me and also gains quite a large increase in manpower.
The first time we played this scenario I attempted to rush the village using cloaked units and dummy cloaking counters as well as Armoured Assault. It was a dismal failure, his Brits are too powerful and his dice were typically blessed.
I shall use my abundance of cloaking counters (CC) to weaken his forces; he will have to take them all seriously, and won’t want to lost control of any CPs. I will also attempt to sit back and blast away until I know where he is… I am really not interested in getting too much into a fight here He is just too strong. Hopefully once he has dealt with my CC he will be tempted to go AFV hunting… this is where I can get him!
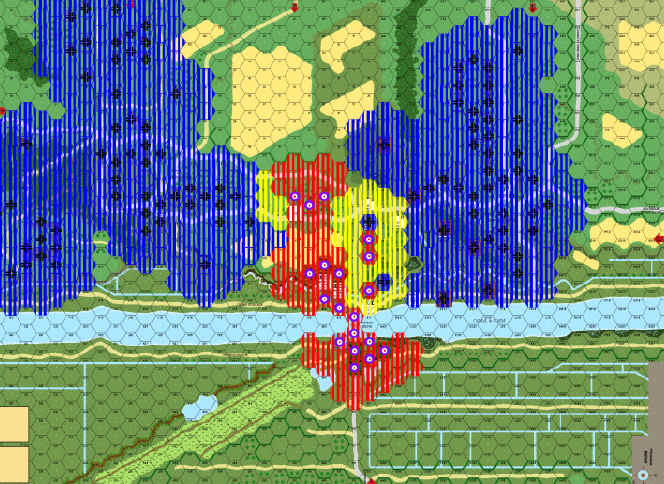
The Game
The game really starts out as a Sitzkrieg with nothing but the sound of shovels flying until turn 4. There is a bit of rain to contend with early but apart from that all goes to plan. I dig foxholes to consolidate my line and to provide what little killing ground I can before the next game (18MMC reinforcements he gets I think).
My CC’s rush to the Schoolhouse to find it unguarded, one of these units is the real conscript MMC, and I have another 447 rushing around from the La Port garrison to bolster what little defence I can manage in case he tries to take the schoolhouse back. I think that this move of his, to not guard the Schoolhouse was a big mistake; though I can understand why he did it. The last game we played I did a valiant, but suicidal, rush at the British held village from La Port with infantry supported by AFVs. I lost almost everything and only caused his men to weep a little due to the smoke from burning tanks getting in their eyes but the threat of a similar attack was enough to cause him to prepare for a similar assault. To be honest this is not one of my usual tactics. I am not the ‘rush attack’ kind of person as my DRs are on the whole quite bad and I get cut to pieces 9 times out of 10!
I held the schoolhouse and had a solid wave of CC and ? counters ringing the village and school supported by AFVs, apart from a CC’s rush towards the Café Gondree (“God, I need a drink”) there had been no attacks. I had dug all the foxholes I needed with the exception of one. His MTR had broken down, again. I had linked my CPs and the garrisons of Benouville and La Port would be able to mix – if the game ended before turn 4… It did not.
Suddenly, from the trenches, the Bridge and the village a wave of JPs forces came rushing towards the newly re-liberated school, possibly to re-re-liberate it. All I had to guard it was a 447 and 436, and there was no way I could hold off what I guessed to be 5 Elite Para MMCs with leadership… so I ran as fast as I could. The 436 made it (thanks to a bunch of self-sacrificing CC) but the 447 whilst able to hold on for a turn of Close Combat against superior numbers and forces was still destroyed in the end.
This is where it suddenly turned… realizing that the attack on the Schoolhouse had taken at least half of his forces away from the bridge garrison I made a massive all out attack on the Z17/AA17 buildings… these were held by a 658, 458, 2x LMG, a PIAT, the broken MTR and an 8-0 leader. I sent 8MMC at them… To support the attack I sent a bunch of ?s and CC at his mega kill stack in Z14 to pin him down with Defensive Fire, and also doubt… I know JP hates those things, though he uses HIPs frighteningly well.
All went well until my famous luck kicked in and a 2RF exposed a moving CC with 2x 447’s in Z16; neither of us had accepted/received starshells. His FPF on them broke one and Pinned the other – though he routed away. I was forced to send more men there, they got there safely and then entered melee. The melee was not successful for me, but he CR-ed one of my units.
His movement next… the units in melee were useless of course, but I did have units in the woods between the killstack in Z14 and the melee as well as units in the Z17 building. He received his 2nd consecutive civilian information and that exposed my covering forces in the woods in AA16; his fire on them with the killstack blew them away BUT it also held his most potent force up… this is what saved me (along with a little something else later).
He started rushing troops back from the Schoolhouse, some to the trenches (I had moved a CC there and they were doing their best to look threatening!), some to the village – but they couldn’t make it far enough. Sure I had gone from 8MMC to 4.5MMC and 3 broken MMC (disrupted conscripts in the next defensive fire phase) but I still held the building in Z17 and was still surviving the CC in AA17 (he lost a unit in a rare close combat victory for me, but I lost another as well).
Turn 5
Would the game end here? Again I rushed what men I could to both Z17 and in preparation to enter AA17. I moved what little in the way of CC and ? counters I had left to make them look as dangerous as possible, but I also snuck a CC with a 237 along the marsh road into Z13, and then upstairs; he ignored it, probably had got so sick of killing air, and was so focussed on the massive battle at the bottom of the village.
His defensive fire was ineffectual (mainly because I was avoiding him and his ‘troops of death’ like the plague) – in fact I was more damaged by the 3rd
civilian interrogation result in a row! And this time it was defences compromised! I had snobbishly informed JP that he was wrong about this, he rang me while I was out shopping to tell me that I might be interested in looking up the relevant rule – he was right and I had more of my troops exposed… concealment is the ONLY effective weapon the Germans have in this Night II game – guard it jealously. More troops entered the melee (Stalingrad de la Mer) but not much resulted from the melee.
It was the British turn 5 and finally all the troops were in place to charge into the battle. I held my fire until the 9-2 killstack (moved as a stack – he needed the MPs) came into view (again starshells had been ineffective); I fired. A HIT! But the mega-morale saved him. He moved adjacent, I fired again… another HIT and this time it is boxcars for the 9-2 – it is wounded, and the MC plus the following LLTC claim 2 of the 3 MMC he had with him! This one roll saved my arse more than anything else I think; and I am sure JP would agree. Though there is no doubt my incredible bad luck is only balanced by his incredibly good luck there are still little moments like this that can define a game (and unfortunately I think the CGs are still too susceptible to lucky rolls early on putting the whole CG out of balance).
The end result of this turn is 2 MMC pile into Z17, another unit enters AA17 and the end of game roll comes up – game over.
We CC the game out, JP makes up a little for the wounding of the 9-2 by getting 5 results from 6 CC rolls… but again I luck out when I decide to bet it all in AA17 in a single 1:1 roll and get a magical 3. He retakes Z17, I gain AA17 and more importantly I set up a massive ring of No-Man’s-Land with the assistance of the unit in Lvl1 of Z13 that will greatly influence his next games setup and flow.
The Aftermath
I think I did quite well, much better than I should have only because he drew so many troops away from the village to re-take the Schoolhouse; this was his biggest mistake I think.
I lost a lot of troops… I have only 6 from the 13MMC I started with in La Port and 3 of those are now conscripts but all my leaders survived, as did my AFVs. More important than this is that he lost a number of troops… I think he might have lost 3-4MMC and that, along with the cruel wounding of his best officer certainly balances my losses, with a little left over as well I think!
The most important thing is the amount of territory I have stopped him from using… that is the real damage, he will get plenty of troops soon enough, but it will take him at least a turn or two to retake the territory he lost and then he has to run across open ground in both directions.
He will kick my butt next game, we all know that, but if I can keep making him pay 1 Brit for every 2 Germans then I might be doing OK!
Conclusion
Sure it says German attack – but why attack? Why not save men to fight another day, while still keeping them in place AND concealed for a sudden attack