PEGASUS BRIDGE
CG I
NIGHT III
Legion playing German
Well, what to do now? I can see from the end of game counter exposure that I got a taste of my own medicine and that the ‘huge’ attack on the School house was mostly a fake – could I have held it, or was prudence the better part of valour? There is no doubt about 2 essential facts.
1. He is totally superior to me in quality of troops, but now also has almost equal numbers
2. I have to try and keep at least a toehold on the board in the 2 villages.
Exposed Fortifications
Wire: W17, X17, Z18
Trench: V16, W16, X16
Foxholes:
1S: AA9, CC12, EE14, EE18, GG15, HH17
Mines:
1AT: Z12, BB13, CC18
Defenders
Defending the Bridge: An element of Grenadier Regiment 736 of the 716th Infanterie Division
HIP: Z13(1): 236
The other unit in AA17 managed to successfully shift to the La Port garrison
Benouville Garrison: Elements of PanzerPioner Kompanie 2
HIP:
J15: 447, LMG
L13: 9-2, 447, MMG
S14: 436
Units:
EE16(0): 447
EE16(1): 2x dummies
K8: 8-0, 447
L9: 3x dummies
M6: 447
O16: 447
P10: 447
P13: 447, dummy
P17: 2x dummies
Q12: 7-0, 447, LMG
R13: 2x dummies
Le Port Garrison: Elements of PanzerPioner Kompanie 1
HIP:
HH10: 7-0, 447, MMG
KK14: 436
Units:
BB8: 447, LMG
CC12: 3x dummies
DD12: 38H 735(f) (CA EE 12/13) (TCA CC12/DD13)
EE14: 447, LMG
EE18: 2x dummy
FF6: 447, 38H 735(f) (CA EE/FF7)
GG12: 2x dummy
II11: 25-S 739(f) (CA: HH11/II12)
JJ11: 436, 38H 735(f) (CA II/JJ12)
LL3: 7-0, 436
Initial Objectives
Z13:
To die nobly taking as many of the bastards with him as possible
Benouville:
I spread myself out, thinking that if I get the chance I can turn and run like a dog if he decides to attack in force. I want him to either commit to a full on attack on one area and therefore spare a lot of the rest of the areas, or come piece-meal. I admit it is not a good plan, but what other options do I have? If I form a defensive position his superior leaders, firepower and morale will cut me to shreds. The only place I am set on fighting for is the Chateau De Benouville, but could I stop him if he really tried to take it anyway?
La Port:
Eeek, not a good situation! I have a HIP low in the village, and will let him get to the village without too much fuss whilst hoping for a lucky hit… I think it is better to let his own worries about walking over the open ground slow him down rather than exposing my troops on low probability attacks. He will usually send out a screen of dummies and HSs anyway. I do have another unit running for the high ground in the top of the map, digging some ‘last-stand’ foxholes!
My AFVs will not be of much use in the village but I put some of them in buildings, risky, but at least they have a better chance against the bloody British PIAT and Gammon Bombs. I shall leave II11, JJ11 and FF6 CE so they can shoot starshells, thus allowing my leaders a bit of safety – no point exposing their location unnecessarily.
My MMG group is HIP to try and surprise a flanking move on my 2 AFV at the crossroads.
General:
Survival if possible, if not then I want to keep hurting him. He will get a bunch of throwaway troops in the Day games, so I need to cause as many casualties in these early days as I can. My best chance for survival is in JP’s innate conservativeness in attack. He is likely to do 1 or 2 massive thrusts with well set-out objectives… This will give me a much better chance of maintaining a foothold than a spread-out territorial grab.
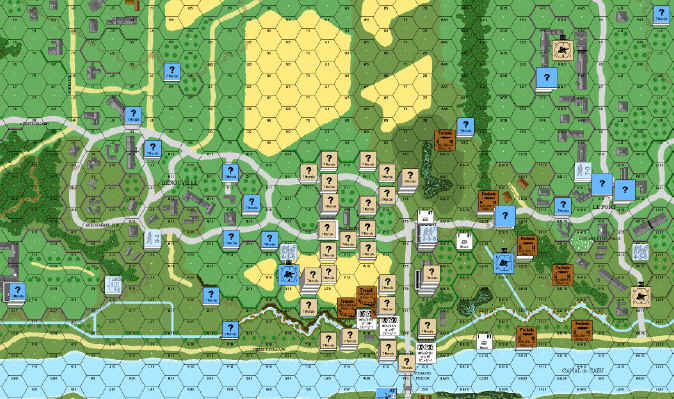
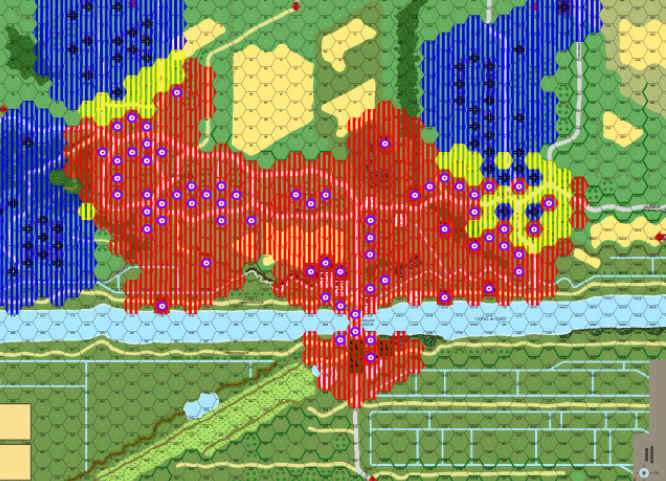
Setup for Night III – The British strike back!
The Game
Turn 1
Well he is going for the big land grab and is attacking both villages with a weighting of about 60% against La Port and 40% against Benouville. This will actually give me a chance! There are also small groups heading both around the marsh at the top of the Bridge village towards La Port and along the road by the river towards the Chateau. A major attack is headed toward Benouville through the Schoolhouse and the grain field below it; a small group has broken off to attack across the grain fields at the top of the Schoolhouse too. Early on he searched and discovered that I only have the isolated HS in Z13(1).
My starshells lit up the area near the Schoolhouse and in the village close to the bridge and; this caused a pair of 658 charging from X13 into attack Z13(1) to lose their concealment and with SFF against the adjacent units I was able to score a CR due to some boxcars! This left 1 broken HS and the other 658, who advanced into Z13(0) under CX. My conscript HS will certainly die with the Iron Cross 1st class, as they not only killed and broke HS from an elite MMC but also exposed a dummy stack with their first shot – Legends!
I pulled back, in tune with my general idea (and standard defensive tactic when outnumbered and outgunned) of placing units in aggressive enough positions to cause him to think about how to move, to slow him down basically, whilst also trying to have escape options open in case he tries to outflank them.
Turn 2
Unfortunately things began to go wrong in Benouville. He did a mass wave of Brits a la Russian Human Wave and almost totally isolated the 2x 447 and LMG I had there (P10 and P11); at least his attacks into La Port were stalled due to uncertainty over the possibility of HIP. His starshells worked excellently for him, whilst mine only caused mass self-inflicted night-blindness! The resultant attacks by the hoard of troops circling these units (Q10-13, with killstacks in P10, R11, R13) only managed to break the P10 447; many ?s did not fire so obviously his dummy count is high here. He sent some dummies into CC in N12 (my 447 exposed them) and the rest got close and personal but did not enter the 447 LMG’s P11 hex.
One thing about JP is that he LOVES his stacks and killstacks, really adores them (he has 6 of them on board each with a leader and at least 2MMC and SW), and naturally this is a double-edged sword. Killstacks are powerful and hard to damage but also show where there are troops and what is to be the major assault line, and they are so, so vulnerable to snipers and ambush (as they tend to be moved together for the leader’s MP and PP bonus). I am not a big fan of them at all, either to use them or to receive punishment from them!
A miraculous CH on the ? & wounded 9-2, who decided to go for a late night jog towards the pretty forest (DD14), by my sole AFV covering the no-mans land leading to the La Port woods made my intentions clear, but resulted in little else. The LMG MMC I had covering this area had been PIN-ned (though it SHOULD have been worse) in Prep Fire by a killstack in AA16.
Still, now his 2 flanks were reasonably clear, a mass assault had centres on the school-house side of Benouville and 2 half-hearted moves were developing towards La Port, one skirting the top of the map and the other along the river road. The Benouville group was supported by a powerful stack (!) in I16 and a suspected dummy counter set in M14… these were getting perilously close to the L13 MMG and 9-2 HIPs that I had sitting and quietly biding their time. By advance phase the killstack here had made it to BB7; the road assault group lead, no doubt by a pair of dummies (confirmed when our 2 dummy stack cancelled each other out in CC in EE18), had its killstack make it to DD17 by the end of advance. With the summary execution of the conscript HS (they rolled 4 and just missed out on causing a CR – though his snake-eyes created another 8-1 leader, something I did not need) there is now another 2 MMC and 2 ldrs free to attack somewhere.
I am in a bit of a conundrum, my broken 7-0 (N11) and 447 (O11) are in danger of being swamped and are in no hurry to rally it seems. A starshell landed nicely for me in N13, but this will also help the O16 FG. I have also dropped a starshell in BB11, protecting the DD12 AFV and giving him another shot, but is it worth it knowing he cannot do much and will most probably get smeared next turn? N12 (447) fired and missed at M14 (this CX ? is probably a dummy, but it is too close to the MMG ambush in L13 for my liking).
My moves reflect the growing tidal wave of the Brits in Benouville. I pull back the LMG 447 to O12 from P11 (only to have him ELRed by the P13 killstack) and shuffle some of the minor pieces to give the impression that I have a plan. I do however move the 447 (FF5) to FF6 in La Port whilst also BU and changing the TCA of the FF5 AFV to cover the approach of the stack in BB7. I wanted to pull the AFV from DD12 to FF12 and tried to bring the 447 LMG (from the over-exposed FF14) back to here first to give the AFV infantry cover, but he noticed the illuminated shot from Z13 and CRed me – credit where credit is due, that was a good shot. The other major change was to pull the II11 AFV out from his building and prepare him to wind his way up the map to cover the entry point (for 2 games away – optimistic I know!)
I am getting hammered!
Turn 3
His attack this turn is not supported by any prep fire. His confidence must be high, but I am sure about the trap I have set with the 9-2 (please, please, let him walk into it!).
I drop the usual pattern of starshells with one (N12) in particular being very well placed; it should slow him down some – there is another in K8. On the La Port side I have them in CC11 and DD10. Of course the K7 starshell has night-blinded M6, (447) and that is where he charged! This is indicative of my luck… I place the unit in a place that can at least slow down that side and my own starshell stops me from getting any value out of it!
He predictably swarmed around the 7- 0 and DM MMC with him in N11 (they were annihilated in AdFPh but left a HOB Hero in their wake). And the fact that I have HIP in L13 was shown by a pair of dummies entering and disappearing in a puff of logic. This now leaves my most powerful ambushing unit’s location exposed (though not the units themselves, yet) and there is no one in sight to shoot at, thanks again to my own illumination.
His movement into La Port started predictably in that AA6 would try to outflank the buildings. He moved as a stack in the open fields and payed the price, a hit from my 447 in FF5 killed the leader with some boxcars and a failed wound check and caused a 658 and 338 to break. The 7-0 and another 338 that was tagging along seemed unaffected but not amused. To add insult to injury a SAN check from the final MC caused the death of his disrupted HS in X12. The rest of his movements consisted of a massive move towards the woods bordering the centre of La Port, as well as a number of MMC rushing along the river road to KK16 and KK18.
AdFPh started to bring the snipers out from their slumbers and my 7-0 in GG8 copped a wound. The aborted attack on the upper part of La Port withdrew back to the safety of the woods. N12 was wiped out as he moved the mega-killstack into CC, though this was really my own fault, as I had completely spaced out and thought I was uphill not downhill!. The newly created Hero in N11 drowned in a sea of brown uniforms. At least the now 237 in N6 was able to withdraw to M6 after he rolled 6,6 in CC.
Dear, oh dear… what to do… maybe run away!
He manages to rally one of the troops I JUST broke and now in CC4 (groan), I rally nothing!
I pop no starshells…obviously; nor do I prep but he starshells K15, EE5 and II11; could one ask for a better grouping than that; they are able to stop or expose any of my important troop movements.
In La Port I can only try to plug the gaps, laying down a cover of dummies in GG12 and GG13 whilst the AFV withdraws to the II12 crossroads. Another AFV slowly (BU in the night) makes its way towards the top of the village.
Benouville is split in two with a 447, 8-0 and a HS up the top, though there are no overwhelming forces facing them. Down the bottom I have the majority of what little I have left and it is ALL running for the Chateau. My 9-2 was lucky to escape being blasted in bypass on its way to J14 (thanks to some kindness from JP there). This did not stop my HIP from being broken by a miracle 3 (for anyone but him for whom 3’s, 4’s and 5’s are the norm) as he blasted at long range with a 648 (O15), into woods at my 447 that AM-ed from K15.
Turn 4
Do you, dear reader, wonder why I get tense? After the stress of the last turn the first thing that came up in this turn is civilian information (we have played 13 turns and he has had it 5 times now!), it revealed the second-to-last HIP on the map, the 436 in KK14 that was certainly going to get a hit this turn as he advanced up the road towards the II11 crossroads – typical (he even rolls a 1,1 when it comes to digging a foxhole – L18). Meanwhile even with a 9-2 leader in I15 on my broken 447 and now 436 I cannot even get the DM counter off!
There is no Prep, I drop starshells in L8, I16 but get none in La Port.
He just swarms me basically, with the main stacks being the 10-2 stack that moved to II14; the 9-2 stack in L13; the 9-1 stack in K11, and the BB7 8-0 stack. My Defensive managed a PIN from the 436 in GG13 at the wounded 9-2 and a 658 in FF13 as well as exposing a dummy stack in M7 thanks to the efforts of the 8-0 and a 447 in K8. For my rewards I lost the 436 in KK14 – the certain ambush exposed by civilian info ended up disrupted.
At the start of my turn the NVR drops by 1, a great help to us both. I finish the MM1 foxhole but naturally fail again to even lift the DM from my guys, even with the –2 leader. At least I drop a starshell right for once, with the one in HH16 blinding a major FG in HH13. I Prep with GG13 at FF13 and score a 1MC that breaks a leader and a 658.
His starshells are essentially useless, so I again bugger off as quickly as possible! Pulling back towards the stables in La Port, to the Chateau and the top of Benouville. He manages to destroy the HD AFV in II12 as I start up using D2.12 (a rule we have never played before, but a rule is a rule) that states that a vehicle starting up is not in motion. So rolling a 9 with a 10-2 leader guiding a PIAT from II13 hits my turret and it’s “good night AFV, hello burning wreck”. My other AFV from JJ11 gets out too, as fast as possible to II10. My 436 in GG13 is pinned by the first Defensive Fire attack and then Disrupted.
Turn 5
First roll of the new turn, a 1,1 in the rally attempt and thus his 8-1 HOBs; he goes berserk, but since there are no units in sight it is Battle Hardened instead (Fanatic now due to being already elite). This sort of thing is again common in recent years with JP; by Turn 2 of a recent ABTF CG scenario he had 3 Heroes all from HOB! I on the other hand roll 6,6 and lose yet another HS in HH9 and can only manage 1 starshell in GG10.
While I understand why he is not charging the Chateau, and is only making minor moves on the upper regions of Benouville it is his mass attack in La Port that amazes me! He has pushed in with 2 attacks (9-1 stack to FF11; 10-2 with 658 and a PIAT to JJ11 – helped by the failure of my AFV in II10 to get a shot that actually even hits!). He swarms my disrupted units and puts them out of their misery. It is with a bleak look that I contemplate my Turn 5.
We played the last few depressing turns on VASL (all praise be to VASL and Rodney Kinney – though I hate the DiceBot) and by the end of it I was not a pretty sight. I offered the end of the game to JP, though he declined. This offer was more based on failing my personal ELR check through the horrors of the last turns. On the other hand I had HIP in HH10 (447 MMG and 7-0) while he had MMC’s in both HH11 and GG11 – prime attack opportunities for my first and only ambush of the game! Since my generous offer to end the game was refused I had no choice but to attack!
With a star shell in GG10 I was perfectly positioned; the 447 MMG opened up on HH11 first, thinking that the guy in the Stone Building was more dangerous than the one in Open Ground (and I had another 447 LMG in GG9 covering him anyway). I hit despite rain level 2, broke him and kept ROF. Turning the guns on GG11 I also got ROF and a k/2 that CR-ed him and broke the remaining HS! Unbelievable… then to top it off the GG8 MMG LMG managed to get another MC failure causing the elimination of the remaining HS! I had just doubled my kill count for the whole game! To make things even better I finished off the wounded 9-2 with a SAN roll (though thanks be to JP for correcting my mistake with it in the first place).
His only starshell landed next to mine (FF10).
For movement I continued my general rout in Benouville… getting back into place in the Chateau and giving up territory at the top of the village.
For La Port the fact that almost all my force is digging last defence foxholes (in OO2), guarding the top of the village (447 in FF6) or has fired in Prep (7-0, 447 MMG in HH11 and 447 LMG in GG8) makes movement easy and quick! I just pull the II9 AFV (a 38H-735 – basically a mobile burning wreck to be) back to II8 so I can cover my right flank… for what it is worth. I think that he is going to be faced with the prospect of charging my tiny hedgehog and thus losing more troops or backing off.
Aftermath
This, gentle reader, was where it ended, there was the summary execution of a disrupted MMC in the final Close Combat Phase but essentially I had a MAJOR gift from the Gods. It saved my guys from losing even more, as I am certain another turn would have brought another British Human Wave to the isolated units at the top of Benouville, and I could not have lasted against that!
Do not be confused about one thing though: I got smashed, totally taken to the cleaners… though I am happy that I have enough VP’s of units left to be able to claim the bonus points after he finishes me off in the next game!
Conclusion
Use your PF’s, I forgot to use any, and they are about the only thing the Germans have that can hurt the Brits. The odds of getting them and hitting with them are not too far off the odds of a 4FP attack with +x anyway…
Shoot starshells that make it EASIER, not MORE DIFFICULT to shoot the enemy. Both JP and I felt that my 2 consecutive failings with starshells cost me Benouville with not a single British loss.
Roll useful or at least average dice; rather than spectacular dice now and then and rubbish the rest of the time, but hell, you knew that already!
And accept that unless your opposition is a loser (and mine is NOT! Alas) you are going to die a horrible death. Again, during the game JP mentioned that this would be better played from the CG2 starting point rather than going through 3 Night games that are nothing more than a turkey shoot.