PEGASUS BRIDGE
CG I
DAWN
JP playing British
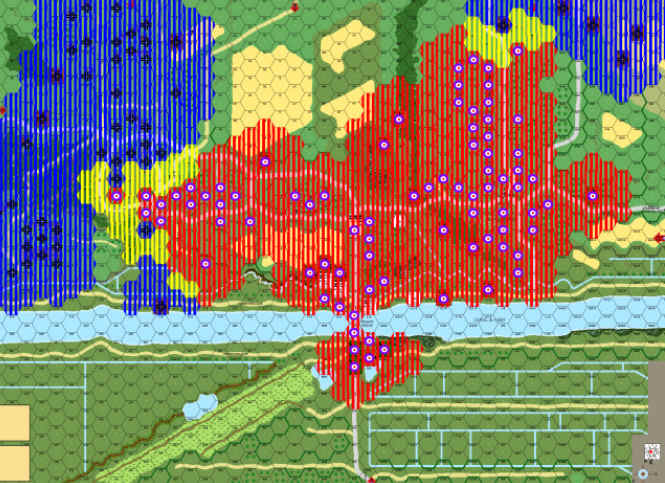
SETUP
I have bought 2 squads and a leader as HIPs as well 8 dummy counters. 6 of the dummy counters and a 7-0 leader are in I12 while in K12 are 2 squads 2 LMGs and the 9-2 ldr. (All HIP) and, under a concealment counter is another squad and LMG. I have set my 2 British AT guns and the captured German AT gun facing the Chateau de Benouville, this is a trap for his 9-2 leader and MMG, basically I want them to fire at the big dummy stack and lose concealment and then my HIPs can reveal themselves and fire back at him (16FP +1 for stone building) AND all 3 AT guns will fire AP to get a –2 acquired and then start firing HE. I feel that the chateau will be a problem all game as it overlooks Benouville all the way to the bridge and the Z13 – Z17 line of buildings (which I shall call the Alamo for obvious reasons) and I need to neutralize it before I can start pushing my AT guns across the bridge.
Elsewhere in Benouville I have 2 squads and a 9-1 leader in both G11 and K15, these are both woods hexes and are out of LOS of the chateau and their job is stop any infiltration through the woods. There are also 1 squad and PIAT in I8, 2 squads in J7 and a leader in K8 all concealed. I have a squad and LMG in L9 to put fire down the road and hopefully stop any flanking manoeuvres as well as my last 2 dummy counters in a threatening position in N4. I have 2 squads guarding the Café Gondree (one is my WW) and a squad guarding the schoolhouse area while another is at BB7.
In Le Port I have setup to attack and my line of advance is (obviously) straight up the HH row (2mmc with 3 more in support) so, I have setup to have my 10-2 and 3 MMC go up the JJ row and another 3MMC to go up the forest row CC. The idea is to be able to put fire on any of his units from the front and sides and basically use the side units (row JJ and CC) to break or reduce his defence before the assault force (row HH) reaches them. I only have one unit setup adjacent his buildings (HH11) and he will search in his turn to ensure the assault force can start clearing him out safely.
My objectives this game is to give ground at Benouville (not the whole town though) only if forced to, I don’t think either of us wants to be too aggressive with the meagre forces available, and to attack at Le Port and take ALL the buildings there, as that will leave his tanks stranded and with a big DRM to be able to escape to his lines.
TURN 1
His on board units have kept a good distance from me, especially the ones near Le Port, they are up the top of the map near row 1 and 2, however, he bought 3 foxholes (which means he spent 1CPP on fortifications and therefore has 12 Fort. Points left) and seems to be short a few counters in the areas near Le Port and the Chateau which makes me think he has HIPs to surprise any of my advances (or perhaps dummy counters entering with his re-enforcements).
He sent a total of 20 counters on the board thru A7 which is (I assume) a company of troops (13 CPP which now makes 14 spent) and through J0 he sent 1x 20mm AA truck which means he has either 1 or 3 more left off board (6 more CPPs for a total of 20) which now leaves him with 5 CPPs which could be either a TD platoon or a panzer grenadier platoon. I think he bought the panzer grenadier platoon as, we have both played enough CGs to know that infantry wins the game every time. (So why didn’t they enter in turn 1? He doesn’t have enough CPPs to bring them on elsewhere so they may as well have arrived with the main force – unless the company was depleted.)
During my defensive fire I blasted at a couple of buildings he owned in Le Port, just to see if anyone was home. (Nobody was!) Nothing much happened in his advance fire, the AAtr fired at my 2 dummy counters near N4 and two of his tanks fired for acquisition at the stables near Le Port (interestingly enough they are 2 hexes apart which means the hex in the middle is protected by the tanks if I attack thru the buildings- the HIP could be there as it would be able to run away to his camping ground in MM1).
During my turn I started advancing into the buildings in Le Port (I deployed a squad into HSs as scouts) and another HS took the church steeple and will stay there as a lookout/concealment remover.
In Benouville I beefed up my defence of the woods with the MMC that was stacked with the HIP’s (they will now be my surprise if he is able to enter the town) and the MMC that was covering the road on row L moved across to strengthen the boys in K8. I tried to move my AT guns but both rolled big numbers so they are still stuck on the other side of the river. (He didn’t have the MMG and 9-2 in level 2 of the chateau as I thought he would, unless it is the HIP).
During his defensive fire he killed my dummy stack in N4 and gained acquired on the HS in the church tower and the MMC that moved to K8. He also re-mantled a HW of some kind.
TURN 2
The re-mantled weapon was a mortar and, I hope to hear of another soon because that way I know that he has bought a platoon and that they entered in turn 1 (which means he did get a depletion roll for his company!!)
During his turn 2 he started to send a few MMC in to the chateau and a HIP uncovered in the chateau, surprisingly on the ground floor!! A 37mm AATr arrived from J0, leaving the question of whether there is another AATr of each kind off-board or did he roll horrible depletion dice? And a small force occupied the woods at both D5 and D9.
My defensive fire was horrific!! I fired my 2 AT guns and the captured German AT gun for acquisition at the Chateau and 2 out of the 3 broke down (including the German one, so goodbye to that!). He then advanced two ? adjacent my 2mmc and 9-1 ldr in the woods south of Benouville (G12).
In my rally my broken AT gun rolled a ‘6’ and died. In my prep fire however, I had some fun at last, I had moved two MMC up to level 1 of J7 and from there they were able to get a shot at his 20mm AATr without the wheat field hindrance and toasted that baby!! In the woods near Benouville my 2 MMC and 9-1 ldr fired at one of the adjacent ? counters (it was 3 high, the other was 2 high-including ?) and scored a 1mc which both squads in the hex failed.
In Le Port I started sending a total of 3 squads and one 8-0 leader to Benouville to help re-enforce as well as 2 squads and a leader to dig foxholes near the TT road entry to allow me to setup there if he creeps too close. Meanwhile my troops kept heading up the buildings towards the stables with no resistance other than one of his 37mm guns gaining an acquired on one of my HS scouts.
TURN 3
His Prep fire was ineffective and, during movement, he prepared to attack, he snuck 2MMC into Benouville through a gap in my defence (G9) and by the end of the turn they were in H9 and I10. He also had amassed a big fire group in the Chateau and it moved (still concealed) to level 2 E14. He also had a line of infantry running through the woods G13-I14-I16 ready to swarm the village. I had little or no defensive fire.
During my turn I prep fired at the MMC in I10 and pinned it, as well as firing AP (for the acquired) at his E14 fire group with my last remaining AT gun.
In my movement I charged a HS up the road II6-II5 to see if I could draw some fire from a HIP (one of his 37mm tanks fired and rolled a 6,6 but no-one else showed themselves) and continued taking the stables nearby, they will all be mine next turn and then I might foray out to see if I can kill a tank or two. Meanwhile I had started moving 3 squads from Le Port to Benouville and they reached the edge of town by the end of movement, his big fire group in E14 elected not to shoot.
In Benouville I moved and then advanced two squads from J7 to J9 (adjacent his pinned MMC) and assault moved my big dummy stack to I11 (also adjacent his pinned unit.) I then moved and advanced my squad and LMG back into the hex with the 2 HIP’s and 9-2 (they started there as a fire group dedicated to killing anyone in level 2 of the chateau and, they will all fire in my next defensive fire phase so that I can then follow up in prep fire should he survive).
During his defensive fire he fired his E14 fire group (9-2, 3 squads, HMG, MMG, LMG) at the 2 squads remaining in level 1 of J7, they are the only men holding this flank and that defensive fire showed that he is not confident doing a frontal assault on Benouville, it seems he would rather break the men on my
western flank thus encircling my troops from three sides with my men in the lower elevation. (That would be an horrific killing ground that I must not let happen.)
I advanced the level 1 men in J7 to the ground floor to escape his fire, and have decided to re-enforce that area with one of the squads from Le Port.
Turn 4
During his prep fire his E14 FG fired at the 2MMC in J9, pinning both of them, he also went Opp Fire with the 2MMC and MMG in G13 which means that my plan to kill his E14 fire group is still a happening thing (got to try!!) he moved 1.5 squads into the area near the building in M6 (I only took that building because the starshells last turn let me get there without being seen, so, no loss.) Then he did a weird thing, he assault moved a 4-6-7 into J6 (adjacent my 2 6-4-8’s in J7) I think he wants me to unload everything on him so that I cannot use SFF. Naturally, I didn’t do what he wanted; I only fired one squad, which broke the 4-6-7. He continued closing in on J7 and I was able to pin a squad with my other MMC but generally, he used the cover well. I don’t mind if he gets closer (2 away by the end of his advance) as I have been firing at long range and will be happy to mix it up at point blank. He also assault moved ? counters into the 2 woods hexes adjacent K15, as well as running 2 squads down the road from D10 to G8.
My defensive fire was a pivotal point in the game; my pinned men in J9 fired at G9 and broke them both. K15 spray fired both hexes and found one to be a dummy and the other a conscript (which, miraculously survived a 1mc and was only pinned). Then IT happened, I exposed and fired my 9-2 ldr, 3 MMC and 3 LMGs at his FG in E14 and scored ROF and a 1MC. His 9-2 leader rolled a 1,1 HOB and then became berserk in the subsequent HOB roll, all 3 of his men also followed him in berserk status, I was very happy to have been able to spring the trap successfully and I had never in my wildest dreams thought I could get such a great result, when he rolled the 1,1 I knew that if he became heroic I would have to give up Benouville so I was relieved to see the berserk. (I have two turns to setup a killing ground for these guys – managing berserk troops is an art form for the defender). Using my ROF from the 3 LMG’s I then fired at his Opp Fire hex G13 and got ROF again (broke one of his MMC) I fired again and broke the other while inflicting the first loss of the game (the other squad casualty reduced).
In one turn I broke 5 of his squads (CR on one) pinned two of his squads (one is adjacent 2 MMC and the other is in the open 2 hexes from the nearest cover) AND had his best leader and 3 squads go berserk, and, believe me, they will be left with no option but to run to my biggest and baddest fire groups. He broke the conscript in J15 (adjacent my 2MMC) and ran away in rout.
During advance he advanced a squad onto my big dummy (and 7-0 ldr) stack (in I11) and killed the leader for no loss, normally I would have broken the leader and ran away but, that would have put him in the LOS of the berserkers when they come through and then they wouldn’t run into my killing zone.
During my turn I prep fired at a lot of his troops, the unit left in the open (F6) got away lightly with a pinned result, I had 2 groups of 2MMC firing at him and I was disappointed with the result. My 9-2 killstack broke one of his squads that had entered Benouville (I11); the other was still concealed in H9. During my movement phase I lost a half squad due to his berserks Def Fire (it rolled a 6,6) and I was not able to reinforce my killing zone for them. He will have no choice but to run down the road to J12 where he will be fired upon with PBF by 2 fire groups 1 is 3x 648s for a total of 36FP with the –2FFNAM/MO and a –2 ldr in one hex (K12) and 2x 648s, 2x LMG’s and a –1 ldr in the other (K13). (I hope the game doesn’t end early!)
Meanwhile in forgotten Le Port it seems that neither of us really wants to mix it up with the other, I have taken all the buildings from FF4 – JJ3 and next turn I will risk a HS taking the foxhole he set-up in II2 (I still think he has a HIP near here and II2 looks straight down the road to II11, an ideal spot for a MMG, but, I need to make sure it is empty and in my control so that he will need to move across open fields to get close to my defence next game).
TURN 5
From now on, turn 5 onwards shall be known as “The bloodletting” (half of it was mine!!!) during his prep fire phase he scored a critical hit on my 2 MMC that had advanced to K8 (these were the only men holding this flank, as I had sent the other two units into town to take care of his 2 MMC that had sneaked in). Both were killed, and the game suddenly was not the “easy win” that it had been. Apart from taking the buildings J7/K8 and starting his berserkers charge, he did not do much.
During my turn I sent a single squad to K10 to try and stem the tide while my other squad stayed in J10 to stop any further incursions from his sneaky guys in the village. In the forest south of Benouville my 9-1 and 2 squads were fired upon with one of the squads being pinned, and, during movement I moved the remaining 9-1 and MMC into F9 (the other was left in F10) with the intention of re-entering the village through H9 thus trapping the MMC he had there and helping to stop the assault on my western flank.
During his defensive fire he fired a 4FP with +2 at my 9-1 and squad and rolled a (you guessed it) 1,1 both broke and routed back to F10.
TURN 6
During the rally phase my 9-1 did not recover and now the door was wide open for him. During his prep fire I scored a sniper result that wounded his 6+1 leader (now basically a 5+2 – don’t laugh, he tried to use him to rally in turn 6!!! – now you can laugh!!)
In his movement phase he naturally took advantage of my depleted force in F10, and charged 3 squads (he had rallied about 5 squads and so was back in business) adjacent while driving his truck to the road (G9) two away to prevent rout. He also kept taking buildings on my western flank (J9/K9/L10) my single squad was not going to hold them all even though he killed one of his squads and so I broke and routed away. His berserkers got annihilated by my mega-fire groups and, I took some comfort in that although, by managing the berserkers path to my mega-fire groups I had been forced to leave holes in my defence and, quite honestly would have pulled the guys in the forest back into the village a long time ago.
During rout my 9-1 and squad were eliminated (we forgot to use the “no quarter rules” in the earlier turns) and he advanced 2.5 squads into F10 where my last squad was valiantly standing firm as well as advancing another squad into J10 to CC my squad there (that did surprise me, 4 against 6!! He was concealed so I guess he was hoping for an ambush.)
In CC my F10 squad killed one of his squads for no loss and the CC in J10 ended up being a melee. (In the last turn and a half I have lost 3.5 squads and a 9-1 and he has lost 5 squads and a 9-2). During my turn I moved a 9-1 and 648 to J11 to re-enforce the melee and I routed my 2.5 broken squads to L12 and advanced the 9-2 to there as well, if they rally I will have two big fire groups in the centre of town and I doubt he will want to mix it up with them. In my CC phase the squad in F10 rolled a 6,6 and I offered him the withdrawal from CC (cheeky of me but, you never know), he declined but was unable to cause any damage, so still in melee (this is good as he will reinforce and, quite honestly, any squad busy doing something other than streaming into Benouville is a bonus.) Meanwhile in J10 I killed his squad for no loss.
TURN 7
He fired at my MMC in J10 and (thankfully as it was a 24FP+1) only got a 1mc which both squads failed (one rolled a 6,6 so CR – my 6th boxcars for the game 2 x CR’s, 2x AT gun breakdowns – 1 in CC and 1 from an infantry only FG) and, as predicted he went to re-enforce the melee in F10 (with 2.5 squads, I was hoping he would put them all in there as there was already 1.5 squads and so he would be overstacked, giving me a –1 drm and him a +1 drm) he also sent the rest of his troops to try and take some terrain in Benouville but, basically, his attack was running out of steam.
During his advance he sent all 2.5 squads into F10 (oh joy, Legion is a very smart player and rarely makes errors like that!!!) during CC he was unable to kill my squad (the +1 over stacked DRM saved me from a CR) AND when I attacked at 1-2 (vs 3 of his squads) I rolled a 1,1 (payback for the critical hit that put me in trouble in the first place) I could have withdrawn but I elected to kill the 3 squads (even though that gave him the extra CPP DR, I know that every CG we have played is won or lost by infantry, and, he already has enough points to buy every squad so I chose to make him bleed, besides, my escape DR did not look pretty anyway).
The game ended there with only the F10 melee to resolve (my 648 vs. his 447). Unfortunately he died but caused a CR on the way out – Victoria crosses all round, as this one squad ended up killing 4.5 enemy squads and turned an embarrassing defeat into only a slight defeat.
AFTERMATH
Three DR’s decided the fate of this game, the first was his mega fire group going berserk and the other two were the critical hit that killed two squads of mine and left the western flank open as well as his 4FP with +2 that rolled a 1,1 and made one of the two squads holding the forest break. (I had two rolls with a 9-1 leader to rally him and failed both times.)
In retrospect I put this down as a win for him although it cost him dearly too, the final losses were:
GERMAN
20mm AAtr.
9-2 leader
10 squads
BRITISH
7-0 leader
5.5 squads
Not taking the Chateau caused me a lot of damage, it is the 2nd most important piece of terrain (after the bridge) on the board, and had I realized just how important it was I would have made an effort to take it in the night turns. (It would be easy to get in Night I or II). Basically it allows fire into ALL of Benouville as well as having LOS to the road from Le Port making any re-enforcements take the long-range fire or sneak through the wheat or school buildings thus slowing down their movement. It caused me a lot of grief and bother (imagine the damage it would have done if his 9-2 had not g
ne berserk!!)
I learnt a very important lesson about the role the Chateau plays in this game and, if anybody that is reading this is about to play the game, remember these words!!!
So far we are travelling about right for losses, he started with a total of 86 squads available and I have 32 squads (not counting Day2/Dusk troops) and our losses are 11 squads for me (9 in reality as I gained two walking wounded) and 26.5 squads for him which is the 3-1 kill ratio I need. However, my force is being reduced every turn while his is getting stronger, I feel that the next turn (Day I) will be pivotal in the game as it will be his last turn to cause major losses to me, obviously Day II I get reinforcements and so his ability to break my lines will be greatly reduced and it will be the Day III turn where he will either win or lose the game and that will all depend on how many losses he can inflict on me in the Day I turn.