PEGASUS BRIDGE
CG I
DAY 1
JP playing British
SETUP
Having been badly mauled in the previous scenario (I managed to snatch defeat from the jaws of victory) I setup my forces further away from Benouville in order to avoid being surrounded and to reduce the effectiveness of his large MG nest in the Chateau, nearly all of my troops are 13 or more away from it thus reducing its firepower considerably.
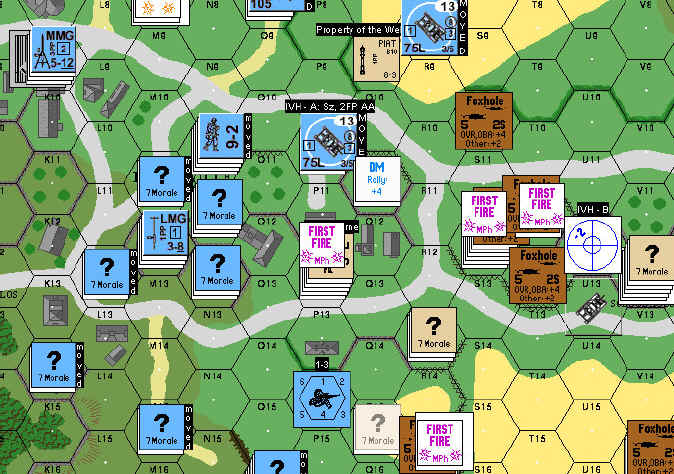
I have 2 strong fire groups based around my -2 leaders and both are out of LOS of the Chateau. In P11 I have 3x 648, a PIAT and LMG as well as my 9-2 leader. This not only allows me a big fire group with LOS to O13, N13, and N14 but also is able to put PBF on O11, O12 and has clear LOS all the way up row “P” to P3 thus hindering any flanking movement. This is, without a doubt, a fire group he will have to attack in order to gain any real progress, as it controls a lot of territory. I want him to attack through the “spur” of buildings leading from Benouville to the Schoolhouse area (P11, 12,13, O12, Q12) because it turns into a bottleneck where I can place a large amount of fire on it.
My 10-2 leader 2 squads and a LMG are in the foxhole at S10 while I also have single squads spaced out defending the Schoolhouse and wheat fields (R13, R15, S12, T12, V15, V16, T17, W18, X18) I have bought a lot of foxholes preparing for the Day III defence and they are placed S12, T11, T12 and V15. I have placed a re-enforcement group in level 1 Z13 to be able to fire at any infantry that enters from the U1 entry hex and my AT gun is in V12 although I will push it to U12 in the first turn to protect my 9-2 FG from his tanks.
My plan is for the 9-2 FG to slow his assault down for a while and then pull back to the foxhole network in front of the Schoolhouse where, hopefully, with 7 squads and 2x -2 ldrs I will be able to hold him off.
In Le Port I have placed six squads in a very light line running from PP13 through to HH4, some of them have been deployed or are my walking wounded so it looks a bigger force than it really is. I also have an 8-1 leader, 458 and German LMG in level 1 of JJ10, this gives me a little bit of fire onto the hill that his troops occupy. Basically, I just want them to sit there and do nothing as, I feel, neither of us is strong enough to attack the other in that area. I have also deployed a few squads and set them up, as HIP to surprise him, the first is in Q9 (A 338 with a PIAT) his role is to surprise any tanks that try to get into a firing position on the 9-2 FG. The second is in Q15 (another 338) basically my squads in R13 / 15 are there to hit any of his men that take the risk of moving across the open area in front of the wheat and the 338 is there as a back up to stop his troops from entering the wheat if my shots are of no effect. The last HIP is a 338 and PIAT in the building JJ3 and is there to surprise anybody that tries to take the building, or assault the stables, it is an obvious spot for a HIP but, every now and then you must have a HIP in an obvious place so that the opposition knows that you do place them there and that will make him wary of obvious places in every game. I am pleased with the idea of having the 338s as my HIP as, they will fire at point blank, making it a 6FP attack with –2 FFNAM/MO and, lets face facts, 6FP needs a “net” roll of 3 to kill anybody but, so does the 12FP column so why waste full squads as HIPs?

GAME PLAN
My game plan is to hold out at all costs, I can give some ground up to row “R” but after that I want to stop him cold, I have a total of 17 squads defending the Benouville area (as compared to the 10 squads last turn) and I have setup with a first line of defence in rows P/R and a second line of defence in rows U/V, there are good retreat/rout paths from the P/R rows all the way back to my second line in U/V and I am very confident of stopping him this turn. I have setup a lot further away from him than he might anticipate to:
1) Reduce the effectiveness of the Chateau MG nest, hopefully he wont even setup in there.
2) He will assume that I have left HIPs in Benouville and, hopefully will move cautiously through the town.
3) Ensure that his troops hit my line in waves. I.e. the onboard troops first, followed by his reinforcements that travelled with leaders and then the remainder of his reinforcements.
4) Buy some time, if he waits for the reinforcements to arrive before attacking it will cost at least two or three turns so his attack won’t start with any real force until Turn 4.
5) Allow me to have a defence in depth rather than the “hedgehog” I would have had in Benouville.
I need to stop him at row “R” to ensure a good defence in depth for the Day III turn and, I am prepared to trade 3-4 squads to hold the ground. My fire tactics will be a case of “fire to repel” rather than “fire to kill” basically, I would prefer to fire at 4 separate hexes and break all his troops in them rather than firing everybody at the one hex and killing all those inside it whilst leaving the other 3 hexes ready to fight. I have been disappointed with his ELR DRs and I hope to cause some long-term damage by reducing the effectiveness of his troops through the ELR DRs this game.
TURN 1
He sent a large number of troops and AFVs down the road from A7 to L8, the counters add up to a company of infantry (he knows that I would expect him to buy a company every turn so no real surprise) as well as five AFVs, two of which were exposed as a Panzer and an SP arty, so, therefore he has spent 33 of his CPP on this thrust, given the fact that he had 32 plus a DR it means he still has some spare so I shall keep my 9-1 reinforcement group in Z13 where it is for a while as I know he must have half a dozen more CPP yet to enter (perhaps J0 or U1).
He will obviously lead with armour (Legion is in love with the bloody things) so my game plan needs some changing, I will just keep my troops concealed and assault move to hexes he doesn’t have LOS to forcing the AFVs to move or making him commit infantry although he does have a PzIV firing from L8 at P11; however I don’t think he looked at ALL the drms as it is +1 BU, +2 orchards, +3 stone building, +2 concealed so I am happy to sit there for a while and waste his ammo/time until he realizes and either moves or sends in the infantry.
During my turn I fired my AT gun at his pesky AAtr parked near the chateau (it had acquired one of my guys in the foxholes near the school) and toasted it good!!! I moved a squad from the Le Port defence to the tree line EE as a backstop should I need to move the 9-1 reinforcement group. I did not move much, my defence is ready and I am just waiting for him to attack.
TURN 2
He kept moving closer but, up until now there has been minimal fire from either of us and, during his turn he kept moving troops into the “spur” of buildings near the school.
During my turn I moved the still concealed 9-2 and 3MMC FG from P11 into Q12 (this took one of them out of LOS while making the other gain +1 for orchard.) I also advanced my 10-2 and 2 MMC into the foxhole in S12 to support the withdrawal of the 9-2 group next turn. I was unsuccessful in moving my AT gun into W12 from V12 but I added another squad so should be able to put it there next turn. I feel that he will move his AFVs to near my HIP HS and its PIAT next turn and I hope to give him a rude surprise. (This turned out to be totally incorrect as, during his defensive fire he area fired at the hex, exposed and then killed my HIP HS – curses!!! Although I would like everybody reading this to look up his comment about firing at suspected HIP hexes in his night 3 AAR – he was quite scornful of the idea!!) My squad and LMG went into the foxhole in BB7 making me feel safer about using my reinforcements in Z13 and I have started moving my 8-1 Ldr from Le Port to the school area to rally troops as they break. Next turn I will have to move a PIAT and squad from Le Port to bolster my AT defence.
TURN 3
He did minimal Prep Fire this turn and moved a lot of troops and AFVs, during my defensive fire I ELRed his pesky mortar crew in I15 to a conscript and broke a HS that got a tad close. I am concerned that I might not be able to extricate my 9-2 FG but they are holding up a large number of his troops as, so far, he has been unwilling to get into their LOS so, if they can hold him off for another turn or two then it would have been a fair trade I feel.
During my prep fire he scored a SAN check, which killed my vitally important 9-2 and broke 2 of the 3 squads with him so now the situation looks worrisome.
During my movement I moved the AT gun into W12 and sent a squad up to X10 to look after the flank. My 8-1 arrived from Le Port and he will have some serious rallying to do. His defensive fire was mostly ineffectual; he broke one squad in S12 and CR’ed a squad in T11. My front line now consists of 4 squads, half of what it was at the start of my turn but, although he may be able to kill a couple of them, he will not be able to get into the Schoolhouse during his turn as I still have a 648 LMG, and 10-2 leader with LOS to all the road hexes in row ‘R’.
TURN 4
His Prep Fire was ineffective (as usual, I don’t know why he bothers) and he started moving a lot of troops towards the schoolhouse. I first fired and SFF until my guns were too hot to hold and killed 1.5 squads, pinned 3 more and broke 2 (one of which ELRed.)
In my Defensive Fire my AT gun went wild and fired 4 times at a squad he had in T9 and successfully killed it. He finished the turn with his troops controlling all the buildings in the “spur” (around P11) but has not established a cohesive front line other than his 9-2, 2x MMC, MMG and LMG which are in Q11.
During my turn I Prep Fired at Q11 and, although the 9-2 leader passed, the 2 MMC both failed their MC so, I am feeling less threatened (but not by much). My AT gun also got an acquired on his squad that had advanced into the foxhole S10. In my movement I charged a squad across open terrain at his SP gun in T8 with the intention of a CC attack. (It is open topped with no MGs and is unsupported so, even if the attack fails I hope it will make him be a tad more careful with his AFVs) I also sent single squads to U13/14 and T13 with the intention of being able to put fire on the road R10 to R12 to stop any dash for the foxholes in front of the schoolhouse. His defensive fire was horrific, my broken squads were chopped to pieces, as was my squad attacking his assault gun, in one fire phase I lost 5 squads (this turn will be where I truly lost the game).
TURN 5
He Prep Fired all along the line and broke my 10-2 leader and squad as well as killing another 1.5 broken squads. During his movement he charged 3 squads at my now vacant foxholes in front of the school area and, although he lost one, the other two were able to take them. (One of his squads survived 3 MC’s!! to get there!!) Then he did something out of character for Legion, he sprinted a 468, MMG, and 8-0 leader to W11 with the intention of forcing my routs away from the school house area, I Final Protective Fired my 8-1 leader, squad and half squad at them (always risky as a big number would have guaranteed the buildings for him) and, thankfully rolled a “4” which resulted in a 1KIA and, during random selection both rolled a “1” so they all died. This was an amazing result for me, as, if only one of them had survived, then my broken 10-2 would have had to rout away from the school so, I am still in the game with a slim chance. He also lost his 8-1 leader in the Chateau through a sniper check and the squad manning the HMG ELRed too but, it was a hollow victory for me. I cant help feeling robbed of a good defensive victory, his sniper killing my 9-2 and breaking the rest of the fire group has had a huge effect on both his ability to get near the school and caused a lot of losses amongst my men.
So far I have lost 6 squads, and a 9-2 leader (and will only regain 2 walking wounded as 4 of those squads were KIA). His losses now total 4.5 squads an AA tr. and 2 leaders (8-0 and 8-1) so, we are trading losses but, that is not good enough for the British, I need to attain a 3-1 kill ratio.
During his Advance Fire he attained a SAN which killed my 10-2 leader and then scored another SAN that wounded my 8-1 leader, this is now becoming a disaster and all due to snipers, I feel that I was out-playing him and all of a sudden my front line has collapsed all due to snipers.
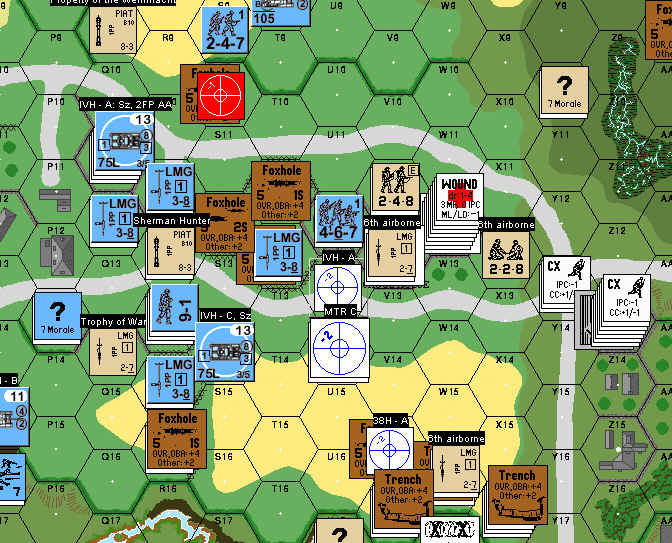
During my turn I pulled back and tried to form a defence around the town hall and in the trenches in the wheat field. I also advanced a crew to X12 with the intention of digging a fox hole next turn so my AT gun (if it survives) will not be isolated.
TURN 6
He continued applying the pressure on my valiant defenders and killed a HS I had advanced to try and gain possession of his abandoned MMG, by this stage my boys have been squeezed back to the building W12 keeping the AT gun company, he kept charging in and I scored an ELR result and killed a HS too, during advance he advanced a 467 into W12 and it scored an ambush against me and killed the crew BUT I rolled another “4” (which I have no doubt will annoy the hell out of him) and was able to kill the squad. Praise the lord!!!! He rolled a 1 and the game ended!
AFTERMATH
I lost a lot of squads (five of them permanently) and my leaders got hammered, all due to his snipers, which also caused my front line to disintegrate, I am disappointed with this, as I felt I had his attack under control. (I lost a 10-2, 9-2, and had an 8-1 wounded) as well as losing more ground than I wanted to, but I still have W12 from which to launch a counter attack next game and, most importantly, denied it to him so my re-enforcements can enter without fear of being mowed down at long range. [Legion Note: the SAN# is 3… just let that sink in for a moment… how many 3’s does one need to roll for that kind of SAN run to occur… just saying]
This game was an absolute blood fest for both of us and I certainly cannot afford another one like it next game.