RILEY’S ROAD CG
19AM
JP attacking as the Canadians
INITIAL THOUGHTS
Well, this should be a walkover… I have 48 squads, 16 tanks, 3 wasps, 20 RAM’s and 3 carriers to his 20 squads, 4 MG’s and 4 88mm AT guns.
I did not do as well for leaders as I would have liked, only gaining one –2 leader for one of the companies on the 2nd wave. I rolled an ‘8’ for the HQ company which, with the –2 drm gave me a 9-1, 8-1 and a 7-0 but I was hoping for better.
This game is all about Location Victory Points (LVP’s) and I know I need to be brutal in game 1, I am going to try a coup de main with my 3 wasps and 3 carriers each with a half squad as riders on the carriers scooting down rows ‘A’ and ‘B’ and trying to get into the Ebben area to quickly encircle his troops and pick up the 6 LVP’s that are spread from there across to the AA24 (Southern) crossroads. I will also have a few squads enter on board as riders on tanks so my second wave can have some of the mobility offered by the RAM’s (which are recalled as soon as they unload their passengers) and might try a dash along row ‘JJ’ and on to the Schwannenhof. The rest of the LVP’s are pretty close to my entry areas and so I will just have to grind it out in that area and rely on my superior numbers.
My barrages are in H7 going to H21, R7-R23 and GG5-GG23 with all of them moving twice per turn as this is a battle of mobility and I need don’t want them getting in my way.
In retrospect I should have started the 1st two barrages in H8 and R8 so my RAM’s could move their full MP on turn 1 but I was worried the barrages would error and miss the crest line of the ridge around row ‘10’. I doubt he will start on this crest but I needed to be sure none the less, that means my troops (other than the coup de main party) will be crossing the ridge on turn 3 but they have limited objectives and I am not too worried about them, besides, if the coup de main and Shwannenhof troops achieve their objectives anyone left behind will be assailed from 4 sides next game if I need to attack.
The rest of my turn 2 troops will split into their 2 companies with one reinforcing the Milk Factory attack which will move on to take N18 and U17 (the Upper Houses) while the second company will attack the EE10, MM10 (the Lower Houses) and JJ11 (Kalkar Crossroads). That only leaves H10 (the Goch Crossroads) to be mopped up. This game will all be about the 88’s – if I can not neutralise them quickly by fire or smoke I could take some massive losses, for that reason my 4 Sherman firefly’s will enter on turn 2 with riders but will only be battlefield taxi’s as I need their 76LL guns for when he counter attacks with Panthers so they shall not be risked although their Smoke mortar will come in handy. That’s the plan but it all depends on his setup, obviously a valuable weapon like an 88 will have infantry support so I will assume that his 88’s are near his big clusters of troops and this may change my plan.
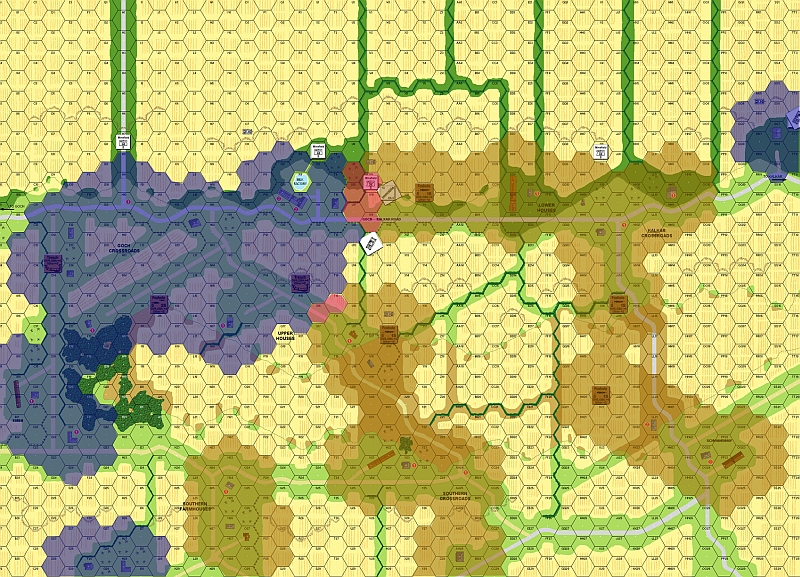
THE MAP
We have named various areas on the map to give it a more historical feel, these names can be found on Legions website
I have also decided to keep my guys in companies and use the real leaders names where known as I love organising things….
– Battalion CO Colonel Whittaker (9-1)
Company ‘A’ and ‘B’ are comprised of 5x 4-5-7’s and 5x 4-5-8’s.
– Company ‘A’ CO Major Bostwick (8-1)
– Company ‘B’ CO Major Dunc Kennedy (8-1)
Company ‘C’ is comprised of 9x 4-5-7’S and 4x 4-4-7’s.
– Company ‘C’ CO Major Piggott (8-1)
Company ‘D’ is comprised of 10x 4-5-8’s.
– Company ‘D’ CO Major Frogett (10-2)
– Engineer platoon CO Lt. Wight (8-0)
Like I said: I didn’t do well for leaders with most of my company commanders being 8-1’s.
HIS SETUP
WOW!!! Nearly all his troops are set up on the left (western) side of the board only leaving 11 counters on or east of row ‘W’ this seems too much like a trap to make me attack in the east – but I will anyway! He only has 5 counters in the Lower Houses and another counter in MM10. My reasoning is thus: in turn 1 I can get tanks into position to smoke what looks like his MG nests in J15,W17,Y15. If he has the majority of his fortifications and AT guns in the east as a trap then all the better for me as I can go around fortifications and AT guns that are unsupported by infantry will fall quickly anyway. I have 5 units that will move to support positions (all are riders on tanks) where the squad and tank will stop and unload the tanks will fire smoke in turn 2 while 3 of the squads will start moving to attack his initial front line, these are:
● S4: tank and squad, tank will smoke what looks like 2 MG’s in J15.
● W4: Squad, leader, radio. Tank will smoke W17 and leader will drop OBA smoke on T9 as an entry point into the Milk Factory.
● Z3: Tank and MTR squad (MTR sqd advances to Z4) tank smokes Y15 and MTR smokes DD9.
● AA4: Tank and squad, tank smokes either Y15 or W17 (is there for back up) while squad can fire at long range at Z11 road hex to stop some lateral reinforcement or retreat.
● JJ3: Tank, MTR sqd. Tank smokes EE10 and MTR smokes HH10.
I will also move a wasp to MM7 and BFF the unit in MM10 for an early hit. The ‘LL’ – ‘NN’ row is where my modified coup de main (now 3 carriers with 3 half squads from Coy ‘A’ as riders and one wasp) shall enter, I will use them to draw MM10’s fire so my wasp has a better chance of breaking him and they shall then charge straight for the Schwannenhof and around to the southern crossroads with half a hope of taking the southern farm house too. That will only get me 9 or 10 LVP’s so I will have to attack the milk factory but I will use my turn 2 troops for that although I am sending a platoon into that area on turn 1 just to start the proceedings. My attack is centred (row ‘R’ – ‘TT’) on the lower houses and Kalkas crossroads Coy. ‘A’ on the left or eastern side and Coy. ‘B’ supported by HQ squads on the right or western side of the attack. After taking the initial crest line we will then move west to attack the milk factory and the upper houses in conjunction with my turn 2 troops. While a few more will reinforce the Schwannenhof with a tank going to GG16 to stop him from crossing the top of the hill and heading south to counter attack my coup de main force.
My 1st attack is only using 9 RAM’s as nearly every tank has a rider which means a full company (Co. ‘D’) of turn 2 troops are on 7 rams (don’t forget to deploy the squads to use the RAM’s 18PP fully) along with all four of my MMG’s on another 2 RAM’s and my engineers and a MTR with squad from coy. ‘C’ on my firefly’s – these tanks are only being used as battlefield taxi’s for obvious reasons as I want their 76LL guns for his counter attacks and I don’t want to risk losing them to 88’s. This leaves me 2 RAM’s spare for the 19PM turn if needed. My footbound turn 2 troops will go straight down the board at the milk factory expecting to attack it in turn 3 by which time I hope to have swung some of turn 1’s troops westward so it can be attacked from 2 sides. My RAM company for turn 2 will go wherever required and I will have to wait and see what is happening before I decide where they go.
THE GAME
TURN 1
On came my armoured rush, all my designated smoke-support tanks with riders stopped and unloaded so I now have 5 tanks, two mortars and my 70mm OBA ready to smoke any of his strong points. (Of which there are 2 – J15 seems to be a pair of MG’s and the milk factory has nearly a dozen counters in it.). A tank with rider stepped into AT and AP minefield on my extreme left at TT6 and with no more MP left it stayed there, while my WASP went to MM7 and BFF’ed for a break result the squad in MM10 a BFF shot from one of my tanks scored a 6,6 to breakdown.
His defensive saw a HIP 88 in SS7 expose and fire at a RAM in RR5 which killed it and the 1.5 squads and 7-0 leader that were passengers, the 88 rotated towards the adjacent tank in the minefield and fired as intensive but only got the acquired. Another 88 revealed in R14 (excellent position as the up-slope crest gives it a good field of fire) but rolled 6,6 on its 1st shot and I was very relieved as he had a plethora of targets and could easily have taken out 4 AFV’s before I could have smoked him. My advance fire and my tank adjacent to his 88 fired for no effect but it made the riders bail out (better than burning next turn) however they failed the bail-out MC and broke (he refused to accept their surrender and I now have no quarter in effect). In his turn the malfunctioned 88 rolled a ‘6’ to be removed and the other 88 toasted the tank in TT6 but the crew survived. It then roated and fired at another RAM but missed (the +6 drm for rotating in a building saved me…) In my defensive a WP shot at HH10 exposed a squad but little else happened.
THOUGHTS
Nice start, although I lost 2.5 squads and a tank to his 88 (and probably another when he toasts the next ram) he has lost one 88 and has another in a position where it can be avoided even though it has LOS to the level 1 crest line along row ‘16’ it can be avoided and taken at leisure.
KILLS:
Brit dead: 2.5 squads, 1 leader, one tank.
TURN 2
I started firing smoke and promptly malfunctioned 2 more tanks (that’s 3 out of 5 tanks designated to fire smoke malfed – obviously I am not going to repair then as they could recall and the repair dr is better in re-fit phase.) Worse, both mortars lost smoke capacity as well – 5 out of 7 smoke creators are out of business already!! All my troops charged and the first of my coup de main party went up the first hill, he FPF’ed the HH10 squad and it broke so that is 2 squads of his broken and nearly surrounded there, my RAM that was in the sights of the 88 drove into the smoke from his buddy’s burning ram and managed (by a miracle) to escape the 88. A RAM drove into a mixed minefield at S8 but managed to reverse out while another tank went to the front of the milk factory (O7) with a view to smoking him out but his 3rd 88 was in the factory at Q10 and turned him into toast. More AT mines popped up in V9 and it seems the milk factory is ringed by mine fields.
My 2nd wave followed on roughly behind the 1st wave, His J15 MG nest scored a K/ result against one of my engineer squads which passed the MC. In my advance the crew adjacent to his SS7 AT gun advanced out of the minefield and into the AT guns hex but died in CC – ah well, was worth a try). He managed to self rally one of his broken squads and in his prep up popped another pair of MG’s in T10 supporting the milk factory and they fired at one of my squads that had gone up the level 1 – he hobbed, hardened and gained a hero but then they both died from his ROF shots. His J15 MG nest broke a rider and its mortar was destroyed as they bailed out. My OBA dropped smoke around the milk factory but my LOS was not good and it is not helping much.
THOUGHTS
Things are going OK for me, I now know where 2 of his 88’s are and the third is destroyed while I think the 4th will be way out on his right flank. My barrage is actually slowing me down, I am only using one of them as cover and it is the one that keeps erroring back a tad but it will speed up eventually, I am glad I made it move every turn or this attack would be bogged down. The milk factory seems too strong to attack from the north as it is ringed by minefields, has an 88, a pair of MG’s and quite a few squads in it so I will just avoid it and take as many of the other LVP’s as I can – my entire attack could get slaughtered if I rush it in there and I don’t have time to setup a proper supported by OBA and smoke attack.
KILLS:
Brit dead: 4 squads 1 leader 2 tanks
German dead: 1 AT gun.
TURN 3
I kept hard charging and 5 of my carriers (the other wasp is helping out with the main force) as well as a tank and squad are now well down the road heading to the schwannenhof and beyond. More AT mines popped up in V9 and it seems the milk factory is ringed by mine fields (a third was “kind of” found by my barrage when I had to roll for some unidentified damage). His OBA managed to kill a HS of mine and break his leader and one of the MG crews (that is how close the fighting has become) and his 4th 88 popped up roughly where I expected it (D13) and it scored an acquired on an immobilised tank at V12. I lost another squad to that damn HMG nest at J15 (cursing the loss of smoke and tubes now..)
In his turn his OBA killed a broken HS and a tank with malfed MA and his 88 killed the immobilised tank, it went intensive fire and rolled a ‘10’ to breakdown so another minor victory for me. His SS7 AT gun is firing for acq. at the road KK16 obviously trying to slow down my advance towards the schwannenhof. He advanced a concealed squad into CC and killed one of my guys while he took his 1st loss from a FTR.
THOUGHTS
This is getting bogged down, I have traffic jams all over the place as my milk factory attack has had to slide to its left and has got intermingled with the centre attack while on my left flank the SS7 AT gun has reduced my to only 2 viable hexes to go up on to level 1 I need the services of a good military policeman!!!!
KILLS:
Brit dead: 6 squads 1 leader 4 tanks
German dead: 1 squad, 1 AT gun.
TURN 4
This turn will be about re-organising my troops and getting ready for turns 5 and 6 (the +1 “end of game” drm ensures this will go to turn 6 and am hoping it makes 7 but I think my attack will have petered out by then and turn 7 will be about consolidating gains.) I dug a foxhole in Y10 with a view to getting some kind of linked setup area. He lost a HS in prep fire and I started getting organised, one of my tanks tried to fire his Sd but failed – he must have forgot his ammo because it also has a malfed main gun, CMG and BMG all from 3 different shots!!! His AAMG is the only offensive weapon (other than my harsh language every time I look at the useless thing!). I put tanks and my last smoke carrying mortar in positions to smoke the area between SS7 and the Schwannenhof road so I can push some tanks and RAM’s over the crest, unfortunately one of my fireflys had to do ESB and was immobilised. I also put squads in JJ15, II20 and FF23 with a view to digging foxholes to link up the area all the way down to the milk factory foxhole – which would be great for the 19pm turn.
My coup de main force are now up to the AA24 crossroads and next turn I will start unloading troops and taking the LVP’s while my lead carrier goes on to N24 (Southern farmhouse) which will get me a total of 10LVP’s and I want to try and take U17 for an 11th LVP by turn 6 but he has much fire support from the milk factory so I will need to get my OBA ready to smoke that area by turn 6. A sniper killed another 7-0 leader and my attack at the lower houses got re-buffed by the 2 squads and hero still there (I have just not been able to do any damage on them and they are in a factory so I am loathe to try and get an AFV close to them due to their PF capability). I also sent a pair of squads to attack the SS7 AT gun so make it lose acquired on the road and it took the bait. He scored a PF which brewed up my triple malfunctioned tank.
On the plus side he red chitted his OBA. LT Lawless died when he took a squad and a hero and tried to get into the smoked T10 building as it was now manned by only one crew and MG but I had no joy in that area and will definitely avoid it until I can OBA it out next turn. I managed to take out one of his squads in the lower houses and my hero tried to CC the crew manning the MG but died. In his turn a 6,6 rally killed one of his MG crews and his malfed AT gun was destroyed on a ‘6’ – 2 down and 2 isolated I am happy with that – shame his 9-2 hobbed up to a 10-2. His OBA pulled another red chit to be out of the game and everything is going well for me, however his SS7 AT gun went on a rof run and killed both attacking squads and at the lower house he CR’ed by fate the squad guarding a prisoner. He moved out of the U17 LVP building (I don’t know why…) and was broken as it climbed up the hill (no HA as you go up) and another squad over in row ‘TT’ died as it tried to get to SS7 to support the AT crew. My barrage killed a HIP panzerschrek toting HS in the ebben forest (glad I didn’t try my original plan of pushing down there…) while his hero died from lead poisoning at the lower farm houses. I also scored a K/ result on another of his squads and the death count is mounting at last.
THOUGHTS
I am now ready to push through for the next 2 turns and without any OBA and limited field of fire for his 88’s things should go well for me, I have a wasp at CC26 which will go up the dirt road and attack his retreating squads around V18 while the rest of my force take them head on (2.5 squads and a leader are still there). If I can get U17 and V18 I can link up that area to the southern crossroads and I can then get a huge number of troops across that hill in my next turns set up. (my other 2 fireflys can reach this area and with 3 of them on the hill top should be able to take care of any of his armoured incursions.
KILLS:
Brit dead 10.5 squads, 3 leaders 5 tanks
German dead: 4.5 squads 1 crew 2 AT guns.
TURN 5
After court martialling my quartermaster for forgetting to pack some smoke shells I finally managed to get a little smoke at OO12 to mask my drive up the schwannenhof road and some WP at the J15 MG nest scored a crew dead when it fated out. His last squad in the lower houses died when my tank, which had been firing constantly for 2 turns without a hit finally hit and KIA’ed him. I also managed to get a foxhole dug at ii20 but still need one in JJ15 to link up with my main force. I managed to fire my Smoke mortar from my immobilised tank and that is enough cover for my troops to scoot along the road to the schwannenhof. In my movement I managed to break one of his squads at Z18 and the way is now clear for my FT carrier to attack this retreating band from the rear. While another wasp broke the last good order half squad in that area.
Now it is just a case of cleaning up, I sent a carrier and rider half squad out to the lower farm houses and ran a firefly and 4 RAM to the schwannenhof. I am now collecting LVP’s and things are starting to look good although the MP cost is high as I have to check every cellar. I ESB’ed a ram to get close enough to drop troops next to the U17 LVP and every one else ran for that area as I am pretty sure I can link up U17 through V18 (get it next turn) and on to W23 which puts me in a great position for the 19PM turn. Meanwhile my 70mmm OBA got into a position to be able to put smoke out to cover the taking of U17. He had no defensive due to my skulking and re-grouping (and having driven through his front line…).
During his prep his only shot made his HMG malfunction. In my defensive my last operational barrage (the one that had been slowing my attack down…) finally moved 2 hexes and hit a carrier that had been on his way to take V18 the carrier failed the MC and was stunned which means the SU point will make him unable to take the building as I miss by one. This shows how slow the barrage was as I had overtaken it and then driven back towards it!!! (and it was moving twice a turn…) His broken half squad died in a hail of bullets and I am getting more optimistic. Another of his squads died from FTR and the turn ended.
THOUGHTS
I don’t mind if this stops on turn 6 provided I can get a linked setup area, I really need JJ15 to dig his foxhole and I have put 3 more squads in and around that hex to dig if the labour countered unit fails. I am still worried about taking U17 and it all depends on where the smoke errors to…
SCORE:
BRIT 10.5 squads, 3 leaders 5 tanks KIA
German: 7 squads, 2 crew 2 AT guns.
TURN 6
My smoke errored to the perfect position, it gave loads of cover (+6 hindrance from both the milk factory and J15 but no smoke dropped on the approach to U17 so I can now waltz straight in… JJ15 dug his foxhole 1st time and now I am connected all the way from Y10 to the schwannenhof. I kept pouring men into the area near u17 so they can setup all the way across the hill next turn. I out 2 units next to U17 and they advanced in later. I also dismounted from one of my wasps to have a crew (carrier crews are infantry so can take locations – clever huh?) to take V18 and I am now happy. Sadly one of my fireflys bogged at W10 but when his SS7 AT gun fired at it he rolled – yep, you guessed it… a 6,6!! Meanwhile my lead carrier and rider had stopped and the riders and crew took the southern farmhouses.
In his trun his malfed HMG gakked and was destroyed followed immediately by his 88 in SS7. In my defensive I lost radio contact (was trying to set OBA smoke on to the farm house just in case it went to turn 7 as I have a small chance of taking N18 and the R14 trench which would put the milk factory under fire from 3 sides next game. The game ended there with me taking 11 LVP’s but big losses to my valuable infantry. I lost a squad and a half in escape DR’s and my bogged firefly immobilised. However, this was offset by my immobilised firefly becoming mobile again and my carrier losing its stun as well as my malfed Sherman regaining his main armament.
FINAL THOUGHTS
I am happy with what has been gained but the price was high: 12 squads, 5 tanks and 3 leaders for the Canucks and 8 squads 2 crews, one HMG and 3 88’s for the Germans.
The AT gun in R14 was brilliant placement due to being up-slope and I was lucky not to lose more troops. The 88 in SS7 didn’t seem to be too much of a problem as it is in a field bordered by a hedge but it also has LOS to the northern side of the central hill and in fact also can hit a few spots as the Canadians go up the 1st incline (W10 as said earlier). I was surprised Legion did not move more of his Ebben troops to cover the southern farmhouses when he could see my coup de main scooting down the road but I am happy with that as it was not strong.
Overall, I gained 11 LVP’s and I feel like it was a slight win for me but not an emphatic one.