RILEY’S ROAD CG
19AM
JP attacking as the Canadians
BUYS
I rolled a DR9 which reduced my buys to 31 points.
I bought a company of infantry for 20 (full but rolled high on the leader table scoring an 8-1 and an 8-0 leader.
I also bought a 57L AT gun platoon for their high ROF, these guys can take care of HT’s and PzIV’s but have little hope of doing damage to a Panther.
A 70mm OBA mission and 2 points of fortifications – used to link up my setup areas with foxholes- rounded out my buys.
SETUP
I think he will attack around rows ‘A’ – ‘I’ with a view to reinforcing his Ebben troops as he seems to have pulled back most of his units leaving a token force in the Milk Factory. (He seems to have gained about 5 counters on his on-board troops so I would not be surprised if he has dummies in the Milk Factory.)
My plan is simple: my 100mm OBA is in U17 and it will just keep dropping arty on the Milk Factory until they are all broken, my assault force for that area will be my newly bought company which will take 2 turns to reach that area anyway. I have a pair of MMG’s and my 10-2 leader in a fox hole at T18 to also put pressure on the Milk Factory and make him pay if he thinks he will slowly pull those troops back. The majority of my forces are on the southern crest of the hill that runs across the board with most of my tanks and AT guns being at obtuse angles with a view to getting side shots on any Panthers that arrive. I will also send a Firefly with my armour leader to J25 as I expect him to push up into the Ebben from around there (I would…). This tank is supported by other tanks on the hill crest and 2 squads with a LMG and a PIAT. I am going to send a re-enforced platoon along the hill to try and take the woods at the edge of Ebben.
Basically I want to take the Milk Factory , the Goch Crossroads and the last of the Upper Houses for an extra 6 LVP’s with a view to also taking E22 and F16 if possible. My resources are stretched thin but they are well spread out and are able to give some measure of interlocking fire.
I also have a concern about him entering on the eastern edge specifically if he runs down the northern hill face (around TT15) and into my troops attacking the Milk Factory so, for that reason my 2 tanks supporting that attack are a distance away (EE12 and JJ1) where they can also deal with that threat and I have put 2x 5/8th dummy counters down in II15 while a crew, leader and PIAT will run to TT14 for some up close and personal defence, these guys are also supported by a 57L and a Firefly in LL22 and KK23 respectively with their cover arcs aimed at that entry area, this will give either them, or the PIAT a side shot on anyone trying to go down the northern flank of the hill. I will also send a platoon from my re-enforcements to try and take the SS7 building as I want to eventually have an AT gun in or around it to defend this flank.
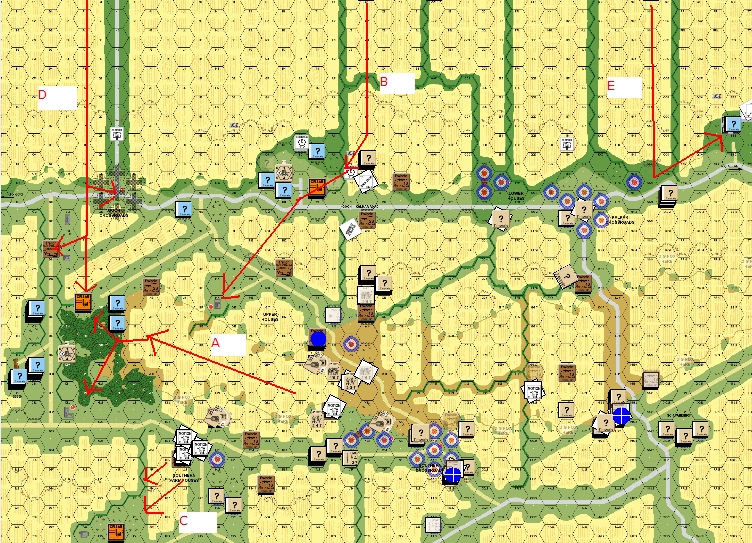
LEGEND: (red lines represent attack routes)
ATTACK ‘A’ : Under cover of smoke takes the forest edge of the Ebben and attacks north and south to secure a line across the trees.
ATTACK ‘B’: Off board company takes milk factory and moves beyond to take last of lower houses.
ATTACK ‘C’ : Localised attack to gain LOS across the row ‘A’ – ‘E’ field and to put pressure on the German controlled southern houses and to hold my flank.
ATTACK ‘D’ : I still have 2 RAMS which will scoot their troops down this row as soon as I find his last ’88 I want the trench in D13 as it can get me good field of fire along the road for future turns.
ATTACK ‘E’ : 2 squads with PIATs attack SS7 – they are armed with PIAT in case he tries to cross the northern edge of the hill with AFV’s.
Blue DOT = MG strong point.
Blue DOT with Cross = MG and AT gun strong point.
THE GAME
TURN 1
Things didn’t start too well for me as I lost a lot of WP fired at concealed stacks and would immediately run out of WP but I managed to expose a stack guarding the hill at the Ebben for the dummy stack that it was. I smoked the Milk Factory and started up my OBA. My troops moved to their predesignated positions and things were going well (except for all the loss of smoke). His defensive fire saw a pre-registered 120mm OBA on U17 errored to the hilltop U19 and immobilised one of my tanks.
His turn and the only Prep was his OBA which destroyed the previously immobilised tank and I was sad to see that he kept to the script and did not bring anyone on to the board, that will make my job easier!!! My OBA started dropping on the Milk Factory for little effect but I am patient.
TURN 2
More dummy stacks were revealed and I now realised that he has 2 strong holds: the Ebben and the Milk Factory. I am not interested in getting all the way to row ‘A’ in the Ebben but do want to get into the woods around F16-F21 so I can get side shots at any of his tanks as they round the forest. I sent a Wasp to flame T10 but it got stunned by some point blank out-of-SMOKE fire. I then sent a Carrier with an engineer HS and demo charge to U11 where it unloaded the engineer who advanced into T10 ready to give his troops in the cellar some loving. Down on the south edge a risky search dr exposed the unit in H28 (the very southern board edge at the southern farm houses) to be a dummy and I advanced a squad into the building and a crew into a nearby German foxhole. His defensive and he revealed another pre-reg hex at U12 which errored to V12 and did no damage to the squads and tank in its blast radius but I had to ask him to roll again and he hit my phone line (after re-reading the rule on this I am not sure that was right…there was no reason to roll for the phone lines hex as it had no units in it…). Worse was to come!!!
In his Prep he setup a bunch of troops ready to advance into the southern board edge and obviously attack my units there. His prep saw the OBA shift and destroy my Wasp and the Carrier which is burning nicely protecting T10. A HIP crew with a PSK took out a tank at the southern edge of the Ebben.
My defensive did damage though: I managed to malfunction the radio on my 70mm OBA!! His troops advanced into CC against my outnumbered troops ( I chose not to rout.) Worst of all!! I forgot to throw my DC down the stair at T10 and both his squads advanced up and devoured my engineer while both CC’s on the southern edge became melee’s for no loss to either of us.
TURN 3
My 70mm radio rolled a ‘6’ on its repair roll so I guess I have some OBA for night shift… In my prep I managed to break the crew manning the 88mm AT gun in the Milk Factory but the door is still not open. I also started digging foxholes to link up my setup areas. I sent a RAM down the ‘H’ road to F9 where his 88 can’t see it should it rally. I also sent 2 squads down the same road and he fired and scored a snake eyes but had forgotten the paratroopers short(ish) range as I was 9 hexes away – I was disappointed that Legion would think I was that stupid. A Carrier and a Wasp took advantage of his broken crew to scoot into the area near the Goch Crossroads while a squad that was out of his range also took the N16 LVP building. I am trying to consolidate my position at the Ebben and also get my re-enforcements into positions where they can assault the Milk Factory. Meanwhile down in the south of the board a BFF from a wasp scored a 3MC for my 458 squad and his leader and 3 squads in melee I rolled a 5 to be pinned and he rolled 3x 5’s for his 4-6-7 squads to break them all (and his leader rolled boxcars and broke/elr and wounded) – never have I seen the advantage of superior morale shown so clearly. My Carrier near the Ebben got toasted by his panzerschrek toting crew (which subsequently died in CC). I sent 2 squads adjacent to the J28 foxhole in the south where the last melee was raging and just kept the pressure on him. I also sent a squad to Q8 waiting for when the guys in Q10 break so I can move to P9 and make them surrender all I need is a low roll or two. I made a mistake in this movement phase as he had shown me troops from 2 different infantry companies which meant he had no tanks but I kept all my tanks in support roles along the board – they will definitely move next turn – stupid of me, I had counted his CPP’s as well!!! My advancing fire only managed to pin the paratrooper in the foxhole at J28 and little else. His 3 squads and leader escaped off board and my pinned squad was unable to hurt them but the failed 2 MC’s as they left so he lost 1 squad equivalent. The J28 foxhole continued in a melee.
In his turn the rain started and, worst of all his crew manning the 88 rallied. I was surprised to see him setup more squads along the southern edge, he obviously wants the D28 fox, F28 and H28 buildings for setup next turn but I am confident my small but powerful force can repel him – especially when I send them a pair of tanks to help out. He dropped his 120mm OBA on my Goch Wasp which shocked and stunned the crew (this will probably die next turn…). But worse was to happen, his 88 scored snake eyes on my foxhole with the 10-2 leader and 2 MMG’s but it was only a possible CH (thank god I had broken them as that hex was acquired) he failed that with a ‘5’ which caused a 3MC and one of my squads broke, he fired again and rolled 2,1 with a ‘4’ for the effects which was a K/3 and I had a squad reduce but all passed the MC – his third shot was a 2,5 for a miss but ROF and his 4th shot was a 4,1 with a ‘4’ for the effects for another K/3 – my leader and the broken squad tied for the loss of another HS and wounded leader and they all failed the MC for a final figure of 1.5 squads dead and a 10-2 wounded.
(I just put this in because his AAR’s always make it look like I diced him and just wanted to even the score…
[Legion edit: Bah.. this is ONE ATTACK, not 6 turns of non-stop miracle dice… sheesh! It did feel damn good though]).
His movement saw him try to use my captured DC in T10 on an adjacent HS but I managed to break the squad (a minor win for me…). My defensive saw my southern Wasp roll a K/3 for my melee crew to die and his paratrooper CR’ed and broke – it subsequently failed its MC as it left the board and died. That’s 2 squads and a crew dead but my losses are big: a pair of tanks, 2 carriers, 2 wasps and 2.5 squads – losing the tanks (standard Shermans, not Fireflies) and Carriers does not concern me but the Wasp and Squad losses do.
TURN 4
My prep at the Milk Factory saw his 88 crew break but the supporting squad survived and I am too scared of his panzerfausts to risk a tank charge. In the south a 6+1 from my Wasp scored a NMC and he obligingly broke both squads with a 6,6 CR’ing one of them. Another shot from my infantry and 2 failed MC’s later and his 2 squads had been reduced to one broken HS. I kept digging foxholes to make a linked setup area (I want a double redundancy so I can have flexibility in my setups) I sent a RAM and a Carrier towards the E12 and E14 buildings looking for his OBA observer and my Carrier HS dismounted and searched E12 and E13 to no avail, that makes his observer in E14 – at least I know where he is!! I also kept the pressure on in the Ebben trying to get a CC against one of his squads in the forest but it broke in FPF which was a shame as I had managed to get a concealed unit next door. I sent a pair of squads to U11 and they survived his defensive fire thanks to the SMOKE made by my burning carrier – they will advance into T10 which will keep the broken squad in the cellar DM and hopefully I will survive prep fire to be able to finish him off. His defensive also saw him kill my stunned Wasp with his OBA and little else. His broken squad in the cellar of T10 surrendered and life is looking OK.
His prep fire saw the OBA get a red chit and a CH from a LMG against my Wasp then gakked the 8#TK with a DR10 – phew, that is my last Wasp I don’t want to lose it… He did little movement and my defensive saw the T10 cellar squad break and become a prisoner as well as a squad on the south edge become CR’ed from double break.
TURN 5 AND 6
The game moved real quick from here, I charged a bunch of troops to the wreck in T11 and he fired his last good order squad in R10 which missed and cowered so I went the extra hex into S11 where he FPF’ed and broke. A HS went CX and tried to do an infantry overrun in E14 (I had “bumped” the hex to expose his leader previously) but he failed his NTC – which would eventually cost me not only a HS but also the last hex of the Milk Factory….
His defensive saw him put harassing fire on to the pre-reg hex U12 (brilliant place for Pre-reg if you are ever in the same situation) where it pinned one of the squads but the other managed to advance in to R10 and take the 1st hex of the Milk Factory– this guy broke in his prep and eventually routed into the OBA to lose a leader and CR the squad. At the south edge he had enough and withdrew off board as he could see a plethora of tanks coming down the road at him but in this area alone he lost 4 squads for the loss of a crew for me so I was happy. Meanwhile one of my Fireflies had opened fire on a massive stack at C15 – I had counted his squads as they were exposed and I knew this stack must be his 3 missing crews 10-2 and HMG/MMG’s. These guys tried to get out of the line of fire and were eventually smashed by the tank with him losing 2 crew and the 10-2 leader but the MG’s they dropped were in his setup area so he gets them back – shame.
At the Milk Factory a last desperate charge saw me send in my last 3 good order squads along with a tank to draw the 88’s fire (which it did and died – the 88 intensive fired at one of my squads though and scored a pin result) with one breaking, one pinning and the last (guarding a HS) surviving – there are now 5 broken Canadian squads within 3 hexes of this building. I advanced my guarding squad into CC and managed to kill the crew manning the 88 and we remained in melee after he CR’ed me (his CC and FPF rolls have been horrid this game). I also killed the crew in SS7 for a CR result for me but have now denied him that area as a strategic location. In my defensive I did not fire at the melee as I did not want his squad to be free to advance against R10 as it is held by my last good order squad.
The game ended on turn 6 and we were both happy with that – I had taken all that I had set out to take except for the last Milk Factory hex and had lost less than I bought onto the board while he had lost nearly a full company of troops which helps for the night turn. I had 2 squads ELR from escape DR’s but no other damage (better than last game!!) I also picked up 5x LMG from scrounging and we did the chit draw: he is attacking and I am defending at night.
THOUGHTS
Wow!! His OBA saved the day for him, the 10CPP’s spent were well worth it, I lost 2 Wasps, a Carrier 4x HS, a leader and my OBA to it – this game would have been a whitewash if he did not have it and as said before the pre-reg hex U12 was brilliant especially as T10 was covered to the north with a minefield. At the end of the day neither my OBA nor my MMG nest did much damage to the Milk Factory and it was up to good old fashioned troops charging with bayonets that took the position – the +1 rain helped without a doubt but similarly I would have preferred to be able to fire SMOKE.
Legion made a minor mistake in the south when he sent units from 2 different companies on board, this allowed me to free up tanks that had been on guard duty elsewhere, if he had sent just the same company I would have been forced to keep my tanks in position to defend my line. By the same token a Panther or 2 in support would have won the south edge easily so I think his re-enforcements and buys were not thought out as well as they could have been as he could have bought tanks this turn and the 2nd company next turn.