BERLIN: RED VENGEANCE
28th PM
JP defending as the SS
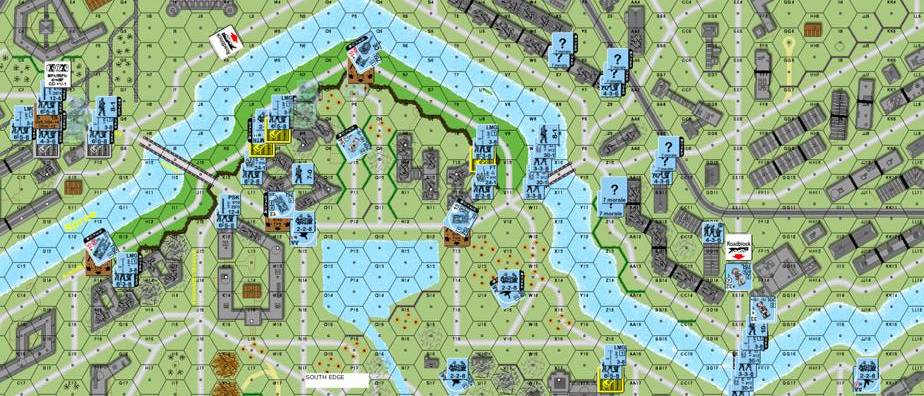
From the first look at the map and I could see that even though it is a city map there are plenty of open spaces; this one will be tough as many units can be fired upon from both ends of the board. However, infantry on their own will die by the company if they try to cross the bridges, so he will need Tanks, BIG TANKS, with big, ugly guns, which perfectly describes the IS2M and IS3 with their 26 AF – they are very scary vehicles indeed. The most important piece of terrain to me is the area around P9 where the rivers circles around a headland, if I can control this area I am able to get some side and rear shots against these behemoths and hopefully have them out of the game before he crosses the bridges and the battle lines straighten out.
BTW, for those of you with the board we have decided that the “North edge” is row ‘1’ not column ‘A’ as the map compass shows. If it was row ‘A’ there would be no need for him to try and cross the bridges thus making his life easier and mine impossible. Add to that the fact that all the BRV scenario cards have the north edge as being row ‘1’ and it becomes quite clear. Also whenever I say left or right it will be from my perspective of the south edge row ‘24’.
LETS GO SHOPPING!!
The AA weapons are only available on turn 1 and, keeping in mind my need for AT weaponry I started looking for some bargains.
BARGAIN #1: Dug-in tanks cost half price, can be setup in paved roads and debris and their BMG can be scrounged to give the infantry an extra LMG ( the equivalent of a set of steak knives!! (SSR: I3) and are NOT an LOS hindrance (D9.54.)
BARGAIN #2: (BRV 9.1) Although the Russians have complete air superiority and all Fortifications have to be placed on board, barricades are placed on board as Roadblocks, so a few Barricades will alter the way he sets up for his initial entry on to the board. (Good to keep in mind…)
BARGAIN #3: (A12.11) Dummy counters can be 5/8th size – once again this will help influence where he enters and moves.
BARGAIN #4: German reinforcement chart V7 Lt Armoured Support. For 4 points I scored a PSW 222 (L) and a PSW 234/1 both of which have a 5 co-ax MG and a 6 IFE 20L – very handy as dual role AA and infantry-killer. I also picked up a PSW 234/4 with a 75L gun.
BARGAIN #5: The Spree bridges can be destroyed by Set DC’s!!
BARGAIN #6: 20MM quad AA guns 2 for 5 points!! These can be used against infantry (20FP) and any of his Sturmoviks.
BARGAIN #7: 88L AA guns at 2 for 7 points, a bit pricey but with a ROF of 2, HE (16FP) and Long range AA fire vs Sturmoviks and spotter planes they are well worth the cost.
My final shopping list is:
2x I1 – Full, scenario given – 2x SS Rfl Platoons with 7-0, 8-1
I3 – Full, Volksturm Pltn, 4x 436 (4 pts)
2x I4 – Full – 2x Engineer Pltn’s with 8-1, 10-2 (20 pts)
V1 – Full, Dug-in – 2x Panzer Mk IVH (3 pts)
V2 – Full, Dug-in – 2x Panther Mk VD with8-1 AL (5 pts)
V7 – Full, 3 AC’s see above in the bargains. (4 Pts)
G3 – Depleted – 1 X 81*mm MTR (The only depleted unit) (5 pts)
G6 – Full – 2x 20mm quad AA guns (5 pts)
2x G8 – Both full so I have 4x 88mm AA guns (14pts)
I was lucky and had only one depleted RG but my leader rolls were average and the 10-2 is more than compensated for by the 7-0 and no leader for the Volksturm.
SETUP
On the headland around P9 I have got an 88 FlaK in a Fortified Building (N8) with a massive field of fire ranging from G8 clockwise around to Y7 – a very important hex!! A dug-in Panther and a squad and LMG covering each bridge (Moltke and Kronprinzen) as well as an engineer and FT in a building next to each bridge exit. My MTR is on level 2 of N8 overlooking the approaches to the Moltke Bridge – love the roofless building rules!
I have a Platoon of SS Rifle troops, and an 88 FlaK (in a fort building – E8) around the entry to the Moltke bridge – building E8 mainly (nifty trick – I have a foxhole in D8 with a squad and PSK in it with wire on top, the railway embankment stops anyone from seeing him at any range. The wire protects him from infantry and the embankment guarantees an underbelly shot on any AFV that come near). These are supported by a pair of squads on the south side of the river as well as a dug-in Pz IV and dug-in Pz V, the MTR and a 20mm AA setup in the road N12 which can put devastating fire across their front.
2x Engineer HS, 2x DC and an 8-1 are on the Kronnprinzen bridge and 2x Engineer HS, 2x DC and a 10-2 are on the Marschall bridge. My opening gambit will be to set the DC and hopefully one or both will be damaged to the point where he can not put his 30+ ton monsters across them. The 10-2 is doing the Marschall bridge as I would like his extra –2 on the damage roll to hopefully destroy it thus freeing up more of my troops for the defence of the remaining 2 bridges. (Could I be so lucky as to have both bridges destroyed? – I hope so…)
3x Volksturm squads, 2x dummy infantry stacks, a dummy Vehicle/gun stack and a concealed AC with 75L behind a barricade at EE12/13 are a light screen designed to keep him away from my Engineers while they do their work on the bridges.
I also have a squad and LMG in U12 and Z17 (2) with 88’s at V14 and JJ17 and a dug-in Pz IV looking straight down the Kronnprinzen bridge at T12. These are covered by a 20L AA gun in T17 which can put fire on the exit of Kronnpronzen bridge too.
Besides the barricade at EE12/13 I have a barricade at K5/L5 which should stop him from sending armour in at the centre of the board near the canal since they could not go any further until the roadblock was removed. 6 points bought the wire in D8 and 10 Fortification Points put the 88’s into the buildings as mentioned as was the dummy stacks which cost my last 6 fort points, the idea is that the Barricade at K5/L5 (remember, he will see a roadblock initially so will probably try to enter at row ‘H’ which will put him on the AT mines) and in my 88mm cross fire.
I can get him in cross fire with 88s or 75LLs pretty much anywhere he sticks his head out so have some good chances of scoring kills. I didn’t buy loads of infantry as I feel a platoon can hold the bridges even against a human wave (just imagine even a 1FP fire lane with –3 TEM along a 3 hex bridge, it would be murder.)
My reserve is the last AC currently providing cover for the 10-2 and engineers on the Maschall Brige. Unfortunately my defence is all “up front” with no HIP’s or surprises other than the 88s but, he doesn’t know that so he will still be cautious but, that said, I have no decent mobile reserve should he get across a bridge, it’s a gamble but worth it as I have gained so much more from not buying mobile tanks or fortifications as they are 1 CPP per 10 Fort points which is not a good exchange I feel.
THE GAME
TURN 1
On came the hordes…
It was obvious to me that I had placed too much importance on the Moltke as his force there was quite small, 3 AFV and only about a million squads. They approached cautiously and there was no opportunity to fire at any of them. As stated earlier there was confusion as to his entry area due to the erroneous noting of North on the map) and I guess I had already decided that the Moltke was where he would attack using the previous entry area’s – a lesson learnt, always re-adjust your thought process!!
In the larger (Eastern) section he drove 4 AFV supported by a gazillion billion squads. At the first opportunity I exposed a 436 which fired and disrupted a moabit squad, I wanted to let him know that the counters on that side of the river were not dummies (well, some of them….) so he would not push too hard. An SU-76 that had entered on LL1 and gone down the LL5-EE8 road was promptly burning from a magnificent piece of LOS spotting on my behalf, my dug-in Pz IV in T12 toasted it to a nice charcoal/black colour. By the end of his movement he had established himself down to row ‘4’. I was surprised by the lack of haste as very few of his units went CX but that was OK for me.
In my turn I set my AA guns into AA mode as he had rolled for Air Support and in movement I tried to set my DC’s but was unsuccessful on all four rolls, I had put HS there instead of full squads which would have improved my chances – but not this turn as even a squad can’t set a DC when you roll 3 dr 6’s!! At the Moltke outpost (hereafter called the customs warehouse – because that’s what it was…) I moved a 658 LMG into A8 to cover my left flank as the majority of his troops were coming down that way. During advance I moved the 2 Engineer HS’s off Kronprinzen bridge as he would have good LOS by the end of his next turn, the guys on Marschall stayed as it would take him longer to get there.
TURN 2
Pardon the disruption…
The stage was now set for some serious confrontation and it started with a positive omen, a 6,6 gakked a prep shot and the RS resulted in a pair of Russian LMG going down for the count. In movement he sent his Moabit squads into the attack, a single one went down row ‘A’ to attack the 658 LMG there, so I laid out a fire lane (1FP) and it disrupted, another followed and that too disrupted, as did the third he sent which was also CR’ed. His fourth decided to go down row ‘B’ but that too was disrupted from my squad firepower. Cool, Huh? He eventually parked a T34/85 adjacent (A7) to push me out of the building.
On the Eastern sector he merely kept taking land and was obviously unsettled by the quick despatch of his SU-76 as he did not put any AFV’s in an exposed position – my PSW 234/4 in EE13 had a T34/85 too scared to cross the EE1-EE24 road and it was just sitting in FF3 wondering what to do.
During my Rally one of his LMG’s malf’ed out and in Prep I thought long and hard about getting the AA8 squad to roll for PF and toast the T34/85 but I decided that I had enough guns to take care of his armour and I should keep my infantry to defend against his rabble so in movement I pulled him back to the customs warehouse. I managed to wire up the Marschall bridge with both DC so I moved my Armoured cars out and later I advanced my Engineers to under one of them that had stopped in EE18 for some form of cover. All my squads on the eastern side of the river started running madly towards the bridges only leaving dummy stacks to slow him down. One of the 436 was only able to get to DD13, but more about him next turn.
TURN 3
Can you smell something burning?
His other LMG malf’ed in rally and he started complaining about the dice – good, I was winning the psychological battle!! His Prep was minor and ineffectual and during his movement he had a Moabit squad fate down and disrupt as it tried to rush the Kronprinzen bridge. His T34/85 in FF3 decided to charge down the EE road and parked behind the barricade EE12/EE13, this worried me as he had LOS to my engineers and their 10-2 hiding under the Armoured car.
He had obviously decided that his tanks needed some cover and he drove an SU-100 into Y8 where it failed the building bog roll. My defensive didn’t do much other than to break a crew manning an 81* Mtr in G4.
During my turn I fired my dug-in Panther in P7 and my 88 in V14 at his bogged SU-100 but both merely gained acquisition. I did get a K/ result on a 447 so I gained my first points for infantry losses. (Moabit’s don’t count) I moved my 436 in DD13 to DD12 hoping that he would rotate his turret to fire at him and thus not at my Armoured car but he did not take the bait. My Engineers finished rolling out the wire for their DC’s and AM’ed into FF19 but not before they scored a SAN 2 result which wounded my 10-2 Ldr and scared the daylights out of me. I moved my PSW 234/4 to a position where it could also fire at his SU-100, I now have three guns firing at it but I can’t get a hit, meanwhile he is firing at my 88 and I am concerned that I might take a hit and lose the gun (not worried about losing the crew, I can get heaps of them.) His defensive saw a MMG malfunction near that warehouse on my left and the T34/85 at the barricade toasted my Armoured car in EE18 but revenge was mine as my 436 conscript in DD12 rolled and gained a PF which hit and burnt the T34, the conscript failed the MC from eating the backblast but fair trade all round. My engineer squad (I had re-combined them in rally) rolled a 6,6 on the TC and could not blow the bridge)
TURN 4
The Big Bang… in theory…
During Rally I deployed my engineer squad so I would have 2 units to roll for the TC to blow at least one of the DC’s on the Marschall bridge. His T34/85 near the customs warehouse malf’ed in his Prep which set the tone for the entire phase as he did no damage. In my defensive fire I malfed a LMG in the Reichstag and both my engineers passed their TC’s to blow the bridge, I rolled for the first DC and it was a 6,6!! I couldn’t believe it had gakked itself!!! This was the one I used my –1 from my wounded leader on as well. With some trepidation I fired my 2nd DC and it went up very nicely indeed, the Bridge survived but is damaged and can now only take 20 tons which stops every scary tank he has from crossing. – I consider the T-70s and SU-76s to be mobile targets so they are welcome to cross if they want. During his Adv Fire he CR’ed my tank busting conscript and it eventually routed all the way across the bridge where it was given the Iron Cross First Class.
My rally phase saw my LMG malf’ed out and after firing at his SU-100 for 3 fire phases I finally scored a hit with my Armoured Car’s 76L causing a shock result. My Panther administered the coup de gras and it went up in smoke. This took 3 guns 3 fire phases to finally kill, I hope that will not be the norm in future games. In his defensive he opened up with 2x 50 Cal’s and a 10-2 leader at a concealed squad guarding the exit of the Kronprinzen bridge which prompted an advance to the rear.
TURN 5
Me and my big Malf…
He finally got his Sturmoviks on scored 2 armed with bombs. At Kronprinzen bridge he popped smoke into W10 and the stage looked set for a charge across the bridge. He only moved a couple of moabits across and I was able to break and CR both of them. In my Defensive Fire I made my 88 in JJ17 fire as heavy AA at the Sturmoviks and it malf’ed – bummer. I fired my 88 in N8 at some level 1 squads near the warehouse and it too malf’ed. Now I am getting concerned. I fired my 8-1, 658 LMG in the fort position in E8 at a squad and scored ROF and broke a squad. At this point I was going to fire the 88 in the same hex at the squad but decided to fire the LMG again and lo and behold it malf’ed!! Thank god I did not fire the 88 or that would have been 3x 88’s malfed in one fire phase. I also CR’ed and broke a DC-toting guy next to my squad in a foxhole under the wire at D8.
In my rally both the LMG and one of the 88’s (N8) died on their recovery rolls. I sat tight and only moved inside buildings as I did not want to give his Sturmoviks any negative sighting check DRM. it was now his Defensive Fire and the moment he had been waiting for arrived, he sent a Sturmovik to do a point attack on my dug-in Pz IV guarding the Kronprinzen bridge and it was promptly wiped out of the sky by my first 20L AA gun. He then (foolishly I feel) tried to send the second Sturmovik against the same tank and it too was shot down by my second 20L AA gun – so much for air superiority.
In my Advance I moved my 8-1 and 658 out of the fort location E8 into D9 which was an incredibly stupid thing to do but my LMG had malf’ed out and I wanted to link up with the conscript squad and LMG to make a 12 FP fire group.
TURN 6
That was a very close combat…
His Prep was ineffectual and it seems that his personal morale had crashed along with his Sturmoviks. He started getting desperate near the customs warehouse and moved troops into A9, B9 and C8 with only one of them getting broken. His sole remaining SU-76 charged into bypass on the fort location E8 and I had no choice but to toast it with my PSK in D8 where it has now made a very nice smokescreen for him. With the 88 behind smoke he moved his T34/85 (which had rallied its main gun) into B9, I got a PF in my big FG and chose to eat the back blast as I fired, the shot missed but the red dr ‘1’ CR’ed my 658 and all three units broke on the MC. Now the position which had held off many attempts to take it was looking untenable. He then drove an SU-100 around to C10 using bypass through the cracks in the adjoining buildings. Meanwhile he moved a 527 squad into the Marschall Bridge hex EE16 these guys survived my Defensive Fire and as squads are strategic locations this did cause some consternation. Likewise in Advance Phase he advanced a squad into Y9 for the same reason. My 8-1 and broken HS and conscript routed into the fort hex and in his advance phase he put a squad adjacent to them all – I was acutely aware that next turn he would be able to enter that hex as Fortified Locations need GO SQUADS to stop people from CC’ing them. He also put a squad into the wire in D8 and we went into melee with both of us causing no damage. By this stage I only had my smoke covered 88, my 658 in melee and a 658 LMG in B10 which was surrounded by his tanks in C10 and B9.
In my turn I decided that my squad in in B10 would stand and fight as I was in a factory so there was no backblast from firing a PF. I rolled for and got a PF and scored a hit on the SU-100 but it was a dud!! A 6,6 spoiling my day and dreams of taking one with me. I was unable to do anything about the guy in Y9 but at the damaged Marschall bridge I drove a FlaK Armoured car onto it and did an overrun on the 527 in EE16 which CR’ed and pinned. I then move a conscript squad and my newly decorated conscript HS (Iron cross 1st class) onto the bridge EE17 ready for some up close and personal action.
In his defensive he Fated and ELR’ed my squad in B10 and this 658 routed up to the roof. During CC my D8 squad finished off his unit and my conscript squad and HS both CC’ed the pinned HS in EE16. The game ended there, the HS conscript had Oak Leaves with Crossed Swords added to his Iron cross 1st class and we drew up our lines.
CONCLUSION
We are all Generals after the battle…
Overall I was happy with the final result as he only took the territory that I was prepared to give him, he surprised me by not being too strong in the AFV department and I wonder what would have happened if a ‘Pike’ had been in his forces. The 88’s and 20L’s were worth their cost as were the dug-in tanks. If I played this again I would have less support for the warehouse area and have made more of a stand around the Marschall bridge area, a dug-in tank at EE11 would have diverted his attention from the bridges to the buildings in that area as he would try to clear them out. He actually had OBA (80mm) but it did no damage and even though he lucked out and had 3 black chit draws the 5 black 2 red chits means that even the nastiest OBA will be depleted quite quickly so I am not too bothered. I was lucky with my 20L AA placement both were near each other in the centre of the board but fortunately for me he attacked near where they were and in future I would make sure that they are 16 hexes apart so they can cover a wider area, if he had chosen to go for my dug-in Panthers in P7 and F13 I would not have been able to hit him. Do not worry about the Moabit prisoners as with an ELR of 2 they disrupt pretty easily and they do not count as strategic locations anyway. The final front lines are below:
The final tally for the each side was:
GERMAN LOSSES
346 Conscript CR
658 SS CR
658 SS ELR’ed and CR
2x LMG’s malf’ed out
88 FlaK malf’ed out
AA AC destroyed including crew
88 malfed yet to be rolled for repair
TOTAL: 9 VP’s
RUSSIAN LOSSES
SU-100 destroyed with crew
2x SU-76 destroyed with crew
T34/85 destroyed with crew
228 KIA
6 squad equivalents KIA
2-3 Moabit prisoner squads killed
2x LMG Malf’ed out
TOTAL 34 VP
Location Control
SS: 340
Russian: 281
SS CGS Victory