BERLIN: RED VENGEANCE
29th AM
Legion attacking as the Russians
Initial Thoughts
Well… the big question, how to get across those bridges? A quick look at the remnants of the SS forces shows that they have not got much against me, with somewhere between 15-26 CPP available to my opponent I can imagine that he is going to buying as many squads as possible. He has some variety to choose from and my guess is he will mix some quality with quantity. 447s or 436s can still lay down a murderous fire when you know exactly where the enemy has to travel (the Bridges!) though a Conscript 436 is worth as many CVP as an 838 Assault Engineer.
I would have chosen to attack in the Night game because even though the NVR is pretty awful (5) it would still have been a Night game with all the advantages it offers to the Attacker – the Night rules would have lessened his AFVs abilities and his defensive chances in general… But then I read CG7 which states that “Only the Germans may use Cloaking…” oh dear, that is a real bother… moving my units through a city at +1 MP per concealment terrain hex, and with no dummy cloaking counters AND on top of that the Defender still gets full Night benefits… no thanks!
Instead I have chosen an Idle chit and will try to blast my way across on the morning of the 29th.
I would like to note 2 important rules that have come to light whilst looking at the Errata for this CG.
– The errata for RePh 8.6052 states that all areas North of the Spree are linked due to a bridge that is behind play. Not also that while the Spree river is not playable terrain all other water obstacles are, thus they do not affect setup and control areas.
– This game was designed with the modifier for shooting along the line of the bridges to be +0, not -1… quite some difference when you have no option but to be channelled down bridges (fat load of good it did me)!
The Map
The Germans have placed foxholes to ensure their control over the Southern part of the playing area. They have a number of fortified locations (these we built for their 88L AA guns)
1S Foxholes: D7, L20, O20, S21, T18
Fortified Building locations: E8, N8
Wire: D7
Wrecks: E8 (bypass with E7), X6
I have cleared the Barricades.
The Marschall Bridge has been Partially Destroyed and is now only able to hold 20 ton
Weather
Moist conditions with No Wind. The sky is clear.
CVP Scores
SS: CVP gained: 34
Russian: CVP gained: 9
SS Remnants
Customs House Defence Force – West Bank
Centred on E8
Guns: 88L AA (in fortified location – E8)
SW: 2x LMG, PSK
Ldr: 8-1
MMC: 436, 348, 237, 228
1S Foxhole + Wire: D7
These forces are not isolated as they can trace a path to the South of the river that is either Friendly Controlled or Uncontrolled – bother…
Reichstag Defence Force – South Bank
Dug-in AFV: 2x PzKw VD (F13, P7), 2x PzKw IVH (N12, T12)
AFV: PSW 234/4, PSW 222(L)
Guns: 88L AA, 2x 20L FlaKvring AA, 81mm MTR
SW: 4x LMG, PSK, 2x FT, 2x DC
Ldr: 10-2 (wnd), 8-1, 7-0: 8-1AL
MMC: 6x 838 (e), 3x 658, 2x 436, 348, 237, 4x 228
There is the possibility of another 88L AA gun being available should he make the repair roll (33% chance)
Russian Plans
Russian OOB
B:RV allows for Leader and MMC to be Battle Hardened in the Refit Phase as per the KGP II rules. This I have done with quite some success, though I was less than successful in keeping my vital SW.
Force Remnants
AFV: 2x T-34/85, SU-100, 8-1AL
Guns: 2x 82mm Mtr
SW: 2x 50 Cal, 2x HMG, MMG, 2x LMG, 2x DC, FT
Ldr: 10-2, 9-2, 2x 8-1, 8-0, 6+1 [9-2 battle hardened from 9-1 in refit phase]
MMC: 2x 628, 3x 458, 7x 447, 527 [2x 458 battle hardened from 447 in refit phase]
328, 248, 327, 226
7x 228
Moabit: 7x 337
127
The Random Modifier gave me +2 CPP = 32 CPP for the Night game

The Russians declare an Idle game. Attack Chits Remaining: 7 (SS:3)
Obviously I wanted bang for buck… it was highly unlikely that JP would have taken the Attack option in the Night game so bought everything I could at Reserve costs. This has left me with plenty of men, so that I can afford to pay for the better toys prior to the mornings attack.
With the 16FPP I have purchased 3x Fortified locations (DD14,Y6, Z9 ) for 15CPP and a 1S foxhole (M3)
Just as an aside; I have had great luck with the leader attempts, the Russians need a 1-4 to get a leader… but I have so far rolled 3x 6+1’s – how cruel!
Russian AM Purchases
The Random Modifier gave me +2 CPP = 42 CPP for the Night game

The Russians declare an Attack. Attack Chits Remaining: 6 (SS:3)
Ah… at last the big toys come on.. most of this will be fire support for the attack on the Bridges… I shall hope to use it as much as possible to force the Germans to pull right back from locations that can interdict the bridges
Russian Plans
With plenty of toys and lots of men it is time to make the big push. I have bought the OBA to allow for SMOKE capability and Katyusha Rockets to soften him up… and if that is not enough then I have bought more Shturmoviks to take out any un-guarded armour!
In the West I shall insist that my men exert the maximum effort to reduce the Customs House position, to eliminate the AA gun here and to claim the North-Western Bank for the Motherland. I have the tools and the talent, if he is smart he will pull out, if not he will lose everyone here… I shall put a few more men on this side than he expects – he over-defended the Moltke Bridge in the initial CGS so I am sure he will pull some of those defenders away… if so then I will attack… and try to cross the bridge too.
The Eastern Bank is where I hope he will concentrate his forces, though this will not stop me edging my way across the bridges… I will attempt to move units across both Bridges, though I will probably do it with Assault Moves. I will use the entire game to place just one HS on the other side of each bridge if that is what it takes. The Katyusha Rockets are for some serious softening up and to that end I have pre-registered the T11 hex. The 70mm OBA is for SMOKE and have pre-registered W11 here – naturally this means an attack on the Kronprinzen Bridge is a priority.
If I cannot claim at least one of the bridges this CGS then I at least hope to make him bleed.
SS Setup
He has set up with a ring of units facing me… but the lack of concealment counters will harm him more than me… I am the first attacker, thus my guys would lose ? anyway. It appears that he has a few AFV in Rubble (K17, V17 – Both were later exposed as JgPz V). He has based the majority of his defence on the Kronprinzen and Marschall Bridges. It appears that all his AA guns are around the Reichstag, this allows me some freedom with my Air Support – if and when it comes.
It looks like he is using a lot of crew to man PSK – this is good, they only need a double break for the KIA and are worth 2CVP each!
The Game
West Bank – The Moltke Bridge Attack
My men waited at their jump-off points with a sense of anticipation, at last we would tie down the enemy and crush him (and his hated) 88L underfoot! At the whistle blow they jumped up and rushed forward – only to find the terrain was empty – the SS had pulled out and destroyed their own Gun in the process.
We quickly cleared up any lingering doubts about HIP locations and then settled down for an attack on the heavily guarded and fortified Moltke Bridge. The SS had not been idle as the bridge was now Barricaded (I9/J10) which slowed down my infantry and presented AFVs with a pretty big speed hump to cross. I started Assaulting infantry across the bridge in the face of heavy infantry and Panzer fire while also sending some men into the Spree to swim across to try to take the C15 buildings.
Meanwhile I had placed a T-70 and T-34/85 (8-1AL) here to put his defending infantry under fire, but the tanks had to move when a JgPz V rumbled forward. The T-70 was too slow and was taken out with the ferocious 88LL Gun. The T-34/85 took this opportunity to run away and did so successfully (to L3) where he started to gain acquisition on infantry again. But he had not run far enough and with a piece of LOS magic the JgPz V was able to thread a shot into the hull of the T-34/85 as he ‘hid’, the 8-1AL luckily escaped though.
With no AFV support now my men on the bridge were in a spot of bother. Like the majority of my men in this game and the last they could not pass simple NMCs with their 7ML and were being cut to pieces by flanking fire. There was the odd oasis of luck amongst the slaughter; the dug-in Panther VD (F13) had a MA malfunction that lasted most of the game, but it was unfortunately fixed later on. I tried a number of times to setup a human wave but it was almost impossible to get 6 MMC and a leader in 3 adjacent hexes in the face of such ferocious and accurate fire.
Finally it was time to pull back off of the bridge, since I had little chance of holding an effective perimeter but in doing so I lost so many MMC that I had little left to withdraw. At least I had saved my Engineers as they had not participated in the attack.
Of the 2 MMC that had set off on a gentle morning’s swim, one of them was gunned down and drowned, the other managed to make it to the opposite bank where he was protected by 2x 458 LMG, 8-1 who were ready to firelane down the E13-E16 road. This single 447 was able to take the C15 and A15 buildings, but it will be to no avail as these areas are SS entry zones. I shall be steam-rolled next turn if I don’t pull out.
My 3 Shturmoviks did quite a bit of damage in this sector when they destroyed a PSW 222(L) and the dug-in PzKw IVH (N12) but were unable to destroy the Panther D or JagdPanther.
I took a lot of losses in this sector for only pyrrhic victory, the Customs Warehouse was evacuated by the SS and the buildings I gained on the opposite bank are of no use to me. My losses were terrible and he lost no men – his AFV losses were quite high though.
EAST BANK – The Marschall Bridge Attack
Right from the outset it was obvious that he was trying to defend here in force. The masses of ? counters as well as non-? counters showed that he was very much planning on trying to hold me off here. Still, not everything went to plan for the SS and if I had put more men into the attack on this bridge then I might have been able to grab some useful territory, or at least ensured that his men here would not skulk as much as they did. From the first turn onwards he rarely exposed his men without ? for longer than a single turn. I just had so much FP over here that it was too difficult for them to be exposed for long.
The biggest problem I faced was the lack of set-up positions for the initial attack. He had claimed the last hex of the bridge in the 28PM game and this made the DD15-FF15 area no-man’s-land. I could not setup here like I wanted to, otherwise I would have started the game off with a Human Wave across the Bridge. By the time I had cleared enough of his defenders away his OBA had started to fall and I was no longer able to move out of the buildings where I was (generally) safe.
Mind you, even if I did get on to the bridge I still had to contend with a Barricade (EE16 – later eliminated by his own OBA when he killed my T-70) and some Wire (EE17). It was under this Wire that a 527 managed to spend the majority of the game; he had rushed onto the bridge in the initial turn and was the only unit to pass the MCs from the multiple attacks faced. he lasted here until the 6th turn and was only broken in the last fire phase of the game! If this guy had survived then I would have been in a prime position to start the next battle – alas.
His OBA caused me massive headaches. Apart from ensuring that my men kept their heads down it also destroyed a T-70 and immobilised one of my ‘invincible’ Pikes, something that did not make me very happy. To make matters even worse it also rubbled the fortified DD14 location and destroyed the beautiful 100L AT Gun in that hex – a gun that had him running scared! It would be safe to say that his OBA was about the most effective tool in his OOB in this game. He also dropped 2 missions on the bridge, not intentionally, but it did have the effect of lowering the Bridge down to a 10ton weight limit… now only T-70s and infantry can cross safely.
My most effective units in the game were over here too… I had my 10-2 manning a 50cal. and a MMG, (II13) and this guy went on ROF tear after tear, he literally ripped up anyone who lost ? in his LOS and often took a full squad down to a bloody KIA in consecutive ROF attacks. It was only after the OBA started to fall and his near-bridge men started to skulk that I stopped getting KIAs with this guy and there were turns where I didn’t even have a target, so fearsome was this threat!
In this sector I also sent some swimmers across, but of the 2 squads and 2 HS (conscript and moabit) only a single squad survived long enough to claim territory, and this was done from the mistaken belief that I would be able to open up the map edges to my reinforcements – alas. However, it did show how ‘bridge-centric’ the defence is. If I CAN break through on a bridge then I shall have little problem exploiting the gap – it is just the break-through part that is proving difficult!
My AFVs were generally useless with only the T-34/85 manned by the 9-2 able to generate any respect. It was not that the FP was lacking, it is just that the Russians use Red TH numbers and at these ranges (ie, 6+ hexes) it is mighty hard to score a hit, especially when the SS come to the front line with ? counters to cancel out Acquisitions. When the guns hit they hit hard, but inevitably his men were as lucky with their MCs as they were with their TH rolls.
EAST BANK – Kronprinzen Bridge Attack
This battle was the closest I came to securing territory and a Bridge. JP is still expecting me to lead with tanks and to that end he had placed a number of PSK units in the shellholes opposite the T9 building. They did not last too long due to the Katyusha Rocket Barrage I dropped on their location (error forced it to T14). This rocket barrage was enough to create a mass of new foxholes, but more importantly it broke the crew of a HIP 88L AA (S15) and forced the crew of the dug-in PzKw IVH (T12) to bail out due to an immobilisation result; they were gunned down in the street. I called my OBA down in the same area with SMOKE ammunition and started a screen that was eventually to last in one location or another until Turn 4.
I brought on my IS-3’s and one of them did not take too long to make the dug-in Panther at P7 burn! Unfortunately this was almost immediately followed by a malfunction of the gun due to the B11, and this remained until the end of the game where his MA was disabled due to a failed repair roll in the refit phase. In fact I had little luck at all with any Ordnance in this part of the battle. I had set up one of my 100L AT guns in the fortified Y6 location but when his Sniper went on a roll I had it’s crew KIA. All I had left to fire the gun was a HS and they immediately malf’ed the Gun due to their inexperienced use DRM. The Gun was Disabled not long afterwards – what a waste. I had put the SU-100 (AA7) here too, to force him to be careful in U10 and U9, but he rarely entered these hexes without concealment and I couldn’t hit even when he did! At a range > 6 the Russian AFVs are close to useless! One rare highlight for me was the pair of MTRs I had in T4 and U4. They were able to drop SMOKE on the Moltke Bridge and also held the units in U9 accountable. They even managed to fluke a Rubbling of U9 which buried an 838 in this hex.
As usual (especially with the Russians) it is the infantry that pay the greatest cost and on the Kronprinzen Bridge this was especially true. Despite the massive SMOKE screen I had laid down there just never seemed to be enough to make my troop investment here pay dividends. The crossfire from the Reichstag and the many Guns (AFV and otherwise) around it just cut into anyone moving across the Bridge. When the troops finally made it across they had to deal with the Engineer Platoon (+ a few others) in the dreaded U9 building. I lost nearly a dozen squads in just 2 turns after I had managed to force a crossing and enter the building. In a never ending cascade of German ‘3’s and ‘4’s my men just melted as they failed MC after MC. I just looked on in horror as the number dwindled and disappeared. I don’t doubt that if I had managed to pass a few morale checks (most of them were NMCs or 1MC) or if JP had managed to roll something above ‘5’ for his attack rolls then I would have been able to gain a foothold that could not be dislodged. However it was not to be.
By the time the game end came around I had a lone 458 on the bridge (even my 8ML troops couldn’t pass MCs. The fact that this guy could is enough to make him a Hero of the Soviet Union!). I had started the Battle with barely enough room to place my squads in preparation for the attack – at the end of the game I could have fit the forces remaining here in a single building!
Control Zones at CGS end
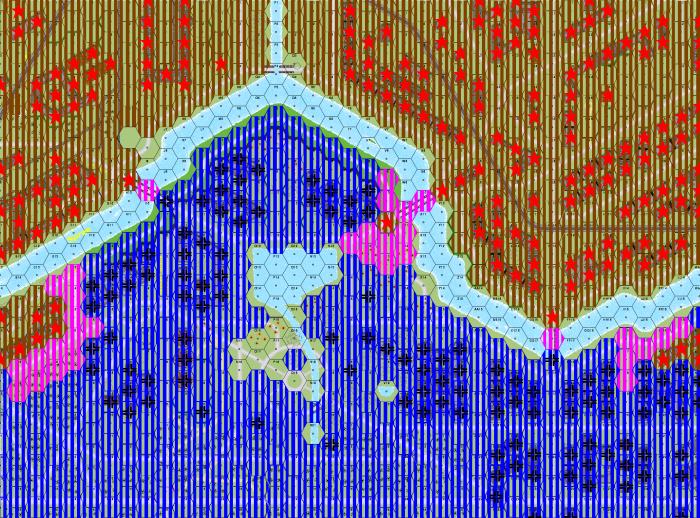
Brown – Russian
Blue – SS
Purple – No-Man’s Land
Victory Points Score
CVP
SS: CVP gained: 62 (96 total)
Russian: CVP gained: 57 (66 total)
LVP
SS: 427
Russian: 278 + 44
The SS have the most CVP+LVP
SS CGS VICTORY
AFTERMATH
Force Remnants – Russian
AFV: IS-3 ‘Pike’, T-34/85, SU-100, 9-2AL, 8-1AL
Guns: 2x 82mm Mtr
SW: 2x 50 Cal, 2x HMG, MMG, 9x LMG [2x LMG scrounged from wrecks]
50mm MTR, 2x DC, FT
Ldr: 10-2, 4x 8-1, 8-0, 7-0, 2x 6+1 [7-0 battle hardened from 6+1 in refit phase]
MMC: 2x 628, 7x 458, 6x 447, 3x 426
328
6x 228
Moabit: 2x 337
Isolated Units
447 – In C15 Control Zone
447 – In LL17 Control Zone
This was a massacre, by any standard. I lost almost the full complement of 2 buy phases in this 6 Turn GCS, though I was able to inflict similar losses on the SS too, loses that will be a lot harder for them to replace.
Force Remnants – SS
AFV: 2x JgPz V (1x MA Disabled), PSW 234/4 (MA Disabled)
Dug-in: PzKw VD (E13), PzKw IVH (T12, Abandoned)
Guns: 2x 20L FlaKvring AA, 88L AA
SW: 2x HMG, 2x MMG, 6x LMG
3x PSK, 2x DC, 2x FT
Ldr: 2x 9-1, 2x 8-1
MMC: 3x 838, 7x 658, 3x 436
237, 236
7x 228
The SS also took ferocious losses and their AFV/Gun OOB is not looking very positive. He has a single 88L remaining from the 4 he bought, 2 of those were lost through failed repair rolls, one was self-destroyed. Of his 3 remaining AFV, 2 of them (including an expensive JgPz V) have also got their MA Disabled. He has also lost an entire Engineer Platoon.
CONCLUSION
Wow… another meat-grinder. This game had 3 distinct phases:
– The first was my opening turn… the Katyusha’s came barrelling down and tore up the landscape, then my assorted Guns, AFVs and MG positions opened up. The SS lost twice as many CVP in the opening turn of this CGS as they did in the whole 28th PM game! JP will have to think carefully before he starts his men in such exposed positions next game.
– Slowly but surely though the game swung around to favour the SS. My men rushed the bridges and on the Kronprinzen Bridge I even made it into the adjacent building, but I just got massacred no matter what happened. Now the odds certainly favour the SS. They have 8ML troops in Stone buildings, I have 7ML troops rushing across bridges that are criss-crossed by flanking fire, but there was a massive element of luck involved, again my men just couldn’t pass simple MCs while JP couldn’t fail. Also his shots became more and more accurate at just the right moments (I am glad we are playing FTF or else I would be very suspicious – though he had to put up with a lot of bitching on my part!).
– Finally, just when it all seemed that I was being bled white I had 2 turns where I couldn’t miss and my shots just ripped him to pieces. My MG stacks would just keep firing and firing until squads were eliminated. In the 5th turn I gained a 50% of my total CVP for the entire game and turned a disaster around to what I would see as a draw slightly favouring the SS. My losses are replaceable, his are too but at much greater cost.
The most difficult thing for me is that after all those loses I still don’t have a clear control zone that can be reinforced on the South of the river. I got mighty close, but just wasn’t able to succeed. I was hoping that my swimming units’ sacrifices to claim map-edge hexes would have been able to open up those areas for reinforcement, but this was not to be. The rules (CG12) clearly state that hexrow A15-A24 (West Edge) are always open for German entry, thus there is no way that the Russians can enter here! On the other hand I hoped that the Eastern Edge would be available for reinforcement entry but on the basis of CG12 I would have to say that it is not possible to open the East Edge prior to the starting of the CG30 Balance Provision.
I have NEVER, in the 20 years I have been playing SL/ASL, seen so many weapon breakdowns. Every single Gun/MA that JP had broke down at least once, some twice. I had over half my Guns/MA suffer breakdowns too. This had a massive effect on the game and indeed the CG as we have spent a lot of CPP on weapons that have had limited use and short lifespans. In JPs case he had spent 10CPP for 2x 81mm MTR platoons, both of which ended up depleted and both of which caused little damage before being Disabled through malfunction.