BERLIN: RED VENGEANCE
29th AM
JP defending as the SS
The refit phase resulted in me fixing my broken 88L AA (never been so happy to see a ‘1’!!). I regained one of my DC’s and my wounded 10-2 didn’t die but didn’t heal either. I was able to battle harden only one MMC so I chose the 237 squad at the customs warehouse thus allowing it to re-combine with the other HS into a full 658 squad again – a little surprise for him. I chose to create a 7-0 leader instead of hardening one to be used for rally purposes as the 658’s 9 morale doesn’t really need a –1 leader anyway. My buys were all off-board waiting to enter and I have setup with only those troops left from game 1.
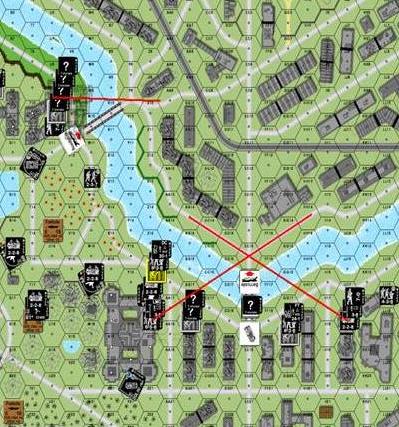
For the Night game I had planned to have LMG’s in Z18 and JJ18 to place fire lanes across the roads in front of the Marschall bridge – we would have had an NVR of 5 and a fire lane (marked in red on the map) still goes full distance at night so that would have been quite a cool way to persuade him to stay off that bridge. I also had a HIP 838 LMG to place residual fire on the entry to the Kronprinzen bridge and on the bridge itself, this guy was my last ditch desperation surprise. In V11 I have HIP 10-2 (wnd), 838, DC and FT – my best leader gets automatic freedom of movement so in my movement phase I will place the DC and pull back. Another HIP 838 DC and 8-1 are on the Moltke bridge at J10 – because they are engineers and on the bridge they get automatic freedom of movement so they can place the DC and pull back. At the Customs warehouse I have my dummy counters in the D8 foxhole and my newly made 658 squad HIP in C9.
However, when Legion and I met face to face to play the game he declared “Idle” thus ruining my plans for the Night game but giving me extra troops.
My total buys across both games were:
– I1 SS rifle squad full
– I1 SS rifle squad depleted
– I7 MG section full
– V5 JgPz Mk V full
– Med OBA 88mm
– G3 MTR section depleted
– 9 Fortification points
I setup with a similar defence as that shown above except I changed the LMG fire lanes for HMG and MMG fire lanes, I also shifted my troops from the warehouse across the bridge as I felt they might give him a surprise at Night but they would be sitting ducks in the day time. Naturally I did not try to have any Engineers wiring the bridges up with their DC’s. I knew that two turns worth of buys for Legion would result in some fun toys and so my defence was nearly all up front, I am gambling on him not being able to gain a foothold on one of the three bridges so I can pull some of those troops back as a reserve/counterattack force. I had to buy the concealment counters as they are not automatic and I got severely spanked in his first fire phase even with them!
THE GAME
TURN 1
Katy who?
Katyusha that’s who!! His 200mm Rockets were fortunately inaccurate and they dropped almost harmlessly in the field to the east of the Reichstag. By harmlessly I mean they only broke 2x 658, an 88 crew, and caused an immobilization TC on the dug-in PzKw IVH in T12, the crew failed and felt that dodging rockets out of the Panzer was a safer alternative than being a target, but they were very much mistaken and died immediately.
He started dropping smoke from his OBA around the exit to Kronprinzen bridge and in his Prep he scored a CH against an 838 and ldr at the exit to the Marschall Bridge they were K/ and were finished off when his first death star opened up (9-2 ldr and HMG + MMG in JJ13) with the 1st of many incredible ROF tears that those guys would get. In truth that death star nearly won the game as I was unable to mount an effective defence of the exit to Marschall Bridge. He had also exposed a pair of Mortars that dropped smoke on the Moltke bridge and a pair of 100mm AT guns that blasted anything in their LOS.
In his movement two Pikes entered and with their 24 AF and 122L gun they certainly looked scary, he start AM’ing towards the bridges and I laid down my fire lanes for a few results. In my Defensive Fire and I malf’ed my 1st MTR as well as the PzKw VD that was dug in at F13 but the 6,6’s didn’t end there as one of his 100mm gun crews rolled a boxcars on a MC and I scored some small measure of revenge.
It was clear in my turn that if I stood toe-to-toe with him I would die horribly and so I started a program of skulking from his tanks, guns and especially his death stars, for the next few turns I would only have a third of my force in the front line around the Marschall Bridge at any time as I was constantly pulling them back to gain concealment and then advancing them into a front line position in the next advance phase. During my Prep my other MTR ran out of smoke and I blew up a pesky T-70 on the Kronprinzen Bridge that had moved there in his turn, there was a roadblock there so it was only sent across to be killed and to make me expose an AT gun, fortunately for me it did not burn as Legion had hoped and so its +1 was negated by the bridge TEM anyway. I moved one of my JgPz V’s to cover the Moltke bridge as my PzKw VD had malf’ed its gun and the other was being acquired by his Pike. In his Defensive Fire he malf’ed a LMG and HMG from one death star and one of his 100mm AT guns also malf’ed.
TURN 2
You put the ‘i’ in KIA
One of my 658’s that broke in T1 fated to a HS and he repaired his HMG. He is still dropping SMOKE everywhere in front of the Kronprinzen Bridge but his inaccuracy is still allowing me to put one or two units where they are able to get a shot at him as he enters the bridge or while on it. His Pike destroyed the PzKw VD at P7 and also killed a crew with PSK in a shellhole near Kronprinzen Bridge but I also gained a sniper and it killed the 9-2 commanding a twin HMG death star in W5, the crew manning one of the guns died in sympathy from the LLMC.
He kept up the pressure and on the Moltke bridge and I KIA’ed a Moabit squad while my JgPz V toasted a T-70, he took the opportunity to move a T34/85 across my LOS to where it could safely fire at my squads on the headland between the two bridges and although my JGDPZ rotated and went Intensive he managed to escape. (For the moment).
With a K/3 result at Kronprinzen Bridge some more troops were dying and or breaking and a K/1 at Marschall also killed another HS. I finally got my OBA happening and it KIAed a squad that was trying to swim across the Spree, as well as causing a CP on a broken HS thus eliminating it. The OBA saved the day at the Marschall bridge as I was unable to put a man into the front line yet the OBA was sitting at the entrance to the bridge.
During my turn my already Fated 658 Fated again for a squad dead for no reason. His 100mm AT gun malf’ed out and he repaired his LMG. My fire was minimal as I am now just trying to avoid his Defensive Fire so that I only face one fire phase (his Prep) and am able to put some minor fire on the bridges. The one highlight was when my JgPz V toasted his T34/85 with some superb LOS sighting.
TURN 3
It’s quiet… too quiet…
I think for both of us Turn 3 was when our losses started to show, the turns started getting quicker and I was able to begin moving cautiously into the front lines without fear of dying instantly. It started with a good omen, one of his Pikes malf’ed and his smoke error-ed into the river, he also malf’ed a HMG and I was happy.
He has kept pushing men across the bridges and there were a few breaks and a KIA at the Moltke bridge.
In my turn my OBA reduced the Marschall bridge to a 15 ton weight limit and also killed a swimming squad. He scored revenge when a 1,1 TH shot against an 838 rolled another 1,1 for the IFT table reducing them to some form of sub-molecular particle. Given the intensity of the 1st two turns this turn was relatively quiet and I was able to catch up on my rallies and field a full army (minus the losses of course).
TURN 4
The turning point
If Turn 3 was when it started to quieten down then Turn 4 was when I started to gain an ascendancy of sorts. He was still dropping smoke at the Kronprinzen Bridge exit and was pushing men across the bridges but most were falling or failing. The Moltke bridge held firm with 3 of his squads failing MC’s. The Kronprinzen bridge had one squad across which AM’ed into U10 and a berserker on the bridge ready to charge only to promptly die from a 32FP PBF shot rolling a ‘4’. At the Marschall bridge he had a man across and under the wire at the end of the bridge, a T-70 that tried to cross got blown to pieces by my OBA and the bridge also took a hit which reduced it to 10 tons gross weight.
In his advance the U10 man went to U9 where he linked up with a squad that had swum across the river and then climbed the cliff while I had not been able to put a single bullet his way due to the pressing urgency of holding the bridges. In my turn my OBA CH’ed the Fortified building where his 100mm AT gun was (both are now out of the game) and I used the SMOKE at the Kronprinzen Bridge to mount a localised counter-attack against the 2 squads in U9, I took a lot of fire from across the river but eventually broke them where, surrounded and with their backs to a cliff, they were eliminated for FTR. His Sturmoviks had not been idle and were attacking anything that was outside the umbrella of the 20mm AA guns – my AA Armoured car falling to them.
TURN 5
Slaughter at the bridge…
The tide had turned and now I felt strong enough to stand toe to toe with his Russians although my losses had been heavy, he had not escaped the carnage either. His Prep was ineffective not only due to average die rolls but also due to lack of firepower. He finally pulled the 2nd red chit and his SMOKE was over. I felt that Legion had failed his PMC and probably his PELR as well. In the Rout phase of last turn he had put 4 broken squads and a leader in the centre of the Moltke Bridge and, although I advised him of this he didn’t care. (Failed PMC or desperate hope they will rally and take the bridge?)
Unfortunately for him none rallied, more unfortunately for him this was the turn where I decided to make him take some losses. (Legion and I generally play CG’s so we are both aware that a dead squad in one scenario has a long term affect on the game and is infinitely more preferable than half a dozen broken squads). I fired my newly repaired PzKw VD’s MA at the overstacked location, then my JgPz V followed by 3-4 other squads took shots and by the end of the carnage all 4 squads had died and the now wounded leader was all that was left.
He had sent some swimmers across the river and a couple managed to take a building each at the far end of the map. (C15 and MM17) I could not do anything about them but now that I had Moltke and Kronprinzen bridges safely in my hands it was time to clear the squad at the end of the Marschall bridge (EE17). I initially dashed a 658 unit across the road I16 – II20 with the idea of killing the squad in MM17 but his death star KIA’ed them as they dashed. I then pulled my big squads off the line to gain ? and allow me to move a concealed FT near his EE17 unit next turn, I left a couple of crews to keep him from moving and in Defensive Fire they also died from the death star; another incredible ROF tear from this group. His planes also destroyed my dug-in tank in N12.
TURN 6
Still got a big malf…
This turn was really a wind down turn, we both knew that any losses/gains would be permanent, one of my units Fated out in rally but I repaired the MA in my JgPz V which had earlier malf’ed. Unfortunately my other JgPz V and an 88L AA both malf’ed (2x 6,6’s in a row, same as last game with the same important units…)
I AM’ed a group of guys near the EE17 guy and they survived any defensive shots before being able to break the unit in EE17 thus giving me complete control of the bridges again but it was close and I am not sure what the results of him holding the buildings on the map edges will be.
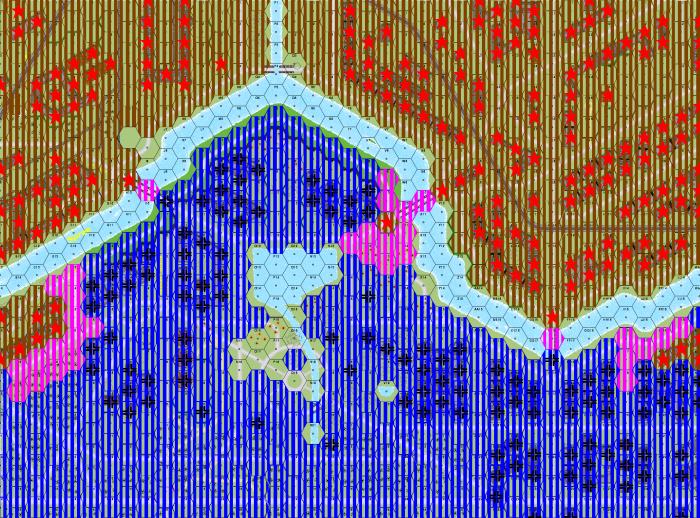
Brown – Russian
Blue – SS
Purple – No-Man’s Land
THE HONOUR BOARD
AFV: 2x JgPz V (1x MA Disabled), PSW 234/4 (MA Disabled)
Dug-in: PzKw VD (E13), PzKw IVH (T12, Abandoned))
Guns: 2x 20L FlaKvring AA, 88L AA
SW: 2x HMG, 2x MMG, 6x LMG
3x PSK, 2x DC, 2x FT
Ldr: 2x 9-1, 2x 8-1 [9-1 hardens to 9-2, 7-0 gained]
MMC: 3x 838, 7x 658, 3X 436 [2x 436 harden to 447]
237, 236
7x 228
FINAL THOUGHTS
Hindsight has 20/20 vision…
I had no choice but to setup in the front line even though I knew I would take a hit, this game revolves around keeping him off my side of the river and although he will probably do that in the 30AM turn. I am also preparing for that by setting up lots of Wire and Roadblocks with the intention of fighting it out a block away from the Reichstag so that hopefully I will be able to use all those wonderful Reichstag rules to my advantage in the last game when it becomes a German Alamo of sorts.
I took a lot of losses but so did he, last game CVP totals ended at Russian 9 vs 34 German and this game was: Russian 57 vs 62 German for a total of 66 to 96 – he has taken an ELR loss and I haven’t (yet). So far the game has been fun and a real blood fest for both sides with 3 small tactical battles going on rather than a large strategic battle like KGP.
Overall I think this has been one of the hardest fought CG games we have played and I recommend it to anyone, this has been the first time I have played a HOB product and I have really enjoyed the prospect of being on the defensive for the whole game rather than the MMP CG’s where the game “swings” half way through and you end up owning the same territory you started with. [Legion: Man, 100% agree. This is an incredible CG thus far]