BERLIN: RED VENGEANCE
29th Night
Legion attacking as the Russians
Initial Thoughts
I entered this game with some high hopes and also a little concern. My position in the Kronprinzen Bridge area was tenuous, an effective SS attack on just 2 hexes would have been enough to snuff it out. On the other hand I felt that entering from the South-Eastern side of the board was going to give me the doorway I needed to the Reichstag.
As it turned out I was dead-wrong about the extended entry area, that doesn’t even exist as a possibility until the 30th PM game – I discovered this about 10min before I set up my initial forces! On the other hand a fortuitous roll for the dual attacks (the SS also attacked; as I feared they would) left me with the first move and him lumped with the initial set-up; instead of being in trouble in the Kronprinzen area I was in a great position!
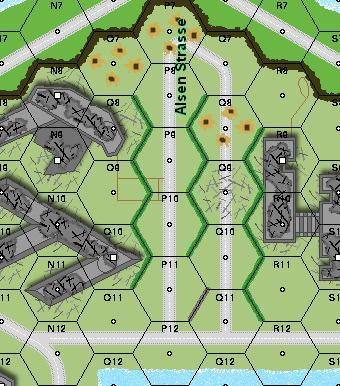
The Map
1S Foxholes: E7, L20, M3, O20, S21, T18, U14, V13
Shellholes: T13, T14, T15, U15, V14
Rubbled Stone Locations: U9 (building), DD14
Fortified Building locations: E8, N8, Y6, Z9 (0/1), CC13
Wire: D7, K10, EE18, EE20, EE22, EE24
Barricade: I9/J9 (breached)
BO Wrecks: F8, H15, N15, O15, AA18, EE18, II16
Wreck: W10 (T-70), EE16 (T-70)
The Marschall Bridge has been Partially Destroyed and is now only able to hold 10 ton
Weather
Moist conditions with No Wind. There is Scattered Cloud with a Full Moon (NVR 5).
CVP Scores
SS: CVP gained: 141 [SS ELR is -1]
Russian: CVP gained: 106 [Russian ELR is -2]
SS Remnants
AFV: JgPz V (MA Disabled)
Guns: 2x 20L FlaKvring AA, 88L AA
SW: 4x HMG, 4x MMG, 6x LMG
2x PSK, 50mm LT Mtr, 2x DC, 2x FT, FT(r)
Ldr: 9-2, 9-1, 2x 8-1 (1x wnd), 7-0
MMC: 2x 838, 6x 658, 3x 447, 436
237
3x 228
Isolated Units
Middle Set-up Zone (N8)
228, PSK Holding me out of the open area in front of the Reichstag – he will die for this
The SS have managed to preserve their core of 658s at the expense of their Engineers and lesser units. This is a very good tactic I feel; the 658s are going to be very valuable for the defence of the Reichstag later on when their superiority in FP, range and morale will be most useful. Again the crews have paid a high price, they have been used for everything and have suffered accordingly… he is actually in danger of not having enough to man all his Guns
Russian OOB
While I have a massive advantage in terms of men, SW and Guns but I am really losing infantry at too great a rate. I have only a tenuous hold on the Kronprinzen Bridge.
I bought a mass of infantry to take territory from him around the Marschall bridge, this was because we both misread the rules stating WHEN the South-East edge of the board opens up. I thought it was as soon as I lost 3 CGS in a row. He thought it was for 30th AM. It is actually after 30th AM game. So I shall have to lose the 30th AM game to have access to the map-edge here for the 30th PM game. At least I have so very many infantry forces still left to buy.
Force Remnants
AFV: T-34/85, 2x GAZ Truck, 8-1AL (Stun +1)
Guns: 2x 152mm ART, 76L ART, 82mm Mtr
SW: 4x 50 Cal, 4x HMG, 3x MMG, 9x LMG, 50mm MTR, DC, PSK(g)
Ldr: 10-2, 5x 8-1, 7-0 [7-0 battle hardened from 6+1 in refit phase]
MMC: 628, 6x 458, 3x 527, 2x 426
237
13x 228
Isolated Units
Middle Set-up Zone (N8)
458 A useful position to start in behind his lines
South-West Set-up Zone (MM17)
447 I shall run towards the Marschall bridge to try to claim some territory under MG nest cover
Kronprinzen Fields Set-up Zone (W15)
426 I will take my time expanding my control zones with this guy
The Random Modifier gave me +2 CPP = 37 CPP

I bought up big on the infantry, obviously I have lost a lot of men and need to replace those losses, but I needed quite a few men to push through the area that I thought was open to me on the Eastern side of the board. The Moabits are there because I shall need some HIP-busters to move ahead of the rest of my units and they shall make up the bulk of any Human Waves I attempt.
Russian Plans
I am definitely going to attack in this night game; my ELR is already ravaged so there is nothing to be afraid of there and the Night, despite not having any great advantage due to the lack of cloaking counters, will cancel out his superiority in unit FP. There will be enough Star Shell activity to make sure he will fall prey to my MG groups as he attempts to either reinforce or withdraw units. I am also aware of the possibility of using sewer movement, something I have avoided up till now to prevent showing my hand too early.
I am concerned too that he might attempt to counter-attack against the controlled locations at the Kronprinzen Bridge. If he sets up adjacent with too many forces then I might be in terrible trouble. I shall just have to chance it, though this was the only concern I had about taking the night attack option.
Russians declare an attack. SS declare an attack. Attack Chits Remaining: 4 (SS:2)
The simultaneous Attack is rolled for, the SS set-up first, the Russians move first – this is a disaster for the SS
SS Setup
The SS setup strongly around the Moltke Bridge, they did not surround me at the Kronprinzen as I thought they would. The people he has at the Kronprinzen look like they are safe, but they are actually well within the range and LOS of 4 MG stacks – they will not last long! I also have an avenue to get around his defenders, he did not setup on the level 1 or 2 of the O8 and O10 buildings as expected.
He again has his MG nest in the Reichstag, they are complementing the already fearsome defence at the Moltke. He has another MG stack in the upper floor of the Opera house (I18) but otherwise the Reichstag looks under-defended again, I might be able to sneak a unit or two in there.
The Marschall Bridge is heavily defended, at least with enough to expose my men to fire as soon as they enter the mass of Wire at the bridge’s end. My guess is that he will bring his reinforcements in here.
JP has obviously paid out a few points for concealment counters as most of his units are covered.
The Game
West Bank – The Moltke Bridge Attack
My attack here was really only intended to be diversionary. I was going to take an opportunity if it was presented to me, but it wasn’t. The Wire at the end of the Bridge as well as the appearance of the new Roadblock on the Bridge itself has forced me to not make any moves against the opposite side of the bank here at all. I did bring on a stack of moabit here, and I kept some platoons back to give the appearance of a late attack, but his forces congregated in this area to keep me from breaking out from the Kronprinzen area into the Moltke area, so I left the reinforcements safe in the Customs house.
His defences were quite strong here, though their fire was mostly directed at the Kronprinzen area initially; towards the end of the game they just kept skulking or ducking back and forth as they were broken by my continuously effective deathstars. He could not leave anyone here if I had illumination, it was close to certain death to leave anyone exposed.
One of the King Tigers he bought (a foolish buy I feel) camped where he could see the T-34/85 who was immobilised when he tried to crash through the Moltke Bridge Barricade – the result of this doesn’t need much imagination. I tried to Deliberately Immobilise the PzKw VIB, but he got me first. This King Tiger was also able to break most of the men I had on the bridge. At least I was able to get a non-Moabit man onto the bridge at the games end, which has allowed me to dismantle the Barricade in time for the next game and have a setup zone here. I was unable to get to the Roadblock though – or that annoying Wire!
I don’t like the King Tiger buy – though, lets face it, if you can buy one, who is going to say no? I think that its FP is something that you can get for less with expenditure on either OBA or on the even more effective HW Ptn. The MG platoon gives you better firepower with a higher ROF capability as well as other advantages like Fire Lane options, etc.
EAST BANK – The Marschall Bridge Attack
Again here I just focussed on an opportunistic attack. I brought on more moabits to give the impression of a minor attack, and also because the 3x 337s will bolster the force I already have here (426, 2x 527, 7-0) enough to allow for a Human Wave. His forces seem comparatively light in this area, he is obviously not too concerned about a major thrust through this Bridge, but he is also most likely to bring his forces on here, the travel time from board edge to battle is very short even in the dark.
As expected the reinforcements almost exclusively enter here, he even parks a King Tiger with LOS right down the bridge itself.
My man in the 2 controlled buildings against the South East board edge makes a run for the Marschall bridge, he manages to get close enough (GG18) to cause JP to drop concealment from his forces and thus allow my Human Wave. Unfortunately the Human Wave suffers from the usual result when I take a risk. Every time in this CG when I have done the hard work to set up a decent attack there comes a time when there is just 1 or 2 shots standing between me and my goal… and EVERYTIME this has come JP has rolled nothing higher than 4 for his attack rolls! This time was no exception and as is also the case when these crucial choke-points occur I cannot pass the MCs, no matter how puny they might be. *sigh* In the end I manage to get the a 447 and 527 into CC (the rest of the Human Wave were either decimated, CRed, ELRed or wounded), then luck works for me and I end up killing 2.5 MMC for the loss of just the 447! In the process I capture a 50mm Lt. Mtr and LMG – both of which he will be wanting back so I shall destroy them – and I also secure control of the Spree-side of the GG18/EE19 row-houses.
In the end I am reasonably happy with the result here. My losses were on a par with his, which is a victory to me (I don’t count moabits, they are relatively irrelevant due to their inability to claim territory), and I gained some very valuable terrain at the top of the Marschall bridge. If he wants to root me out of these locations then he is going to have to start off in positions that I have LOS to – and I am not sure that is going to be worth it for him. I have created an extensive ring of no-mans land which will stop any further annoying placements of Wire or Roadblocks. Even more importantly I have also cracked a hole in his defences over here. He is faced with yet another possible front which I can force with a mass of men.
EAST BANK – Kronprinzen Bridges
Again this is where then real battle happened, though by this CG’s standards even this was relatively quiet. I did my usual trick of placing MG ‘deathstars’ in the upper floor of the handy AA10-CC13 Rowhouse building; from here I can range across almost the entire map; I don’t doubt that he will be buying his maximum OBA (128mm) for the next game so I might not have quite the same option with their placement in the 30th AM game. From these positions the MG stacks again almost completely set the course of the game, it was only when I had a relatively poor run of ROF in the 3rd-5th turns that I stopped causing death on a major scale, though by this time the SS had taken to skulking which also limited my target opportunities.
His most powerful forces were 658s and assorted other units in Himmler’s House (L15), they were there to cut down units crossing the open terrain to the Reichstag and to also stop me attacking towards the Moltke Bridge. He also had a very effective stack of his own in the Kroll Opera house (I18(1)) that was able to cover all my South-of-the-Spree units.
The first turn brought the almost immediate elimination of the Engineers who had been tasked with stopping me from expanding the ‘bridgehead’ – the leader and 838 stacked with him (S10) were cut to pieces by very accurate MG fire over the ruins of the U9 building. This left a single 338 holding me out of this ‘block’ of buildings (R10). Under the cover of the night and using the messy LOS of the buildings as cover I was able to CC him to death, though not without loss to myself – it was worth it. His Engineer Platoons (2x 10CPP) have virtually ceased to exist and in the process I have captured a FT, 2x DC and repossessed my own FT – I am going to be in the habit of destroying SW’s of his that I capture as I cannot afford to allow him to get them back.
This was unfortunately about as far as I got with this assault. I managed to get men across the open Alsen Strasse into the fortified N8 during a time of poor Star Shell coverage but once inside the building my FT rolled high at a crucial time, his defending units did not have any trouble passing the MC. I had opportunities but the dice gods were not on my side and in the end I have only managed to maintain my hold on the Fortified N8 (0) as well as N8(1); this will give me a good jump off point for an attack against Moltke since there is not a single place he can set up in this building that I shall not have LOS to with my dreaded MG stacks!
On the Reichstag side of things I was again able to take advantage of a lack of coverage, though this time the cause was some poor starshell placements. His starshells were, for the most part, incredibly unlucky; he could barely get them even when leaders were rolling and when they did come they were often in poor locations. I had excellent luck with the starshells with only the last turn’s working against me. With nothing illuminating them a Guards Rifle Platoon was able to make it all the way to the Reichstag, one of the squads was broken when illuminated in the next turn, the other 2 made it inside and all of a sudden the battle got very interesting!
His defence of the Reichstag consisted of 2x 447, a 228 (who escaped with his life when JP exposed a 20L AA to my deathstars) and the 9-2, 658 who were manning the Reichstag MG nest. One of the 447s was eliminated when my 152mm ART CH him; I was even able to Rubble part of the building though this brought up the question of Fire in the Reichstag which I look at further in Conclusions. The other 447 was broken by a SAN result. The 9-2, 228 and 658 made one of the most dangerous moves in the whole CG and it nearly cost the German’s dearly. In a bold move this stack attacked one of the Russian 458s who had entered the Reichstag, easily accounting for it in CC, in the process of this though they had to move into the LOS of my massed deathstars who made no mistake, even with their Fanaticism bonus the 9-2 and 658 were broken while the 228 was eliminated. My remaining 458 chased them down and CRed the 658 and wounded the 9-2; this 9-2 was subsequently eliminated in the Refit Phas. My own man was killed when JP rushed a leader and 2x 658s into the ‘Stag though a tunnel of darkness between starshells and then fired into the Melee, breaking with no further loss to himself.
I actually paid a big price thanks to the only piece of bad luck I suffered with starshells in the entire game. This ‘tunnel’ of darkness that allowed his units to enter the Reichstag might have made a major difference; if I had been able to stop them (not too hard considering the FP I was able to summon against the almost open street) that would have left just a single broken 447 in the Reichstag to stop my remaining 458 from actually winning the whole CG there and then! I don’t think this was likely, but it was possible – C’est La Vie.
The other ‘starshell’ moment in this turn was another ‘dark tunnel’ that allowed JP to rush some units who had been patiently waiting for a long time into the U12 foxhole, thereby severely changing the nature of the control zones in front of the Reichstag – I was no longer going to be able to set up 1-4 Human Waves just 2 hexes away from the Reichstag itself, I now have a lot more open ground to cover before I waltz in and take the prize. This really was a great move by JP, hats off to him for that.
In the end though I was exceptionally happy with the battle here. I caused more casualties than I took and killed his best leader. I was able to claim a pyrrhic victory by taking some Reichstag hexes and though I shall lose them immediately it does make JP think a bit (better get him some aspirin). I was able to consolidate my position on the South of the Spree and now have a number of options for my next attacks.
Control Zones at CGS end
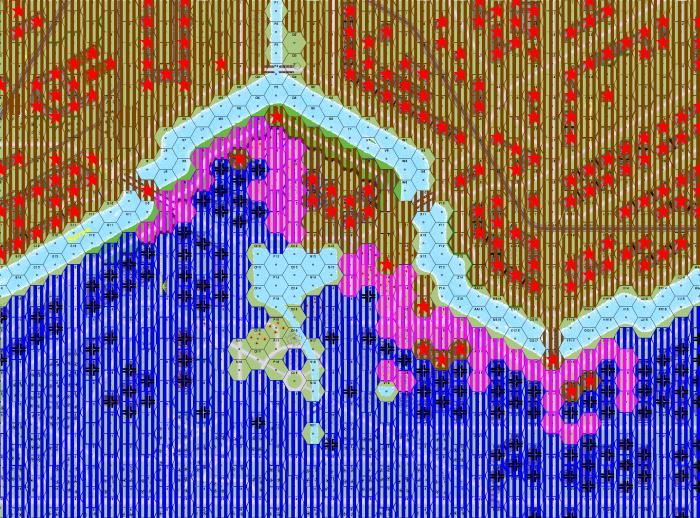
Brown – Russian
Blue – SS
Purple – No-Man’s Land
Victory Points Score
CVP
SS: CVP gained: 21 (162 total)
Russian: CVP gained: 25 (131 total)
LVP
SS: 383 + 2
Russian: 290+ 32
The SS have the most LVP
SS CGS VICTORY
AFTERMATH
There is no doubt about it, this was a great game for the Russians. Not only did we nip a potentially catastrophic counter-attack in the bud (thanks to a single pre-game dr for who sets up first – this will ultimately be the most important dr of the game I feel) but we also suffered negligible losses.
The Russians lost 21 CVP but 13 of those consisted of a T34/85, a +1 stun 8-1 AL, a MTR, and 2 officers. This meant that I ended up losing only about 8 CVP through non-Moabit MMC losses; an amazing result for the poor Russians. The SS on the other hand lost a 9-2, an 8-1 and 2x 228 crews (meaning he MUST buy a HW Section next game to be able to man his AA Guns) but all the rest were valuable MMC.
While I made only minor gains in territory, I did consolidate my position around the Kronprinzen Bridge, he will no longer be able to dislodge me from here and will face the might of my many deathstars as I set up in and around the places he will have to be if he wants to try and stop me waltzing into the Moltke Bridge area. The built up area to the East of the Moltke is as good as mine, unless he wants to fight to the death for each hex, a battle that will ultimately favour me. Again he can stop me crossing the Moltke Strasse to Himmler’s House but only if he exposes his men to my MG stacks.
His final move of a unit to claim the U13 foxhole was a brilliant move taken in a “corridor of darkness” (his words). If not for that move I would have been able to set up right on the door-step of the Reichstag – and the Reichstag was nearly lost this game. I feel that the SS are going to be faced with the prospect of starting to take attacks against the Reichstag very seriously. I am across to the South of the Spree now, so defending the remaining bridges can only be of use if it aids the defence of the Reichstag itself. He might have to bite the bullet and give up territory for a more focussed defence.
Force Remnants – Russian
AFV: GAZ Truck
Guns: 2x 152mm ART, 76L ART
SW: 4x 50 Cal, 4x HMG, 2x MMG, 9x LMG
50mm MTR, DC, PSK(g)
Ldr: 10-2, 5x 8-1, 7-0 [7-0 battle hardened from 6+1 in refit phase]
MMC: 628, 6x 458, 3x 527, 2x 426
237
13x 228
Non-Isolated Setup Zones
Marschall Bridge Set-up Zone (FF18)
527, LMG This Hero of the Soviet Union managed to kill 5CVP of SS units, and secure vital territory.
EE18: IAG-6 – immobilised
Middle Set-up Zone (N8 (0/1))
458, 447, 328, 2x LMG, FT A very important position, with a strong force
Kronprinzen Fields Set-up Zone (X15)
458 I am not sure how long this guy is going to last out here!
Force Remnants – SS
AFV: 2x PzKw VIB, JgPz V (MA Disabled), 9-1AL
Guns: 2x 20L FlaKvring AA, 88L AA
SW: 3x HMG, 4x MMG, 6x LMG, 2x PSK, 50mm Lt. Mtr., FT
Ldr: 9-1, 2x 8-1, 7-0
MMC: 9x 658, 3x 447
338, 348, 236
2x 228
I am happy with the state of his left-overs. Again he has managed to preserve his core of 658’s. Although he did lose a few he is gaining them from 447’s Battle Hardening in the Refit Phase. More importantly he only has a single HS and a single FT left from 2 Engineer Platoons; they were a major cause of grief to me as they were often used in the front-lines to deadly effect. I have also managed to capture all of his DCs and a FT – better they should be in my hands than his! His number of forces remains at 12 Squads, but he has lost leaders.
CONCLUSION
Well, without a doubt one of the biggest talking points for me is the possibility of a Reichstag Fire burning the thing down… what happens then? Are the Russians supposed to not fire with heavy weapons just in case a fire starts? There is a clear rule (BRV 5.0) stating that Kindling is NA, but is that enough to stop a German Engineer testing his FT at the back of the Reichstag? There is no rule stating that the Reichstag is immune to Blaze or the Rubbling that Blaze creates. We discussed this and have settled on a House Rule for this eventuality: the Reichstag will be gutted and will lose it’s +1LV bonus (due to the holes created by the fire) but otherwise it will not be changed… we might have to discuss this further though.
A BIG mistake for me was not reading BRV CG12 and thus making an error with my entry zone options. Luckily this was pointed out prior to the games start otherwise I would have made some serious errors. Oh, dear! when will I ever learn to read and re-read the important rules until they are crystal clear.
As I mentioned in the previous AARs I feel that the Kronprinzen Bridge is an essential target for the Russians. It is the only bridge that doesn’t have buildings on both sides of its exit, and thus it allows the Russians to have clear LOS to any defenders (except for T11 pre-rubbling) – sure the SS do, but they would anyway, so no biggie! It is a hard area for the Germans to reinforce and an easy area to force a break-out from. Now that I have this bridge it is going to be impossible for his to take it back.. the battle has completely changed in character, which leads to my next point.
Getting across the River changes the game.
Oh, yes… ain’t this the word…
I am across, it is a fact and one that means he is no longer able to focus his meagre force’s massive FP on just a few hexes. I have the option of a risky rush towards the Reichstag, or the slow but unstoppable push towards the Moltke Bridge defence. While having to try to contain my Kronprinzen breakout he has to still have enough troops to protect the Marschall and Moltke Bridges as well as ensuring that he does not leave the open ground in front of the Reichstag undefended (again!) – and all this with less men and weapons than me and in the face of the increasing number of deathstars. I am of the opinion that the SS should trade territory for secure perimeters, but that is really just a stab in the dark – I shall be interested to see what JP does to deal with the possibility of 1 or 2 Schwerepunkts against over-stretched defenders