BERLIN: RED VENGEANCE
30th PM
Legion attacking as the Russians
Initial Thoughts
This game is going to decide the CG, there is no doubt about it – both JP and I know this and are as ready as we are ever going to be. The timing could not have been better either – I am to return to Sydney for work in just a week, so this was going to be the last chance we had for FTF play.
There is no doubt that JP has played this CG exceptionally well, he picked up the vital points of the game much quicker than I did, though a fixed defence is certainly his speciality. However, I think I just might have him here… I know JP enough to bet that he will attempt to hold Himmler’s House, and every unit he puts here is one less unit in the vitally important Marschall Suburbs area, the area now open to me through CG12 and the area into which I shall pour everything I have. If I can make it as far as the Reichstag then this CG is mine.
The Map
1S Foxhole: D7, E7, L20, M3, O20, S21, T18, U14, V13
2S Foxhole: L13
Breach: AA11/BB12, BB12/13, BB13/CC13
Shellholes: T13-15, U15, V14, Y20, AA17, AA20
Rubbled Stone Locations: U9 (building), Y17 (1/2), Z18 (2), Z20 (all), BB18-20 (building), CC13 (0/1), DD14 (all)
Fortified Building locations: E8, N8, Y6, Z9 (0/1), CC13
Wire: D7, K10, EE18, EE20-22, EE24
Roadblock: J10/K10
BO Wrecks: F8, H15, I9, K10, L16, M11, N15, O15, W10, AA17, AA18, EE16, EE18, II16
The Marschall Bridge has been Partially Destroyed and is now only able to hold 10 ton
Abandoned Weapons
N13: LMG(r)
U12: PSK
Weather
Moderate conditions with No Wind. The sky is Clear.
CVP Scores
SS: CVP gained: 180 total [SS ELR is -2]
Russian: CVP gained: 172 total [Russian ELR is -2]
SS Remnants
AFV: PzKw VI B
Guns: 20L FlaKvring AA, 2x 75 LeFK ART, 88L AA
SW: 5x HMG, 5x MMG, 6x LMG, 2x PSK, 2x 50mm MTR, FT
Ldr: 9-2, 3x 8-1, 7-0, 2x 7+1 (Gestapo)
MMC: 9x 658, 6x 447, 436
338, 237
5x 228
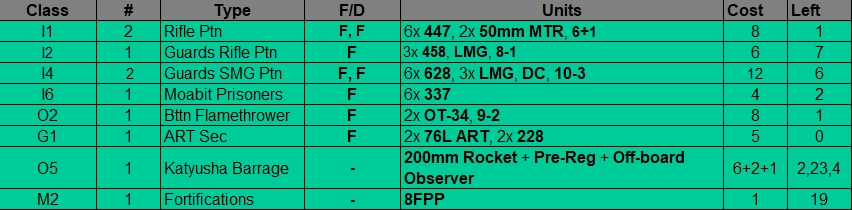
Russian OOB
I started the Refit Phase off with a bit of a gambit that I cannot imagine JP will pick up on. I Shifted (BRV & P8.613) a whole bunch of units across the 1 road no-man’s land hex separating the Himmler’s House setup zone from the main setup zone. It actually took me a number of rolls, the dice I was using didn’t seem to want to roll below 10 or 11 for some reason, but in the end I was able to send a Guards SMG platoon and some MGs across to bolster this position.
Force Remnants – Russian
Guns: 152mm ART, 76L ART
SW: 4x 50 Cal, 6x HMG, 5x MMG, 11x LMG
50mm MTR, 4x DC, FT, PSK(g)
Ldr: 2x 10⁻², 2x 9-2, 2x 9-1, 3x 8-1 [9-1 battle hardened from 8-1 in Refit Phase]
MMC: 2x 628(e), 4x 628, 5x 458, 3x 527
226
11x 228, 5x 127
OBA: 80mm + Pre-reg hex (Plentiful Ammunition)
Separate Set-up Zones
Reichstag Ufer (MM15)
527, LMG This guy will be safe due to the entry of Russian units from this side of board
Marschall Set-up Zone (HH18 (1)) – Isolated
458, LMG This unit is in danger of being overrun, or eliminated by his own Katyusha… Oh well…
Schliefer Ufer Set-up Zone (I13, G14))
458, LMG The very position of this unit will mean that JP will have to cover the buildings on the West of the board thus pulling units way from the East.
Himmler’s House Set-up Zone (K11)
628(e), 328, 337, 127, FT, DC, LMG These units have to survive long enough to hold his forces in this area.
The Random Modifier gave me +3 CPP = 53 CPP
I have obviously gone for infantry so that I can attack in the East with as much punch as possible. Again I have done exceptionally well with my Depletion rolls, but that is easy to achieve when I have the -2 drm due to losing continuously. Again, if JP had managed to lose that last game to me then I would have had a much better chance of having some units depleted. In this game the Russians also have a -2 due to the Historical Date Chart (giving a -4 DRM total), this is the reason why I did very few depletable buys last game.
I have the Katyusha Rockets to open the door and have gone with the OT-34s to support the infantry as they attempt to take out the SS defenders.
Russian Plans
I will use the Katyusha Rocket Barrage to smash the defenders in the Marschall Bridge area and then pour on with all my strength, there is no point being subtle. My Moabits will rush likely HIP positions and attempt to strip concealment, the infantry will follow up. My OT-34s will be used to Flame enemy positions and even to get behind them if possible – I shall have to watch out for PF and PSK attacks, JP doesn’t fear the Backblast penalties and killing a Flame-tank will be worth the loss – my 76L ART guns will be positioned to cover the possible approaches of his King Tiger, with luck I might be able to score a side shot!
In the Moltke Bridge area I have a large enough force in Himmler’s House to at least hold him off – I assume he will reinforce here to a degree, but probably not enough to force the issue. I need to hold units here for as long as possible. I am willing to use almost my entire on-board force of infantry to attack here to keep his mind occupied on this areas defence.
The Kronprinzen Bridge will not be undefended to just make sure he doesn’t get cute and attempt to take back territory, they will also be there to take any opportunity presented and make a run for the Reichstag. I shall keep a few units back just in case i get a chance to re-claim the U14 foxhole and thus set him up for a Human Wave in the next game.
There is no denying it, this is the most essential date of the whole CG and I think it is going to be the decider, should the Russians be able to get close enough to attack the Reichstag then there is little he is going to be able to do over the next games except use an up-front defence. My Guns and MGs can fire INTO the Reichstag through the rubbles hexes, he is going to be in a terrible state in no time if I can get close enough to only have to move across the street to the Prize! If I get bled-white this game for little territorial gain then I am going to be in all sorts of trouble.
Attack Chits
Russians declare an attack. SS declare an Attack. Attack Chits Remaining: 2 (SS:1)
The Simultaneous Attack roll forces the Russians to Set-up first.
*GAK* In a surprise move the Germans take an attack Chit and the subsequent dr makes the Russians set up first! This was not in the plan.
Frankly I am surprised at this move, if I setup first then he moves first, I am sure he will bring on all his reinforcement in the first turn which will give him little room for manoeuvre after he sees my attack’s intentions. Not only that but I am given the opportunity to put my Katyusha Pre-Reg closer to the entry zone (HH21 instead of the planned EE21) as there is no longer a fear of having to move through the Rockets if it drifts poorly – with luck I might hit any reinforcements too!
The big negative is that I will be in danger of taking hits on my vital MG stacks – he gets to set up his MG units in such a way that will maximise his chance of neutralising these stacks. I am forced to spend my 8FPP on covering the important stacks with ? counters instead of fortifying a building.
In the end my setup plans are little changed. I have concealed MG stacks with -2 leaders all over the perimeter – there are only a few locations in the Reichstag that they cannot hit. I set up almost the entirety of my infantry in the O10 building ready to rush from the Diplomatic Quarter across Moltke Strasse into Himmler’s House at the first opportunity; this is another benefit of setting up first, all JP will see is 4 massive stacks in the O10 building across the road from Himmler’s House – this is sure to influence his setup and take more vital units away from the Marschall Suburbs. I have ‘dummy MG stacks’ (actually 628s and 458s with LMGs) on the North Bank across from the Kronprinzen Bridge and in the S10 building… these guys are actually the ‘exploitation’ force for the rush to take the U14 foxhole and any other locations I can grab near the Reichstag.
SS Setup
With a massive sigh of relief I can see that JP has made his only serious mistake of this whole CG. He HAS setup with strength to protect Himmler’s House (looks like 3 MG stacks – Kroll Opera House, Himmler’s House and in G16, and about 3 MMC with SW) – he is really going to regret that when he sees what I am bringing in on the South-East edge!
He has his usual stacks in the Reichstag. They will pose problems for my crossing of Moltke Strasse.
The vitally important defence of the Marschall Suburbs is left to quite a sizable force, but for some reason he has not only set them up in reasonably predictable locations (the FF2-II22 block and the FF19-HH19 block) but he has also bunched them up pretty nicely too! It looks like there is almost no chance my Katyushas are going to miss! If it drifts into the FF2-II22 block then it might be game over there and then! JP has stated time and time again that the defence of this attack (it has been expected all CG) will not be too hard.
Hmm… I disagree, lets test it shall we?
The Game
The Himmler’s House (L15) Attack
I was in trouble from the outset here. His forces in Himmler’s house were far stronger than mine, there was not a single hex I could move to that was going to be safe from his leader-directed MGs and to attempt to claim the L13 foxhole was suicide thanks to the 838 FT, 658 MMG here. He had bought more Engineers and paid the extra point to set them up on board. In the first turn I was methodically cut to pieces and it all looked over…
Then 2 major events happened:
– A 10-2 directed pair of 50 Cal’s (O10) were able to not only score a good hit on his Reichstag MG nest (X20(2)) but he actually failed the MCs and the whole stack was taken out of business!
– The ROF allowed me to take another shot – but I pointed out the SAN result that he had not noticed – that SAN result was hot and ended up dropping right on top of the same 50Cal stack! The 10-2 was eliminated with triples for the RS roll and both my crew broke in the +2LLMC! *Arrgg*
Still, the road was now open and I quickly moved units across, in the end I was able to get 6 MMC (628s with LMGs, DCs and a FT) into the building where the battle raged without quarter until the end of the game. JPs famous luck (and my famous bad luck) coupled with excellent defensive work turned my men into mincemeat with little loss – BUT – my unit’s sacrifice held up nearly half of his available FP and stopped it from having any effect on the Marschall Bridge battle. I took terrible losses (12 CPP worth) and achieved no territorial gain, but for once it was worth it.
As a sign of the ferocity of the battle, location K11(0) had a veritable armoury of unpossessed weapons left by their deceased owners (3x LMG(r), LMG(g), 2x DC, FT).
My luck with MCs was starting to get to me right from the outset, 7ML MCs were being failed almost every time I rolled for one… a 7ML MC (or 8ML 1MC) should succeed about 50% of the time… but within no time at all I was quoting my new motto “A 50% chance equals a 100% fail”.
Kronprinzen and Reichstag Area
My plan was to use the 80mm OBA left over from last game to neutralises his Kroll Opera House position… but it AGAIN red-chitted, this time after a single mission! I was really worried about this, the Kroll is a great place for a MG nest and he had also fortified part of the building (I19(0/1)) so he could put an INF gun on the level 1 location. It was luck that saved me. As he was having a nice little ROF spree he asked me “should I take another shot?” and then proceeded to roll boxcars! The RS here malf’ed both HMG – and they then were both disabled when he attempted to repair them.
Apart from that very little happened here. It was mainly a waiting game for me as I used ART and MG stacks with no targets to Area Fire possible defensive positions in the Rubble to the west of the Reichstag. When this was shown to be clear I was able to finally rush 3 units across the shellhole scarred ground to grab the U14 foxhole (by now the Kroll MGs were toast) – it took some time and 2 of the 3 MMC were pretty beat up, but I got it! With this foxhole’s capture I had a clear control zone extending from the Kronprinzen Bridge to the no-man’s land created in front of the Reichstag – an ideal starting point for a Human Wave as the opening Gambit of the next game. I was quite happy to Assault Move my way to either the U16 Rubble locations or the S16 building and thus further open my control zones, but this was stopped by the events around the Marschall Bridge…
SOUTH-EAST BANK – The Marschall Suburbs Attack
No player of this CG can be unaware of the possibility of the South East corner of the map opening up. JP and I had discussed it, he felt confident he could hold it, I felt confident he could not. I had 53CPP to spend this game and EVERY SINGLE ONE of those CPP was spend on attacking this part of the map.
My first act was to bring down the Katyusha. I had enough to actually buy an Off-Board observer for this attack. I desperately needed it to be effective when I needed it, I could not afford the risk of having it Red-chit thanks to unknown Enemy Units adjacent to the AR. Luckily it came down on the first attempt and in a great location (FF19).
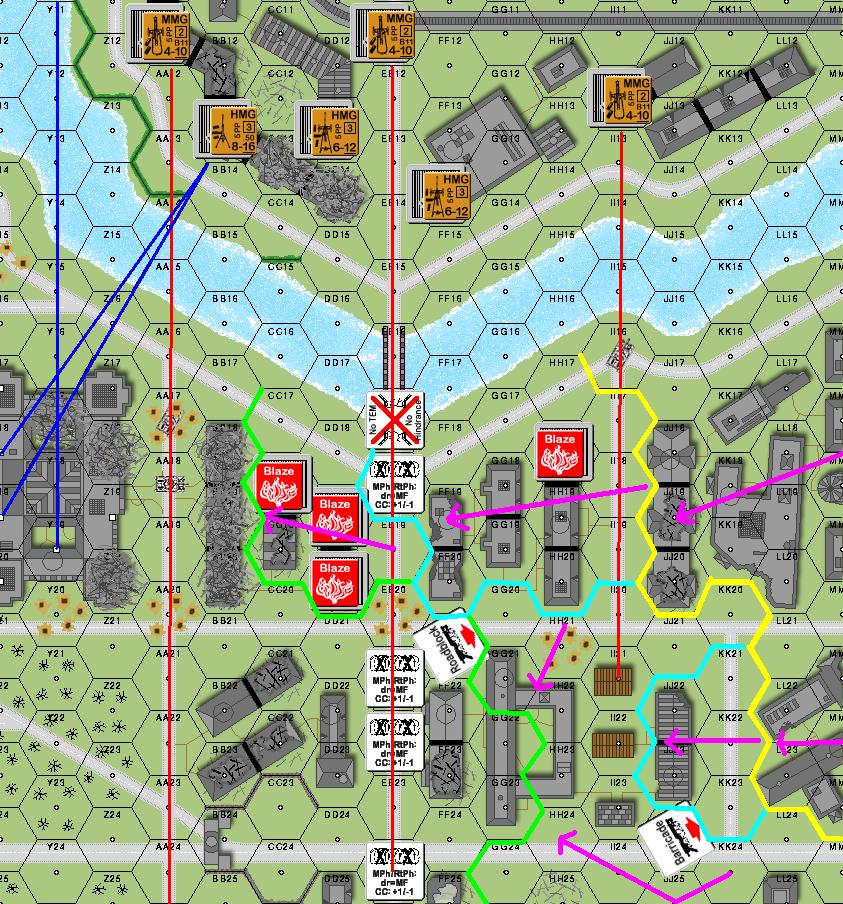
This map shows not only the devastation wrought by the Katyusha, but also the Fire Lanes I had setup to either stop his men routing or reinforcing.
It also shows the fire possibilities I had INTO the Reichstag through the Rubbled hexes.
RED – MMGs lanes to stop Rout/Reinforcement
BLUE – HMG/ 50Cal to reduce enemy positions
PURPLE – Axis of attack
Yellow – 1st Turn Phase Line
Light Blue – 2nd Turn Phase Line
Green – 3rd Turn Phase Line
The Katyusha came down and broke all the units in the FF19-HH19 Block. In the BB19-DDF19 Block the Katyusha not only started a Flame (DD19(1)) but it also broke a HIP MMG unit in this hex. The Marschall Bridge was destroyed and it managed to eliminate a Wire hex in EE20. The vast majority of the SS were in the FF22-JJ22 block, and they were virtually untouched by the Katyusha, but with all visible resistance in the FF19-HH19 Block eliminated I was going to be able to out-flank them with no trouble.
My men swarmed on-board, searching as they came on (looking for HIPs). I was able to take it to the 1st Phase line without loss as JP was keeping his ? counters and not moving.
In the next turn the HH18 Flame turned to a Blaze but my men who were here managed to rally and they followed his Broken units to a cellar where his 2 MMC and 7-0 were eliminated for no loss. In fact this was to be the story of the battle in this entire area… his men would break and by sheer numbers alone I was able to always have a unit move adjacent to them to force the DM or eliminate for failure to Rout. Any SS in cellars were eliminated in no time, and the units could not afford to cross the streets as I had them covered with my MMGs.
I was still faced with the mass of units in the FF22-JJ22 Block, so I brought on my happy tanks – the OT-34s – you should have seen the look on JPs face! Unfortunately the look on my face when the first FT fired and rolled an ’11’ was pretty much the same – I was FURIOUS. However that and the Moabit debacle were about the only low points I suffered in this battle. The other FT tank was able to poke a hole in his defence (JJ23) and again the men just poured through. By the end of the second turn I had a solid foothold in his strongest defensive area with my still-Concealed units… and 25% of his force here was eliminated or Broken.
I used my Moabit’s to clear the way, they are expendable and limited with their FP, but they cannot be ignored when it comes to CC and they do cause DM like any other unit moving adjacent. Unfortunately my Moabits suffered the “50% chance = 100% fail” rule of MCs… not a single one of them suffered worse then a NMC, not a single one of them passed! The streets were littered with disrupted 337s!
Finally in the third turn I was able to take advantage of the rapidly crumbling SS line to rush into the BB19-DD19 Block, it was obvious to us both that the SS were in terrible trouble. There were very few units in the Reichstag and what few were there found themselves running the gauntlet of fire as my MG stacks could fire INTO the Reichstag from their various Level 1 locations… there was not a single non-cellar location in the Reichstag that I could not hit. His broken units in the BB19-DD19 Block were again eliminated for failure to Rout so there was nothing that could stop me here. On the other side of the Suburbs my OT-34s had edged past his poorly placed Barricade along with a few men, his units in the FF22-JJ22 Block were in great danger of encirclement and yet again the broken units were hounded and DMed at every opportunity.
I have made a lot of mention in almost all my games of JPs legendary luck (at least against me). He is truly blessed by the dice gods, but they let him down 4 times in this game and in this area, and each of those 4 times was in relation to the dreaded OT-34s.
1 – JP had an excellent HIP 236 PSK in the JJ18(1), a hex he assures me I did not Search. When one of my OT-34s passed underneath (II17) he fired, and missed. Naturally JP ate the Backblast resulting in this unit’s Breaking and subsequent elimination.
2 – With things getting desperate a 658 MMC (II22) rolled for PF to shoot at the same OT-34… and rolled a ‘6’! The Pin result ended this units chance of rolling for another PF and even of saving himself and he died in a hail of gunfire.
3 – Both my OT-34s had moved to HH24 and II24. They were ready to breakout and cause devastation on a major scale, only a single conscript HS was left unbroken in HH23, he rolled for the PF and got it, my heart sank… but with a 6 or less needed for the hit he missed! Pure joy on my behalf!
4 – Things were desperate, JP knew it, there was one unit on the battlefield who could change the tide, the sole remaining King Tiger, in which (I like to believe) the SS commander was himself fighting from. This PzKw VIB moved initially to DD21 where he hoped to stop my infantry swarming across N. Wilhelm Strasse, but the restrictive terrain which had so aided him when defending the Bridges now came to my aid and I was able to make it across anyway (despite bumping into a 658 with tragic results). When he saw my OT-34s switch their axis of attack from Sommer Strasse (the MM20-AA20 road) to Unter Den Linden (the MM24-AA24 road) he knew he was in trouble. The FT AFV could easily account for the King Tiger, even if they didn’t get behind for the rear shot with their 76Ls. In an act of desperation the panzer attempted to enter the DD22 building but the Bog roll had a 6 on the cdr… as the King Tiger plummeted to its doom in the cellar the SS bowed to the inevitable and surrendered there and then!
RUSSIAN CG VICTORY
CONCLUSION
I have said it before, I will say it again. This CG is easily one of the best I have played… it is wonderfully balanced and has a great combination of infantry and toys to allow any commander to put their own personal mark on their forces. The battles were tough, nasty and very tight. 5 times I came close to taking bridges with just a single DR deciding the result – 4 times JP won those DR battles; the one time I had the luck flow my way I took the Bridge and held it, totally changing the nature of the game. Anyway I shall write more on this sort of stuff in the B:RV Strategy Guide (published in LFT #13).
This game was won because JP misunderstood the strength with which the Russians could attack through the South-Eastern side of the board. He was again caught with his pants down as far as the Katyusha were concerned. They blasted a hole in his defences that he could not patch; the infantry, supported admirably by the OT-34’s, did the rest in amazing time. As much as I would have preferred to fight it through to the bitter end I do not doubt the clarity of JPs decision; with at least 2 turns to go I had already made it to the rubble (BB18-BB20) across from the Reichstag. He had lost 2 of his 3 AFV (1 StuG remained but could not move for fear of my 76L ART guns) and his units were breaking with no chance to rally as my men rushed in to eliminate them for failure to rout.
It took me a lot longer to get the gist of the tactical requirements of this CG, but when I did I knew that this one game was vital – this is the only time in this CG where I have been ahead of JP tactically. Were we play this CG again the whole CG will be used to either prepare for this turns events or to prevent its occurrence!