ASL B – THE TRACTOR WORKS
Legion as the Germans
Rami as the Russians.
ROAR (G:R – 22:47) – 4th January, 2009
Played with 78 VASL Logfiles (Jan 2009 – Apr 2009)
I really have no idea how many times I have played this scenario. I do know it would have been the 2nd scenario I ever played when my father bought me Squad Leader as a kid… I have played it many times since and against a number of opponents. Some people see these scenarios as scripted and dull… however while there might be an element of ‘script’ to this excellent scenario it is certain NOT dull.. Look at the OoB for instance! Anyway, I present for your enjoyment ASL B – The Tractor Works.
Initial Thoughts
This is a real meat-grinder of a scenario.
The Russians have a huge numerical superiority as well as a nice bonus of being Fanatic whilst in the 1X3 building (which is also a Factory). They start with a Rifle Company in the Factory itself and also have a hefty counter-attack in the form of 2 Companies of SMG Squads coming in from the Western edge of the battlefield. Against this the Germans have a fairly scripted setup of a strong Rifle Company and a Battalion of their fearsome Assault Engineers. Thus, numerically and perhaps tactically (in terms of location) the Russians have a strong advantage.
Even in terms of available SW there is a slight pro-Russian bias – Germans: 4x LMG, 3x MMG, HMG, 2x FT, 4x DC against the Russians: 7x LMG, 2x MMG, HMG. Obviously the FT are a fearsome weapon, but with their X10 they are not guaranteed to have a long life-span, though if they DO survive a few shots they can turn the whole game on it’s head. The DC are also extremely useful weapons, especially as the lack of space in the factory forces the Russians to stack up, however someone has to survive long enough to plant the things, or they have to be Thrown… However, unless the poor-quality Russian MGs (B11 LMG and MMG) break down then the advantage again lies with the Russians. The German Assault Engineers have a ‘3’ for the Smoke Grenade availability, but I think this is over-rated when you still have to AM out into an open street against Adjacent stacks of Russians… personally I prefer to smash the enemy first.
One area where the Germans are definitely stronger is thanks to their 6 leaders having a total mod of -9! This is including the awesome Capt. Meunch (10-3). The Russians have just 4 SL with a total mod of -3, though I assume that one of the 8-0 will be made a 9-0 Commissar.
The terrain is a mish-mash of Stone Buildings and streets ripe for Firelanes… and indeed that is one of the true flavours of the ASL A-C scenarios is they way that they truly give life to the Firelane rules.
Personally I am very confident about the result of this battle. I have played it many times before and although Rami is learning fast he is still coming to terms with the rules and tactics of true-ASL as opposed to the SK stuff… so I think that this, along with the obvious pro-Russian bias, will make for a tight and nasty struggle!
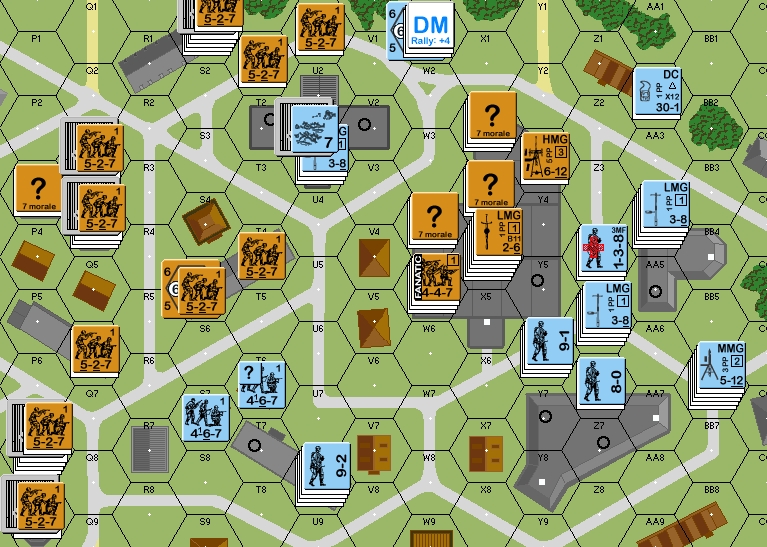
Russian Setup
In the Factory the Russians have the usual sky-high stacks. These will be a combination of Dummy stacks and ‘real’ units. As the Russian I feel there are only 3 ways to do this:
1 – All up Front – The Russian tries to stop the Germans in the streets. This means that as much FP is up against the street as possible and relies on the +3 TEM and Concealment to survive the initial Prep Fire Phase. This is really and all-or-nothing setup. The first turn can often decide the game. Personally I NEVER do this, I think the odds favour the Germans, a quick look at the potential FG options and the FT + leadership available to the Germans means any slugging match is likely to end up in their favour.
2 – All Back – This defence assumes that the Germans are going to crack the front line and thus forces them to enter the Factory before they have to deal with the Russian Defence. The Factory TEM is only +1 here and the Germans are moving and adjacent to the majority of the FP, this can be a real bloodbath and it is my preferred defence. Units that are not used to hold the Germans back are used to support the attack against the spread-out Germans defending against the SMG Counter-attack.
3 – Combo – Realising that the Germans have LOS to most of the locations in the Factory dummies and real units are spread through the front lines with the main Russian Defensive stacks buried deep within the Factory. This is a great second option, especially when you and your opponent have played this scenario against each other before. It does rely on some luck and also weakens the strength of the back line.
Until the game starts it is impossible to see what Rami has done.
German Setup
I am focussed on smashing into the Factory ASAP and to that end I have placed the majority of my forces with the idea of hitting the Y5 corner with as much Firepower as possible right from the outset. I don’t need to kill his men, Broken units Routing back will add to the chaos in the Russian defence, but I do need to make sure he cannot hurt me too much as I move up to the Factory walls. I need to swamp his defences and push them back whilst also keeping as many of his counter-attack forces away from the factory as possible. I need undisputed control of at least 6 of the Factory buildings by games end, unless I get in there and make him have to attack me then I am not going to successfully achieve that.
The Game
TURN 1
The Germans hit it off with a flurry of FT and MG fire. The FT have ammo but are ineffective so the main damage is done with Squad FP and the kill stacks (with help from a 1,1 DR). With much of his initial line of defence smashed (he is doing the Combo Defence) I then try to rush some Assault Engineer HS in to plant DC but they suffer from the SFF shots despite being quite safe from the First Fire – in this initial attack alone I lose a 338 and a 247 as his men FPF and blast away at mine in the open street; Rami does 4 FPF shots through all this and managed to Eliminate his own LMG and break a 447 at the cost of saving himself from 2 DC and killing 2x German HS. I would put this this Movement Phase down as a draw; I have entered the street Adjacent to the Factory and he has a solitary GO unit able to face me down. My losses were not crippling, but he did not lose many men either. Unfortunately the Defensive Fire Phase scores some useful hits by the Russians from their SMG Squads as they manage to reveal a dummy stack and break a 467 in the North. In Advancing Fire the luck again swings back to the Germans with an 838 managing to wipe out a 447 (thanks to it being already broken and rolling 6,6) and also breaking the last Good Order unit facing down my corner of the Factory. My men re-arrange themselves to get as much Fire Power as possible onto the Factory walls and then await the ferocious Russian attack.
Poor Rami is taken in by my Dummies and uses 14x 527 to remove 2x Dummy stacks! This is a huge win for me as it slows down half the counter-attack by what is essentially a whole turn. He jumps off with a few probes and Dashes on the Northern Flank; he rushes forwards and flows around my obstacles as well as through the places where I have only Dummy Defenders. I do a bit of damage to him both in and outside of the Factory but the first SAN result of the game also kills a German 8-1 to the West of the factory. Shots are traded back and forth and the Germans declare No Quarter to eliminate a 527 who had no option but to Surrender. Rami bravely advances a HMG 447 up to the walls of the Factory in an attempt to slow me down next turn.
German Losses: 8-1, 247, 338 (5x Dummy Stacks)
Russian Losses: 237, 3x 447, 527, LMG

The Germans have forced the corner of the Factory and are poised to enter its walls.
The Russian counter-attack is starting to gain traction in the North but caught in the Centre and South
TURN 2
The German attack on the Factory goes ahead full-steam with the Russian defenders being pressed on all sides. My men who assault the factory take some breaks but all-in-all it is a pretty fair battle with the Germans swarming the central kill-stack. Rami is lucky to gain 2x ROF with his LMG but in the end it really only came down to my men passing a single MC, which they finally did. For Advancing Fire I was able to smash the central kill stack but when I attempted to finish them off his 9-2 leader came up with a Berserk result which really messed me up! His men all Rallied in the hex and went Berserk with the exception of a Pinned 447 LMG. I had to neutralise this nasty mess so I jumped into CC with an 838 and a 248; there was no Ambush but I managed to kill the 9-2 and a 447 and in return I only lost a 338.
His turn starts with a phenomenal shot to ELR break a 467 LMG covering his entry route to the Factory then he also gets a SAN result to Wound an 8-0 in the Factory Assault force. His men edge forward as fast as they can but my mutually supporting defence limits them to an attack to the North-West of the Factory. They still manage to close up to the Northern MG stack and my shots are generally unable to do much damage to him. In Defensive Fire I open up with the intention of hurting him in the factory, but again the dice do not want to help me out. I am able to win the day only through sheer weight of FP and this leaves the Factory all but emptied of Russian units; only the CC units remain and one of those 447 I am able to eliminate without loss when he rolls a ’10’ on the 4:1 against a HS in this hex!
German Losses: 838
Russian Losses: 227, 2x 237, 6x 447, 9-2
TURN 3
Poor Rami starts the new Turn off terribly with his Commissar reducing all of the 4 units in his stack and one of those is also CRed from a 6,6! My Prep Fire is able to break units but generally I leave a single unit in each stack I hit and that is enough for him to damage me thanks to some poor luck with my MCs. The flip-side of this is while he was mopping up the 467s standing between his SMG attack and the Factory I had moved to a position where I was able to clean up in and around the Factory itself. The Advancing Fire Phase was moderately effective with a few Russian CRs and I also kill another HS in the Factory Melee. By the end of the turn my hold on the Factory is near absolute and he is not spread out enough to make a good enough push back (barring some wild luck!). The Russians declare No Quarter to kill a 467. Once I can re-position the FT units to back up the main line of defence then I should be able to form an impenetrable wall in the Factory itself.
The Commissar keeps shooting his own men and causes 3x 226 to be KIA. Rami also makes a crucial, but common, mistake with new players in a city fight… he attacks piece-meal before the main body of his force has arrived. This essentially means that he attacks me with equal numbers of troops, but at about a 1:3 disadvantage in terms of TEM and FP. The result is even more carnage when we get to Defensive Fire Phase as my units with their high leadership rip into the attackers. He has more losses from FTR thanks to the tight nature of the terrain and the CC is resolved without a single loss to me giving me complete control of the Factory.
German Losses: 237, 2x 467
Russian Losses: 226, 227, 2x 237, 5x 527
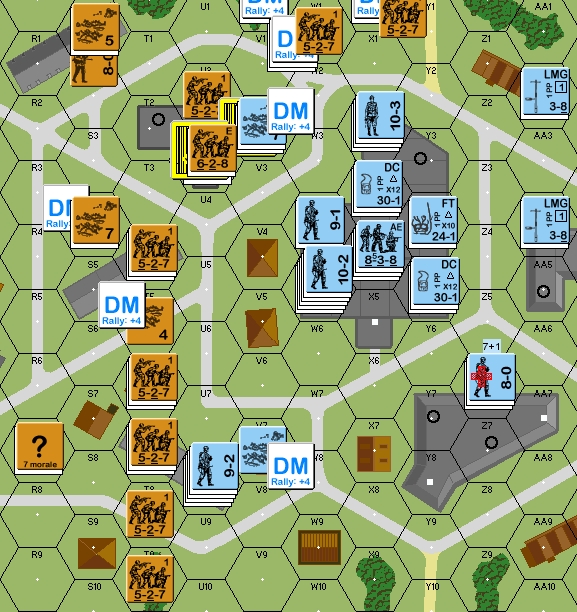
The German hold on the Factory is absolute.
TURN 4-5
Both the Germans and the Russians trade shots but with very little effect… the shots go wild and the MCs are mostly passed with ease. The Germans take the time to consolidate their Factory defence with multiple layers of FP whilst the Russians attempt to build up local superiority and mop up broken stragglers (3 CVP worth this turn alone). With the completion of the CC in the Factory the Germans can set up a defence in depth based around the FT, MG units, Assault Engineers and the killer leaders. I also have a single MG stack remaining from my blocking force of 467s and am able to pull them back to force Rami to send his men into the multi-layered kill zone that defends the factory itself.
The Russians attempt to pull back in the hope of forming a final thrust towards the Factory but all this does is ensure that the few defenders I have left have multiple shots at the vulnerable units. Rami is haemorrhaging men right now and I know he is only playing on because he is a gutsy opponent who is determined to try and at least form a Human Wave for a last-ditch attack.
Unfortunately Turn 5 starts off with the Russian Commissar again hurting his own men as the Conscripts are not buying his patriotic diatribe; as is so often the case when one side is down the dice come in to add insult to injury. My Prep Fire cuts apart any defenders worth shooting at and totally smash any real chance of forming a concerted attack. I am able to use the holes in his attacking line to pull all my men into the factory, he now has no option but to form up in my LOS and/or run through open ground Adjacent to my FG and multiple leaders! We drop the game here.
German Losses: 237, 467
Russian Losses: 2x 226, 4x 227, 237
The Russians Surrender
German Victory
Conclusion
Let there be no mistakes, this was always going to be a tough battle for the Russian commander. I believe that one of the biggest barometers of a players capabilities is in city fights and this game was no exception. A lesser player would have thrown in the towel long before Turn 5 but Rami is tough and tenacious and that is one of the many reasons why I enjoy playing him. I hope he was able to gain enough experience from this battle to ensure our playing of ASLC – The Streets of Stalingrad will be a much different outcome. Having said this, my years of play of both scenarios and CGs (RB, ABTF, B:RV and even KGP and PB) gave me a definitive edge in this city fight as it allowed me to strike hard at the weakest points and then position myself against the counter-attack. I was also less taken in by the Dummy Stacks.
The Russian MUST get his SMG men to the Factory ASAP. The Factory defenders can last for a few turns with a bit of luck or against an indecisive German attacker, but they cannot hold off the Assault Engineers by themselves. Once the Germans gain a foothold in the Factory then it is potentially over very quickly indeed. This scenario, for those of you who remember the old Squad Leader chapter-by-chapter and scenario-by-scenario teaching method, was used to illustrate FT, DC and HW use… so make sure these 3 tools are foremost in your mind. The Russian should be thinking Human Waves right from the outset! Sure you will lose men, but they will also quickly open the door to the Factory and you might be able to stop the Germans from making too much head-way.
On the other hand the Germans have some fearsome tools in their arsenal. The DCs can wipe out entire stacks with impunity, especially when Factory TEM is generally only +1 – but you have to suck up the shots and MCs to plant… or you have to Throw the DC and take the lucky-dip result. FTs are also an enormously powerful weapon, but they are also notoriously Breakdown prone and tend to attract enemy fire like bees to honey.
So… stack your FT away from your MG kill stacks, give the Russians something to think about… “Do I attack the 20FP stack with the -3 leader or the HS with the FT?”. Give your DC to HS and make them run into the factory first; the Russian will have to fire at these units like the very potent threats that they are which will potentially save the follow up MMC attacks from the full weight of the Russian Defence.
I really like this scenario and it is one that I have played many times over the years on a whim, sure there is some scripting involved, but understand what that script is for and you will be able to score a great game!