ASL6 – Red Packets
Legion playing as the Russians
Rami playing as the Germans.
ROAR (R:G – 78:62) – 28th August, 2009
Played with 33 VASL Logfiles (Aug – Jun, 2009)
It is time for Rami to learn ASL style AFV battles and this is the perfect scenario to start with. It has a bit of all types of AFV movement and is an interesting situation as well. I have played it at least 7 times before but mostly as the Germans. Even though the Russians have a slight advantage as per the ROAR rating I chose to play the Russians this time to give Rami a chance to use the AFV and HT of the Germans since this is the most likely combination found in scenarios. Also I did not want him to bother learning how to play motorcycles since they are so rarely encountered in ASL play.
Initial Thoughts
There is no setup for this game as both the Germans and the Russians are ‘meeting’ on the field. Since the Germans go first with only half MP this does allow them to set the scene for the battle. Having played this many times before I know that it is the initial disposition of the German’s forces which has a huge effect on the remainder of the battle.
Looking at the sides we see that there is a numerical superiority in favour of the Russians… they also benefit from superior Gun size. Although the Armour strength is tilted towards the Germans is is of negligible effect considering the 10TK of the Russian 45L guns. Manoeuvrability favours the Germans; the Russians 5x BA-6 are Radioless which means that they must use Platoon Movement in 2 Platoons. Also the most excellent 75L Gun mounted on theIAG-10-AA cannot B(F)F so it is a defensive AFV being used in an offensive manner. Lastly the Russians have a Platoon of infantry up against a single German HS (with an ATR which can be taken from the SPW 251/10); the Germans do, however, have a 9-1 Armour Leader.
So, where does this all leave us?
The map is split by a Shallow Stream with 2 Stone Bridges.
The Russians have a numerical and firepower superiority with their AFV and infantry.
The Germans get to choose the battle terrain and have superior freedom of movement coupled with an AL but they are in defence.
As always with Eastern Front armour battles, the Germans MUST keep the Russians in a killing zone of 6+ hexes away… this in and of itself can be enough to negate the usual numerical advantage. Since victory can be achieved by the Russian either killing all the German AFV (the most common Victory for the Soviets) or by getting 18VP off of the Western edge of the map the Germans are forced to cover the whole of the map’s width in a congested village.
When I play the Germans I usually use the Pz III and the PSW 231 to support each other and cover the Northern-most bridge, their guns can also cover the movements up to and onto the Southern Bridge in R7. The placement of these AFV must be carefully thought out to ensure that they can get maximum LOS and TEM (use the hedges?). I use the HT and the HS to cover the bypass route that must be taken if the Southern Bridge is crossed and the village entered. Also, since the Russian Infantry is on Motorcycles it can be useful to have the 3ROF 37L gun, the AA MG of the HT (NA through VCA) and the HS with ATR/LMG covering this little route.
As the Russians I look for holes and exploit them! The best tactic they can have is to either push for the VP exit and force the Germans to react to it, or, pick off the Panzers 1-by-1 and surround the remains.
Good luck, this is a fun scenario and a great one to use for teaching tactics to an AFV n00b. For this reason I gave Rami the Germans in this game so that he would have a chance to experience some of the many options available (AFV, AC and HT and no need to learn Motorcycle rules). I also made it clear that we were playing for educational experiences… despite it’s simplicity and the fact that it is heavily reliant on useful DRs in the it is also very unforgiving with poor tactics.
The Game
TURN 1
Rami has made a mistake right from the start of this game and is likely to not be able to recover from it. He has placed his AC right out in the open in the centre of the board… sure it has great oversight of the battlefield, but its 20L Gun is going to have a hard time penetrating my Armour. I can literally afford to take him apart without even risking an attack from his other forces. The HT and Infantry are in the South (where is believe they should be) and the PzKw III is watching the Northern bridge.
My AFV rush on-board with the motorcyclists leading the way. The Infantry leave their bikes once they cross the Southern Bridge and enter the woods to prepare to keep his HT and HS busy – remember the HT is Open Top, so he cannot afford to get to cheeky with it against my 3x 447. The platoon with the 3 AC also heads across the Southern Bridge and starts to wind it’s way though the buildings using the very slow bypass movement. I am doing this because the mathematical chance of me being able to cut the battlefield in half and kill his SPW 231 is quite high. The 2-AC platoon spreads out in front of the AC position where each AFV will have a 50% chance of hitting it in the next turn leaving him with a 10TK shot and only 2AF defence… this is a battle I am sure to win. My 76L truck has gone overwatch on the Northern Bridge in case he gets cute with the Pz III.

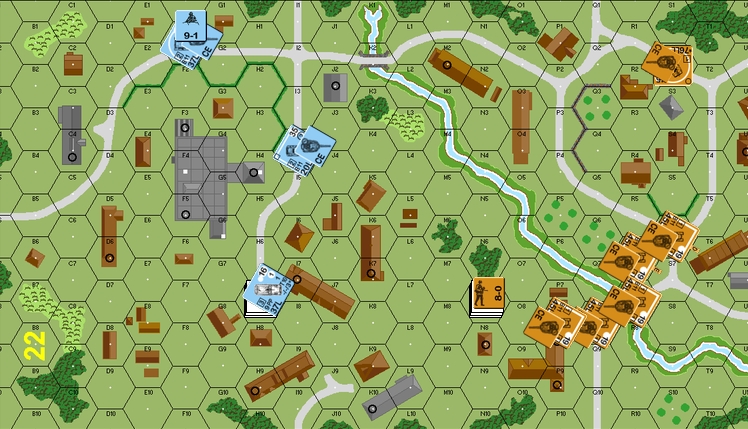
Tactically the Germans have split their forces with nothing to back up their stance.
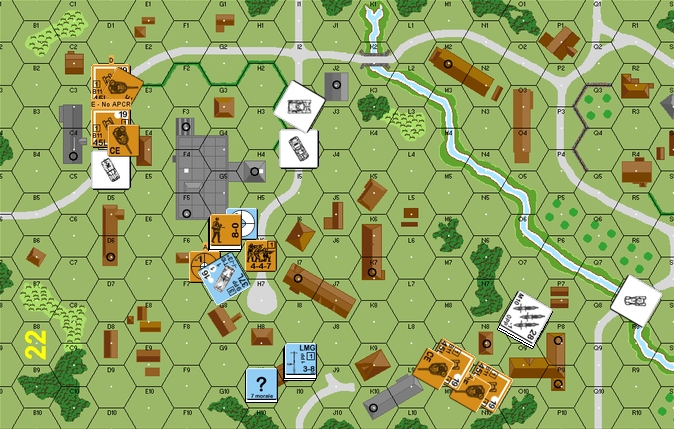
TURN 2
The Germans start their turn off with an attempt to dress their lines and this immediately results in the loss of their SPW 231. Like all players new to AFV (and many who have played them over and over) Rami did not understand how lethal AFV vs AFV combat is once the opponents are in range. As his AC has a 2ROF pea-shooter, and my AC have a fairly powerful 45L it was always going to be a fight with the odds in my favour especially with 3AFV able to shoot at the AC. Rami should have, like all Germans should in this scenario, placed his AFV in mutually covering positions and waited for the Russians to lumber into LOS THEN it would be a different story. As it is, at the start of his 2nd Movement Phase his forces are split and now outnumbered 3:1. He brings across the PzKw III in an attempt to contract the lines and this moves him into LOS and range of another of my AC. I take the shot and am unlucky not to get a kill, instead I must settle for an Immobilisation; out-numbered as he is, this is essentially the same thing anyway! At the end of his movement Rami flips off a BFF shot with the PzKw III and as luck would have it this wipes out one of my BA-6.
With the PzKw III Immobilised right in front of 2x 45L Guns it is only a matter of maths. I shoot with APCR first in both cases. The first BA-6, despite hitting twice (thanks to ROF) does not penetrate the Panzer’s Armour which is really quite annoying; neither shot cause the crew to bail either thanks to the 9-1 AL in this AFV. The second BA-6 has an APCR hit with the first shot which cuts straight through the AFV and wrecks it, the crew and AL are killed. I weave my other BA-6 platoon through the buildings and am close to breaking out into open ground. I rush the IAG-10-AA right around the back of the map to come in behind the SPW 251/10 but Rami is knowledgeable enough to realise that he can rotate the VCA to get the Acquisition shot in and with my Truck having no B(F)F capability I don’t have a chance to take him out first.
I made a poor choice here, if I had waited until he was surrounded then this would have been a valid move… as it is I just gave him a gift kill for the start of the next turn.
Russians: BA-6
Germans: SPW 231, PzKw IIIF, 9-1
TURN 3-4
Unfortunately my IAG-10-AA Truck paid the price for my lack of patience, his move up behind the HT was too early and with his HT CA now facing directly at me the ROF3 37L AT Gun tears me apart (after missing first to only manage a Shock result!). It was a good idea… and one that I will do again with my remaining BA-6 platoon, but the timing was terribly flawed.
My men move up and I swarm toward his sole AFV with infantry but he does not miss often and he gets many ROF results that make it very hard to get close enough for the CC kill. As it is of my 3x 447 I have 2 pinned to his 37L pop-gun with one of them Pinned in the Street Adjacent to the HT. I move up the other platoon behind his position but am unable to get a hit with any of my BA-6 to pass my sole PAATC as poor odds and even worse DRs conspire against an early end to this scenario.
Russians: IAG-10-AA
The end is nigh… but the dice don’t want to give it to me too easily!
TURN 5
With just a single AFV left Rami continues to have trouble missing any of his targets… his 37L SPW is able to not only break a 447 but also rotates and gets a bullseye on a BA-6 which turns it into a Burning Wreck! Unfortunately for him I have a mass of units left and one of his MC results was a HOB to call a Hero and Battle Harden a 447 to a 458 (can you believe this, I would have much preferred a Berserker!). He attempts to position his ATR HS in a better location but this means moving him into the open street and even an AM is not able to save him from the MC. Then I gang up on the HT with my 12FP +1 FG and am able to score a Stun result which will essentially put the game out of his hands.
In my Movement Phase I am able to swarm him with BA-6’s and despite one of them getting taken out by the rather annoying Gun on the HT Rami has his lucky run ended when he attempts an IF shot against my infantry and gets a high number for once. Then I pop a shot off at him from the rear with one of my BA-6 and this carves his SPW 251/10 up leaving me with the victory thanks to the ‘kill all AFV option’.
Russians: 2x BA-6
Germans: SPW 251/10
The Germans lose all of their AFV
RUSSIAN VICTORY
Conclusion
I am a much more experienced AFV player and for that reason I gave Rami a number of options in this game to re-assess moves and shots. This was never to be a game about winning and losing, it was to give Rami a chance to process the rules and tactics of AFV combat.
From the end of his first Turn I gave him a number of opportunities to take a second look at the situation, the Immobilisation of the PzKw III was one of those options. Due to the nature of the game in that log (the death of the SPW 231 and his subsequent luck with the kill on the first BA-6) he had something to gain (a non-Immobilised PzKw III) and something to lose (the BA-6 would have been safe if he changed his movement). He chose to keep the Immobilisation and kill the BA-6. I think it is safe to say that this is not something he would do again if he was to be given the choice once-over! For Germans AFV in ASL and real life a lack of movement = death.
I hope Rami enjoyed this game as much as I did. There is no doubt that he had a very lucky run of DRs through most of the game but I am sure that this has not obscured the lessons a player of his developing calibre will be learning from such a scenario. So much happened in this game stemming from his lack of familiarity with AFV maths and tactics and as I pointed out in the AAR even players with decades of experience (such as myself) continue to make silly errors which easily lead to dead AFV (see my up-coming AAR for ‘To The Bridge’ for an example of this!).
I enjoyed this game despite our differences in experience, it is a scenario that I would suggest be played by anyone who wishes to learn or refine their AFV play.