ASL77 – Le Hérisson
Legion attacking as the Germans
Mario Aceto (Sgt. Essig) defending as the French
ROAR (F:G – 126:130) – 29th December, 2007
Played with 56 VASL Logfiles (Jan – Feb, 2008)
Another new player and another chance to fight one of the lesser used nationalities in the ASL OoB. I enjoy playing either with or against the French, the early war stuff in particular is always interesting due to the weapons being rarely encountered in other theatres.
As this is our first game we chose to play a scenario which appears to be fairly well balanced (at least as per ROAR) in then hope that we can have a good close game!
Initial Thoughts
This looks to be a good representation of the kind of battles that were often fought in France. An outgunned and under-strength French Company have holed up in a village ‘hedgehog’ (Le Hérisson) in the hope that the stone buildings will provide cover against the invading Germans. In response the Germans have sent in a Company of Infantry supported by 3 self-propelled 150mm Howitzers to blast them out.
The French are under Ammo Shortage, but have a nice mix of SW (HMG, 2x MMG, LMG) as well as a HIP squad-equivalent and a couple of roadblocks and a fortified hex. Leadership-wise the Germans hold the edge (as would be expected) with 3x leader at -3 total, the French also have 3x leaders but with only a -1 total bonus.
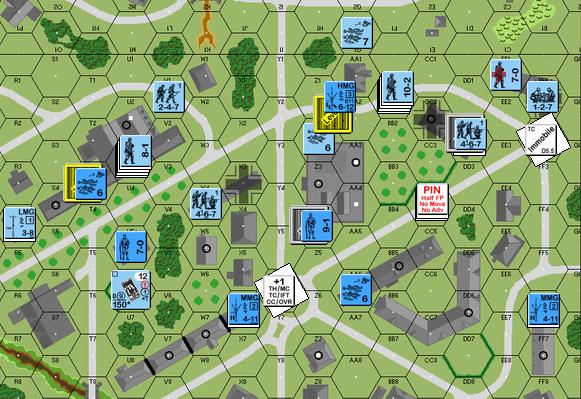
The battle is to be played out on half of Bds. 20 & 22, which will make for a dense environment with lots of LOS blocks and level 2 locations to exploit.
To win the Germans must capture 11 of the 14 multi-hex buildings on Bd 20… this is a pretty tough ask, but there are a lot of options for out-flanking the French once their initial defence lines crumble.
French Setup
The Defenders have placed a lot of their initial forces up-front, there defence is strongly centred around the 20U2 building though they have spread themselves all through the stone buildings facing down the direction of German advance.
All French are Concealed and on Bd.20
Square Brackets contain the actual forces.
S4 2x ? [457]
T2 2x ? [457]
T3 2x ? [7-0]
U2 3x ? [LMG 457]
X3 2x ? [457]
X6 HIP Fortified [237 MMG]
Z2(2) HIP [237 HMG, 9-1]
AA3 2x ? [457]
CC2 2x ? [457]
EE1 2x ? [457]
EE4 2x ? [dummies]
FF6 3x ? [MMG 237]
Looking at this post-game I must say that I liked this setup… it spread his forces out allowing them to hit hard without being too vulnerable, and it also allowed for his men to collapse back on themselves to the excellent X6 position. You will notes that there are no Roadblocks… I don’t know if he used them… I certainly didn’t see them!
German Setup
This was written prior to seeing his Concealed men or HIP
I am going to attack down the Flanks with the majority of my forces while pinning him down in the centre with my HMG and 10-2.
The Northern Flank has 1x sIG 1B and 3x 467, 7-0. These forces are to mainly cause him to hold units in place to deal with them. I should be able to gain a few buildings with them, but essentially they are to force his defence to stay in-place
rather than falling back or reinforcing the other flank.
The Southern Flank is the main hammer-blow, and I shall be smashing straight into his (apparently) main defensive position, the 20U2 building. I assume that the mass of units here means that the HMG and MMG he is sure to have HIPed are not around this area, thus I will tear his defenders apart and push through the village from the South. To achieve my aims I have 1x sIG 1B and 237, 4x 467, 2x LMG, 8-1.
The Central Attack is my HMG stack with another AFV. The AFV will keep his men from easily getting across the 22I5-20Y10 road while the HMG stack will keep the pressure on him once they make it the short distance to the stone buildings facing down the Southern side of the village. I shall be moving smart with this part of the attack because there is likely to be a HIP overwatch in this area. I have 1x sIG 1B and 5x 467, HMG, LMG, 10-2 at my disposal here.
My main concerns are his HIP HMG and MMG; though his HMG and LMG have a fair chance of scoring their B# during this game thanks to their already poor quality matched with the Ammo Shortage. My main assets appear to be the potentially lethal sIG 1B’s, but they too suffer poor Ammo availability and will need to be used thoughtfully. Also with his being able to score a win through beating the CVP cap (Germans must lose <26 CVP) I cannot be too reckless with the AFV as they are OT.
The Game
TURN 1
I deploy some men into HS for the initial scouting out of enemy locations and move forward into the battle. My moves are reasonably successful despite having an AFV Stunned through an ROF tear from a LMG. Finally the turn ends with the French having 2x Squads broken (from the sniper and -2 led stack) on their vulnerable Northern side.
He pulls out as fast as he can, and in an interesting move he actually pulls almost the entirety of his forces out of the Southern 20T3 building… hmmm… why would he do that? It seems so easy to take that building now… or is it? Is there something left behind there? His men move into the centre of the map but many of then lose concealment thanks to some nifty gaps in the buildings. In the Advance Phase he moves some men back into the front lines to face my attack and to make me suffer in the open ground.
TURN 2
I start edging men forward. I get a HS into the central 20AA3 building and follow it up with a 467 who Searches looking for HIP MGs; he finds the HMG with the 9-1 leader but is then broken in Defensive Fire Phase. When I attempt to move another 467 into this building though Mario finally fires with a 457 and also breaks this squad. I have another 467 Broken when I send men into the Southern 20T3 building. In the North I use one of my sIG to sleaze-freeze a 457 defender and then surround him with 467 who break him and kill him through FTR. Unfortunately Mario goes on a ROF and low DR tear with his HMG that ends up breaking 1 of my 467 and eliminating another, as well as wounding a 7-0; at least I am able to get a little revenge when my -2 led MG stack breaks the 9-1 and HMG’s HS. In fact the game seems to be balanced well due to the fact that we are both doing well with our attack shots and both doing poorly with our MCs. The French have a Southern 457 Pinned which puts him into a lethal CC against an Ambushing 467, 247.
Mario has a perfect start to the turn when a SR 457 scores a 1,1 for a Leader Creation roll, unfortunately (for him) he isn’t able to gain a leader. He doesn’t shoot, but does move and strangely he decides to counter-attack. The just-rallied unit attempts to Dash to the central building to take the pressure off of his Encircled leader and HS but is broken in the street; a 2FP shot against a Dashing unit is still going to manage a result 50% of the time. He also does a big counterattack in the South, moving 3 units into the building here in an attempt to squash my 1.5 MMC; I am encircled and he loses a 457 to a break . All this counter-attacking is great if it works perfectly, but with the French having such an advantage in terrain I would have rather tried to dress my lines and make the Germans do the risky moves across open streets.
French Losses: 2x 457
CVP: 2
German Losses: 467
Buildings Taken: 1
TURN 3
My men continue the assault and with much of his forces tied up in separate parts of the town it is time to exploit the gaps in the defence. Things go poorly for me initially with a sIG being Immobilised thus forcing the crew to escape but other than that I am able to swarm all over his positions with my dominating force of infantry and AFV – this results in a number of units being eliminated for FTR and also results in me being able to attack him in CC for another Squad killed – though I lose a HS when Ambushed by a lone leader. He does reveal his last HIP (MMG and HS in 20X6) and this gives me free reign to start mopping him up with a peace of mind. Poor Mario though, his last HIP had a Rear Adjacent shot against one of my sIG, and missed by 1… what bad luck, he deserved better for that ambush. I get a lucky break on the sole mobile defender in the 20T2 building and this cripples his defensive flank.

After the German’s Turn 3
His turn is again dogged by the dice failing to give him the shots he needs until right at the end; his MMG (20X6) fails to kill my sIG but my sIG fails in return when he is foiled by the Fortified Location in this hex… and then ends up destroyed from a leader CCing him (the OT with no MG is a real bother). All his other moves are to form a “hedgehog within a hedgehog” centred around the wreck in the 20Y6 crossroads – this is something he should have done much earlier when we had a rough parity of forces.
French Losses: 237, 2x 457, 8-0
CVP: 8
German Losses: 247, sIG 1B
Buildings Taken: 3
TURN 4
I push forward, cutting Rout paths of the units he left behind and claiming buildings whilst also tightening the noose around his men. I use one of my sIG to freeze-sleaze his MMG position and this allows me to get in nice and close for the CC kill. Luck is still mostly with me in this turn and though he has had some good DRs they have generally not been followed up with results. He is now left with just 2x 457 and a single HS with the sole remaining MMG. For the French to win from here would require a miracle and I accept Mario’s surrender.
French Losses: 237, 457, 9-1
CVP: 8
German Losses: nil
Buildings Taken: 7
The French Surrender
GERMAN VICTORY
Conclusion
This was a pretty conclusive victory for the Axis forces and there are some clear reasons why.
1. The counterattack by the French was doomed, although there are some equalities in terms of MMC numbers and SW FP the Germans are a superior force and they have a huge advantage thanks to the AFV. A German player not afraid to lose an AFV or two – or not afraid to risk running out of Ammo – is going to freeze French defenders in place for the easy follow-up infantry and CC kill. Mario did not try to CC my AFV once during their freeze attacks, but this is not such a bad thing, the OT AFV are vulnerable to German fire into the hex and they are also an easy kill should it get to CC in the first place.
I would suggest that any French player trade territory for time and casualties, pull back to a strong defensive position and make that hedgehog so thorny that the Germans are going to fear taking it on.
2. We were both affected by the dice in this game, in the initial part of the game neither of was able to miss shots and neither of us were able to pass MCs; ultimately this ended up helping the Germans as they are the one with the tactical flexibility and the superior force. While some good shot opportunities were missed by the French late in the game it was by this time too late for them to have much effect.
3. The French must understand that taking 11 multi-hex buildings is a difficult task for the Germans as there are just 14 to attack. With 7.5 turns at their disposal it is the French who can frustrate the Germans enough to make their task very difficult indeed.
I enjoyed this game and I would recommend it. It has enough interesting toys and terrain to ensure that this is not a “same-ol, same-ol” scenario and it also provides enough tactical flexibility to both sides to make it an interesting battle. I cannot imagine that a game of this would take too long if played FTF, though I would make the more experienced player take the French to provide a bit of balance