ASL79 – BRIDGE OF THE SEVEN PLANETS
Legion defending as the French
Victor attacking as the Germans
ROAR (F:G – 33:33) – 24th February, 2008
Played with 63 VASL Logfiles (Feb – May, 2008)
This is the first time I shall be playing Victor, someone I have had the chance to chat with from time to time in forums.
I asked for a game and he suggested this one, I was happy to oblige and chose to play the French (something I have been doing a lot of lately)
Initial Thoughts
A slight French force with some decent Guns and SW have to hold off a numerically superior German attack across a Bridge to take a building on the other side (40oP5) of the river. The French have a locked-down ‘Fort’ (40C2 -units may not enter nor leave this building) from which they can provide some initial fire on the entering Germans but otherwise their force is split up and has a lot of ground to cover if they want to hit the Germans before they get to the bridge.
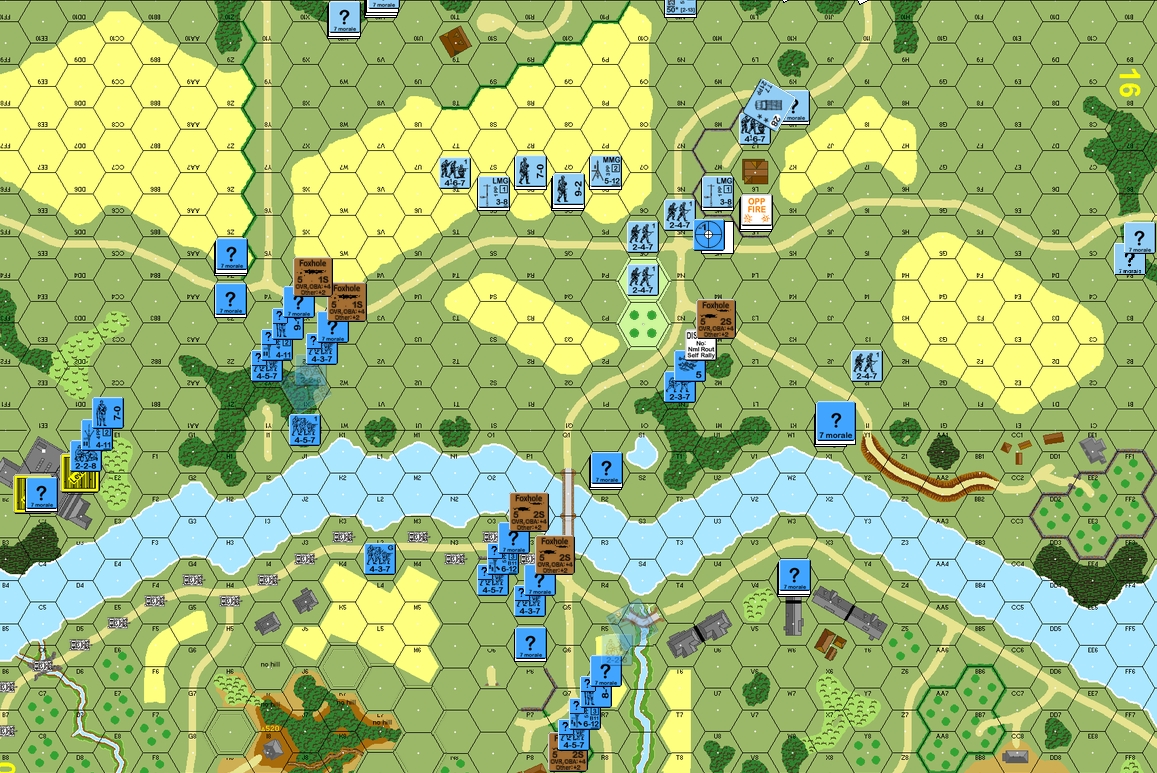
French Setup
I have my forces split by the river with some of my best SW on the opposite side to where they are needed if i am to stop his men as they enter the board.
My choice is to either try and rush them across the bridge (maybe to the 40R1 stone building) or to keep them on the other side of the river to interdict them as they cross the bridge. At the time of starting the bridge TEM was -1.
16N1: 2S Fox, 437, 237
16X1: 1S Fox, 8-0, 25L AT 228
16Y1: 437
16Y2: 1S Fox, 457
16GG1: 2x 457, HMG, LMG, 9-1
16GG3: 437
40C2(0): 228 – Unable to leave this ‘Fort’ as per SSR
40D1(2): MMG 228, 7-0 – Unable to leave this ‘Fort’ as per SSR
40F5: 437
16O4: 2S Fox
16P4: 2S Fox
40Q4: 2x 457, 2x 237, 8-1
40Q5: 2x 437
40Q8: 2S Fox, 25L AT 228
40W4: LMG 437
40X0: 155 ART 228
My HMGs are on the VC building side of the river and I must choose whether to send them across the bridge to hit his men as they come forward, or to keep them on this side of the river and use their ROF and FP to interdict movement across the bridge. A lot of this will depend on the initial moves by my German opponent.
The Guns are so placed to provide him with a few little surprises early on. I don’t expect the ART to survive long, any player worth his salt will use HS to search out possible locations, but if I can use this Gun to get a kill or two, or to hold him up then I shall be happy. The AT facing the initial assault is going to be relatively safe in the woods where he is, he has a fair bit of cover thanks to the wheat fields and the woods, at least he will get to shoot first at anyone getting into LOS of him. The last AT Gun is facing right down the centre of the bridge, I shall use the ROF 3 Gun like a MG to hit anything that moves and with a bit of ROF luck I might be able to lay down enough RF to make bridge movement nasty indeed.
All the other units are spread out to try and cover as much terrain as possible. Although he greatly outnumbers and outguns me I do have the ability to slow him down and to place fire on the approaches towards the Bridge.
German Setup
The Germans enter from the East Edge of the map on Turn 1. Their reinforcements come in from the Eastern or Southern Edge on Turn 3.
The Game
TURN 1
As expected the Germans spread themselves out and try to make as much ground as possible. They don’t rush on to place men covering the bridge and thus to stop my movement, which did surprise me; part of my original plan was to send a HMG across the bridge to the 40R1 building, but I changed my mind and moved back instead to cover his movements as he leaves the bridge later in the game… this way I can interdict him on the approach and still have Rout options available to me should he manage to bring his ferocious FP to bear.
I have sent a few minor units around the Northern flank of the battle, I can with this through the CVP cap and killing through FTR is a great way to do that. I tried to move my other MMG up into the Fort with its level 2 LOS, but Victor pointed out SSR3 which forbids any units entering or leaving the Fort… sigh… I send this MMG around to the 16Y2 woods instead.
TURN 2
The Germans edge forward through the grain while my French fire impotently with what few shots they have. I have positioned myself to totally cover the bridge so that means I am unable to do much about them until they get closer. Mind you, I would have preferred my ‘Fort’ MMG to do a little better than it is; it has not had ROF, nor has it managed to score anything more than a passed PTC. He is keeping his men spread out to avoid calling down shots onto them.
I have really not had much help this game; my MMG fires and again fails to score a hit or ROF. He has a HS bearing down on my ART position too so I am forced to fire with that Gun, I need an 8 and roll a 9… Movement Phase is really just dressing my line, trying to avoid his congregating FP while ensuring I can interdict movement towards the Bridge. His Defensive Fire is generally useless, but what little does hit manages to score a Fate MC result thus turning a Green MMC into a Disrupted HS
French Losses: 227

End of Turn 2 and the French are waiting for the Germans to leave the grain.
The Germans are avoiding movement in stack just in case they suffer an unlucky shot.
TURN 3
The 3rd turn reinforcements arrive and they come in from the East and the South. A Wave of CXing units enters first from the East to search for the other AT Gun (which is still HIP), they end up losing their Concealment and finding nothing. The Units from the South are mostly truck-borne infantry and they are able to enter unmolested too. He Dashes into my ART position to strip concealment but then has the offending HS broken in the street when he is bounced back. Defensive Fire sends a MMG carrying 467 Berserk but is otherwise generally ineffective.
In my turn I un-HIP the AT Gun on the Eastern shore and manage to Shock the AFV, but when I fire again hoping to score the kill I miss and lose my concealment. I have more bad luck when I fire with the ART and have a malfunction. I make some moves and send men over to cover the bridge, but I am really only tinkering with my defence again… he has to rush me sooner or later and for that he will have to try his luck on the Bridge-of-death. When it comes to his turn his tiny 50mm MTR scores a CH on my AT Gun with it’s first shot… sigh… His next shot then brings down a 6,6 for a MC result to kill a HS and an ’11’ to double-break another HS (these were units in the forward foxhole in 16N1). So in this 1 turn I have lost my 155mm ART to an ’11’, a 25LL to a ‘2’ and 2x HS to an ’11’ and a ’12’… the rest of his shots have been pretty useless, but they can afford to be, these 4 results have almost stripped my frontline bare.
French Losses: 228 (crew), 227, 237, 25LL AT
TURN 4
Unfortunately the German Panzer is immediately un-shocked, things are really not going well for my French at all… a bit of luck is what is needed and I am just not getting any. He uses his 81mm MTR to SMOKE my Fort and thus render the MMG useless for this turn. Victor blasts away with a few other units and misses, then it is movement turn. He attempted to do OBA in the middle of the Prep Fire Phase which was disallowed as per C1.2; I am no stickler for the ASOP when it comes to things like Rally and Repair rolls, little things like that, but game-changing stuff like 100mm OBA has to be done by the book! His Berserker moves first and is cut down to size with a k/ result, and then he has a HS broken as he attempt to cross to my now vacant 16N1 foxhole. He moves on and the attack meets limited opposition though he does suffer some breaks. The defining moment of this turn though is when his Pz IIA moves in to put the pressure on my MMG in the 16X1 foxhole. I unHIP the sole functional Gun I have remaining (40Q8) and let loose with a few shots thanks to some ROF; The AFV is burning and the CVP count has risen to 6. My ART crew gets swamped with people trying to take shots at him and eventually someone gets him which causes him to die from FTR and leaves the German Berserker with the need to choose a new target for his frustrations.
My turn opens up with more ineffective shooting, mind you, with all the grain and orchards littering the landscape this is to be expected. I make some moves to get my men out of LOS of his Radio carrying leader… I want him to have to at least pull another chit before he calls down the OBA; the leader does call in a SR which is way off-target but he is obviously planning on covering the Bridge with SMOKE. Other than that I continue to just correct my men’s positions, there is little more I want or need to do. I am edging a unit towards his 81mm MTR in the East, if I can disrupt his MTR here I can take this very important unit out of the game. His fire is ineffective and that suits me fine. If he spends another turn blasting away at me then I shall be happy even if I take a few moderate losses, time is starting to become a factor now and I need to delay him even if it is at loss.
French Losses: 228
CVP: 6
German Losses: 247, Pz IIA
The fields are a’ flood with field-grey uniforms as the Germans move forward in strength.
His AFV burn and that is a huge break for me, the rest of his men are finding themselves bogged down in the 16N1 woods area.
I have been able to get a fair bit of interlocking fire and that is swinging things my way at the moment.
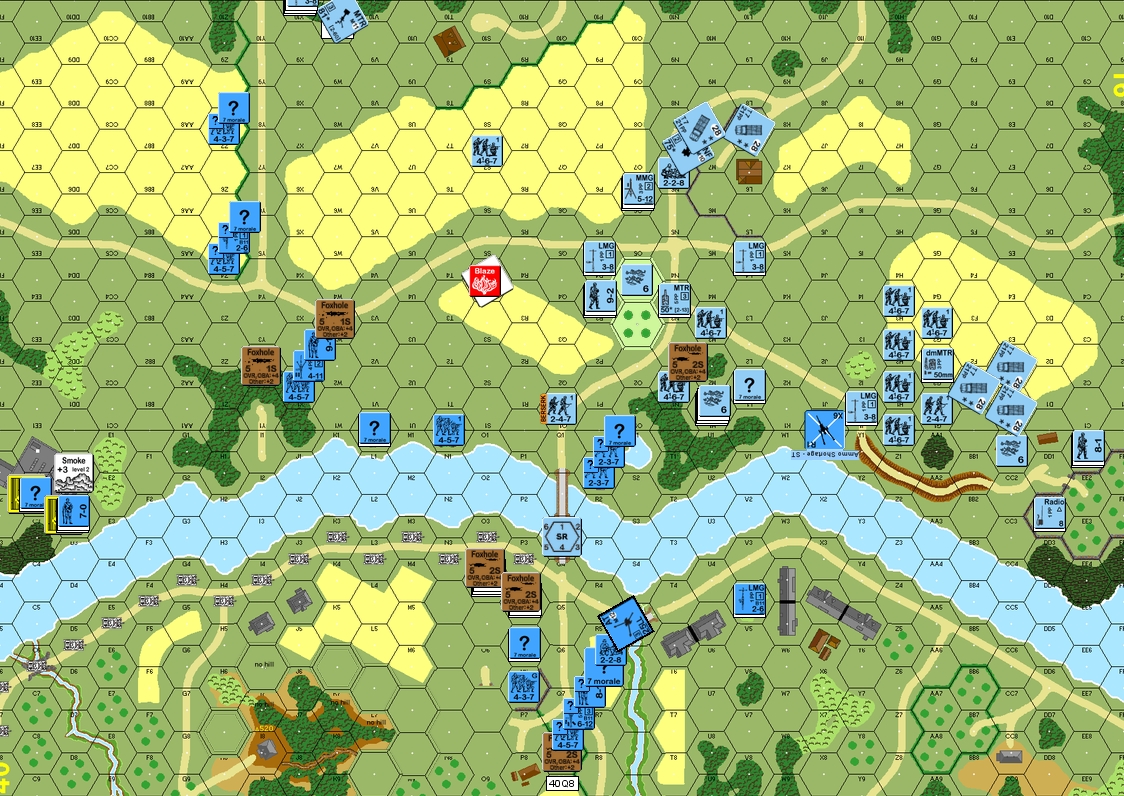
TURN 5
With +4 hindrances between his 81mm MTR and my Eastern bank MMG stack he needed a low DR and, curses, that is what he got; SMOKE falls to obscure my vision. This MTR then manages to hit my 437 who was edging up towards his location which is enough to strip ? and leave him vulnerable to a good shot from a LMG 467 – he gets the dice and I don’t, so I break. His Berserker jumps off the attack but gets cut down in front of the Bridge by my deep HMG position in 40Q8. The rest of his moves are unmolested and when Defensive Fire comes around I have only one brief respite from my high DRs – this is a long-range MMG shot which manages to 1MC his 9-2 leader… and that leader whips out a 6,6 to end up Wounded… wow, that was an important result! His return fire is pretty useless and the turn ends with the feeling that things are possibly turning around for the French.
The Germans rally only one of their units but then have another 1.5MMC broken by the Fort’s MMG; after 4 turns of terrible shooting these French soldiers have finally found their sights. There is little else to report, I score a good 1MC off of a HMG shot but his rally roll is equally good. My Movement is more of the same, just small corrections to firm my position or to prepare for the rush across the bridge, most of my men have moved little since the game began, I make an AM into open terrain and have the Green MMC Disrupted off of hot then cold dice but there is nothing to complain about because he has either hot DR with equally good MC rolls or just plain misses with the rest of his shots. In my Advancing Fire I shoot a 1FP -1 shot and manage to kill another German HS – that is 8CVP and he is yet to make it to the bridge.
French CVP: 8
German Losses: 2x 247
TURN 6
His turns start off poorly when a 6,6 result causes his 9-2 leader to suffers another Fate roll but again survives the Wound. OBA brings SMOKE down on the bridge and sets the stage for his rush into the attack, but he needs to clear up more of my men first before he can even make it to the bridge entrance. He fires more SMOKE onto my Fort MMG which is really annoying but then also rolls boxcars for this MTR too which is a fair swap I guess. Unfortunately his mini-MTR is able to scrag a hit and then manages to break the LMG 437 out on the Southern side of the Western Bank, then with ROF scores a CH which CRs my unit. His movement is really conservative and although there is time left in this game for him to make the bridge rush his chances are dwindling with every turn spent moving slowly, also, although I am not getting the kills I need for a CVP win I am constantly breaking units which reduces the men he has available for a cross bridge rush.
The Germans get another Rally boxcars to cause the loss of another HS and thus gift me with a CVP. My shots manage to break 2 more 467. His force is really taking some punishment, though he is luckily able to avoid any CR results despite multiple units scoring MC checks on these newly broken squads. My moves are more of the same, tinkering with positions as I try to relocate one of my HMG to avoid the LOS problems the SMOKE is sure to bring. I am also placing a Green MMC out on the street (in the SMOKE) to block the end of the bridge! Victor tries to place his SMOKE in such a way that the whole of the end of the bridge is obscured, but in order to do that he must make an extra chit draw, and this comes up red (of course) – he really has had terrible luck these past turns. His various forms of ordnance attempt to take out the units I have guarding the Eastern side of the bridge but they all miss. He is able to take out my 2x HS in the 40R1 building though but I then low crawl one of them in front of the bridge to try and block his entry! Time is running out for him and he needs some exceptional luck to pull off a win from here.
French Losses: 227
CVP: 9
German Losses: 247
TURN 7
His first action of the turn is to do some rallies and though he gets some men back the feeling we both have is that this is not going to be enough. Then in Prep he make his OBA chance and again red-chits. At this moment i think he failed the PELR check that had been in the making for some time and decides to surrender. Although there was a slight change of a miracle win (i.e. his men rush across the bridge with no SMOKE cover into the face of 2x HMG and a 3ROF 25LL AT Gun after first surviving the fire in the open ground on the bridge approaches) the reality is that there is almost no chance for the Germans now… I accepted the surrender.
The Germans Surrender
ALLIED VICTORY
Conclusion
This game was really one of the few I have played recently where there was not too much swing in the dice. It was a reasonably fair game dice-wise with the both sides getting some great hits and some terrible misses. Certainly the Germans Morale Checks suffered towards the end of the game but he also had some great passes too.
Tactically I am happy with this result. I think my French did quite well with their limited men and weaponry. Being spread out meant I had to think about the initial setup so i could prepare for all eventualities. I obviously didn’t think enough otherwise I might not have tried to illegally put men in the Fort, and thus they would have not had to waste 2 turns moving to the location where then ended up staying till the end of the battle (16X1).
The HMG positions were quite useful. One of them was in a foxhole behind a Stone Wall, this kept me safe form his fire while allowing me to watch the exit hex of the bridge. The other was facing right down the bridge itself and with his OBA observer having no LOS to this location I was safe form anything except SMOKE.
The German attack never really got into any swing. They were lucky initially due to my poor firing, but then things changed around and I started getting hits and he started failing the MCs. The loss of his 9-2 leader was really the pivotal point of the game as it took away his most potent officer and thus affected his ability to shoot effectively against my dug-in men. He never really go aggressive with his attack and the few times he did (the AFV and a few HS attacks) he suffered losses. Also the Germans never really managed to find a way to bring their superior FP and range into the game, their spread-out nature protected them, but protected me too in a way.
I hope Victor write an AAR for his men as he mentioned that he had noticed some things that he could have done to give himself a better chance in this scenario and I would be most interested to see those ideas. I think the Germans need to make sure that they don’t allow any French on the Eastern side of the river to live long enough to stop the movement towards the bridge; the Germans are going to lose men on the bridge itself anyway, so they need to make sure their men get there in good enough order.
As much as I enjoyed this game I don’t think I would be in a rush to play it again, it has a lot of waiting and manoeuvring before any real action starts and the meat of the scenario (the rush across the bridge) is really only going to be in the last 2 turns of the game… that allows for 7 turns of dicking around before things get really hot. I like the idea, I appreciate the scenarios style, but it just wasn’t totally there for me.