ASL49 – PIERCING THE PEEL
Original Version – prior to Doomed Battalions 3 Reprint
Legion defending as the Dutch
Colonel Custard attacking as the Germans.
ROAR (D:G – 10:40) – 26th December, 2009
Played in 2 FTF sessions (8 hours, January 2010)
This is an AAR for one of the most maligned ASL scenarios ever released. When I was doing the setup for it I went to GameSquad ASL Forums to do a bit of research on the scenario and to check if it was as hated as I remembered it to be… it is.
Still, with Colonel Custard still learning Infantry and needing to know more about Fortifications and FT this is a perfect chance for us to try it out for ourselves.
Initial Thoughts
This certainly looks tough for the Defenders. A quick view over the card shows that there are 16 German 1st-line Squads up against 10 Dutch 1st-line Squads. Since the Dutch are defending this is pretty much what is expected. The Germans have 4 leaders with -1 total, the Dutch have 2 leaders with -1 total… so that looks good too. The SW are heavily in the Germans favour, 2x MMG, 4x LMG, 2x 50mm MTR and 2x 2pp FT vs 2x Dutch MMG and a HMG (all with B# 12) – again, this is fair enough as the Dutch have 3x 1+3+5 Pillboxes and 6x Trenches, so that sort of Fire Power is what is need to crack them. All in all the forces look to be reasonably well balanced, what is the problem?
The problem is that those 3x Pillboxes must be setup with 5 hexes (inclusive) between them, in a narrow band and facing away from the German attack (to show a flanking manoeuvre on their behalf). The space between them means that essentially the Germans can swarm 1 whole Pillbox with everything they have and once that is crushed they can then use their full force to capture the last Pillbox they need for victory. All of a sudden those nice balanced numbers are thrown out of whack and the reason why this is a scenario at the top of the dog list become apparent.
Dutch Setup
I examined a number of different options for my defence. I thought of single line of defence as deep as possible in the area allowed, it would be spread across Bd.11 and 33 and I would place up-front Trenches with HS in them to act as speed-bumps. The problem with this is that it allowed the Germans to attack the Bd. 11 Bunker with their entire force and I would only have a ⅓ of mine to hold them off. In essence I was surrendering a Pillbox to gain time. The only bonus here is that the loss of a single Pillbox wouldn’t compromise the rest of my defence.
In the option I chose the Germans, once they capture the first Pillbox, will actually have better TEM, numbers and weapons than anything I can muster; unless time is running out the loss of the first pillbox will essentially mean the loss of the game.
In the end I settled on a triangular defence with the entirety of my force on Bd. 33. I would have 1 bunker up and 2 back. The intention here is to force him to travel through the low TEM high-mobility areas so that I can hurt him, or to make him move through the Orchards, gaining some TEM but always much less than what I have.
All units on Board 33
[note: All MGs must start IN the Pillbox as per SSR]
I1 1+3+5 Pillbox HMG 457, 8-1, Trench 2x 457
I2 Trench 457
I9 1+3+5 Pillbox MMG 457, Trench 457
K4 Trench 457
K5 1+3+5 Pillbox MMG 457, 7-0, Trench 457
K6 Trench 457
This defence is based only upon the need to hold him off for as long as possible, it should still be very vulnerable to a ‘swarm’ attack, but against anything else (dice-gods willing) it might, just might, be enough to hold him off for long enough.
German Setup
I am surprised by the German setup. From my point of view there is only one way to play the scenario against my setup and that is to hit the 33I1 Bunker with the full weight of the forces available to the Germans. Taking this Pillbox will be relatively easy thanks to the TEM available and the LOS obstacle of the hill on Bd. 11. More to the point the Woods and hedges are going to restrict the ability of the Dutch to support this Bunker with MG fire from the other locations.
On the other hand, if the Germans have both MMG in the Eastern attack group then a lucky hit against the 33I9 Bunker might take this out long enough to severely weaken the defence too.
The Central group (which was revealed once the movement started) should be either the MMG or MTR to pin my men down in place, but again the Germans are relying on hitting +2 TEM locations from distance and then getting the breaks… why not forget this and just crash into the Dutch with a ‘Human Wave-style’ assault?

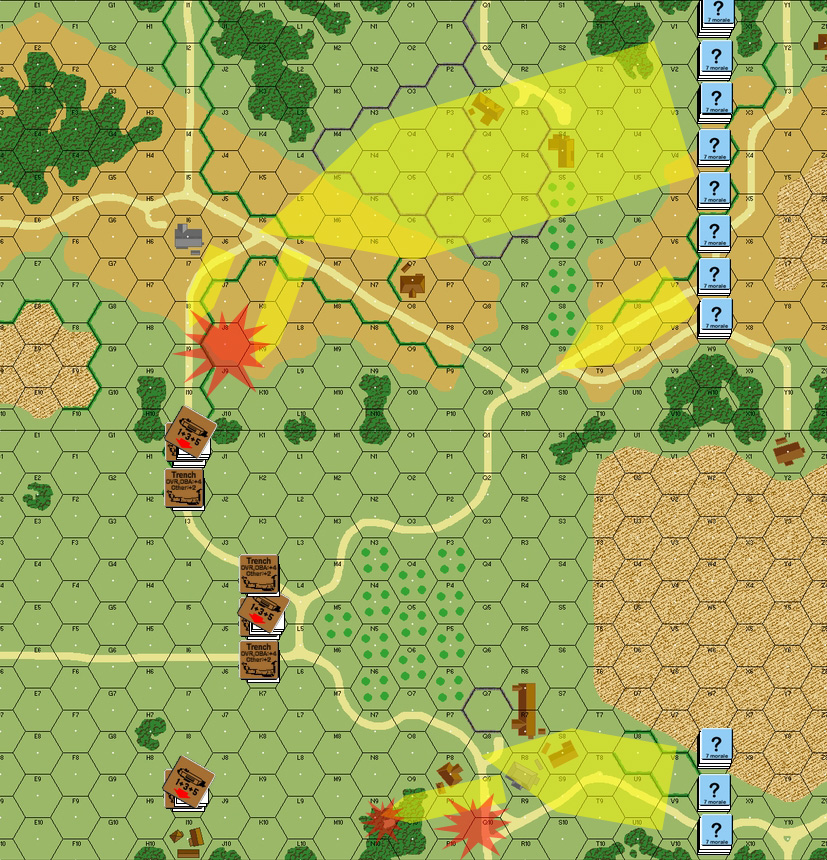
The Jump-off positions for the Germans attack are set.
This map shows the flow of their assault.
Yellow represents the weight and direction of attack
Red shows where the attack was blunted by stiff Dutch resistance
The Game
[Note: Bunker is 1+3+5 Pillbox and Trench as per B30.8]
The Germans kick off their attack as my MG are kept inside the Pillboxes, which are all facing the wrong way… sigh… those wacky Dutch. The attack splits into 3 main thrusts, the Central one is a timid move which places 2x MTR in overwatch at the base of the 11S9 hill. The Western attack is the main weight of his force (about 60%) and it travels across the Bd. 11 Hill to obviously attack bunker 33I1 from the 11I6 house area. The last attack comes at me from the 33R7 farmhouse area and as expected it holds the 2x MMG but also the 9-1.
This attack is going to have to rely on timing otherwise my men are going to be able to cut it apart… any location he can hit me from is still better for me thanks to my entire force being in Trenches. Also, with the mass of Orchards right in front of the main defensive positions he has to get close before he even gets a valid shot.
Right from the outset of the game he takes losses and this makes his timid attack even more cautious. A 467 is ELR Broken off of the first shot of the game when I thread a HMG shot down hex spines to hit one of the moving units in the central attack. Then, as he tries to manoeuvre his heavy FP in the East into position in the 33N9 woods I again smash his men both there and on the way back as again I am able to thread shots behind the 33P8 building. Even before he is able to bring his main force into the battle the Germans have 50% of their in-LOS force broken and they seem to be lacking a cohesive attack plan.
On a positive note for my opponent he is keeping his men together more than he ever has before and this works for him. The damage I was able to deal to the Eastern attack was so great that I would have considered a counter-attack to mop this mob up and thus relieve myself of a medium-sized headache, but thanks to the mutual supporting structure of the remaining GO units this is impossible. Colonel Custard has, I believe, made a strategic error in the choice of his targets and forces assigned to those targets, but he is handling his forces better than I have seen before and it really has only been my long years of experience which have allowed me to sniff out the lucky LOS opportunities that have cut him down.
With things stalled and taking a while to recover in the East and the Centre taking it’s time getting into position (and lets face it 50mm MTR against units in Trenches are not a huge worry) the Germans decide to attack from the West.
Although the Woods provide him with some excellent TEM shadows he clumps his men together too much and I am able to pick them off with the help of an excellent ROF run from my HMG and a supporting MMG. He has also attacked with his FT (each manned by a full 467 rather a HS) in too much of an exposed manner and since I was holding FP back just for them I was also able to Break these units and send them running. In breaking up his attack I had to allow some of his units to sneak past to the South, but he now has 3 separate groups attempting to take this Bunker, and 2 of those groups are badly mauled. His FT Squads are broken and going to take another turn to enter the battle at least and his Eastern attack is also in disarray.
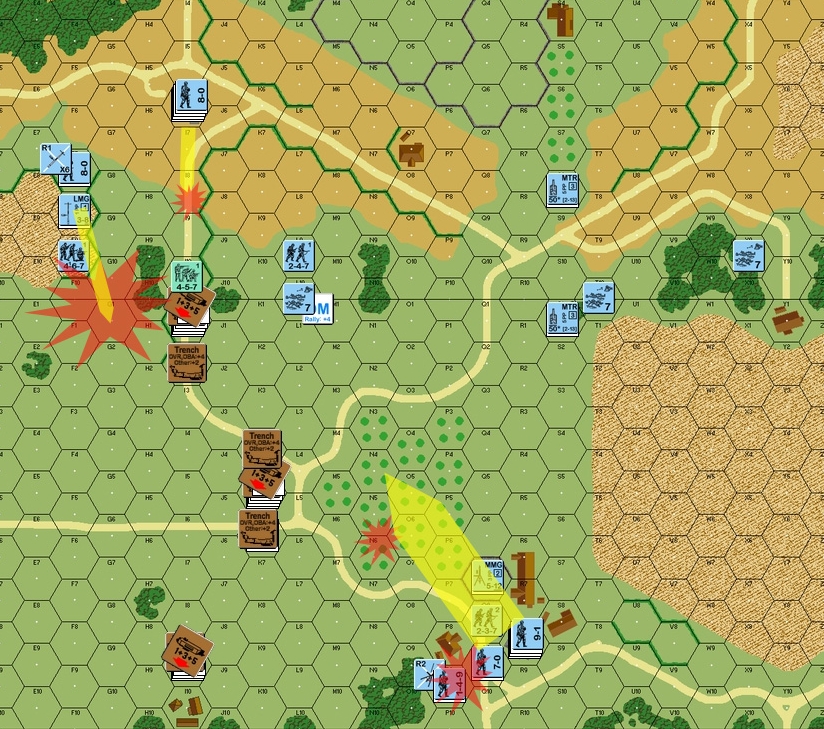
Mid-battle and the German attack has broken apart thanks to accurate Dutch fire.
The firegroup in the North-East has taken the worst damage but is starting to patch itself up
In the South-West a flanking force is making their way along the hedges to attempt to encircle the brave Dutch defenders
Yellow lines show the next phase of their attack
Red marks the places where they were broken apart by accurate Dutch fire
The End
Things were going swimmingly for the Dutch. The Germans were being beaten back with every attack and this did not allow them the time or the numbers to swamp the multiple interlocked MG with a mass attack.
They attacked again, this time towards the K5 Bunker and using the Orchards as cover. It was an audacious attack and despite my MG being needed to cover the I1 Bunker I was still able to cause some serious damage to them; squads broke and one was KIA in the open though he still had 3.5 Squads left to engage me in his next turn’s attack (Turn 6) from the N3-N5 line.
In the I1 Bunker’s zone the Germans again pressed the attack, this time with almost fanatical abandon, and they are cut to pieces. His attack to the South through the small ploughed field attempts to push up to the Bunker using the Woods as cover but is ripped apart by the high ROF of the HMG. The FT carrying units have Rallied and also push towards this Bunker but they are again decimated with ELR + CR and KIA results once they get close.
By the end of Turn 5 it seems that the Dutch have this one in the bag. There are only 2.5 MMC left to attack 33I1 and 3.5MMC to attack 33K5. The rest of his force, with the exception of the HS manning the MTR are broken or KIA. He has lost 1x LMG to a Repair failure and both MMG are also malfunctioned! The Dutch have taken minor losses, a 457 was killed in the I1 Bunker area to FTR when I stupidly decided to attack an adjacent unit rather than pull back… I have also lost a HS.
And then it all changed
It was Turn 6 and the Germans get to move. They take a simple 2FP +2 shot against the Trench in K5 and hit causing a NMC… my 2x 457 (one with the MMG) and the 7-0 leader ALL fail their MC. Suddenly this Bunker is wide open to attack and he has not taken any other shots yet! To make matters worse the same thing happens in the 22I1 Bunker when a piddly little NMC Pins the 8-1 leader and breaks everyone else in this hex! In just 2 shots I have lost 80% of my force and there is now no way I can stop him from taking the 2 Bunkers and winning the game. I have a solitary 457 left in the K6 Trench and a 227 left in the I1 Pillbox. My I9 position still has 2x 457 but the MMG is lost with a 6,6 roll on a Sustained Fire attack as the Germans swarm towards the 2 Bunkers. Not a single shot of mine caused damage as the few shots that hit are MC passes and he navigates through my Residual Fire, First and Final Fire with ease.
Due to the mechanism of CC and Pillboxes they take 2 turns to fall, but fall they do. I am left with no option but to use all that remains of my force (2x 457 in I9) to attempt to take back 33K5. It is a single 457 against 2.5 MMC in CC, and that assumes I can make it across 5 hexes of Open Ground to force the issue – my 457 falls in the first hex to a simple 2FP -2 shot! I cannot move the other 457 out of the I9 hex because that would allow him to just walk into the Bunker in the next turn even if I DID manage to beat the odds and take K5 back… the battle is lost in essentially just 2 shots as I failed 6x 7ML Morale Checks in a row!
The Germans Capture 2 Pillboxes
German Victory
Conclusion
What an absolute mess… And what a terrible way to end the game.
This is one of the few games of ASL which has left a pretty nasty taste in my mouth and I am not sure what to blame. Is it the system’s fault for allowing such crazy luck to completely turn the result around in just 2 shots? Or is it the scenario’s fault for forcing a defence which essentially MUST be focussed on just 3 positions?
If it were not for the negative press about this being a ‘dog’ then I might have a clearer view, but I cannot deny, up to the point where it all went nuts, that this was a very enjoyable and close game.
To be honest I think it was only close because Colonel Custard did not have the experience to dissect this scenario right from the beginning. Like me he is a player who likes to use a ‘pincer-style’ attack with a main force heading for one objective and a minor force working around the other flank to keep the enemy occupied or striking for another objective… these are excellent tactics and should be a basic plan in either scenario or CG play.
In this scenario though, and against my style of defence there is only one plan… strike hard and smash the Dutch into the dirt… The Germans in this case need only have attacked with the full weight of their force against the 33I1 Bunker to have made victory a certainty. With just the MMG and MTR interdicting the Open Ground from the 11S9 area they could have ensured that a single Bunker (33I9) would have faced 80% of the German OoB with minimal interference from the other Bunkers thanks to the LOS Hindrances from the Woods and the sheer numbers in the assault. With one Pillbox taken and the HMG lost to the Dutch the Germans could have taken their time Rallying and rebuilding their attack and then cleaned up the other targets. This is a no-brainer and only impossible luck could have stopped this result.
This is not to say that my opponent played poorly. Even before the game turned and I lost to that aforementioned ‘impossible luck’ I had pointed out that although the Germans were losing they were doing so in the right way for the tactics used in the assault. Despite this being only his 4th game the enemy commander continues to learn and develop and although his over-all plan was incorrect in this case his execution was excellent… this is opposed to his previous attacks where his overall plan was correct but the development of that plan was immature. In fact, because he played things so well during the game even when overcommitted on the wrong targets he was able to win the game when the opportunity presented itself. And I would point out that his luck for 5 turns of the game in both attack and Morale Checks as much poorer than mine with the exception of Turn 6.
So, is this scenario a ‘dog’? Yes, it is. Any experienced player should have no trouble at winning this game as the Germans. Most experienced players would have a hard time holding off even a moderately competent German attack. However, up until Turn 6 this was a great game which we both enjoyed mightily and although Colonel Custard won I am sure he is as disappointed in the way it happened (if not the result!) as I was.
As a Beginner scenario this IS a good learning tool… the Attacker (obviously the Beginner) needs to learn how to see opportunities and then follow up with a successful assault; in many ways this kind of situation is something commonly seen in CGs, especially in the Opening Scenario of a CG or in a localised Schwerpunkt attack or after a break-though and as such ASL49 is of great value contextually.