ASL31 – THE OLD TOWN
Legion attacking as the Germans
Jonathan Fry defending as the Polish Partisans
ROAR (G:P – 33:10) – 15th September, 2007
Played as 38 VASL Logfiles (Sept – Oct, 2007)
After putting out a ‘call to arms’ I got a reply from Jonathan who suggested 3 scenarios for play. I chose this scenario, and without looking at ROAR first I chose the Germans, mostly because I preferred to have my opponent do the setup since I had a busy week at work. It is disappointing to see that there is such a pro-German bias in this scenario (a’la ROAR) but I am hoping that we can turn it into a tight tussle for the ruined city of Warsaw.
Initial Thoughts
This scenario starts with the Polish setting up prior to a Bombardment hitting the map. After the Bombardment the Germans may setup. This obviously puts a few big variables out there, the Polish could suffer immensely in the initial devastation, or the Germans could have their jump-off terrain severely altered by the devastation. As it is, the Polish setup and the Bombardment were done prior to me even getting a look at the board.
Numerically this is going to be an interesting game. Being Partisans the Polish have an under-strength company of 337s, they also have 3 leaders (-1 total mods) and a Hero.
The Germans have an over strength company of 447s with 4 leaders (-2 total mods). SW also heavily favour the Germans, they have 2x MMG, 3x LMG, a FT and a Goliath – which makes for 2 cool SW; FT are always fun and I have never used a Goliath before!
The Polish have a HMG and 3x LMG, they may use Sewer Movement and MOL but are under Ammo Shortage restrictions.
The Germans are Lax with no PF. No Quarter is in effect. Note also that the Partisan SAN is 7 while the Germans only have SAN 3.
The map is half of Bd. 20, which means that it will be a tight and tough fight. Ammo Shortage stops the Poles from using Firelanes, which is a relief. The Victory Conditions are an immediate win for the Germans if they are able to control buildings C7 & H3 (Sewer units do not count for building control) or if they can cause 22+ CVP.
Polish Partisan Setup
With so little territory to cover the Polish have not had to use much finesse in setting up. They have not stacked the building with troops but have instead settled for making sure that they have units able to cross the roads and reinforce tough spots. Although they have 1 Squad available for HIP they have not hidden the HMG nor the LMG. He seems to have placed most of his dummies on-board as stack, and left the majority of his real units un-concealed, this will be fine when they gain concealment later on but has shown me where to expect the fake stacks!
B4 LMG 337
B7 8-0 – Broken
C3 HMG 337, Hero – 337 Broken, HMG eliminated
C6 337
D4 337, 8-0
D6 337 – Broken
E9 3x ? [337]
F1 3x ? [dummies] – Hex Rubbled
F5 337
F9 4x ? [dummies]
G1 LMG 337
G3 337
G4 3x ? [dummies]
H3
(2) LMG 337, 9-1 – Leader HOBs to a 9-2
H10 HIP 337
His weakest point is his lack of range, I can afford to sit outside of his LMG range, or his 3-hex IFP range and blast away with full FP.
The bombardment free hexes were numbered 2, 4, 5, 9, 10, 12. The result was a drastic changing of the landscape with many buildings rubbling and falling into the street. His defence has been quite shaken up and though he only lost a few units to breaks he did suffer the loss of his HMG to a failed MC. Unfortunately the rubble has not made my approach to the target buildings any easier, in fact, it has become harder due to the HOB Hardening of his 9-1 to a 9-2, but the biggest building has suffered extensive damage which will make it a lot easier to capture.
Polish Losses: HMG (3x Dummies)
German Setup
Control of the 2 victory buildings could be tough if he pulls back. Pre-Bombardment H3 (Target Building #1) is a 6-hex level-2 Stone Building. C7 (Target Building #2) is an 11-hex level-2 Stone Building. His setup makes it hard for him to reinforce the buildings though, so I shall be firstly trying to cut off any lateral movements.
L1 447
L4 237, Goliath, FT 338
L5 3x 447
L6 MMG, LMG, 3x 447, 8-1
L9 LMG, 3x 447, 8-0
L10 237, 2x 447, 7-0
M4(0) MMG, LMG, 2x 447, 8-1
My MG stacks are to suppress his 9-2 leader in the tower and to cut off any movements in the open; I have placed them on the Ground Floor to allow for easy movement during Advance Phase. The Goliath and FT HS are essentially bait to absorb as much FP as possible.
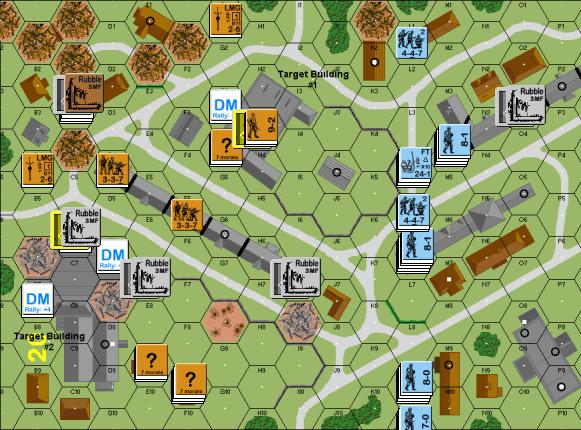
The situation prior to the German attack jumping off
The Game
TURN 1
Jon is able to rally the 8-0 who was broken during the bombardment, but he would have had plenty of time to achieve this anyway. Both my MGs stacks have to open up to break the Partisan MMC with the LMG in H3(2), but with him out of the way (and unless there are any nasty HIPs around the place), I am able to rush the Target Building #1 with a HS. As I rush a second HS to the wall overlooking the Target Building #2 Jon reveals a HIP 337 (H10) but the shot goes wildly astray – with the revealing of this HIP unit I have an almost free run of the battlefield. My men swarm through the open terrain in front of the H3 building and also move line-abreast towards the other target. The Polish get lucky when they score a break on a LMG 447 in Stone Rubble but otherwise my advance is rapid and safe. I am able to break all the up-front units I have encountered and am in a good position for the Partisan 1st Turn. The units on the Upper Levels of the H3 building are under Encirclement which will make finishing them off much easier. An interesting moment happens in Rout when a Interdicted partisan gets HOB and becomes Berserk; unfortunately for him I have a LOT of FP in this area.
His Berserk unit rushes across the Open Ground towards 1 of the 4 German MMC in this area… and is promptly cut down. He starts to use the Sewers to move around, this gets some men across the German-held roads but it also goes astray when he rolls a number of ‘6’ drs and that allows me to put those units in places that are as far away from the action as possible!
Polish Losses: 127, 337
German CVP Total: 3
TURN 2
In my move I start running into the hexes where I expect there to be dummies and am not disappointed as the first stack quickly shows it’s ’empty threat’ value, the second one is a different story however and I lose a HS as he reveals a 337 when I attempt to enter the #2 Target Building. Many players use dummy counters to create dummy stacks, but if real units are not covered with this free concealment too then it just gives away the whole charade; in this case I got sucked in but it was not to any real loss as I continue to swamp his defence and I know that the rest of his Concealed-at-start stacks are fake. My Defensive Fire scores a Pin on a 337 while the FT-armed HS manages to break another 337. In CC I barely manage to CR a HS – though this was a 3:1 attack with -1 for Ambush, so I can feel a little disappointed with the result!
His turn starts off poorly when a SR attempt comes down as box-cars; as if things are not desperate enough for the poor Poles. He is just trying to pull-back to keep hold of the buildings against the marauding Germans – at least it doesn’t go so poorly for his Sewer moves this time with only a single Hero paying the price as he blunders into my FT HS. He loses a HS through my Germans shooting a bunch of Broken Partisans down as they tried to cross a road and another in CC but the real slaughter feels like it is only just about to begin.
Polish Losses: 3x 127, Hero
German Losses: 237
CVP Total: 6
TURN 3
I have no need to be too cautious now, his men are huddled in corners of the Target buildings waiting for the final hammer to fall. I am able to AM my way next to him, sometimes even with Concealed units, this will make Advancing Fire or CC a very decisive time for this game. I am also starting to work men behind his lines to cut off Rout paths. His Defensive Fire is terrible… not a single DR below 9 and that allows me to clean up the MMC in the #1 target building through CC leaving just the 9-2 to go. In the #2 target building we have one Melee going on while he has just two locations still under his control.
I am so much on top of this game that I got a real shock when Jon sent a Sewer unit into the #1 Target Building (G3); wow, lucky he did not do that later in the game or I would have been totally surprised. Since I am to play Red Barricades CG III soon this is a timely reminder to not forget Sewer Movement capabilities. He tries to send what men he can into #2 building, but a 337 is Pinned on the street as he attempts to assault move across the road. CC Phase sees the death of his units in Melee with me, but the Emergence of the Sewer units stops me claiming Target Building #1 – though I have a massive FP and numerical superiority in this building so eliminating this little annoyance should not be too difficult
Polish Losses: 2x 337, 9-2 (HOB from 9-1)
German CVP Total: 12
TURN 4
I am able to score a break on the sole 337 attempting to reinforce Building #2, from here I can round up all his Broken units and wipe them out thanks to No Quarter. I am sorely disappointed when my attacks on the newly Emerged Sewer unit score 3x 1MCs, all of which are passed with just a solitary Pin result on the 8-0 leader! However, I clean him up in CC as I am able to surround him with units. In the other building he is running upstairs, this allows me to score Upper Level Encirclement on his men (A7.72) and I am able to surround them with troops. I am also able to corral the 4.5 units of broken men up against the Northern edge of the board, they will all die for FTR in the next Rout Phase.
It was at this point that I offered the Surrender to Jon. His men were all but finished and there was little point fighting on for either the game’s or the AAR’s sake. Jon graciously accepted and his men laid down their arms.
Polish Losses: 337, 8-0
German Losses: 237
CVP Total: 12
The Polish Surrendered
GERMAN VICTORY
Conclusion
There is no denying this scenario is unbalanced, even without the Bombardment I don’t think many Polish Defenders could hold off the Germans, but add the Bombardment to the mix (it is done AFTER the Polish setup is complete) and there is a real chance that this game can be over before it begins. If a couple of hexes with high value units are smashed then it really is “goodnight nurse” right from the Wind Change DR of Turn 1.
As it was, in this game the Polish actually got off pretty well, but the Rubble, especially the Rubble falling onto the street greatly modified the Defensive Fire opportunities available to the Defenders. I was able to hit his men with multiple units or large FG and he was never given a chance to crystallise long enough to return the favour.
I like this style of game, short, sharp and sweet… I like the toys available to the Germans. But with the Bombardment and the Ammo Shortage affecting the Partisan force I very much suggest a vastly more experienced player takes the Polish forces, or that the Polish setup is done AFTER the bombardment. Otherwise I feel that 95% of game will play out like ours did.