ASL21 – AMONG THE RUINS
Legion defending as the Germans
Martin Barker attacking as the US
ROAR (US:G – 72:74) – 23rd April, 2008
Played with 103 VASL logfiles (Apr-Oct, 2008)
This will be my third attempt to play this scenario for the AAR site, but only my first as the Germans. The first game ended when my opponent ran out of time to complete the game due to work commitments. The second game ended due to opponent only using d4 for his attack rolls and d20 for my Morale DRs! Hopefully this one will get through to the end!
Initial Thoughts
In the smashed up city of Aachen the Americans are trying to bust through an Elite German defence which is blessed by plentiful MG support. The attackers are not not totally out-classed; they have numbers on their side (double the German Squad tally) and 3x M4A1 as well as 4x MMG and a single FT. However I have the advantage of Sewer Movement and a 20L AA (20IFE) FlaKvrig 38. The boards in use are 21 and 20, which provide for excellent defensive Fire Lanes. To win this scenario the US forces must exit 10 GO Squads (or equivalents) off the centre of the North edge.
To be honest I think a lot of the result of this scenario depends on the German’s Setup. They get 10x Rubble Counters to place prior to setup, this can allow for channelling of the US forces, especially the AFVs. They also will force the initial setup and moves of the Americans to respond to the initial Germans defensive positions. The Wehrmacht forces have the option to HIP 2x Squads (note this is Squads, not Squad-equivalents) and also receive 14 concealment counters for dummies. Once these are placed it will be up to the attacker to choose where the weight of his force is to fall… from there the Germans must move swiftly to cover any and all gaps in their line.
[I was in error with this above ruling about ‘squads, not squad-equivalents. See A1.121 and A5.5 for the reason as to why I could have set up with HS. Thank you to ECZ for picking me up on this]
German Setup
I am not the kind of person who likes to make an ‘up-front’ defence, I like some depth to my line. However, the paucity of Germans to cover the 20-hex width battlefield means that I am forced to make a strong initial stand. Also, since he must be aware of the need to conserve 10 Squads worth of MMC I can afford to place a few units up close to slow him down in the initial turns when he will be probing my concealed units in an attempt to find out who is what.
Rubble Counters
Wooden: 20N9, 21O1 (to make him think this is AA Gun location), 21R9, 21R10
Stone: 20O10, 20P9, 21P8, 21Q9, 21R6, 21S8
For the most part these are placed to channel his AFV into the centre of the map… with him being channelled thusly he is sure to be more careful with his AFV use expecting my AA Gun to be set to capitalise on his likely movement paths. I also placed some of them to cover my moves back to secondary lines of defence, to slow him down, or to give me opportunities for PF or PSK fire.
20L6 2x dummies
20N3 2x dummies
20O5 LMG 548
20O8 LMG 548
20O10 548
20P2 548
20Q5 Crest PSK 238
20R6 2x dummies
20S9 548, 7-0
20T2(2) HIP 548, HMG, MMG, 9-2 – These will deploy when they drop HIP
20Z7(3) 3x dummies
21I3 HIP 20L AA 228
21K4(2) HIP 548, HMG, MMG, 8-1 – These will deploy when they drop HIP
21Q5 8-0
21Q6 PSK 238
20R2 548
20R4 548
21R6 2x dummies
21R9 LMG 548
21S1 548
21S10 LMG 548
I have placed the AA Gun far enough back to ensure that I have at least some last line of defence, it is a valuable weapons but it’s threat value is almost as important as it’s FP value, so I am hoping that it being missing from the game for a number of turns will force him to be all the more cautious with his moves.
Due to the 2 Squad limitation on HIP I have placed my 2x MG nests with just a single MMC, they will deploy ASAP once they start to fire so that I can have some measure of safety from SAN and FP while also ensuring that I can relocate if necessary; both these positions alone should be able to slow or stop his movements through the middle part of the battle and that might buy me enough time to reorganise a second line of defence.
Dummies are so placed to give a bulk to the line as well as forcing him to make moves that risk attack if he wants to be bold. For this reason I have also placed the 21S1 unit; it is close enough to the initial setup line that he is sure to bump into it on the first turn and thence will aware that not all my forward men are ‘a screen of dummies’. Should he decide to fire in the first turn at these same Dummy units then he runs the risk of calling my SAN 6 sniper…
US Setup
His force is VERY heavily weighted to attack through the West from Bd. 21. He might intend to swing around later, but I assume he wants to push through with brute force.
The Game
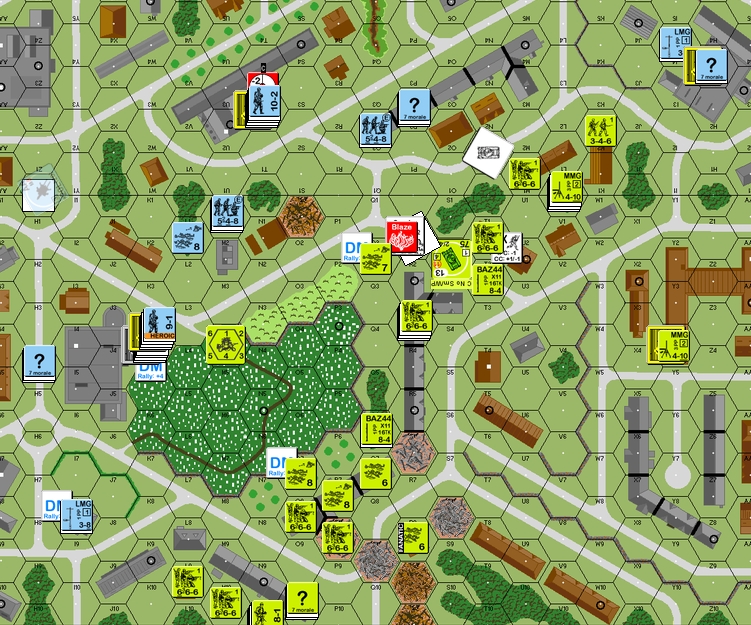
TURN 1
The game starts with 2 of his AFV blasting away in the hope of having some SMOKE or WP rounds on board, but they have none. He takes Opp Fire with a his 21Y3(2) MMG unit and then starts to move. The first result of the game is a 4FP -2 shot causing a Pin result on a scouting HS – this is great as it might convince him that the majority of my front-line units are non-dummies. He moves in force through the central part of the map, though this only leads to the 21S1 woods from which I can escape with ease… then he has roads to cross. He pushes hard for the 21 R2-R6 row house and although I am able to break a HS I do little other damage until a 12FP-4 shot CRs and breaks a 666 thanks to the 20T2 HIPsters; unfortunately I don’t get ROF which is a real bother as even another shot or two could have done some real damage. Martin fires with a massive 32+4 FP group and rolls low… for my first MC of the game I score a 6,6 to ELR and CR a 548 (interestingly in the 4 logs for various games and various opponents that I did today EVERY ONE of my opponents rolled a 6,6 for the only MCs I had to take… what joyous synchronicity).
I deploy my exposed MG position and open up on the units he has which are exposed, this results in 3CVP dead, including his distant MMG Squad in 21Y4; he will have to either ignore this unmanned MMG or send someone back to get it now. Movement allows me to start to correct my lines, but it is going to be difficult thanks to the attackers he has placed on overwatch of the main roads to cover my lateral movement. The units in the West ease back, partially to keep concealment and partially to ensure I can slow his movement down as he enters the LOS of my other HIP units. His shots are as expected, mostly misses, though I do end up losing concealment with one of my up-front 548, thankfully I pass the MC from this attack though. The situation in the city is very much dominated by the tightness of the terrain and we are playing cat-and-mouse with each other through the LOS gaps. When a unit of mine does get exposed it is in desperate danger through his ability to swamp me… once we pass the Row houses and enter into the Graveyard part of the map it will be he who suffers the terrain-blues.
US Losses: 2x 666 (3 Dummies)
German Losses: 238


The weighted US attack is obvious in this shot. I must pull back and try to shift units to hit his flanks and strengthen my frontline.
TURN 2
He does well with his Rally, scoring a pair of ‘3’ DRs – better dice like that now rather than Prep Fire though! As it turns out his Prep is a bit of a non-event with the only shot going wide. As he starts to move I open up with the other HIP MG position (21K4) and break a 666 who was trying to sneak down the Western edge. I manage to break a few HS who were being used as scouts, but ultimately his moves were either too safe or my shots were too limited to bring about much of an effect. He is attempting to push with force down the Western edge of the battlefield and this causes me some problems due to the positioning of many of my troops up in the East – they are mobile, but this mobility is hampered by the excellent MMG HS positions covering the main roads. As a result I focus my -2 MG stack on one of these MMG positions and break it with ease. My -2 MG nest then turns around and fires at an 8-0, 666 position; the leader is safe, but calls a SAN which kills a 7-0 down in the West (this 6 SAN is ripping into the US forces), the 666 is broken – his brittle 6ML units are falling all over the place and soon his attack will be quite thin due to these MC losses.
He gets a few Rally results which stiffens the Eastern flank of his force but if he is not careful I shall soon be all over his back lines and nipping at the tail of his Advance. My other MG position deploys to give me greater safety in the event of a successful attack. I open up in Prep Fire and despite getting excellent results leaving 2 more 666 broken (one of them ELRed as well) I fail to gain ROF which means I cannot do more damage to him. I targeted one of the units on an AFVs position, if I can sneak a unit next to him and either PF or CC him then I will be quite happy; almost all my attacks are guaranteed to be Street Fighting – at the very least I can draw his Aqr off of my MG positions. Movement sees me make a strong move down to contain him, I have to risk sending units into the LOS of his other covering MG and this is successful thanks to him taking a long-range shot at another unit which missed. All-in-all it is a good Movement Phase as I close in on his flanks and only take a single break (a 548 near the graveyard). Defensive Fire is another matter with an AFV scoring a k/3 result on my 8-1 MG position – I lose 2x 238 but the 8-1 Hardens to a 9-1 Hero through HoB. The other MG position also suffers a hit from the 6FP +3 MGs and this breaks my 9-2 off of the NMC! Advancing Fire is useless for me, but CC goes well with a US HS being eliminated as well as one of his Shermans thanks to Street Fighting
US Losses: 346, 7-0 (2 Dummies)
M4A1
German Losses: 2x 238
TURN 3
We both get a bit of luck with the Rally Phase.. my broken 9-2 comes right back up with a HoB result that makes him a 10-2 while he has a HS go Fanatic also through HoB. On the other hand he also loses a 2nd line HS through Fate. His Prep Fire shots are all merciful misses and that really does let me off of the hook big time. When he does move the first unit gets smashed off of a 16FP NMC result that comes up 6,6 for the second time for the Americans this Turn. However, it is this sacrifice which might allow him to flood units right past the defenders as they hug the board edge. I have no more shots that can affect them, with the exception of my HMG unit with the heroic 9-1 and I use this unit to take out a FT 666 who was getting smart, with the ROF I then hit an 8-1 and 666 who also tried to move through this hex and I keep ROF for another 5 shots which is used to break another 666 and ELR fail a HS (through an 8-0 leader being killed with a SAN result). He tries to move one of his Shermans but as soon as it starts up a PSK shot rips into it and kills the AFV (though my HS is killed by the backblast). This has been a VERY expensive turn for the US and despite him playing this game well he is being robbed by my attack dice this turn. He is able to break another of my 548, each one of these that he breaks is a mini-victory for him as my lines are stretched thin. I Voluntarily Break the PSK 238 and with the 8-0 leader they Rout into the 21K4 building.
My Prep Fire is reasonably effective with a few units paying the price, again it is the US 6ML that is causing him to drop so easily when I hit, and I am getting some decent hits; he is also suffering from a few ELR fails which is not making it any easier. My moves are mostly to shore up the edge of his advance, but also involves some smoke-n-mirror moves with my few remaining dummies. He takes a 2FP -2 shot at a dashing unit and cowers; he really is having terrible luck, at least he is able to hit it with a 2FP +0 shot and this NMC breaks my 8ML defender. Defensive Fire sees him punish my 21K4(2)
MG nest (breaking the HMG HS off of a 6FP +2 shot) and also sees the broken units in this building re-DMed.
US Losses: 2x 346, 236, 8-0
M4A1
German Losses: 238
This turn sees a really blessed run of attacks for the Germans that effectively hammers the US attack to a standstill thus buying valuable time for the defenders.
There is a palpable feeling that the initiative might have swung across to the Germans.
TURN 4
The US suffer more losses from 6,6 results as another Rally ends up killing a HS. I get my MMG HS back; even with DM I am only +2 to rally, the other 2 units in this hex failed though. He pretty-much jumps straight into Movement and a Dashing unit pays the price first up with an ELR break… but he absorbs the K4 MMG ROF and I am left with only a pair of leaders (one of them heroic) manning the HMG. The rest of his moves are quite clinical as he really tries to push hard down the Western Flank. My Defensive Fire causes a bit of damage and I finally am able to take out the last MMG position – he has done well with those though, the 2x MMG HS have end up absorbing the attention of 2x 548 for the whole game. Advance sends the first of his men right into the LOS of my HIP AA Gun, he is trying to protect the perimeter against me pushing down against his now almost totally committed forces and doesn’t realise that I am only able to get dummies down there.
I am able to rally all the units in the MG stack but the 8-0 leader has possession and I have no-one to transfer it to yet. I am going to have to move this MG stack and I needed those extra MP to avoid his remaining AFV’s AQR. Prep Fire sees a HS vaporised by the other MG stack but the AA Gun which was exposed to stop him gaining concealment in the last CC Phase misses his target completely. My moves go off without a hitch and a brave move with a PSK 548 to draw a shot on his sole remaining AFV comes up trumps when he first changes CA (thus protecting the relocating MG nest in the K4 building) and then IFs to Malfunction the MA! I am slowly managing to reorganise my defence and the narrow line of attack he has so bravely developed is going to be working against him soon if I can just get my men closer to the exit area. My PSK unit fires at the AFV and misses but survives the backblast NMC. I am in close at the rear of the battle trying to catch his broken units from behind but when I attack with a decent 8FP +2 shot I also roll a 6,6 to malfunction my LMG. When I fire with another stack I get another 6,6 – that is truly unbelievable, even by VASL’s Dicebot standards… 3x 6,6 in 3 DRs and 4 total out of 6DRs…
US Losses: 236, 346
TURN 5
He does OK with his Rallies but it might be a case of too late now. He doesn’t Prep, just moves instead. Down against the vital Western Edge of the battle his first 666 suffers an unlucky Pin result which keeps it in the firing line for the next turn thanks to my 12FP MG nest. I failed to get ROF with the shot, but I would not have kept it in any case as the target hex (21G10) is the only exit that is not going to be interdicted by my various defenders; the ROF stops him even bypassing with any safety. The rest of his men bunch up around this area and I might be able to hurt them in the next turn, but he has managed to claw his way back into this game well. His last AFV explodes as a PSK shot goes up his tail-pipe from a lethal rear shot. Defensive Fire sees my few defenders able to score Pins and nothing else, but I should have a few target next Prep Fire Phase. His Advancing Fire sees a 1,1 come down to hit my most important stack – this causes the breaking of the MMG HS in the 21I5 location but he also loses his most-forward FT. His men are all bunched up and I have 1 more movement Phase to get into position for the final US moves off-board.
I lose an LMG in the backlines thanks to a failed repair roll. My Prep Fire is mostly unsatisfying as I either miss or the US discover the ability to pass MCs finally. The only effective attacker is my M/HMG Combo in the distant 20U2(2) location who tears apart a 666 and is then left with no more targets for his remaining HMG ROF. Movement is the usual mix between scrambling to try and put units in the exit zone and also trying to stay out of the LOS of those vicious 666 Squads. I am chipping away at his numbers, I shall not be able to stop him getting men off, but at this rate I should be able to stop him getting ENOUGH men off to score the win.
German Losses: LMG
US Losses: 666
FT, M4A1
TURN 6
He has a few rallies, all of which are a welcome addition to his side. There is no US Prep as he needs to really hustle to get those units off of the map. The first US move is a risky one that might have huge ramifications for the game, it is an AM move in front of the 20FP AA Gun – I score an ROF K/4 and
then finish off the HS in Defensive Fire to further reduce the number of men he has available to get off-board. All the rest of his movements are quite conservative and he doesn’t make as much ground as I think he needs too. My men are streaming back towards the Exit area and thanks to the excellent MG positions I have a commanding view over the battlefield which means he is always going to have to run the gauntlet (including at the end where he cannot get off-board without being exposed to my 20U2 MG stack).
The Germans stream back as far as they can whilst also attempting to set up blocking points in the major movement zones (21I9-I10 road, 21H5-Q10 road) I will only need to score a few more KIA/CRs, or even just breaks to ensure this one is in the bag for the desperate Germans. Martin keeps the pressure on by hitting my broken units to ensure their 8ML cannot bring them back into the game though he has few other valid shots thanks to my elite skulking skills (1337 skulk skillz). By the turns end almost all my men are in valuable positions to interdict his movements and have also gained Concealment.
US Losses: 666
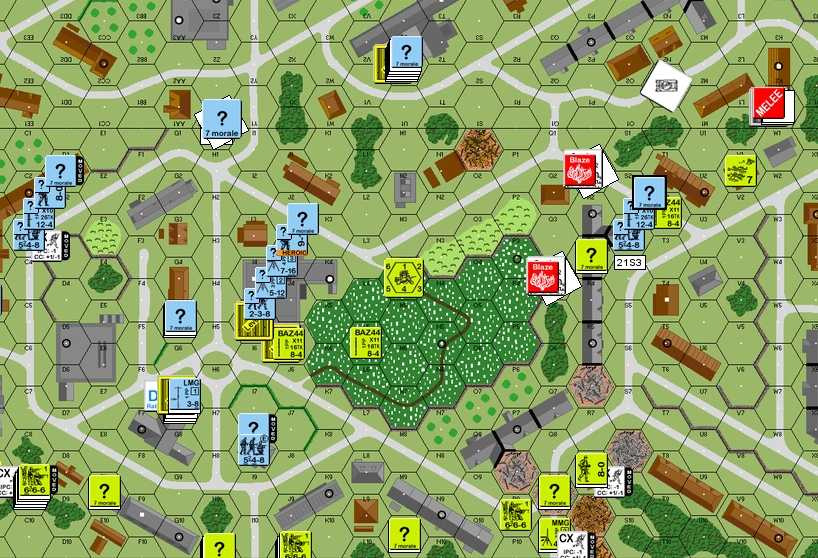
The tight nature of the US attack helps them push through my defence and utilises the many LOS blind-spots.
It also allows me to flood back with little fear of interdiction to cover the exits in time.
TURN 7
A HoB result from a SR attempt also scores him a very useful 8-1 from a Leader Creation roll. The US again make their moves towards the Exit edge but they are very much restricted now by the German defensive positions and FP advantage. The are forced to AM out into an open road thanks to RF and the mass of FP facing down 21I9-I10 and this puts them into the line of fire of my 6FP -1 HMG in Defensive Fire – he suffers 2x HS CR, 3x HS broken and his 9-1 leader is Pinned out in the road in front of my HMG position. The newly generated leader takes a 666 on a fanciful run into the LOS of the 12P -4 (leader FFNAM/MO) MG nest and pays a heavy price with a K/3 taking out a HS and breaking the remnants. The breaks of this turn (3.5 MMC) are probably enough to put paid to the slim chances he had for winning this game. I clean up another HS in CC; even though I used a full Squad to kill this HS in the end it has been worth it as this has held up vital Exit VP.
Martin is fighting on with élan, something I respect greatly; as unlikely as it is that he can score a win his main aim is to still get as many men off as possible. He gets his 9-1 back immediately in Rally but loses a HS in the process thanks to Fate. My Prep Fire is useless, but I have very little of it anyway, mostly I want to keep my big MG groups to stop his movements at choke points (including a shot from the -2 led FG that can hit the most likely exit point for his troops!). Other units move closer to the exit as well, he cannot cover the streets without exposing his men to my MG nests so I have almost free movement while he is forced to move in a looping channel of buildings along the Board edges. In the back lines my Sniper is active and kills off an 8-1. Martin gets some good shots in but the MCs are also good and I suffer no loss at all. Little else happens in the turn, I jump into CC to clam up movement options for his men and also to take a 666 out of action – a kill would be a bonus, a non-stop CC would be a win.
US Losses: 3x 346, 666, 8-1
TURN 8
With time running short and my men closing in he needed to either risk the dice as he moved or try for some Prep Shots to soften me up a little. His most forward unit (2 hexes away from exit) shoots and rolls high… Mind you, when it comes to my turn the dice are not so hard (except for him); a HS of his takes a 3MC and scores a Fate result to be KIA. Then a 2FP -2 shot against a 666 running in the open street comes down as a KIA result. I am able to score more breaks; on an 8-0 who was trying to stitch up SFF opportunities and on 1.5 Squads worth of troops but again, to his credit Martin is playing this one through to the end!
My Prep Fire is poor and this is again letting him off fairly easily. My men all stream towards the Exit Zone with the exception of those already there who pull back into LOS shadows to avoid the massive US FP. I take a risk with one of my 548’s and Dash him across to the 21J9 building, this is to lock up the area for the very very few stragglers and also to start to roll up his rear lines and broken units. In CC I am able to kill another HS, each one makes it just that little more impossible for him to score a win – he is only able to kill my 7-0 in reply.
During the next Prep Fire Martin tried to shoot to clear a way for his men to exit (I still don’t think he recognises the threat to his exit location from the 20U2 MG nest) but the dice do not come to his aid and he sensibly decides to let the game go here. Although in a FTF situation it would be fun to fight it to the last gasp there is no sense wasting time in a log-file game.
German Losses: 7-0
US Losses: 2x 236, 666
The US Army have failed to Exit enough VP and Surrender
GERMAN VICTORY
CONCLUSION
I am so very glad to have had the chance to finish off this scenario and consider myself doubly lucky to have found a gracious and interesting opponent. The attack he made was excellent and despite some bad luck he never gave up but kept plugging away looking for a chance to turn this into a win.
The heavily weighted US attack so very nearly worked. However, this game was turned around by a single devastating turn (Turn 3) which cancelled out the gains he made in choosing to attack at my weakest point. His attack came at the right place at the right time but unfortunately for the US so too did the Germans scoring some great hits with last ditch shots. Martin was not immune to some good luck himself and in one turn I had both of my vital MG nests neutralised by excellent low-odds shots… but the German 8ML coupled with their fantastic leadership and Stone Building cover meant that my rallying came think and fast. On the other hand his US troops with their 6ML were vulnerable throughout the scenario and often fell prey to ELR failures despite having 4 ELR.
If I have any criticism of the attack it would be that he would have gained by a 2-pronged attack to hold my Eastern defenders in place. As it was I was able to stream most of them back to the exit zone faster than he was able to break through my initial strung-out defence.
I put a lot of effort into wiping out the AFV. The AFV do not win this game for him, their death means nothing in terms of the VC but they can strongly influence the result through their MA and there very presence. Once they were taken out of the equation it was just his men again mine. Luckily I think our relative experience in using AFV was quite different so I was able to kill all 3 tanks cheaply but I am not so sure he would be so generous were we to play this scenario again.
I would like to take the chance to remind players that A22.3 does make the US FT a little less effective as a weapon since they have no Elite units to use it.
For the defender I cannot express my admiration for the 20U2(2) MG Nest enough. This is such a necessary position that I would not even both HIP-ing the units you put here as any US attacker who has played this scenario before will expect something nasty in this location. This position is able to lock down vast areas of the middle board as well as covering the exit locations and also interdicting the US forces as they approach the battle proper.
The 21K4(2) MG Nest is another great location but this is not so essential. I needed it because my defence down in this part of the map was initially too light to stand alone.
So, all-in-all, this was an excellent game of an excellent scenario against an excellent opponent. There is not much higher praise I can give it apart from that. The dice had their moments and certainly one Turn proved to be the turning point for this game, but generally the dice were fair enough considering the vast difference in quality between the troops on both sides. The replay value for this game is very high and I would not hesitate to take either side. It is not a small game, so whip it out when you have a FTF opponent and a fair whack of time!