ASL14 – SILENCE THAT GUN
Legion attacking as the US Paratroopers
JP defending as the Germans.
ROAR (US:G – 115:186) – 3rd July, 2009
Played with Live VASL in 4hours (Jul, 2009)
This is a really ugly scenario. It is an ugly map even if you use VASL to make the transformations which enable this to be played without using your imagination. it is an ugly battle as it is clearly a situation in which the Germans are heavily favoured. We played it out over 2 weeks and in the first weeks play over Live VASL the dice were so one-sided that I am amazed we got much of a game out of it at all. As it was my US Para’s managed to keep coming back and kept pushing their luck enough to make this go on longer than I initially thought possible. Ugly map, ugly situation and even uglier dice… hardly much of an introduction for an AAR is it?
Initial Thoughts
With there being 2 options for winning this scenario one would think that the US have a reasonable chance.
But then you see the terrible map. You notice the way that it channels the US into a few bottlenecks.
You also see that ANY US attack must walk through Open terrain.
You realise that there are 12 inferior class German Squads DEFENDING against only 7 Elite US Paratroopers (with their truly awesome 7ML).
You note that those same Germans have a HMG and MMG against just a pair of US MMG.
Finally you spot SSR4 which points out that the AT Gun cannot be destroyed through a bad repair roll thus almost INSISTING that the Germans fire it with IF until the barrel melts.
This scenario has “dog” written all over it.
Setup
Because this game is really looking like it is going to be one-sided I have combined the setup lists.
GERMANS
2M9 447
3M2(2) 2x 447, MMG, HMG, 8-1
3M5 LMG 447
3M6 75L PaK 97/38 228
3M7 436
3M10 7-0
3N1 436
3N2(0) 8-0
3N2(2) 436
3N7 LMG 447
3N8 436
3O2 447
3O10 436
4M2 436
I will state this clearly now… the 3M2(2) MG nest is truly an inspired piece of defensive genius. There is no way I can setup with any chance of hitting him (short of awesome dice) without a statistically greater chance of getting smashed in return. It is actually in an LOS shadow to the best places for me to setup and that means I will be the one who takes the hits as I move forward into the attack. Also, with its FP and the terrain I must enter in mind I don’t have much safety even with Concealment. I wasn’t feeling great about my chances of winning this even without seeing the setup, now I am even more sure this game is going to have to rely on JP rolling poorly… something he has been loath to do in the ~20 years I have known him!
US PARATROOPERS
(all on Bd. 3)
R1 2x MMG 337, 9-1
R5 2x 747, Baz ’44, 7-0
R6 2x Baz ’44 747, Hero
R8 2x 747, Baz ’44, DC, 8-1
This setup was done with the intention of attacking down the centre. The MMGs are to take out (and KIA) the Gun Crew, the rest are hopefully going to survive the fire from the MG Nest long enough to pop SMOKE and take the Gun. I really thought long and hard about all possible ways of achieving this games VC and this is the best option I have – I freely admit it has a poor chance of success!

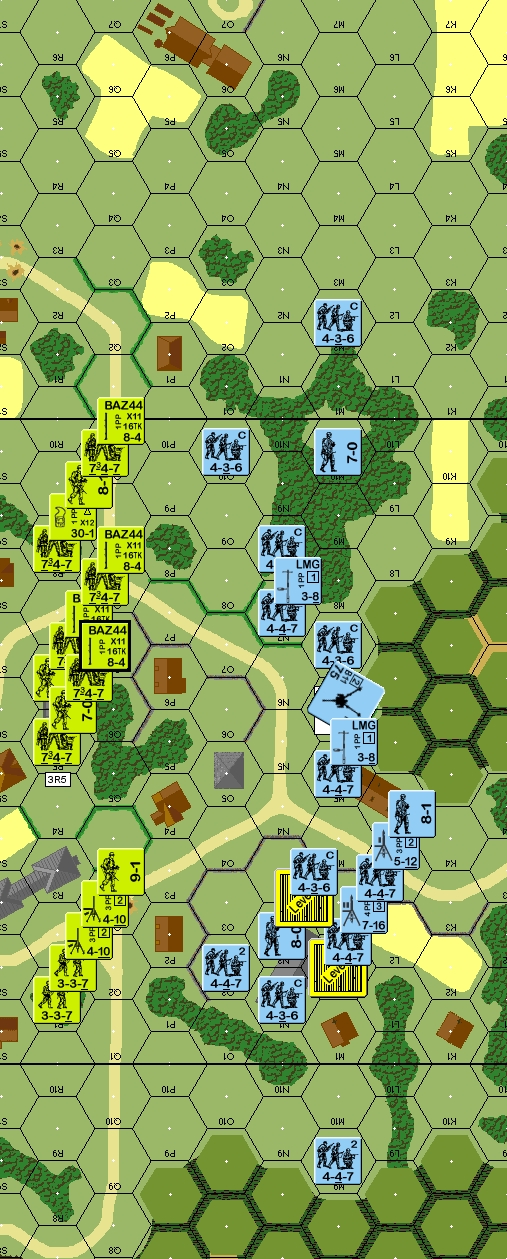
The Setup prior to Game’s start. “I got a bad feelin’ about this”
The Game
TURN 1
Right from the beginning of this game I knew I needed luck to be able to win it, and as usual with JP there is none… for me. In Prep Fire I score a pair of MC on his Gun Crew, it passes both of them. Then this same Gun fires at an AMing 747 and breaks it; with only 7x 747 available at game start this is already a huge disadvantage to me. My men edge forward towards their start lines (3O5, O6 & P5) and maintain their Concealment. I take no more hits until I score a lucky shot in Advancing Fire which ends up killing my 7-0 from a SAN while one of JPs 447 fails his 2MC.
The 447 immediately Rallies in the Woods thanks to his 7-0. Prep Fire starts and the most excellently placed MG nest goes on a ROF run that leaves it’s targets (2x 747, Baz ’44, Hero) devastated. The Hero is KIA off of a 6,6 and the subsequent DR is a 1,1 (happens all the time that snakes and boxcars follow one another with VASL) which sends my 747 Berserk! Arrggg… Mind you, now that I look at it, this Berserker might just be the unit which can open this game up for me; unless JP is smart enough to Advance a unit closer to him (and he does not) then the only target he can rush will be the AT Gun!
US Losses: 337, 7-0, Hero (1CVP)
Germans: 248 (2CVP)
TURN 2
My Berserker charges and he manages to get a 10 off of his first 1MC… that is ≥10+ for 80% of my MC this game up to this point. Then there is a whole slew of misses (including FPF shots from 6ML units which cause JP no loss) until the MG stack goes for Sustained Fire and manages to CR me! Sigh, this was the very last shot possible and if he missed with this then it would have been a Berserk HS into CC with his 228. Even with the Berserker taking all the fire I was not able to capitalise thanks to the way I was cut apart in the first Turn, I had no units close enough to dive in, or the only route they could take would be through multiple RF -2 shots.
I get another MC on the Gun crew (2MC this time) and for the 4th time in a row he passes… My men edge up and I am thankful that JP has not yet realised that LOS from 3M2 to 3O6 does not cross the Wall! I place a few units in the street, with luck I can survive the turn and get in for the Gun Elimination.
The AT Gun opens up to get a CH against my adjacent 747, I break but when JP goes for the Intensive Fire shot he malfunctions the Gun. I am hit by an 8FP +0 shot against the other 747 in the street, it is HOB to become Fanatic but then broken soon after and forced to Rout away. At least things pick up for me a little when I am able to break then KIA the 228 Gun Crew with my 5th and 6th MC on them… this game is hard enough without his 6ML and 7ML units passing their MC better than my ‘Elite’ 7ML men. Again the street is clear of anything but dropped US SW and dead or dying US Paratroopers and yet again the remnants of my attack are huddled in the Woods awaiting Rally Phase. At least I have a pair of 747 in position (3P7, O5) to launch another attempt for the Gun.
US Losses: 747, Baz (3CVP)
Germans: 228 crew (4CVP)
TURN 3
I am getting desperate. Last Turn I came close, so very close, but failed thanks to the sheer weight of fire. This Turn I have less troops available to me, but I am in a slightly move advantageous position; his gunning down of units in the open street has allowed me to place a 747 Adjacent to the road (3O5). I feel that if I am to take this game it has to be now… it will not be getting any easier. So, I attempt to pop a Smoke ‘nade to at least protect myself form the MG hell… if I can get this dr then I might be able to place a single unit in the Gun hex, and that would give me an advantage in that I need only protect the Gun and generate a CVP advantage. The SMOKE attempt fails and this means I am forced to AM out onto the street. JP fires, I take a NMC and roll a 6,6… ELR, CR Fate = full KIA…. can this game get any more biased against me? I am forced to again consolidate my position, this loss has set back the entire assault and the feeling is that it is all well and truly beyond my reach now.
In my Turn JP Voluntarily Routed a 436 to stop me gaining easy CVP, his Rally scores the 1,1 which usually follows a 6,6 and this brings JP a Hero and 447 through Battle Hardening! (this is from a +2 on the HOB roll). THEN he manages to repair his LMG which is Adjacent to the Gun hex and things just went from terrible to terrible-r. JP blasts away with the huge weight of fire he can bring to bear and manages to score himself another 337 CR. My men are really just cycling through attack-break-rally and I am not getting any closer to achieving victory.
US Losses: 747, 337 (7CVP)
Germans: 2x 436 (7CVP)
TURN 4
The beginning of the Turn gives me some hope that the game might see a reversal of fortune. Rally returns to me 2x 747 and he has split his MG position so that I need take more shots when I move but with less FP – this might allow me to stand-and-fight. I decide to Prep Fire with the intention of softening him up a little and kill his Hero and break his 8-0 as well as a Squad. Movement sees the 2x 747 and the 8-1 leader enter 3O5 hex so that I might use Advancing Fire to try and damage his supporting units… and then the predictable happens. JP takes 4 attack shots in the rest of the turn and ends up with an average of 4.7 for the DRs… my men take 5x 1MC and fail all but 1 of those! I started with 4x Squads, 2x HS and 2x Leaders and by the end of the turn have just a Squad, HS and the 9-1 in Good Order!
After withdrawing to Rally in 3P5 JP fires with his combined force and takes his average attack DR for the WHOLE TURN down to just 4.1 with another 2MC on my stack of just-rallied brokies. My 9-1 ELRs, my 8-0 is wounded and the rest of the stack is re-DM. The only guy who survived called a SAN which comes back to break the only 747 who was defending my flank with the MMG. His next shot is with 6FP +3 and that hits my MMG HS in 3O5 for a NMC which fails! JP has units left to move and the Prep Fire Phase is not even over yet! I have a 747 stuck in a stack of broken units and no ability to stop him counter-attacking, it is time to put an end to this farce.
The US surrender with their sole remaining GO unit
GERMAN VICTORY
Conclusion
This game was marred by really biased dice. Yet, despite that I would have to say that JPs placement of the MG stack in 3M2(2) was one of the most brilliant tactical choices for an initial Setup that I have ever seen.
Right from the start of this game this MG nest decided the course of the action and I was really at a loss to find any way to combat it. It was in a LOS shadow to me yet as soon as I moved forward to attack his Gun I was facing FP and TEM which were almost impossible for my 7ML Paratroopers to survive, it was horrible! My best option (2x MMG 747, 9-1) in 3O5 would have relied on me surviving 2x 20FP +2 shots (pre-ROF) with only a single 8FP +2 return shot (AdvFP) before I could take a full 20FP +2 Defensive Fire attack and as the dice turned out there is little doubt that I would not have survived long enough to even squeeze off a burst, let alone break the units in this killer stack. To even attempt to bypass the village and attack from the West would have exposed me to at least 8FP -3 shots! Thanks to JPs defence I had to first take out the Gun’s Crew and then the MG nest before I could even seriously think about his many supporting troops… it was a nightmare.
After the game JP and I looked at where I might have turned the game around. To our mind there were 4 possible attack choices:
#1: Attack from the West. Attacking through the Woods to the West might have presented a unified front but by the time the attack got to 3M8 it was going to be heavily bottlenecked and still vulnerable to (at best) 16FP +0 shots from the MG nest. I did not take this attack idea seriously.
#2: Hold and Pin. In this idea the US attack down the centre but hold their positions with the intention of pushing the Germans back or breaking their defenders. There is a lot of merit to this plan but it still was too vulnerable to the MG nest. 3O6 had no cover to the MGs at all and that location is vital to this option. Also the AT Gun can cause some real damage with a few lucky DRs; it survived a NMC, multiple 1MC and a 2MC before the Crew finally broke.
#3: Attack the Nest: Since 3N2 was the Fortified Building as well as the MG nest location JP saw this as the most likely attack target. His thinking being that to take this out and make the Germans come to take it back would fulfil the victory conditions. I disagree because at best I would still be attacking with 1-3x 747 MMC AM-ing into a Fortified hex against 40FP +3 fire… The stairwells could be easily held with just the MG nest and single assistant MMC to back up against any lucky misses/MC passes.
#4: Attack straight down the Centre – this is what I did. It relied on the Germans having terrible enough dice so that a single US Para could make it into the 3M6 Gun position to destroy the Gun and be safe from the MG nest. In the end, with my Berserkers help, it came down to 8 attack/MC rolls and I survived 6 of them only to fail on the last one.
Personally I think all these attack plans stink and I will be happy to include into this AAR any credible options against JPs defensive setup!
Another beef I have with this scenario is SSR4. That the Gun might not be destroyed by a failed Repair DR means that apart from the loss of its FP there is no risk associated with IF or with non-qualified use. A Conscript HS might IF the Gun and the biggest risk is that it will Malfunction. Personally I would prefer it is SSR4 stated that Destruction is not an option UNLESS it was through IF/non-qualified use. As the SSR stands the Germans would actually be mad to NOT take outrageous risks with the Gun.
As you may have guessed by now this scenario was a great disappointment to me. I really can find nothing good to say about it. Interestingly, JP would like to try this again as the US with the balance… I would rather read a dull book. If you MUST play this scenario then choose the Germans or take the US balance. If you do play the Germans learn from JP: 3M2(2) for the MG stack is the key to this games defence – in his words “put your MGs in level 2 in 3M2 and watch the streets run red”.