ASL12 – CONFUSION REIGNS
Legion defending as the Germans
Jonathon Fry attacking as the US Army
ROAR (G:US – 56:77) – 14th November, 2007
Played with 55 VASL Logfiles (Dec 2007 – Jun 2008)
Poor Jon has not had much luck, the 2 games we have played have been white-washes and in neither case was this entirely his fault! It was his turn to choose some scenarios and this was one of the options available to me – I liked it the moment I saw it as it is one of the few Paratrooper scenarios that I have no recollection of playing (mind you in those days I was killing brain cells with high ROF substances).
I have jumped at the chance to not only play this scenario but also to play Jon again; he is a gentleman even when the games go poorly for him and that is the kind of opponent that I admire the most.
Initial Thoughts
What an interesting scenario. Germans and US Paratroopers squaring off on the out-skirts of a city. The force numbers are equivalent, but of course the Germans have the edge with range and the 747’s have the edge with FP. The US have an extra leader, and that leader is a 9-2, but the Germans get their usual HMG/MMG combo and 3x LMG. The countryside is also littered with Bocage.
Winning this scenario demands that the US forces engage the Germans with the idea of killing as many guys as possible while losing as few men as possible (how novel is that!). The US must gain 12CVP or more and must also gain twice as many CVP as they lose… this forces them to be aggressive. The Germans can exit men off of the North edge of the map which is a way they can reduce their CVP losses… BUT they are limited in the amount of units that they can move each turn!
Due to their initial setup restrictions (no more than 1 MMC per hex) the Germans are going to be close enough to the US forces to necessitate a hedgehog defence there are problems and benefits to this. I think that, at least initially, the Paratroopers are going to find this hedgehog very prickly indeed!
Essentially the Germans have 2 options in this game… break out run for the edge and try to save as many men as possible while holding off the Ami’s OR stand and fight with the idea of causing more CVP losses than one takes…
German Setup
I have set my men up with the idea of pulling back into the valley with its high TEM stone buildings. This gives me the best chance of holding him off as he will have to come to me and although he has 7ML paratroopers they will still be vulnerable to the German FP. Essentially I shall be edging my hedgehog over to the West to take advantage of the buildings and to force him to situate in the lesser TEM Woods.
My men might not be able to move very much, but they will be able to Advance, and if they break they will have a whole extra 6MF to use too. I shall probably try to get broken unit out of the combat area and move them towards the North Edge to exit, thus saving me some CVP losses. Since the majority of my force will be holed up in the valley village I can use movement allotments to get these guys off (assuming they rally!)
My biggest concern will be if he attempts to send me behind my lines, this could cause me some difficulty. His 9-2 leader is also a concern, but if I can KIA him, or even Wound him then the fight will be a lot more in my favour!
US Army Setup
Jon has not gone for any great subtlety in his setup, he has placed him men in a line from 1 R1-AA1. His men are mostly placed in stacks of 2x Squads each. He looks to be mostly be going for a frontal assault with the possibility of sending a MMG 2x 747 and a 7-0 around my flank to stop me skulking off-board.
The Game
TURN 1
His men move forward in an aggressive frontal assault on my Level 0 Woods positions. I have a few shots at him but am unlucky with the dice and he gets off scot-free. He is VERY aggressive with his Advances and places unconcealed stacks Adjacent to my men…
Faced with the thought of shooting or running I have to really look at my options; unless I get KIAs or CRs his strong leadership will get any broken men back up quickly – so I decide to condense my defence and use the limited movement options I have to pull back away from his kill stacks… he is now going to have to come up nice and close to me. I do pop off a single shot and get lucky, breaking 2x 747 (one of them ELRed) but he also gets some useful dice and breaks the offending 467 and Pins another.

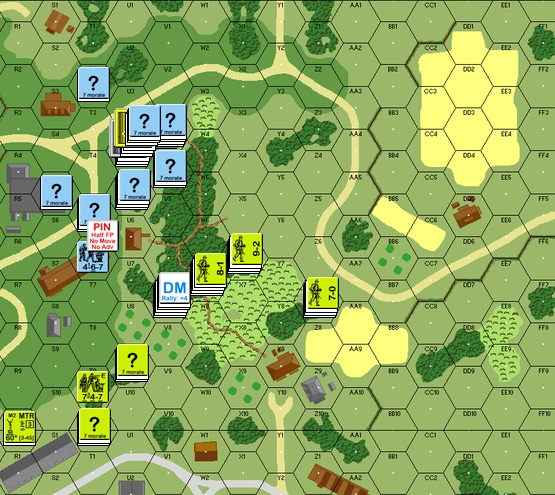
The German’s Hedgehog survives the initial contact while some Paratroopers suffer bad luck
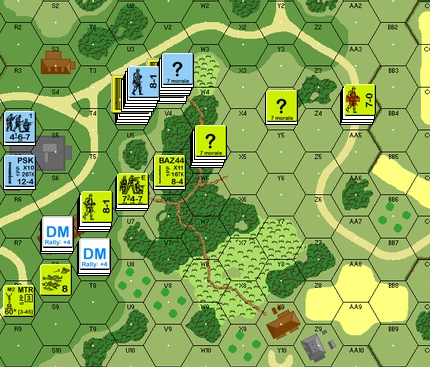
TURN 2
The US are now in no rush, they attempt to out-flank the Woods rather than go through them but at a gentle pace. We both have some ineffective shots with the few units we are willing to risk shooting with but the last shot by Jon does well enough to force the break of 2x 467, they were front-line units designed to be ‘speed-humps’ to stop his advance so this is a pretty tough loss.
Things are still not so good for the Germans. The Rally Phase brings a CR thanks to Fate and my SR attempt fails. Then I shoot with my HMG and MMG, both of whom are able to hit their targets (the MMG even scores 3x ROF) but I don’t manage to pick up a single CVP as the US either pass their MCs or barely fail them and then pass the broken MC to avoid CR… this is very frustrating. I am forced to give up more ground as I shorten my defensive lines and get out of his LOS. In response Jon atomises the firing 467 with a 36FP -1 shot – ouch!
German Losses: 247, 467, LMG
US CVP: 3
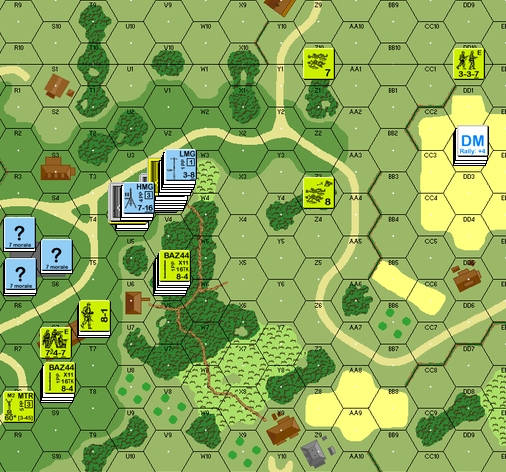
TURN 3
Things just go from bad to worse for the poor Germans; a 12FP +1 shot rolls an ’11’ letting the non-AM Adjacent 747 off the hook and then I fire with a HMG at a MTR 747 with 6FP -3 and barely manage to break him! I get a great 3MC with my PSK – and the US soldiers pass it with ease! ARRRGGG… It is only at the end that I am able to open up with my HMG stack to score a kill on the broken unit in the open and then go on to break the unit who survived the PSK hit. Jon is not coming straight on to my men as I have them covering each other and in major stacks… he knows that up close I have the advantage as I am in Stone Buildings and he will be Adjacent and in just Woods or Open Ground.
The German turn sees my men continuing to slowly give up ground, which has the double effect of later forcing him to make the high-risk moves into open terrain. My Prep Fire scores a useful break on a 747 in the valley building, but I shoot with a 20FP +0 stack and not only miss but also get no ROF… sigh… I re-arrange some of my defenders, but essentially I am happy with the defensive position I currently hold. My moves are reasonably free from danger, but with his 7FP units and Baz ’44 I am always going to be in danger… luckily for me, and unluckily for him he rolls one of the most consistent runs of terribly high DRs I have seen… and the ONLY shot that hit (a Baz TH roll) generated a SAN which broke another US MMC! Thus from the US Defensive Fire Phase the only losses are a broken US 747 and an eliminated Baz.
German CVP: 2
US Losses: 747, Baz ’44
Shots are traded all along the line without much success either way
TURN 4
The US are content to just take pot-shots and change the disposition of their forces, they are not willing to dive into the attack which gives me some free shots after his Prep Fire turns out poorly. Unfortunately I am not able to use this chance, I manage to break a 747 but in doing so I lose my HMG to a malfunction which is a disaster in the context of the game. I have a number of the US forces broken but cant get the subsequent hits needed to finish them off.
Even with some great FP opportunities I am unable to break the poor-DR hoodoo that has afflicted both sides of this conflict. In the end I am forced to make my best unit goes Opp. Fire in the hope that a 20FP +0 shot (assuming I get through Defensive Fire unscathed) can do what the rest cannot. He doesn’t reveal the unit I wanted to hit… nor does he have any luck in Defensive Fire Phase, but I finally score a decent DR and am able to eliminate the Concealed 747 (who was carrying a MMG) – at least he got a Hot SAN in response which broke a 467 of mine. While I am not doing any major damage here I am whittling down his forces with a combination of very high FP stacks and poor LOS options for the US. To attack me he either has to move through Open Ground under MG overwatch, or AM Adjacent to high-FP stacks.
German CVP: 4
US Losses: 747
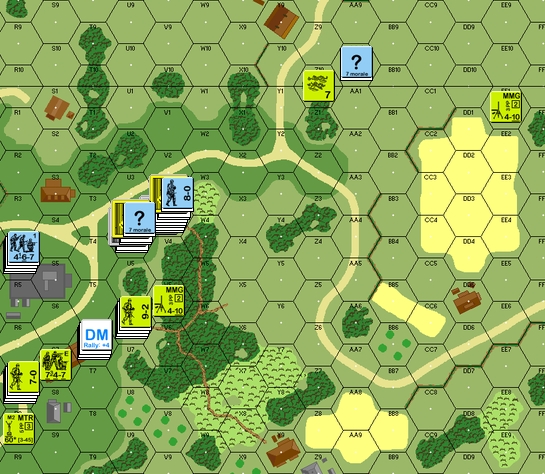
TURN 5
After 2.5 games of terrible luck finally Jon gets a real piece of fortune; a 12FP +3 shot causes a 1MC to my massive HMG position and every single unit breaks… Then things go back to normal as he suffers the loss of a HS through an adventurous move out in the open with a 747. He is firing and not moving and when he is moving he is either trying to flank me to the East (through low/no TEM terrain) or edge into position within the forest. Advancing Fire sees him pull out a nice Baz shot against my already broken MG nest resulting in a 2MC which wounds my 8-1 leader and CRs 2x HS… ouch that hurt!
I do well in Rally with a 467 coming back up in the Western edge 24R4 building but so does he as the unit broken by the sniper last turn rallies immediately thanks to the 9-2 leader. My MMG is able to open up and score a break on his wounded 7-0 and the MMG 337 with him, but the MG doesn’t get ROF and cannot finish the job properly. I have only a few moves to make, I send a 467 upstairs to try and claim the HMG, and move another 467 across to try and cover the gap in this line this last move has caused. My defence is very strong, but extremely brittle and wont stand up to much more punishment so I have to balance my need to hit his men with as much FP as possible with the reality of my strong position and his stung-out attackers who will have to come to me. In the West I left a Concealed unit behind to face what is probably a 6FP +2 shot, so that I can absorb some more of his FP but this bait doesn’t work. His Baz are again running hot and this time they are able to ELR break and then CR the 467 MMC who had made a run for the HMG in the U5 building. I rout units away and am finding the 24V3 building is becoming a major rally point for the units as they are getting hit by his 9-2 led units. I Advance a concealed unit upstairs to the HMG position but I wont attempt to claim the HMG as I need that concealment if I am to survive…
German Losses: 3x 247
German CVP: 5
US Losses: 337
US CVP: 6
His flanking moves go horribly wrong but he is causing so much damage with the 9-2 leader (V5) that I fear a Defensive collapse is imminent.
TURN 6
Things keep getting better for the US forces, a self-rally attempt give a leader creation result and that gifts the US with an extra 7-0 in the valley building area which is able to assist an extra 747 unit with its rally success. He does no Prep Fire, but Movement is not helped by 3 consecutive ‘6’ rolls for SMOKE grenades in the valley. He continues to try and sneak units around the flank to my rear but only succeeds in seeing a 337 atomised by a MMG shot, this MMG goes on a bit of a tear and manages to DM most of the broken units in the area, though it is unable to score any more kills… the run ends with a 6,6 and leaves my poor MG malfunctioned. His moves are more to the West now, it seems he wants to reduce my Western building before worrying about the MG stacks in the level 2 building in the centre of the map. Luckily for me his shots are not even able to strip concealment, let alone break my men in this building.
I fail to repair the MMG but at least I have the HMG now; this MG fires and is able to Pin a leader but nothing more. I also fire to re-DM some units in the East. In Movement I defensive skulk in the Western Stone Building as well as sending a HS CX to start mopping up the mass of broken units in the East – I decline the Surrender of a 747 and declare No Quarter. Advance Phase allows me to re-arrange the men in my main building so that they are spread out thus allowing them to FG but not letting them be knocked out by a single lucky shot.
German CVP: 8
US Losses: 337, 747
US CVP: 6
TURN 7
The Wounded 7-0 lucks out and rallies and then is able to bring up the MMG 337 with him, though it is a case of too little too late. He uses his best stack to fire at my concealed guys in the 24S5 and only gets a PTC for his trouble – sure it strips my units cover, but I would rather he waste time over here even at the loss of all units because that will still not be enough for a win! He blasts away at the now unconcealed unit but luck is not with him, even when he does get a hit with a Baz I pass the 1MC with ease. He has just a single stack to move; the 7-0, MMG 337 out on the flank take a first tentative step forward and both die from a k/1 result that rolls doubles for the RS… poor Jon, he doesn’t deserve crap DR like that. My Defensive Fire comes along and I also score some hits but again the MC rolls are hot and the worst he suffers is a 747 broken and a 8-1 pinned (all this from a 16FP +2 shot). I take a chance and un-conceal the other in-LOS unit in the R5 house, but even though I get a NMC result from this attack Jon’s US forces manage to pass all 3 MCs.
I eliminate my MMG from a failed repair roll but it really is not that much of a worry now, the enemy in that field of fire has been decimated and the game is almost certainly in the bag for the Germans as the US will find it hard to get the required CVP. Prep Fire goes well with a 20FP +2 shot breaking his 747, 8-1 stack and that also stops him from making a strong attack back on my few visible defenders, the ones who were exposed in the 24R4 building have skulked back and will indeed stay back now… I cannot afford to lose men at this point in the game – though he would need 11 more CVP without any loss to himself to score the win now.
German Losses: MMG
German CVP: 8
US Losses: 337, 7-0
US CVP: 6
A lone HS cleans up his units in the East while the massive Germans FP holds off anything but a suicidal charge by the US.
TURN 8
With nothing to lose the US now charge into the attack, it is all or nothing with it being a high probability of nothing. He jumps off towards the heavily defended U4 building and has a 747 and his 9-2 Pinned (thankfully he rolled the results of that through a RF), this is then turned into a mass-break from the Adjacent Defensive Fire attack of 36FP +1 and the subsequent HMG ROF tear (this tear also wounds his 7-0 and breaks 2x 747 right out in front of the R5 building. The Americans have lost this battle.
German CVP: 11
US Losses: 337, 747
US CVP: 6
GERMAN VICTORY
Conclusion
Newer players in ASL need to start off with Defensive actions. Once they have started to master Defences then they need to learn that Attacking is a completely different situation.
In this game Jon showed his inexperience as an attacker by not keeping his force together, by not hitting the Germans with enough of a ‘punch’ before trying to get around them and by not using the terrain and concealment to his Advantage. These things can be learned from playing more games as the Attacker and by learning from the mistakes of this game. Thankfully this is something Jon has no trouble doing as I watched him dramatically improve as a Defender in just 2 games.
Like a lot of newer players he also focussed more on the firing than on the moving. This is often a fatal mistake in ASL due to the time constraints of most scenarios. In this case it was probably not so bad… 10 turns for such a small game does invite the US player to be more inventive with his tactical disposition. The Germans (being holed up in the best terrain on the board) hardly presented an easy target but this is also an indication of the need for the US player to be more thoughtful about getting as much FP onto a target as possible, to swamp the Germans with numbers and Concealed Adjacent AM troops whilst also ensuing enough men are available to replace the inevitable Broken units.
The Para’s have a great SMOKE grenade chance which is needed to cross heavily guarded streets; it is just that the dice were TERRIBLE for him when he did try to use the grenades.
The close-in FP of the Para’s is also excellent, as long as they survive the initial contact with the enemy, and any German player who stands and fights is going to ensure that you are facing as much FP as possible but once they are within range then the Germans should find themselves outclassed very quickly indeed. The flanking manoeuvre was a great plan too, it was just poorly timed and did not use the terrain (including the Bocage) as well as he could have. On the other hand his use of the Baz was most excellent and caused me all sorts of head-aches.
Like all the Paratrooper games this was an excellent little scenario with a limited OoB. It is a great way for newer players to learn the use of Baz and MTR and also provides experienced players with enough flexibility to make it an interesting contest. In fact it is the length of this game and the limited troop numbers and movement options for the Defenders that make this such an interesting Scenario.