ASL13 – LE MANOIR
Legion attacking as the US Paratroopers
JP defending as the Germans.
ROAR (US:G – 128:61) – 26th June, 2009
Played with Live VASL Logfiles
I have no recollection of playing this game at all. I know I have had the Paratrooper Modules for as long as I have had ASL, but when I look over the scenarios I am only aware of playing a few of them before.
JP and I have been looking for games without complicated rules or SSRs as we seem to be arguing about that stuff a lot recently, for this reason we went back to basics and despite my misgivings at seeing how much this game is going to suit JPs style of play I am determined to teach the old fox a trick or two! It was my choice of scenario, his choice of side.
Initial Thoughts
Wow… this is a tough looking scenario, though the more I look at it the more I question which side has the advantage.
Just 2.5 Squads of Elite Germans are trying to hold off a company of US Paratroopers!
This game is won by the US if they control 2 Victory Buildings. It is won by the Germans if they can cause the US to have ≤4 GO Squad Equivalents on the Board.
Even the fact that the Germans have 2x HMG and a MMG as well as a Hero to assist in the fight just doesn’t seem to make it possible.
The terrain is open and the US have a SW mix of the usual Baz overload as well as 2x 60mm MTR and 2x MMG.
The more I look at this I see only 2 possibilities:
#1 – The Germans massacre the US as they move out in the open.
#2 – The US manage to break a German unit before the massacre and this leads to the crumbling of their defence.
In either case the potential for a dicing is very, very high and this makes me nervous.
There is no doubt that ROAR puts this down as solidly pro-US. However if anyone is going to win this as the Germans it is JP… I am not entering this game with any element of over-confidence.
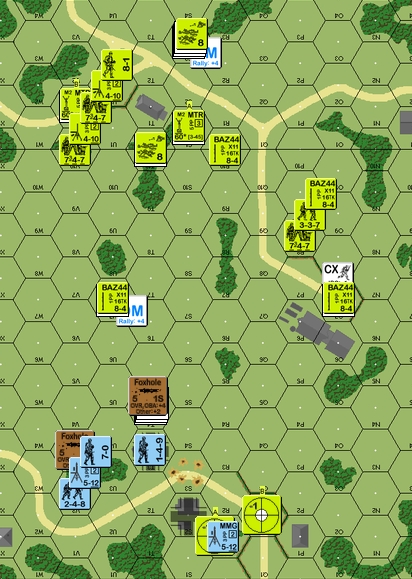
US Paratrooper Setup
My setup was based upon the idea that he was certain to place units in 2 locations:
4Q2 covers the road that leads to the Manor-house. Anyone attempting to move to the South is going to have to pass a FL here.
4T4 covers the frontal approach to the Victory Buildings as well as being able to cover the flank approaches.
Being forced to setup AFTER the Germans yet having no idea of where they are thanks to their HIP whilst also being limited to just a few hexes around 2T1 does really constrain the initial possibilities for the US attack. The Germans can say with some certainty that the US are most likely to expose themselves to 2 out of 3 of their initial positions… the US have to commit themselves with the knowledge that a canny German player will not expose his men or open up until the US are deeply into their line of attack.
For this reason I have placed my MTR ready to Opp Fire on the most likely German positions.
I am going to be ready to spread to BOTH flanks of the battlefield as well as being very aggressive with my HS screen down the centre to flush him out!
3R1: 2x Baz ’44 747
3R2: 2x 747, Baz ’44 337, 8-0
3S1: Baz ’44 747, 60mm MTR 337
3U1: 2x 747, Baz ’44 337, 7-0
3V1: 2x MMG 747, 60mm MTR 337, 8-1
German Setup
Even though I have no idea what the Germans have done prior to play I have placed their setup here to give the AAR some definition.
My setup was based up upon the expectation of units being in 4Q2 and 4T4. The only location to surprise me was the 4V3 units
4Q2: MMG 468
4T4: HMG 468, Hero, 9-1, 1S foxhole
4V3: HMG 248, 7-0, 1S foxhole
The Game
TURN 1
The low Dice just never stop with JP, the more he needs them the more likely he is to get them. In my Movement Phase have 2x 747 KIA off of 4FP-2 shots and another HS is KIA due to him declaring No Quarter… it was a simple situation of; do I sit in place and wait for him to ROF me to death or do I try to get to a position where I can hurt him? All I needed was a few misses and a few MC passes and as usual this was asking a little too much despite the statistical probabilities! In the end I managed to get 2.5 Squads worth of men to the Manor House and have placed my MMG stack with the -1 leader in a location to start to hit him. His Defensive Fire Phase has left broken units littered all over the map, though they are thankfully at long range or in difficult LOS to him. Putting my MTR in Opp Fire positions which could hit his most likely setup locations was a great move. By the end of Advancing I have his 4T4 HMG location under -2 Aqr and the 4Q2 location is under -1Aqr; these MTRs are all at 4FP +1 thanks to either airburst or the reduced TEM of Bocage thanks to Area Fire… thus JP has to think now about staying or running.
JPs Prep Fire is able to Pin, but crucially NOT break my Southernmost MTR. This means that when JP moves his 4Q2 unit through the 4R1 Woods (as expected) I have a clear LOS… the shot comes home with a CH! the 16FP -2 result is enough to KIA his 468 and leave the responsibility for this entire flank up to the 4T4 position. This result was unfortunate for JP as it was exactly what we feared…a solitary good attack DR for the US or bad MC for the Germans (he doesn’t suffer a single bad MC roll until the final turn) has turned the game entirely on its head. Mind you, I am not complaining. He wiped out 25% of my OoB in the first Movement Phase and the US lose if they have ≤4 Squad Equivalents in GO on the board! JP pulls back from the 4V3 position which is a real surprise, it basically allows me to openly move on the northern side of the battlefield once he has exhausted his Fire opportunities from the 4T4 units. JP also pulled his Hero out of T4 to the Victory building in 4T3, this was a surprise as that extra 1FP -1 would be most useful in the stack I would have thought.
Allies CVP: 2x 747, 337
Germans: 468

Suffering terrible luck the Germans have had their excellent defence nearly neutralised and must scramble to plug the gaps
TURN 2
It would be negligent of me to NOT put pressure on the Germans now. They have lost 40% of their force in a single DR and that has shifted the game over to my side. With the North of the board open I make a suicidal run with a HS to threaten the rearmost victory building (4S2) and that gets JP firing with some of his units… a follow-up 747 to lock his HMG CA into place gives me complete freedom in the North and shows that JPs dice have deserted him as shot after shot is missed with ease. In fact, things have turned so completely for me that I get impetuous and make a rush forward with my 8-1, 2x MMG 747 stack to get adjacent to the 4T4 position… a single lucky attack or CC can put this game out of reach for the Germans. As luck would have it this was one of the few times in the turn that JP managed to get a decent attack and I was left with a single 747 form the FPF to take into CC. My 747 killed his defending MMC but is KIA in return, the sole remaining unit in the hex is a lone 9-1! I now have units in the Shellhole adjacent to the Victory buildings and it is hard to see JP pulling his butt out of the fire from here.
The US get lucky with Rallies and JP fails to pick up the HMG in the hex with the 9-1. He moves the other HMG stack and these guys get broken by MTR shells as they travel through the Woods. It is strange to see JP expose his men to Airbursts like this, this is the second time that he has made it easier for me by moving through Woods in MTR LOS. The only other move is the Hero to join the leader in 4T4 for a ‘last stand’; he has just 2x SMC manning a HMG up against half a Company of US Paratroopers. The 9-1 was actually broken but a follow-up shot caused him to go Berserk right at the end of the German Turn so he is able to man the HMG until his next Movement Phase.
Allies CVP: 747, Baz ’44
Germans: 468
TURN 3
Proving that the defenders are not toothless the HMG manned by the 2 SMC are able to rip another 747 to shreds in my Movement but it is far too little, too late. The US surround the brave defenders and literally blast away at them until the 9-1 is Eliminated and the Hero is Wounded + Encircled. Jumping into CC, 2x 747 are needed to kill this sole Hero but with his death the Germans are left with only a broken 7-0 and HS stack, and these are all but surrounded… the Germans Surrender.
Allies CVP: 747
Germans: 9-2, Hero
The US Paratroopers have broken all the Defenders and accept their Surrender
ALLIED VICTORY
Conclusion
What an enjoyable game! A quick look at this scenario makes you feel that it is going to be a dicing and a half… and in many ways it was. However, once you accept this fact and the challenges it brings then it is a really fun experience! The game swung backwards and forwards; a single DR, a single offensive or defensive failure makes the whole games balance change wildly. I would suggest that the better player take the Germans, that will give the game some more balance I feel. As I have already mentioned this game was perfectly suited to JPs playing style and that is part of the reason we got such great value out of it.
Obviously as the US my tactic of hit hard-and-fast worked… but it was a close run thing and the whole game essentially hinged on a single attack result; the CH on the units moving through the Woods… if not for that then the result would not have been so sure.
I really got to hand it to those German defenders… the last-ditch defence by the 9-1 and Hero is something I am going to remember for a long time… they held off half a Company of US Para’s for nearly a whole turn!
Seriously, this scenario is not for the faint hearted but it is a blast of a game and considering that JP and I played it in less than 3 hours on VASL it is something you can knock over in no time at all!