RED BARRICADES
CG III – THE BARRIKADY
17 October
JP defending as the Russians
INITIAL THOUGHTS
Well this one is a big game, lots of squads and only a few toys to distract your attention, obviously like all CG’s infantry is the most important buy. I looked at a few AAR’s on the net and they varied from a massive win for the Germans on turn 1 (100+ stone locations) through to moderate gains and equal losses all the way to one website claiming it is impossible for the germans to win so I am not sure where to set up or where to draw the line and make a stand. Given that CG 1 has victory conditions of taking all but 3 stone locations on/west of row ‘U’ and north of the gully in 12 turns I have decided that the northern manufacturing hall and northern foundry are where I will stop him on game 1.
BUYS
I had only 8 points so bought:
Militia company in reserve. (Full, with an 8-1 leader)
SMG company in reserve. (Depleted, with an 8-1 leader)
80+mm OBA standard ammo and a pre-reg hex. (More about this later…)
Just for the fun of knowing I will mark each squad with a company number to see how long it takes for a company to be totally destroyed and to see if any survive a decent amount of time.
COMPANY DESIGNATIONS
RFL ‘#’ 4-4-7 Rifle Coy (I3)
SMG ‘#’ 5-2-7 SMG Coy (I4)
MLT ‘#’ 4-2-6 Militia Coy (I5)
G RFL ‘#’ 4-5-8 Guards Rifle Coy (I1)
G SMG ‘#’ 6-2-8 Guards SMG Coy (I2)
My first 5 companies are listed below:

My OB given troops were all full and I was lucky enough to get a 9-2 leader with one of them. I also changed 2 of my 8-0 leaders into 9-0 commissars for their quick rallying skills, one will be in the factory complexes where their extra morale factor benefit can rally 1st line troops in a factory with a ‘10’ or less which means I can keep a lot of guys in the firing line. My 5 fortified locations are at level 0,1 and 2 of the Commissars House (BB18) and levels 0 and 1 of BB25 – this area will be my “Alamo” and I will make my last stand there if it gets desperate so I will try and spend any left over FPP’s on this defence.
SETUP
RFL Coy “A’ will hold the left flank while RFL Coy ‘B’ will hold the right, both have a few squads up front as a delaying force and the rest at the main line of resistance. My 2 SMG companies and the Militia company will be in the Northern and Southern Foundry Halls as well as the Northern Manufacturing Plant and the Gun Tube Hall.
THE PLAN
The Pre-Reg hex is crucial to my plan. Buying a pre-reg allows the Russian to drop a barrage on a north-south axis so I am planning on dropping a barrage from D4-D12 which will stop him attacking across the board in an easterly direction with his troops that entered on row ‘A’ so my observer and phone are in level 2 J21 (The Plant).
I will also try and set the B13 building (the Railway Offices) on fire thus containing his troops in this area, he will hopefully send them north up to D3 to go around the barrage which buys me time as it will take a turn or 2 before he gets into the action. (I was originally going to buy another OBA module and drop it on B8 with the barrage sealing the troops in all the way up to D0 but the cost was too high and I decided on this option as it allowed me to buy an extra infantry company.)
The other entry area is along the north edge which I feel is divided into 3 areas, the first is A1-I1 which has fairly open terrain pockmarked with shellholes. The second area (where I expect his squads to enter from) is from J1-N1 and has a lot of debris with the whole lot encased by a stone wall and seems to be the safer infantry option. The entry area that it is least likely he will use is from K1-U1, it has some shellholes, open terrain and a few small buildings, if he enters here my HMG and AT guns will have a field day!
So, to summarise:
I expect his attack to come from the A3-N1 area and my defence is setup with this in mind. I have a put one HMG in level 1 of the Commissars House with a -1 leader, these guys are concealed as I want him to know I have the open area row ‘O’ to ‘U’ in my LOS to once again make him attack in the area of my choosing.
My second HMG and 9-2 is HIP in level 1 of K10 where it can put fire on A10, B10 and C10 to buy time for the guys in the Railway Offices to set their fires as well as rows I, J, K and L where I expect his infantry to come from. (I want to keep this HIP until his Stukas have dropped their bombs – I am pretty sure he will buy them as he is in love with Air Support).
I have 2 minefields, one is at C11 to slow down his southward attack until I can kindle the Railway Offices and the other is in the L5 building hex. The L5 building is where I expect to make my first counter attack of some kind, I have a HIP 5-2-7 in the cellar of both L5 and N5 with a view to advancing into CC after he has taken the building, I am hoping that the mines in L5 will stop him from routing broken units out of the building so my HIP in that hex could get some cheap kills against broken units in CC or, conversely, the minefield breaks him as he enters the hex and I can CC him in my turn.
My AT guns are in the Commissars House at level 2 (all fortified) and in the J13 factory hex where it can put fire on the Shipping Docks area and protect my troops in the factories from his armour. That leaves rows ‘D’ and ‘E’ open to exploitation by his tanks so I have an ATR unit there as well as another ATR and a MTR in reserve further south, I also have a 4-2-6 reserve in the F19 factory where, due to being Fanatic in a factory they can street fight any passing AFV’s without need of a PAATC.
My last HIP is a 527 in the cellar of the Railway Offices to surprise him and once again buy my troops in there some time to set their fires.
I have 11 squads in reserve in the foundries and Northern Manufacturing Hall to complete the defence. My biggest kill stack is a reserve 426, MMG, 2x 527 and an 8-1 leader in O8 where they can fire at the L5 building or hit P7 with PBF of 36 FP which should stop him taking this factory for this game at least. My mortars are on the roofs at J13 and U17 where they can put fire on him as he enters and also strip concealment without me having to give him any free intel. I have 4 squads and a Commissar in the Northern Foundry and Gun Construction Hall as a mobile reserve or counter-attack force. Likewise I will release 4 squads from the Railway Offices once it is a’blaze and send them into the action where needed. The rest of my troops are spread out from F12 to F5 and across to U6 with some of these troops taking their shots at him as he crosses the open and then falling back. I have a MMG in V11 which will put a fire lane up the V10-V1 road to stop him attacking eastwards as I want his attack to concentrate on the F5-P6 line.
TURN 1
Well, no plan survives first contact with the enemy and my plan was no different, to be precise my plan fell apart BEFORE contact with the enemy. He dropped SMOKE on C9 which blocked my observers LOS so I could not start my Barrage plan but it is a fair trade, the Russian has the CC advantage and so SMOKE does not hurt him and in fact I may use it to do a small counter-attack, his OBA is not dropping HE which means my guys are all in good order and I may get to keep my module for next game. He also rolled for Stuka’s but to no avail – I told you he would…
In his movement phase only about a dozen squads entered the board along with 3 Panzer IIIL’s. He only has 3 squads over near row ‘A’ supported by 2 tanks, a single squad and MTR in L0 and the rest of the squads plus the remaining tank entered at T0 and U1 – the area I thought least likely for him to enter from. They immediately made it clear that they want to attack eastwards before heading south. I had a few shots and broke a scout HS but did not want to expose my HMG or AT Guns as he is obviously feeling out my defence and trying to see where best to commit the majority of his force. He finished the turn with a tank in bypass of my guys hex at W1.
In my turn I fired my 45LL AT Gun from the Commissars House at the side of his bypassing tank in W1 and it kindly died with no crew survival while I also kept concealment so his Stuka’s will not have a good sighting TC DRM; I am pleased about that. I will not use this Gun against infantry as I do not want it exposed and bombed back to the stone age. Other than that I merely repositioned my troops, losing one to a snake eyes TK roll as it exited the F6 building while its companion squad was broken by a sniper. One squad AM’ed north into the SMOKE just to see what he can snap up next turn. I also moved my factory reinforcements a little closer to the Chemists Shop which will obviously be my main line of defence if he attacks southwards but they are not yet committed to the action and can turn to face any assault in turn 2. His defensive was ineffective due to me playing hide and seek while his OBA moved and dropped more SMOKE on F10 nearly obliterating my OBA observers LOS to the shipping docks.
THOUGHTS
I was surprised at how little he sent on board and although he is not attacking where I would expect him to I am still very confident of holding the T0 and U1 troops. I am already thinking about a pair of localised counter-attacks – one through the SMOKE near the Railway Offices, using it as cover to get into CC and the other at the U1 MTR squad, assuming he does not reinforce too heavily in that area as it is where I want him to attack from.
TURN 2
Wow, he has got a lot of men…He scored air support but only one Stuka turned up. His Prep bought SMOKE on my right (Eastern) flank and the Prep was ineffective. In his Movement Phase his attack certainly took on shape, I would say that he has a probe in force coming in from the North and West towards the Shipping Docks and his main attack is on my right flank where he bought in another 3 tanks, and another half a dozen squads. I had some Defensive but not much and his Advancing Fire did little damage to me with only a squad breaking which rallied next turn thanks to a Commissar (glad I exchanged 8-0’s for them).
In my turn I pulled back and committed my central reinforcements to my right flank where they took up positions in the Chemists Shop. I lost a squad carrying a MMG that was trying to get to the rubble in Y14 to put fire down the road but his Stuka swooped and killed him in a hail of lead (sadly he HOBBED into a fanatic but then was KIA’ed on the next shot). His Defensive Fire saw a MTR squad in J13 ELR and the squad in N5 ELR too. I advanced a pair of conscripts out of O6 to CC the tank that had cheekily driven up to O5 and Immobilised it in CC for the loss of half a squad. Over near the Railway Office I also advanced a concealed squad into CC with a concealed HS and won the ambush roll, I declared H to H and gakked the 9-1 DR with boxcars, he chose not to withdraw and attacked back at 1-2 and scored a CR. Things are not going to plan but are still in control at the moment any way. Next turn the SMOKE clears on my left flank and I can get some OBA happening, I have been moving up in this area with a view to making his troops attacking the Shipping Docks divert to hold off my counter-attack so I am hoping they will be near my pre-reg hex by the end of his turn.
THOUGHTS
I am surprised at where he is attacking, he needs stone locations to get the scenario win and he is mainly taking wooden ones at the moment, I am keeping my AT Gun in the Commissars House concealed so his Stuka wont attack it but sooner or later I am going to have to fire, I get the feeling he has more AFV’s off board and wants to carry riders down the board – but he can’t as it is only 1942. Either way I know I need to have street fight opportunities along the ‘V’ and ‘Y’ roads and to keep my ATR in good position. He has spent 2CPP on Stuka (early arrival), 7CPP on a rifle company and 3 on a Pz IIIH platoon which leaves him 3 CPP so he might have another OBA module which is unlikely as it would have fired by now or he has either a PSW, SPW or another tank platoon which reinforces my feeling he is trying to open up a path for an armoured strike down the eastern side of the board. The game is poised with both of us losing 6 CVP; but mine were all infantry while his was a Tank.
TURN 3
I had no rallies and his all failed, a nice start. His Prep was minimal with him dropping OBA on 2 of my dummy reserve counters – the rules say “may be exposed when in LOS” (unless attacked of course) so I have not been exposing my reserves as soon as they are in LOS which has led to him being wary of them all, including the dummies – all good for me. He managed to CR a pair of squads when he scored an ROF run with his F6(1) MMG but other than that he has chosen to move rather than fire. I pinned a leader and sturm squad next to my pre-registered hex (D8) and also scored a SAN which killed a dummy stack!!! This means he spent 1 CPP on fortifications and also that there are another 16 dummy counters out there, it also means that he has probably bought a HT platoon which I have not seen yet so I will try to re-deploy my ATR’s to cover against a HT invasion. A sturm squad was KIA’ed by my HMG in the Chemists Shop as it tried to enter the L5 building. A half squad went down the gully at CC3 obviously with a view to flanking me so now I have to react to him and his HT’s did finally arrive with troops on board. In my Defensive I made a major error, I got contact and then exposed my pre-reg hex only to realise that I had not got battery access and, yes, you guessed it, I pulled a red chit!!! (He self broke and routed away…curses!! I was too eager to score some cheap kills) revenge was not far away as my AT gun in the Commissars House toasted a HT carrying a sturm HS. I was happy to see him advance into N5 where I have a HIP squad in the cellar ready for a nice CC attack. His Advancing Fire saw both my conscripts in Melee with his immobilised tank get disrupted and they both died in CC, while the flame in the railway office became a blaze. CC saw my half squad in the C10 melee die for no damage to the Germans.
Now that he has committed all or at least, most of his troops I can counter-attack and although my 1st CC’s in this game have been disasters for me I am sure that my –1 stealthy bonus is the best way to kill German squads. My Prep was small and ineffective (I particularly avoided firing at N5 – I want him to stay there) but I did get my OBA on board, I also lit a fire in the W7 building with a view to putting this entire block on fire so as to force him into the open if he wants to attack the Chemists Shop. My movement was all about covering gaps, I sent a squad to my far right to cover his HS in the gully and I also sent one squad adjacent a massive fire group (2x MG and a 9-2) to draw fire so that another of my concealed squads could AM adjacent one of his rifle squads for a CC opportunity. I also kept attacking near the Railway Offices as there are a lot of concealed stacks there which have never been exposed and so I feel there must be a few dummies amongst them. CC saw me successfully kill a dummy stack at B10, I failed the ambush roll at N5 (had a –3!!) but killed him none the less although I was CR’ed in the process. At S6 (near the big firegroup) I successfully ambushed him and killed the squad.
THOUGHTS
I am giving as good as I get but it seems he just has more (or, at least, enough, troops) the CVP tally is 18 for me (4 squads, 2 AFV’s – with a 3rd immobilised) and 15 for him. My counter-attacks scored some of those kills but more importantly they have shown him that he does not want to get into CC with me regardless of who initiates it.
TURN 4
Every game has a turn where the outcome is decided and, unfortunately for me the winner was Legion, his Prep saw a snake-eyes on my concealed guys in B10 pinning the other squad and breaking the 9-1 leader. He then followed up with another snake eyes to kill a rifle squad in some debris at L6, his big firegroup at S5 KIA’ed the squad that I had sent to draw fire and it also CR’ed the squad that had killed his rifle squad in CC. Another mega firegroup on my right flank KIA’ed an ATR concealed squad which I had re-deployed to cover a HT invasion. In his Movement he got smart and searched L5 before entering, exposing the minefield and HIP squad but he was CRed in the process. I finally exposed my 9-2 and HMG in level 1 K10 and fired at a squad and leader but the 8FP –4 shot fell short of the mark and only broke them. A SAN for him (mine has been extraordinarily quiet) killed the broken 9-1 near the Railway Offices and CRed the broken squad with him. He has got very aggressive with his armour on both flanks and also sent his HT to unload troops next to my guys in the block in front of the Chemist Shop, I was able to CR one of the squads and Wound a leader as they de-bussed but the weight of armour is too much, I currently have 3 squads held in CC by bypassing tanks. On the positive side I have 2 tanks stationary with one each in the LOS of my AT guns and my MTR has LOS to a pair of stationary HT so things can turn around quickly.
My turn started out well and for a moment it seemed as if I might be able to re-take the Shipping Docks, my OBA broke his firegroup in F6 and my AT gun Shocked his tank, all I need now is for my 8FP +1 shot at his I9 troops to break them and I can charge out 4 squads and re-take those buildings while only being exposed to a single tanks fire but alas, my shot was a ‘10’ so I will have to be more careful. Elsewhere on the board my AT Gun in the Commissars House scored a possible shock on his tank but it passed the TC and my MTR went intensive fire and scored a hit on a hex with a HT and a squad and a HS, the following ‘3’ destroyed the HT and broke the HS. My movement consisted of having a half-hearted attempt at a side shot of his shocked tank in the Shipping Docks but his Stuka dived on him and pinned him in place. I moved a squad into the sewers at P10 as a subterranean reserve and to let him know I will be doing sewer movement so he had better watch his manholes, especially the ones in buildings. Over at the Chemist Shop I tried to re-deploy my HMG into the cellar but the only shot that could hit it (a 4FP +1) broke the squad, the leader picked it up as the squad routed away. Other troops from the area where he had done his bypass freeze sleaze also tried to escape but only one made it out and into the Chemists Shop in good order although the others are at the back of the shop with a broken Commissar so if he rallies it can all change quickly. His defensive saw a CH from his K9 tank kill my 9-2 leader and squad (his subsequent roll was a 1,2 – all of a sudden things are falling apart everywhere). My last good order squad in the L5 building was also broken – the other squad had moved through the cellars to attack the N5 troops but got broken too. Advancing fire was ineffective although the Railway Offices turned into a blaze across all 3 hexes so my plan in that area is working and I may drop my OBA on his troops down that way. Sadly the W7 flame refused to turn into a blaze so he will be able to AM across that area and attack the Chemist Shop. In advance I moved a pair of concealed SMG squads from O7 to CC a sturm squad with 2 DC’s in O6 and they were successful so another of his squads bites the dust and I may be able to pick up the DC’s in rally.
THOUGHTS
Things are getting desperate for me and I am hoping for a ‘1’ at the game end dr next turn, I am currently in a line from C15-F14-F9-H11-K10-O6-R10-W10 and strategically that is as far as I want him to get otherwise I could lose the Northern Foundry and the Gun Construction Building as they would be untenable if attacked from 3 sides. On the positive side I have 2 of his 4 tanks with acquired counters on them (and one of them is shocked anyway) and my MTR can see his last HT so I might be able to negate some of his bypass sleazing.
TURN 5
Things went from bad to worse. He rallied his shocked tank in I9 but few others. I lost 1.5 squads in Prep Fire including my MTR squad and in his movement he swamped the guys at the Chemist Shop. Both his tanks put my front 2 hexes in bypass sleaze and, although they spray-fired the hexes in front as the tanks arrived, all his infantry passed the 2FP +0 RF (I rolled 3x 7’s and 5x 9’s) they all jumped in during Advance and I took a beating in CC. Over at the Shipping Docks the I9 tank started up and I scored an Immobilised result, the crew had to abandon so hopefully that is one tank out of the game, his other bypassed K10 and bashed straight into the Northern Foundry, he followed up with a HT that froze K10 and his 2 infantry squads came into the action around there too. By Turns end I have lost 7 squads with 1 more broken and waiting to be snapped up and another pair locked in melee. His tanks have run rampant and I have nothing to slow them down with, even my 45LL AT guns need a DR5 to kill them. In retrospect my OBA should have been where it can support the Chemist Shop instead of the Shipping Docks, I currently have 2.5 squads that can defend the Chemist Shop area and if the game goes on for much longer I will lose a lot of factories for the simple reason that they will be assailed upon from 3 sides. (I am hoping for a dr 1 at games end – if it goes to Turn 6 he will take a bit more land but if it goes to turns 7 or 8 then he will have won a major victory).
In my Prep Fire my OBA broke the crew that had abandoned the I9 tank and my BB18 AT gun destroyed another of his tanks with the 9-1 AL and crew escaping but dying further on in Prep Fire from the squad stuck upstairs in the Chemists Shop. In my Movement I started pulling troops back on the Eastern edge of the board as I have too few to defend the area if he gets a Prep Fire Phase at them but in the Centre and Western edge I kept going for the jugular. I sent one squad through the sewers to attack his tank in L10 which scored an Immobilisation in CC and also pushed one around to the North of his escaping 8-1 AL in I9 to kill it for FTR and I also went for a CC in F10 where he had a single unsupported squad. His Defensive did little damage except for his Stuka that scored a CH against my BB18 AT Gun and the building rubbled down to level 1 and killing a squad that foolishly non-AMed in the Northern Foundry Hall. Close Combat saw heavy losses for both of us, I lost 2 squads and a leader and he lost a squad and a half.
THOUGHTS
I am trading too much land for time but have no option, I have lost easily a dozen squads in a very small area in the east and although his attack is petering out it still has enough venom to take out the troops left there. I hope the game ends next turn…
TURN 6
He kept up the pressure and mopped up the guys in the Chemist Shop, a HT tried to freeze sleaze one of my squads in the Dock-yard but was killed by the squad in movement, however, that allowed a pair of squads to get adjacent and they killed him in CC. My right flank is wide open and he is pushing hard with his last tank and HT along with the few squads he has left there. In the centre he was able to charge my AT gun and it malfed out during Intensive Fire with the crew breaking and running in Rout. Meanwhile the slug-fest on the left flank kept going, he lost a wounded 7-0 that searched a dummy hex where I had 2 squads hidden. During CC I lost about 5 squads and 2 leaders but he also lost 2 squads.
In my turn I dropped my OBA on the melee hex at F11 where I survived the PTC but both his units failed it, the next roll scored a CH which rubbled the target hex and killed his squad in there. I attacked where I could but my defence has lost all cohesion and all I am trying to do is kill any of his squads that are unsupported, a counter-attack of squads and a concealed leader at the J13 AT Gun was dealt a severe blow when the 2mc (NMC vs ldr) rolled a 6,6 for the ldr and both units broke. CC was better for me and he lost 2 squads worth to my one. Sadly I did not roll the end of game dr so the slaughter will continue…
THOUGHTS
Wow, this has been expensive!!! Although he has taken and will take, in turn 7, a lot of terrain this last turn has cost him dearly with his losses being a HT and 5.5 squads along with a leader while my losses were roughly 8 squads and 2 leaders. All I can do is keep trying to kill squads so I can launch a counter-attack next game before his re-enforcements reach the front line.
TURN 7
The slaughter continued as he was basically mopping up at this stage, he made big in-roads into the terrain as I had no-one left alive to stop him. I was able to kill a HT that tried to freeze sleaze my guy in BB13 and also took out a HS in CC but my losses were 3 squads, sadly I lost the squad in BB13 during CC which would have made a large area (roughly BB13-U12-V15-DD16-BB13) an isolated one for me but would have denied him a setup area – in retrospect I should have broken and routed away to deny him the buildings as a setup area.
In my turn I pulled out of his LOS where possible and then advanced forward in the hope that the game would end which, thankfully, it did. In the post game wrap up I killed a HS in a melee and he lost a pair of Immobilised tanks from blaze spreads. He also destroyed the captured malfunctioned AT gun and lost every decent MG of mine that he had captured.
THOUGHTS
Phew…
THE BUTCHERS BILL
93 CVP to him and 69 to me shows how ferocious this game was. He lost 17 squads to my 39.5 squads. Both my AT Guns died along with their crews but he has lost or had immobilised 9 out of the 10 AFV he started with – my infantry losses would have been a lot less if these boys had been taken out quicker.

DR Stats
I kept count of all DR’s divided them into categories:
CAT ‘A’: RALLY, MC’s, PTC , PAATC.
CAT ‘B’: IFT, TH#, TK#, OBA, CC.
CAT ‘C’: MISC: CS, HOB, SNIPER, PHONE, WEATEHR, ESB, BOG, BLAZES ETC.
CAT ‘D’: BURN OFF
CAT ‘E’: TOTALS
The average DR’s for all are on the right of the table.
(Russians in red, Germans in blue)
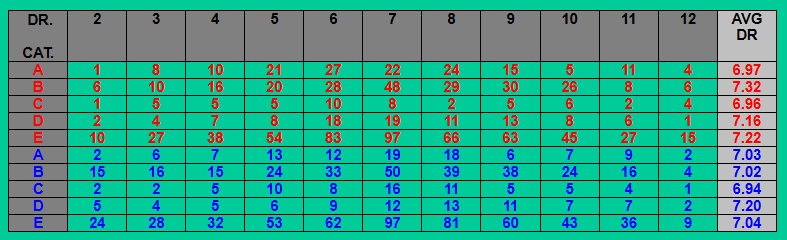
As can be seen, both of our Rally/MC DR were within a whisker of each other (only 0.06 difference) but our IFT shots were quite different with mine being a full 0.3 higher. As is often the case in ASL, it is not what you roll but when you roll it, had the DR’s for his burn offs been used on his MC’s or IFT shots then the game could have been different.
TOTAL RALLY/MC/PTC DR
● RUSSIAN: 148
● GERMAN: 101
TOTAL IFT/ TH/ TK/ CC DR
● RUSSIAN: 227
● GERMAN: 304
The telling stat from that above is that the German had 47 less MC/rally DR’s and 77 more IFT shots showing the weight of firepower he had over my Russians.
FINAL THOUGHTS
If I were to do this scenario again my buys would be different, I would probably buy a pltn of T-70’s dug-in to counter his armoured threat along with a Rifle Coy in reserve, an OBA (80mm) with either 1 CPP on fortifications, a Mol pltn in reserve or a pre-reg hex. (I would go for the MOL Pltn as they have AT capability and can set buildings alight).
My mistake was to look at the game from a tactical view point and assuming Legion would enter from row ‘A’ using the cover to advance, however, he saw it from a strategic view and knew that if he could get the Chemists Shop he could make the Northern Manufacturing Hall untenable for me without him having to lose a lot of blood to take it. That said, if my OBA Observer had been in the Chemist Shop or Commissars House his attack could have been shredded as the approach to the Chemist Shop is very narrow and quite open and I would recommend anyone playing this to have their OBA on that side of the board.
WHAT WORKED
● Not always activating the cloaked counters when he was in LOS kept him guessing as to whether they were dummies or real and caused him much consternation.
● Mines in a building hex with HIP squads in the cellar was brilliant and he was doing a lot of search dr which caused him to lose a HS and a leader.
● Setting buildings alight channelled his attack but I should have done it all on turn 1 instead of seeing where his attack was coming from.
● OBA!! The +1 TEM from shellholes or debris might be good enough to withstand a 4FP shot but it is nothing vs 16FP or more from an OBA hit and he needs to cross the open ground to get to those factories.
● Sewer movement was good to cross areas that would be under fire but was not effective as a way to get behind him and cut rout paths, the 3 hexes you can move takes you from your front line slap in the middle of his front line.
● CC!! You have a –1 stealthy for 1st line and elite so use it!! It is the best way to kill Germans and half of my kills were from it. Don’t try it with the militia unless they are concealed though.
WHAT DIDN’T WORK
● I just didn’t have enough AT guns to take out the 10 AFV’s he had although the MTR did keep his HT honest and he was eventually forced to take the mortars out but a large part of company ‘B’s losses were from being freeze sleazed.
● Militia were OK when in factories but melted away to disrupted nothings when outside of them.
● HMG in K10 and the Chemist Shop were too close to the front line and both (although HIP to start) were quite ineffective with only 1 HMG scoring a KIA and both dying quickly under the barrage of rifle fire from his nearby troops – or in the case of K10 a CH from an AFV.
● Trying to hold the M6 building and the Northern Manufacturing Hall, I should have just done a cautious withdrawal from these positions.
● My sniper did minimal damage and would not be worth spending a CPP on to increase it.
● Level ‘C’ booby trap did nothing and would not be worth spending the 1 CPP to increase it either.