RED BARRICADES
CG III – THE BARRIKADY
18th October
Legion attacking as the Germans
Played with Live VASL (6 sessions: `6 hours)
After the last game the Germans have quite some territory to hold, they have managed to capture nearly a third of the terrain and completely hold 2 factories, this is a stunning achievement. The cost was high though and while the Russians lost 2.4 MMC for every German MMC lost this is not enough for me at this stage.
The Situation

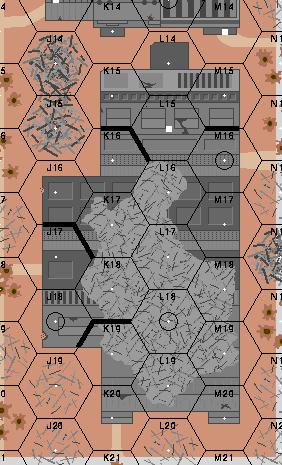
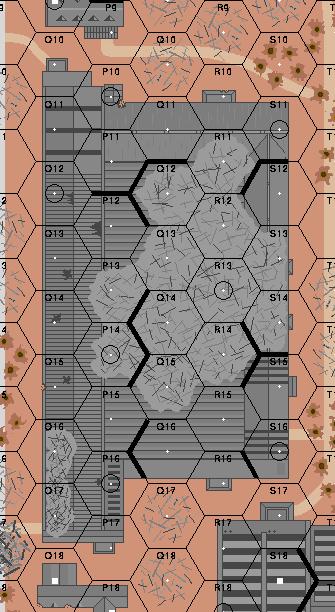
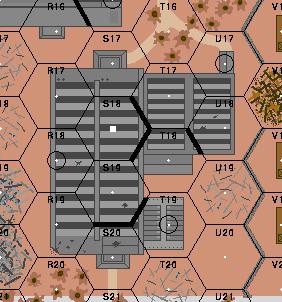
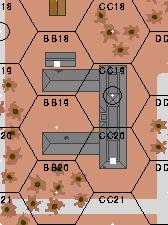
Map at game start with Perimeter marked out. Blazing locations are also marked
The weather is Overcast but Dry with No Wind
Beginning of Game Forces
German
2x 127, 247, 238, 9x 467, 6x 468, 2x 548
7-0, 2x 8-1, 9-1, 9-2, 10-2 + 1x 8-1(wnd)
11x LMG (some scrounged from AFV)
3x MMG
2x HMG
ATR
2x 50mm MTR
2x DC
2x Pz IIIH (1x Immobilised)
Captured
LMG
ATR
Russian
226, 7x 426, 3x 447, 2x 527
7-0, 10-0
LMG
MMG
2x ATR
2x 50mm MTR
German Purchases
With a -5 DRM I was not going to have to worry about missing out on too many CPP and as it turns out I managed to score 18CPP for the next game, but that don’t buy too much!
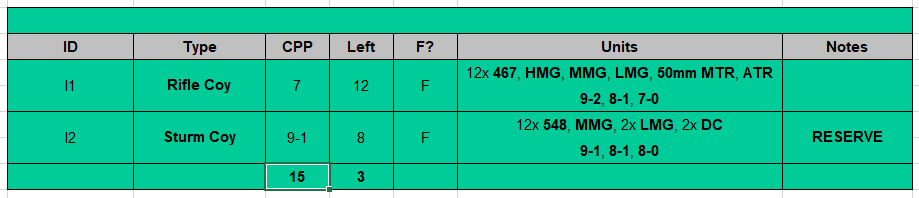
I am choosing an attack chit
The Sturm Coy is to setup in my back lines to protect against any counter-attack into the Chemist Shop or Red House area.
I shall bring the Rifle Coy on from off-board… this will delay any attack I aim to make but I hope to cover my initial lack of strength in the line with the use of my FPP and the nearly 2 Coy of units I have left over from the last CG Date.
Russian Setup
He has not bought as many troops as I thought he would! in fact I am amazed how FEW troops he seems to have. He has also put some men on as Reserve units, but they are far enough back for me to not have to worry about activating them until I have ground his other forces to extinction. I am sure he will have OBA, and I am worried about the thought of a local Counter-attack somewhere… but my men have sufficient number and more than sufficient FP to deal with anything coming straight at me.
After the last game he will expect more AFV to attempt to freeze-sleaze him. I have not bought any more though, I have preferred to keep those points for some other little plan I have been brewing! Still, this means that he is likely to have bought more AT Guns, and that is an expensive buy.
Aims For The Game
My aims for this game are:
#1 – Take the Garages and Expand
#2 – Take the Southern Foundry Hall
#3 – Take the Gun Construction Building
#4 – Hold the Chemist Shop and Red House
I am actually not going to be too concerned with taking territory this game, though if I manage a breakthrough I shall exploit it with all I have. I am more interested in killing his troops. If he decided to buy lots of men for a counter-attack then I shall happily let him come to me. Otherwise I shall just put up slow but steady pressure to grind forward. With this mind it is hard to imagine that I cannot achieve my territorial aims.
Obviously I am a little concerned about the Commissar’s House to Chemist’s Shop Area. I have put almost the entirety of my Sturm Company here to stop him should he try to push through this area. He could, possibly, surround me and thus retake the Factories from the rear if he wants to be audacious, so I have placed a few mobile forces in this area as well – just in case.
The Factory attacks are not going to be a problem, my FP advantage should win the day unless he really tries to stand up and fight or Human Wave me. Even then I am not too concerned, I am just hoping that he did not learn his lesson from the last game and that he throws men away against me. I have placed my sole AFV in this area for a bit of FP and Failure-to-Rout support. I have also armed a Sturm HS with 2x DC to do the ‘Breach Attack’ against the units he is sure to have skulking behind Factory Inner Walls.
THE GAME
Objective #1 – Take the Garages and Expand towards the Factories
I bring only a few forces on here from off-board. I want to feel out his defence as I am concerned that he might actually counter-attack here with some HIPs or such-like. As it turns out I activate a 447 and have a HS broken to a poor MC DR, but I am able to claim board-edge hexes and enter rubble or buildings Adjacent The Garages. I have also brought on a 9-2, 3x 467, HMG, MMG, LMG stack right down in the Shipping Docks area and they are making their way towards the factories I hold.
JP pulls back, I outnumber him 3:2 but I think he is trying to draw me into some more of his HIP location CC attacks.
I bring on another 8-1, 2x 467 to bolster the attack on this building while also sending a MMC across the Railway lines to claim the buildings there. JP reveals that he has quite a force in here (2x 447, MMG, 426, MMG) and so I decide to sit back and wait until my 9-2 led MG stack is close enough to force the issue.
JP also plays the waiting game but I reduce the odds against me when I am able to break a Conscript thanks to the reinforcing 9-2 stack.
Wow, this battle is a tough one… I take my only loss of the turn here when he muscles in for CC and manages to wipe out a HS, but I get some revenge when I kill a HS of his and then hold 2x MMC in CC with just a single 467. I was really in a great position until a lucky MMG shot broke the 2x 467 with my 9-2 and HMG/MMG combo… these SW would have easily turned the tide of the battle to my favour. As it is we are in a bit of a standoff, but I am about to regain my potent MG stack and his men are finding it hard to do anything except CC.
We are still dancing around each other to try to gain position and CC advantages. I decide to bring on my last 2x 467 from my reinforcements to help in this battle and they enter the contested Garages without loss. In my CC Phase I reinforce the battle (after firing into the Melee and Pinning each of our forces) and then kill off a HS for the loss of a 467… sigh… still, I think that with external MG support and the numbers I have in this building it is going to fall to me now.
As expected JP runs most of his few men out to safety across Arbatovskaya Street. The rest (2x MMC) either stay to fight (1x MMC) or dive into CC as usual – only this time I am the one who ambushed him and a lone 247 kills off a 447 in H-2-H CC! With just a single unit left in this building against 4.5 MMC I am going to be able to take this for the Fatherland with ease.
I surround the final unit in this building before entering into CC with him; unfortunately with 3x 467 and and 8-1 against a solitary 447 I am only able to score a CR. To make matters worse I lose 2x HS, one of them is killed when JP reveals a HIP AT Gun (C23) and the other when a Dash to attempt to capture my first building across the central road on the other side of the Railway Embankment fails thanks to Reserve units (447 in F21). Luckily the F21 unit is smashed by a SAN and I now own some real estate on the other side of this road in the main factory area!
This battle stays reasonably static in JPs turn, he tries to reinforce the F21 area but gets broken by my AFV when a Dash goes wrong. I kill the final unit in the garages and this completes this part of the Objective.
The Garages are Captured.

The Garages
I swarm my men out across the open terrain under the barrel of his AT Gun. Luckily he cant hit anything and by the end of the turn I am Adjacent to the next building (C23) which is the last obstacle standing between me and the remaining open ground to the West of the Railway Embankment. His shots are atrocious and I make it forward without loss. To the East of the Railway Embankment I am able to expand my territory and take a whole chunk of buildings (F21, F23, G22), I defend these in depth with multiple units.
JP skulks away, he is not crazy enough to try and shoot it out. Most of his moves are just to get out of the firing line. He Advances back into his original locations, but I would not give much for the chances of these units were the game to go on for another turn – luckily for him it ends.
Objective #2 – Take the Southern Foundry Hall
My initial probing HS take a few hits each and both Break thanks to my run of poor MC rolls. On the plus side I am able to cause a Breach with a DC which smashes one of his MMC and the rest of them who had shot at my probing HS were either wiped out or forced to Rout by the Opportunity Fire Death Star (10-2, 2x 467, HMG, MMG) Adjacent to them. On the more unfortunate side of things I enter a CC with 2x LMG 467 vs a 426… there is no Ambush and while I am able to CR him he also CRs both of mine (thanks to a poor RS roll). I have my lone AFV facing down the side of the building but it seems that JP has spent more points to get AT Guns (4CPP) and one of them is facing me down; luckily he fires and misses.
I have already made big in-roads into this Factory and so JP starts to move men over to cover the gaps. He had a Berserker in here, but his run came to a quick end thanks to a 24FP -2 shot rolling low. By the end of the turn he has 6MMC in this factory, but 3 of them are Broken and a HS is in CC. The AT Gun blasts away again for another miss.
By firing into the Melee I am able to ensure his HS dies while both my HS survive. The rest of my men grind forward as few shots are exchanged. I am taking only a few hexes a turn, trying to keep his men as targets rather than letting them leave me the factory for free. I manage to get my first SAN result for the game which Pins his AT gun thus allowing my sole remaining AFV to escape by crashing into the Factory – although I am Bogged the Russian HS here withdraws rather than risk CC.
JPs men still mostly avoid confrontation, they hide behind the thick factory walls (and I hope to show him what an error that is in the next turn) or run out of the Factory entirely. He activates a mass of 447 with a MMG and leader in H19 and promptly runs them into the backlines of his defence. In what is sure to be the beginning of a nasty tactic he Advances a Concealed Conscript MMC into CC with a German HS – JPs luck naturally holds, he gets the Ambush, then the kill and then withdraws. My losses in this factory are 1.5 MMC so far, and bad luck has played a major part in all these.
The DC Breach works like a charm and the follow-up MG stack which fires on the already messed up stack of his units finishes the job off with ease… he loses 5CVP in just 2 DRs. These DRs were about the only effective ones I rolled though, his pathetic 8FP +3 shots are ripping me apart as my men still have no idea how to pass MCs.
The last of his units run out of this Factory and try to make it across the street to the safety of The Plant; this building is rapidly becoming a bit like an Alamo and I hope it falls just as surely. As soon as the Russians activate Reserve units they are running away to their back lines. This leaves me the option to sit in my nice new Factory and to fire away with -2 Deathstars, or to attempt to push out across the mean central street and attempt to deny him setup locations for the next game.
The Southern Foundry Hall is Captured.
The Southern Foundry Hall
I push forward and start to stake out the exterior walls of this factory to ensure I can bring my massive FP into play. JP misses out badly when a great HMG shot through a roofless factory hex scores terrible dice and then he misses again when his AT Gun (manned by a 447) pops away at my Pz III with no effect; my Panzer had moved up to the edge of this Factory but ended up Bogging again.
JPs men try to skulk and for the most part they succeed, but they are trapped in The Plant and will find it hard to get way or get into firing positions (seeing that I have almost every hex in my kill-stacks LOS). He keeps pulling back where possible but does manage to move his Crew back to the AT Gun.
It is so demoralising to see my massive FP advantage wasted through non-stop terrible DRs and great Russian MCs. Even when my MGs do hit they rarely get ROF and even more rarely do the Russians do anything other than a single Break. I move a HS out into the central street, trying to tempt his Reserve units to activate, but they are either Dummies or he doesn’t want them revealed yet.
JP pulls all his men back in a big skulk move, waits until the Defensive Fire Phase is over and then moves what he can back… I open up against the Reserve units here, I clear up 2x Dummies this way, and I also obliterate the Conscript Berserker with a great PB shot. It is a stand-off here, JP cannot pull out, nor can he counter-attack, nor can he expose his men to my FP – but I am also having trouble getting close enough to force the issue and missing when I do get shots. At least he loses the 45L AT Gun here to a risky IF shot.
With time running short I decide to take some risks and along with most of the rest of his shots in this Turn 6 JP misses some real sitters. I place Opp Fire on all my Deathstars and then rush HS across open terrain. The Russians are forced to expose a 447 in the M22 building but he misses badly and get smashed by 3 stacks firing at him.. mind you, the best I am able to do is only to break him, I don’t get the KIA I desperately need; still this building is taken and with it is gain a lot of territory and another opening across the dangerous Arbatovskaya Street. I move my AFV out of the factory (his AT Gun is malfunctioned and the crew was eliminated in Prep) and promptly Bogs it in the first hex I enter… sigh…
JP skulks his men back as well as attempting to kindle The Plant; this fails but he is at least free from my FP in his current location. Little happens, I have few targets so I decide to smash a 447 who impetuously tried to edge forward toward the P20 Rubble.
Objective #3 – Take the Gun Construction Building
The very first DR of the game is a Deployment attempt which activated a Booby-trap and thus I suffered a CR. My men flood through this factory in search of his units while the 2x Death Stars I have placed in here go Opp Fire. JP has placed a 527 HIP right up close and this unit fires but misses against a HS, the HS fails later though (I failed 6 out of 9 MCs in this first turn). When it is my turn to shoot I wipe out a few Dummy Stacks (so he bought Fortifications too) and put the fear into him when he sees just how much FP I have available.
As expected JP turns and runs. He is edging his way out of the Factory to avoid my massive FP advantage and thus giving me the building with little fight. He had one of his precious leaders with an MMG (O18) but they didn’t last long at all; both leader and manning 447 are forced to drop the MMG and run.
My men quickly reveal a dummy stack as they reposition themselves in this building. I lose a HS thanks to a HOB sending him Berserk, but in doing so I am able to kill a HS of his too. My shooting has been atrocious for the whole game from these units but he knows he cannot stand up to my men so he is continuing to slowly pull back. I am only 4 hexes short of controlling the Factory by the turn’s end and I have a 2x 468, HMG, MMG, 10-2 stack able to cover the Gun Tube Hall and Rubble field adjacent to it (Q19).
JP’s men run as fast as their little legs will carry them. I don’t know why they bother though, the few target I have to shoot at are only just broken by even more extremely pathetic shooting from my men. To make matters worse he again managed to kill a HS by risking a Squad in CC; he knows my dice are poor at the moment and doesn’t have to worry about the statistical odds.
The last of his men have left the Factory and mine flood forward without loss. I take the adjacent Level 2 building (a great tactical position for my MG stacks) and am ready to attack the Gun Tube Hall.
JP’s men continue to withdraw, they have been spared heavy loss thanks to my poor DRs but they have little coherence and are only conscripts, thus they are finding it had to form a serious defence now they are out in the open.
The Gun Construction Building is Captured
The Gun Construction Building
I have claimed the best positions from which to cover the open terrain and to force him to withdraw deep into cover, but in doing so I have had to leave the defence of this Factory to a mere 2.5 MMC and when they attempted to push into the Gun Tube Hall a point-blank shot by a Conscript broke and then CRed one of those 467s. I have had to pull back a bit as a result. On the other hand the first-turn reinforcements have managed to make it this far and are attacking the Gun Tube Hall from the other side, this will force him to split his forces a little.
As expected, JP attempted to force his way into the Gun Construction Building and in doing so I fired the first of very, very many poor shots this turn. I had to Voluntarily Break a HS to save them from CC and I also gave up one of the Hexes in my factory. I am not too worried though, I have many forces who will hurt him easily since he has left men exposed to attack.
My men now reinforce the attack on the Gun Tube Hall with one of my MG stacks whilst also forcing the 447 who had attempted to re-take the Gun Construction Building to withdraw as a Broken unit. I am unlucky (for a change) with my MC with the first unit to enter the building but then he falls prey to the pair of Conscripts that form the backbone of the defence of this building. With the entry of a MMG 467 and a 9-1 leader (the LMG 467 with them broke also) it seems that things are looking up in this area. I charge into CC with a 467, 7-0 vs a 527 and we both kill each other, this is not good for me at all…
By claiming the last of the Stone Rubble adjacent to the Gun Tube Hall I have also allowed JP to activate a Reserve stack, and that stack contains a HMG, ATR and 3x 447 with a 10-0 Commissar, these men make use of an LOS blind spot to rush into the Gun Tube Hall have made my job of taking any more of it almost impossible… I should be able to hold him off though and in doing so I will be able to consolidate my gains and give me a strong place with which to start off the next day’s battle, especially with the Sturm Company and their DC.
How quickly things change around… my men suddenly have trouble missing; the units in the Factory here devastate a Conscript and are left with ROF but no target to shoot at. Then I charge a HS into the guts of this building in an attempt to gobble up terrain and to force him to risk entering my MGs LOS to regain ground – but he cannot hit this guy at all… it is so strange, JP cannot shoot straight and I cannot fail MCs. By the end of the turn I actually have control off all but 3 of the hexes in this building and I am daring the Russians to move into the attack against me (and thus risk losing men) or to preserve the stats quo and gift me 75% of this factory. Outside the factory I am able to escape his OBA with just my Wounded 8-1 being broken, but a slick move by JP allows a Russian Conscript to retake almost all the terrain he had lost near the Gun Tube Hall – this is smart play, had he allowed me to hold this terrain then his defenders would have been forced to setup on the other side of the map’s central road to avoid being surrounded.
The Gun Tube Hall
Objective #4 – Hold the Chemist Shop and Red House
This whole area is awash with my Reserve Strum Company, I also have 3 MMC and 2 leaders here as well, just in case I need the mobility. The First turn is a stand-off, though his SAN (4 successful attempts from 5 rolls) manages to Wound an 8-1 in this area. JP is actually moving men away from this part of the battle as he realises just how much of a danger my Factory attacks present to his forces. He has dropped some Spotting Rounds in this area, so he has at least 1 OBA mission. It would not surprise me if he planned to bring forces into this area from off-board.
Again we dance around though JP claims the sole hex of mine in the Commissar’s house and also sends out a MMC to start to secure ground around the Gun Tube Hall. I brought on 2x 467, Lt MTR, ATR, 7-0 from offboard and they are rushing into the fray as quickly as possible. I don’t trust the lack of troops in this area (there were 3 stacks until I revealed one of them to be a dummy) but if there are no reinforcements brought on from off-board (or revealed) soon then I shall assume that I can start to attack with my meagre men.
Things are still moving slowly over here, my off-board reinforcements are almost at the battle, but JP has also revealed a few HIP units and is starting to move along the shore lines to stop me from easily claiming his backlines in the next game. We move back and forth but I think he senses the precariousness of the situation here and wants to try to firm up his defence a little. I am planning to do a minor attack towards the Commissar’s House soon.
This area is really a side-line to the battle, but I move forward with my men only to finally have the OBA called in – I am not disappointed with this as it is ineffective and in doing so he has wasted this mission as it cannot be used in the next game. He has again tried to take me on with CC and although I ended up losing a HS to his CC attack I caused him to lose 2x Squads and apparently all his mobile forces in this area (except for the leader and unit who claimed the Water Pump this turn). Especially galling for JP was the H-2-H Ambush by a Wounded leader on a Conscript Squad of his… I killed his 426 without loss!

The Water Pump
Again I am able to edge men up and a lucky Rally DR scores me a Hero to add to my OoB. With the the Hero I move the entirety of my men up to the Commissar’s House and I re-take the hex I had lost to him at the start of the game. The Hero will also give me a another option for searching out the building so that I don’t fall prey to any HIP traps.
My men nervously edge their way through The Commissar’s House expecting to be ambushed at any moment… but it is not to be! JP did actually leave this building undefended (he had expected me to attack through here he later told me) and I have gained a massively important landmark without loss and with little investiture of men.
The Commissar’s House belongs to the Germans.
BB18 is Rubbled to Level 1
The Butcher’s Bill
German Losses
247, 8x 467 (8.5 MMC lost)
1x 7-0 2x 8-1 succumbed to wounds
LMG
2x DC
Post Game
2x 467 Harden to 468
8-1 harden to 9-1
PzIIIH Immobilised
Russian Losses
228 Crew, 1x 227, 1x 237, 13x 426, 2x 527, 7x 447 (23 MMC lost)
2x MMG
2x LMG
3x ATR
50mm MTR
Post Game
527 hardens to 628
9-1 Harden to 9-2
SAN -1
45LL AT
German CVP Gained: 50
Russian CVP Gained: 22
Stone Locations Controlled by the Germans: +82 (+26 Locations destroyed / Gutted)
The German have killed 2.7 Russians per MMC lost
CG Date won by Germans
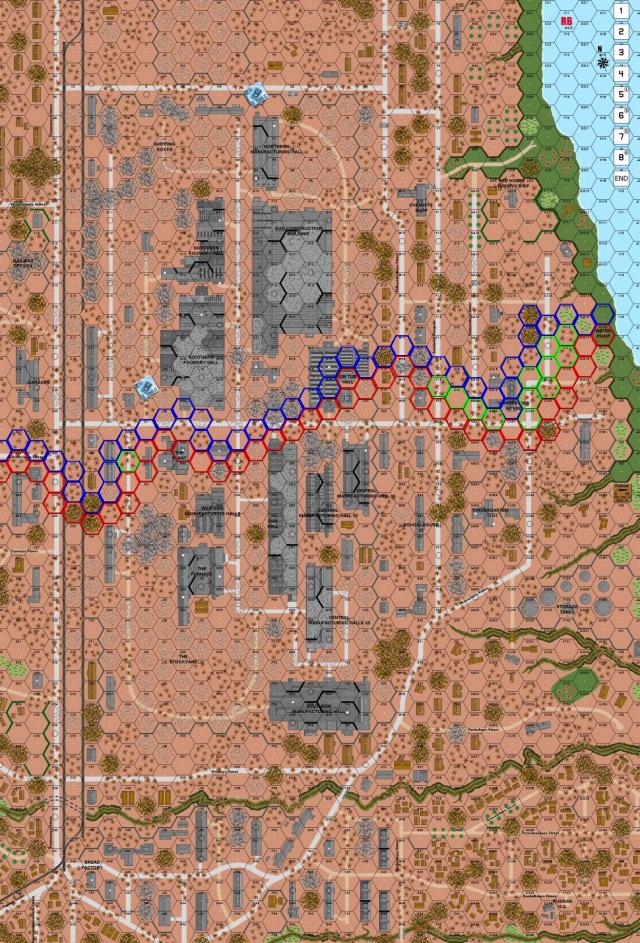
Map at game end with Perimeter marked out.
There are no Blazes to continue into the next game.
End of Game Forces
German
2x 127, 247, 238, 11x 467, 8x 468, 15x 548
7-0, 8-0, 2x 8-1, 3x 9-1, 2x 9-2, 10-2
15x LMG (2 newly scrounged from AFV)
5x MMG
3x HMG
2x ATR
3x 50mm MTR
2x DC
2x Pz IIIH (2x Immobilised)
Captured
LMG
MMG
ATR
Russian
3x 228, 7x 426, 18x 447, 628
3x 7-0, 8-1, 9-1, 9-2 + 9-0, 10-0
2x LMG
2x MMG
2x HMG
2x ATR
4x 50mm MTR
2x 45L AT
45LL AT
Conclusions
If the Germans had not had such poor luck (in the main) with their shots or their ROF then this would have been a blood-bath. I think JP still has not realised just how vulnerable his men are to my massed FP and MG stacks. He is using the terrain as brilliantly as usual in Defence… but being forced to give up ground because he has not used the terrain to setup an Offensive-Defence. By this I mean that the Russian have to force the Germans to lose men to take ground, not just keep their own men alive… Now, it is early days, but still it has been pretty rare for my men to face attacks except in the first turns or when I am crossing killing ground. In fact the best defence of this whole game for the Russians came with their dogged actions in The Garages… this was a nightmare for me as I could not afford to move forward without loss or risk of CC death. I am not sure if he has the men yet to do this across his whole line, but if that time does come about then it will be a torrid time for me!
Tactically I am over the moon with the results of this game:
#1 – I gained both of the Factories that I set out to take, as well as most of the Gun Tube Hall which is an absolute bonus. I also took the Level 2 Commissar’s House and the Level 2 O18 building… both these locations are perfect for OBA or MG positions.
#2 – I was able to cross the central road in a number of places. This is really important as it is a massive killing ground with Russians able to hide in factories firing on Germans as they try to cross with just some debris as cover. By taking locations on the other side of the road I have a number of places in which to put my strike groups and have thus being able to save myself quite some losses. Even better is the ground I have taken over by the Railway Embankment, this is a nice wedge of territory.
#3 – My gains have placed a number of his important buildings in doubt. Taking the Gun Tube Hall is only a DC Breach away and The Plant is surrounded on 3 sides. He can still chose to defend these buildings, but in doing so he is certain to doom his men. Both these buildings are stepping stones to the factories on the other side of the board.
My losses were more than I expected. I ended up losing ¾ of my newly bought 467 Company. Even though I caused massive losses to the Russians (he lost all the Militia he bought and ¾ of the 447 Company) I am not happy with losing so many, and so many to just plain old bad luck (about 2 MMC worth to Fate or Booby-traps). Still, I have gained a whole Sturm Company without loss while all his buys (OBA, Militia Coy, Rifle Coy and AT Battery) suffered.