RED BARRICADES
CG III – THE BARRIKADY
19th October
Legion attacking as the Germans
Played with Live VASL (5 sessions: 24 hours)
After the last game the Germans have quite some territory to hold, they have managed to capture nearly a third of the terrain and completely hold 2 factories, this is a stunning achievement. The cost was high though and while the Russians lost 2.4 MMC for every German MMC lost this is not enough for me at this stage.
The Situation
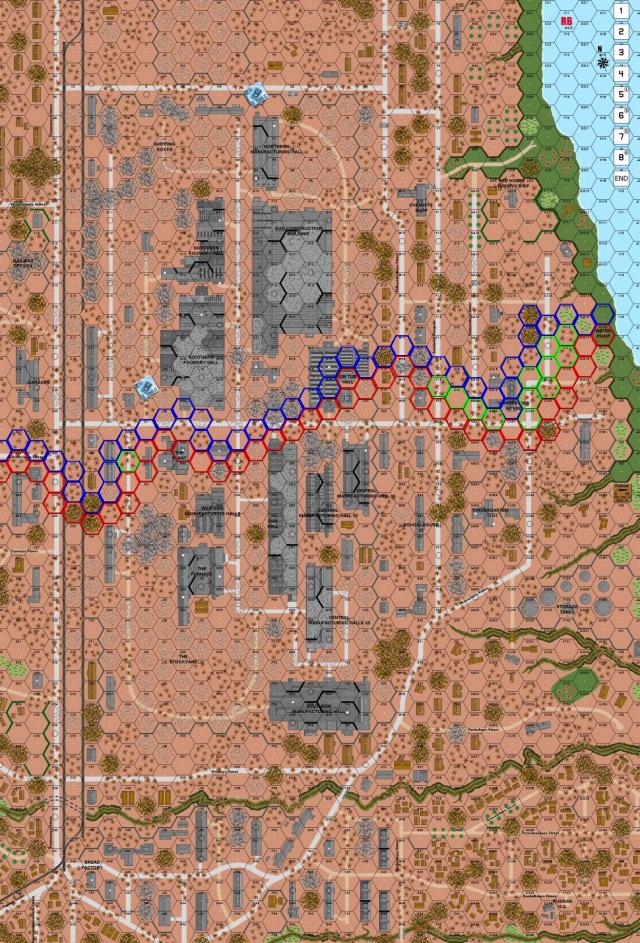
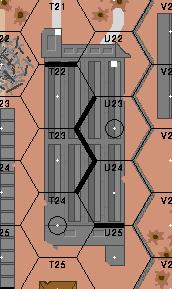
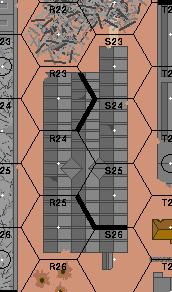
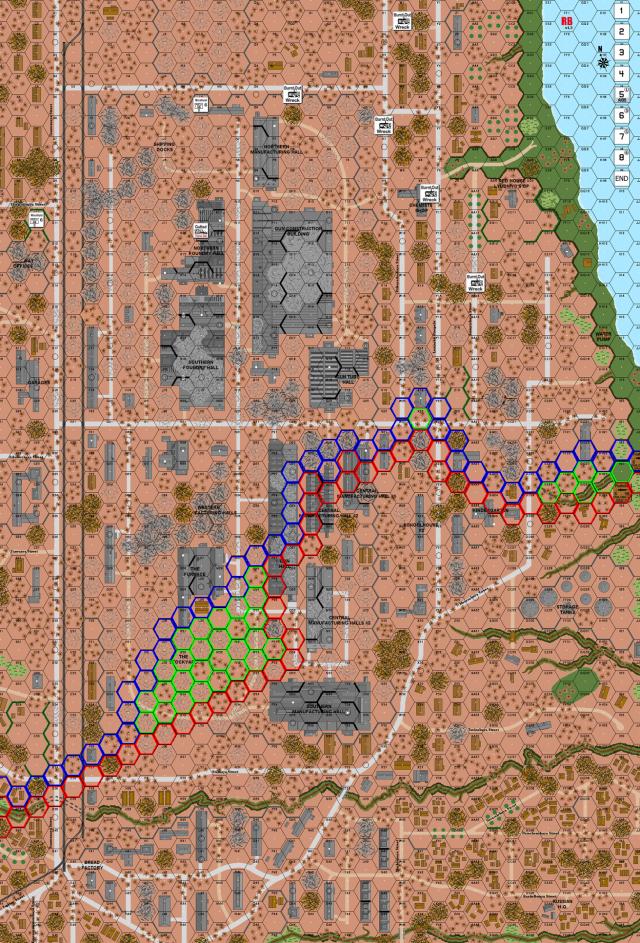
Map at game start with Perimeter marked out.
The weather is Overcast and Moist
Beginning of Game Forces
German
2x 127, 247, 238, 11x 467, 8x 468, 15x 548
7-0, 8-0, 2x 8-1, 3x 9-1, 2x 9-2, 10-2
15x LMG
5x MMG
3x HMG
2x ATR
3x 50mm MTR
2x DC
2x Pz IIIH(2x Immobilised)
Captured
LMG
MMG
ATR
Russian
3x 228, 7x 426, 18x 447, 628
3x 7-0, 8-1, 9-1, 9-2 + 9-0, 10-0
2x LMG
2x MMG
2x HMG
2x ATR
4x 50mm MTR
2x 45L AT
45LL AT
German Purchases
I only had a -1DRM on my buy chart and this gave me 15CPP, when added to the 3CPP I saved from the last game I have another 18CPP to spend.
I am choosing an attack chit
This time there is to be no messing around. I have a great advantage in men, material and positioning so I am going to make an all-out assault. Both my Rifle Companies will be attacking from the West edge, though I might keep a platoon from each to reinforce the centre and the Commissar’s house area and to cover the back lines again infiltrating Sewer units.
My Nebelwerfer will be used to either smash a hole in his defensive line early, or to take out a cohesive mass of troops. If he doesn’t setup on/near my pre-reg hex (S23) then I shall use SR to herd him back towards the area of the attack.
I did not buy any toys, though I was tempted to get Stuka (no point, it is Overcast) or the INF Battery (great guns, but of limited use in the current battle). I did spend a point on the SAN increase, though my sniper has been sleeping most of the game. Mind you, the few times my sniper has woken up it has brought great things so I am willing to hold out for those moments; the lines in RB are often so tensely held that a SAN result suddenly breaking a defender can bring about quite some chances for a bold player (I gained a whole salient in the last game from a single Hot SAN result).
Russian Setup
Finally the Russians are starting to have enough troops to plaster the board with men. It looks like his Reserves are only a Coy in strength and with the Historical DRM at +0 for the Russians he can only have bought 1 more Coy of infantry, this mean more toys (OBA presumably). It would not surprise me to learn that he bought some more Guns as he would be expecting AFVs to be bought sooner than later – I hope to surprise him again!
He has bought units in Reserve and this is not a bad idea as the front line will be coming towards him and thus his cheaper troops with be activated for ‘free’ though it does give me the chance to choose who gets activated and who doesn’t.
One of the biggest concerns I have is OBA. It is to stop this concern that I shall be spreading my attack out a bit, to stop myself being too easily smashed by a lucky OBA strike.
Aims For The Game
My aims for this game are:
#1 – Secure the area West of the Railway Embankment
#2 – Take The Plant and Western Manufacturing Hall
#3 – Take the Gun Hall and Central Manufacturing Halls
#4 – Hold the Commissar’s House and Expand along the Shore
I have a lot of men coming on-board this game and though the area to the West of the Railway Embankment looks quite empty JP would be mad to not have put any HIPsters here… then again, this might be where he intends to bring troops on-board from. I will try to take as much territory as possible this time, there is a lot of open ground but once I have taken the first major building (C23) then I will have a place from my HHG/HMG stack and from here is can jump off on a further attack. Also this area will serve to absorb his men/attention while I attack in other areas.
My gains last game put me right up against The Plant, quite apart from this being an important building and a corner-stone of the defence of the Central factory sector it is also a perfect place in which to base a MG position. It is for all these reasons that I expect JP to torch it ASAP! He has no chance of holding it and that leaves him with no option but to try and Kindle it, to stop this eventuality I will be attacking it as hard and as fast as possible.
I also have the chance to crash through his lines to the Western Manufacturing Hall and it is not unreasonable to assume that I can take much of this during today’s battle.
Taking the Gun Hall and the Central Manufacturing Halls is also going to be an obvious target for my men. What he wont expect (I hope) is the Rocket OBA that I intend to bring down on his men. He has setup without any units Adjacent to my OBA Pre-Requisition and this means that I don’t have to worry about getting a subsequent chit draw. He has quite a lot of men in this area, but with a bit of luck the Rocket OBA will so completely smash them that I will be able to wander in and clean up the mess.
Holding the Commissar’s House looks to be a bit of a difficult proposition, he has put the majority of his non-Reserve troops in this area and that tells me 2 things:
1 – He is likely to bring his off-board reinforcements in on the Western side of the board.
2 – He is aware that this area is ripe for the taking.
Even with there points in mind I am not going to make a major attack here at all, I would like to expand along the Shore because I want to cut down his entry opportunities but mostly the action in this sector will be to hold him in place and to force him to defend while I am (hopefully) steamrolling his Factory defenders.
To achieve my attacks I am essentially putting Sturm troops in the centre and the flanks will be held by the remaining or reinforcing 467’s. I am using 468 Squads to man the MG positions; I am not using HS because I will need to move forward as the battle dictates thus the extra FP will be a bonus, as will the added security against double-breaks. I have a fair number of leaders, but being so spread out I have had to place them piecemeal along the line, they will be sitting back much more than I usually do to try and keep them alive, I have lost a number of leaders in the past 2 games and I want to stop this trend.
THE GAME
Objective #1 – Secure the area West of the Railway Embankment
My men come on-board and quickly take the first building almost totally unopposed. In doing so I am able to slide a HS down the side of the map to shut off his entry areas just in case he is thinking of swarming me with reinforcements. My total reinforcements thus far amount to only a Coy, that way I can keep him guessing as to my other buys. His turn is uneventful over here and the reinforcements that I feared have thus-far not arrived.
I send forward a screen of HS scouts and some of them pay a price as JPs dice again go hot… I lose 4CVP in this part of the turn’s attack just through KIA or K/ results from 1FP or 2FP shots with -2; it wouldn’t have been so galling if they were MC results, but the losses were all outright kills and that is annoying (as well as indicative of the kind’a DRs he was scoring). However, in doing so I gobble up more of the map edge and cross into the last major piece of cover before the open patch prior to the Bread Factory – I have made it to A29 which puts just 15 hexes between my advance units and the Southern map edge.
JP pulls his men back in the face of 2x monstrous stacks which I had placed in advantageous positions. I am attacking aggressively with roughly 1.5 Rifle Coy and facing me is just an AT Gun, a MMG, an ATR and 3x MMC – there are also 3x Reserve stacks and I bet that they are not insignificant forces since he has done the same trick as last time and not taken any Dummy Reserve counters. In the distance are also 4x MTR manned by 2x Conscripts (one of which is eliminated in Defensive Fire leaving just 2x manned MTR) and an AT Gun (O45). I have to keep pushing here as this area will be crossed only once the defenders are all eliminated or have fired all they can!
My men are forced to move through open ground with just shellholes as the best cover available. We take out the AT Gun crew thanks to some good long range shooting by the 10-2 Deathstar but the rest are passing their MC with alarming regularity. Unfortunately this means that they have the chance to influence my movement and do by scoring a KIA on a 467 – when he gets -2 TEM shots he really makes them count. I move up my 2 big MG groups and despite some annoying AT Gun fire from the distant South I am setup and ready to push him out of his last defensive positions.
JP has decided to fight it out and at least in this part of the battle luck is still with him; he again passes whatever MCs my men dish out at him, but at least his distant MTR positions are silenced and I have moved out of the LOS of his AT Gun. JP knows he must stand and fight and I am planning on taking out all his known defenders before activating his Reserve units, that way I can at least keep moving on the extreme Western flanks and possibly make it as far as the Bread Factory this game while scoring some valuable kills with minimal loss – the Railway Embankment can act as a LOS shield for me from the Reserve units.
At last my massive firepower advantage pays off as multiple MG stacks score ROF and low DRs – and the Russians match this with poor MC rolls; the entire Western side of the Railway lines is open and ready to be taken. I send off units as quickly as I can and try to take as much territory as possible; JP has no HIPs here and the AT gun is unable to hit me either. With all the Known units cleared out of the pesky F32 complex I now send units in to activate the 2 Reserve units here – the first is a 447 MMG who doesn’t last long at all, the second is being kept secret for now. By the end of the Russian Turn his forces here are all in disarray and if the game goes on for any more than the 5th turn then I shall be able to actually cross the gully and will be in the Bread Factory district.
The last Reserve unit is a dummy! I swarm through this whole flank, bringing my MG stacks over to the G33 building to prepare for the encirclement of the Factories… if the game continues on I shall be across the gully and into the Bread Factory area with ease – there is a broken 447 and a 7-0 standing between me and the back third of the map!
Objective Completed
Objective #2 – Take The Plant and Western Manufacturing Hall
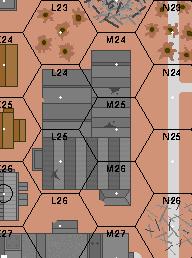
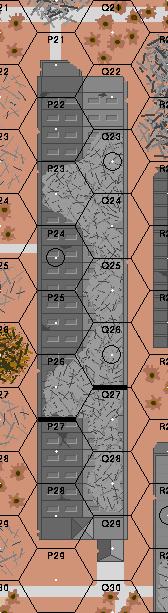
The Western Manufacturing Hall
Again my initial moves are totally unopposed and a Search roll shows that The Plant should be free of HIPs. My men also rush up to attack the Western Manufacturing Hall; in doing so I lose a Sturm HS to a Fate roll though I am able to kill a Conscript of his (also due to Fate, JP rolled 6,6 4 times in this first turn for MCs or SW malfunctions). JP immediately kindles the Western Manufacturing Plant thus gifting it to me and most likely giving me The Furnace too thanks to the Heavy Winds.
Objective Completed
New Objective: Capture The Furnace
The Furnace
As expected the Flame spreads to The Furnace and this will really put him in a predicament as I will gain total control of all this area now (A26.16). So I hope I can spread out through The Stockyard and possibly even to The Southern Manufacturing Hall. JP has a stack of 3x Conscripts that are too fearsome to take on right now as they are stacked together and to tough to consider without some concealment support. He also has 3x Reserve units in this factory and I don’t want to activate them, I would rather they be forced to moved thanks to the expanding fire – I don’t have to attack anyone here, the Blazes will force them out for me as well as ensuring I end up in control of these locations.
The Blazes are spreading rapidly, but unfortunately in the wrong direction; my men are the ones being forced back… I send a Sturm HS with a DC out on the street to scare his 10-3 death star a little but it attracts a lot of MTR and AT gun fire from his units in the distant South, this persuades me to hold back with the rest of my units in this area… I was also concerned about a suicidal charge by his Conscripts in The Furnace through some of the non-Blaze buildings, he cant capture territory but he can mess with my Rout paths and MMC. Mostly this part of the battle is quiet though, neither of us move much and both wait for the other to commit.
My men edge around The Furnace, trying to not activate his Reserve units so I can keep those extra men out of one of the most important areas of the game (the attack West of the Railway Embankment). The Blazes spread all over the Western Manufacturing Hall and I am forced to withdraw, safe in the knowledge that he cannot come to attack me either thanks to my FP and LOS superiority. The battle is slow here, but I do allocate units from this area to attack his 10-3 stack in the Gun Hall – a Fanatic 238 rushes a DC, and throws it on the massive 10-3 stack, but it fails to do any damage at all… However, while his attention was fixed here I had also moved my 10-2 Deathstar over in The Plant to get a shot opportunity and the ROF tear was matched by good attack DRs and terrible MC DRs – his 10-3 was Wounded and the whole stack ended up broken!
I finally activate some of the Reserves, just because I wanted to ensure I had control of the Rubble to the West of the building in case the game ended early, his men were just 2x 447 and they could only move with extreme caution as I literally control the western half of the map now. We still engage in the Sitzkrieg though he starts to withdraw towards the East to somehow provide some support for the Gun Hall which is in real danger of falling completely
Objective #3 – Take the Gun Hall and Central Manufacturing Halls
Central Manufacturing Halls #1 & #2
I dropped my Rocket OBA right away, and the DRs I had were excellent… except for the attacks on the 3 biggest stacks, in this case the attack DRs were pretty useless! Still, I end up breaking all the other units in the area of Central Manufacturing Halls #1 & #2 and this really opens the door for me. My FG in the Commissars House and the force superiority I have thanks to my Sturm Groups (each 2x LMG 548) ensure that he cannot come around the outer edge of the Rockets to cover my next step in the Assault on these buildings… it will be just me vs. his initial forces. Mind you, his initial forces are not insignificant and it is clear that he has bought a Coy of 458, this means a 9ML in the factories! In the Gun Hall I have given him the option to stand and fight (i.e. do some damage and then almost certainly die) or turn and run, thus ceding more territory… a point will have to come soon when he cannot continue to give up territory without a fight.
Surprisingly JP has decided to start sending men into the Sewers, but I have the feeling it is a bit too late for that… my men are poised to smash through his defences and are already reaching his line of Reserve units… what is the point of sending men back to be isolated in Factories that no longer have any tactical bearing on the CG? My Rockets kindle and Rubble large areas of Manufacturing Hall #1 as well as destroying a minefield in the factory. I am right on the doorstep of claiming all these factories here but I assume that the few Reserve unit he has here are powerful stacks… this is likely to be a tough fight, but one that is heavily stacked in my favour. He lost another 2x HS as they Routed out of the Rockets.
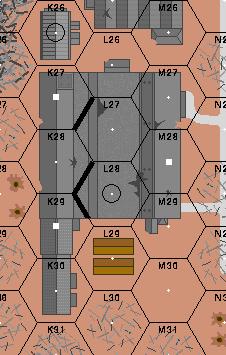
The Gun Hall
Wow… This is actually going to be a very tough battle and I am thinking off pulling out to allow my men to fight elsewhere. The Heavy Breeze is going to spread the fires from the Rockets and so I make a move to grab as much terrain as possible before it is un-enterable. A scouting HS is eliminated by a 36FP -3 shot from a massive Reserve stack with a 10-3 leader… wow, what a time to roll a 1,1 for a leader! This will make capture of the Gun Hall a very difficult proposition. In the Central Manufacturing Halls his big stacks and the +1ML from the Factory also make attacking very difficult, I think this is all going to degenerate into a Sitzkrieg.
The fires spread but we make few moves… JP does infiltrate my other factories thanks to his sewer movements, but I still think this is a fools errand – he is going to seriously risk having these units cut off and isolated in the next game, and while they are wandering around the sewers they are not affecting the real battle. A huge stack fires and misses at an Adjacent Sturm Squad – the Sturm fires back and really messes the remaining units up… There is no doubt about it, JPs luck is helping to keep him in the game, but when it doesn’t fall in his favour then the Germans have such an advantage – all they have to do is keep pressing and eventually the Russians lines crack; especially since JP is not using the Factories as much as he should be.
This part of the battle is also being heavily influenced by the Blazes which have gripped the Factories. Again, neither of us is willing to force the issue, though I use some HS and a MMC to grab what terrain I can before the Blazes make it impossible to enter the hexes. I was sending units down the Eastern side of these factories to try to push him out, but his fire-groups are too powerful and the Blazes are going to cut me off from support anyway, so instead I use them to take some buildings between the Factories and the Commissars House. JP’s 10-3 Deathstar manages to force a 1MC for a 9-1 leader in this building, and unlike his MCs my men are failing with great ease; that 10-3 stack is a real worry and I am just happy that I have just enough FP to keep him at bay.
The first Berserker of the turn moves off to attack a Sturm Squad and I roll a mass of 10’s and 11’s to mess up any chance I have of stopping him… thankfully he fails in the CC while my men do not and I gain the kill anyway! He sends masses of men streaming towards the Eastern edge of the factory, trying to re-take my positions here and also trying to draw men away from the area in front of the Commissar’s House which was hard hit this turn.
The Factories are well and truly a’blaze now and this has severely restricted our attack options. JP’s counter-attack down the Eastern side of the burning Central Manufacturing Hall #1 does put pressure on me and I am forced to take some risks; even with the massacre happening to his men in front of the Commissar’s House I am not able to help this part of the battle much with my MG stack, there are too many targets and I have to make each area’s MGs prioritise. I beat off the first wave of attackers, but in the Russian turn the units which have spent much of the game skulking through the sewers pop up in the Gun Tube Hall and then come at my V21 defenders from behind; this is a great attack… for a Defender in an equal or stronger position, but considering the hiding he has taken this game I am not sure I would have been quite so willing to risk so many men for such a small return. Sure, he might be able to score a number of kills (with a lot of luck flowing his way) but the risk of loss is high too, and for what? A bit of territory that he will most likely have to give up straight away due to it being totally surrounded by German territory… and the men that have been left in this area are not defending the now unguarded Gun Hall or the almost defenceless area in front of the Commissar’s House.
With Central manufacturing Halls #1 & #1 both well and truly ablaze the only option is to move around. Thankfully the loss of his 10-3 leader’s stack (the leader himself dies this turn) has totally opened up the Gun Hall and I rush through it as far as the last internal walls – from here I can stop him from coming at me from the Commissar’s house side of the battle and I can stop his few mobile units to the South of the Factory from doing any more than Assault moving or Advancing any closer. He had taken a risk in thinking that the 10-3 stack alone would be able to hold off the 1x 9-2 Deathstar and 3x (2x LMG 548) facing him down, sure he suffered a bit of bad luck with the leader failing his MC, but the more shots taken the more chance for luck to assert itself. This couldn’t come at a better time as the pressure on my V21 position was becoming unbearable, this was really the only counter-attack JP made in the whole game – very unusual for him! The sewer units have all been neutralised, they caused some damage, but I still think they were better off assisting to hold the front lines.
Objective #4 – Hold the Commissar’s House and Expand along the Shore
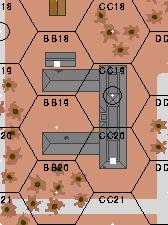
The Commissar’s House prior to burning to the ground
I bring a stack in from off-board to scoot along the shore while up around the Commissar’s House I have a massive Death Star and lots of 467. He has put real units in the frontlines here (as opposed to the dummies in most other areas) but they mostly fail to shoot straight and I have a lucky escape when a Dashing unit is bumped back into the street and ends up going Berserk. JP drops an OBA mission in this area and is obviously targeting the Commissar’s House where he knows I would have put a powerful FG.
OBA falls on the Commissars House, but causes nothing more than a single Pin result on one of my MG units. The Russians pull back to force my Berserker to face multiple attacks prior to reaching his target. JP sends a few mobile units forward but again the stand here looks like it is likely to fall in my favour. If the going gets tough I will hold my ground and stop attacking, I don’t need to take this territory yet and what men he keeps here can’t be used to defend the Factories.
My Berserker falls in JPs Defensive Fire Phase… yet another CVP to him through a strong run of 1,2 and 1,3 results – about the only good thing was that I had a SAN result from this loss which broke his nearby AT Gun crew. At least I used my Commissar’s House MG stack to smash his opposing MG stack; that was a great result and by the end of the Game Turn I had caused his 9-2 to be wounded and also killed 2x 447, thus leaving the 2x HMG unattended. I tried to gently push forward out of the Commissar’s House but he has too many troops around here so I was content to just grab bits of territory and wait. Near the shore I have pushed back his control zones quite a bit as well as gaining (without loss) the multi-story building watching over the final shore-gully exit, I think he should have defended this better, it is a very useful building (GG21).
JP really attacked hard in his turn and it freaked me out a little… but, after wiping out his HMG nest my MG stack (despite being OBA-ed constantly) did great execution and broke, ELR Broke and CRed a number of his advancing units… that should hold him off a little. I have half-a-Coy of reinforcements coming in down to this part of the battle and if he doesn’t achieve a breakthrough now then he is going to find himself in quite some trouble – there is too much room for manoeuvre on this flank and I can use that if I have a numerical superiority.
His OBA finally does some good (for the Russians) as it causes a a Flame in the Commissar’s House which will severely cramp my style from this point onwards – I also have a 467 broken by the OBA which means I cannot attempt to douse the Flame (yet). My men have little luck with their fire up and down the line until the last few shots which cause a Commissar to go Berserk and take 1.5 MMC Berserk with him (they are going to die easily as they have no cover to attack through). However JP is setup to charge across the road and all I have is my 9-2 MG group to protect my main asset and the 2x broken 467 in the ground floor of it. Along the Shore there is a standoff as JPs MTR misses me and my MMG misses him!
This turn is great for me… I lost 2.5 MMC in my Movement Phase but JP lost nearly 6MMC in this Phase and this area alone, as well as having a 9-0, 9-1 and 9-2 KIA! I also Wounded another 9-0 – almost all of this was due to a good set of low DRs by my 9-2 Deathstar in the Commissar House. I am able to decimate his Berserkers and also cut up some aggressive attempts to enter the Commissars House. At the start of this Phase the line was full of Russian units, by the end of it I was left facing mostly broken or concealed men in high-TEM terrain. His OBA has also red-chitted (finally!).
I am finally able to break the MTR position guarding the shoreline and that opens it up for me. A MMG position fires and misses as my men stream forward but they are not stopped until he brings down Harassing Fire right in this area, it scores a lucky break on a 50mm MTR crew and also blocks me off from further exploiting the gaps in his lines here with my man-power advantage. The defence in front of the Commissar’s House has almost totally collapsed and I again send units into the area here to take locations and expand my perimeter, this is doubly-important now that the Flame in the Commissars house has turned into a Blaze, thus dooming the building.
With what few mobile men I have I start to take the Rubble and buildings across the road. I even send my Deathstar out for the commissar’s House and across the road to a level 1 location (Z22) which will allow me to influence the rather more important battle to the East of Central Manufacturing Hall #1. I don’t have a huge amount of men, but what I do have is enough against his gutted lines, we have both been bled severely in this area but it is my side which has access to mobile reinforcements. I should be able to take a fair bit of The Kindergarten if this game goes on to Turn 6.
It is here that the Russians Surrender
The Butcher’s Bill
German Losses
1x 238, 7x 467 , 4x 548 (11.5 MMC lost)
LMG
DC
Post Game
4x 467 Harden to 468
9-1 harden to 9-2
2x PzIIIH are re-mobilised
Russian Losses
2x 228 Crew, 1x 226, 1x 237, 5x 426, 16x 447, 3x 458, 1x 628 (26 MMC lost)
2x MMG, 5x LMG, 2x ATR,
7-0, 8-1, 2x 9-0 commissar, 9-1, 9-2, 10-3
German CVP Gained: 74
Russian CVP Gained: 23
Stone Locations Controlled by the Germans: +111 (+72 Locations destroyed / Gutted)
The German have killed 2.4 Russians per MMC lost
CG Date won by the Germans
CG won by the Germans
Map at CG end with Perimeter marked out.
End of Game Forces
German
238, 20x 467, 15x 468, 10x 548
2x 7-0, 2x 8-0, 2x 8-1, 3x 9-1 (1x Wounded), 4x 9-2, 10-2
14x LMG
7x MMG
5x HMG
4x ATR
5x 50mm MTR
DC
2x Pz IIIH
Captured
MMG
2x ATR
Conclusions
There is no doubt that the decision to surrender was greatly influenced by the massive German successes of the 17Oct date. JP really did not have a defence that was able to support itself, nor was it able to stop my limited Armoured Blitz. He initially hunted AFV for the CVP value, only later realising that I was going to use them all suicidally anyway – the CVP loss helped me gain more troops on the 18Oct date and the Sleaze-Freeze option presented by the AFV was too good to miss. I feel he also under-used fortifications and did not plan out his Kindling as well as he would have liked (as well as suffered some bad luck with the Kindling Attempts). However, were we to play this again I feel that the results would be dramatically different, JP has a feel for the turf now and the terrain and I think he would not be so willing to concede the factories, nor so willing to let men die protecting an outer shell of buildings before the open ground of the Shipping Docks.
I am VERY pleased with the way my plans came together. I had set out to use a ‘wet tissue attack’ – which is where I attack across the line and mould my men to his defence; this can only work with a force which is superior in numbers and/or quality, and I had both through most of the CG. By keeping the pressure on him I was able to push against his lines (though with loss) until they eventually caved in. Often, due to the limited man-power available to him once the line caved it was a simple matter of mopping up and exploitation.
I was able to resist the temptation to buy toys, they would be needed soon after this game, but for the initial games the Germans need Infantry, Infantry and more Infantry – the Russians should be buying the same, with the focus on quantity (up to the Coy Cap) and then Quality.
I chose to attack through the factories for games we played because I had the FP and numerical advantage, also, JP bought a lot of troops as Reserve units and this meant I was able to decide where and when to activate them, it allowed me to neutralise a threat until I felt ready to take it on. My biggest fear was a Soviet counter-attack from one of the board edges and I really cannot understand why he did not attempt it; maybe he just needed every man possible in the factories? I did not attack through the open flanks until this final game because I did not have the spare manpower myself, and any ground taken needs to be held… it is far easier to hold a 15-hex front in the factories than a 30-hex line across terrain littered with Rubble and various types of buildings – again, I was concerned about a Russian counter-attack.
As for luck in this game… well, I think it was fairly well balanced… I don’t know what the complaints about my ROF mean… the longest run I got with my 3 ROF HMG was 5 shots, in the first 2 games the average ROF run for this same SW was 1 shot! His AT Guns and Lt MTR got 2-4 shots most time they fired! I did get lucky with some CH… the Stuka taking out the AT Gun in the Commissar’s House on 17 Oct, the AFV 50L shot wiping out a HMG on the same date, and it is true that the majority of my kills on the 18Oct game came from KIA or CR results… but the unspoken part of this is the acknowledgement that I either didn’t get the ROF to follow up breaks (very common in the 18Oct game) or his men passed their MC with alarming regularity (which occurred most of the CG with the exception of the odd isolated turn) – my men, even my 8ML MMC, failed their MC with alarming regularity, something that happened every turn of every game!
I very much enjoyed this CG, though it was short. I think JP surrendered too early, though I can totally sympathise, he was getting hammered and even one more turn of this was going to give me major territorial gains his line had cracked across most of the front and it was only a question of how far could I get before the end-game dr came up… If this game went to Turn 7 he would have been in most terrible trouble.