46 – STRONGPOINT 11
Legion defending as the Dutch
Chris Wendel attacking as the Japanese
ROAR (D:J – 40:41) – 17th October, 2007
Played with 56 VASL logfiles (Oct – Dec, 2007)
Chris wanted to play a PTO game and I was very happy to oblige. I suggested 3 scenarios and this is the one he chose. It is again from the most excellent Journal 3 and is a small but tough looking affair.
Initial Thoughts
A depleted Company of ELR 2 Dutch (1st and 2nd line units) face a Company of ELR 3 1st line Japanese. My Dutch must try to stop the Japanese from taking all the Level 2 Hill hexes on Hill 538. For this we are blessed with some strong SW (HMG, MMG, and a pair of LMG) as well as some useful Fortifications (HIP as per G.2). Our leadership is a little uninspiring though.
The Japanese will be attacking through Palm trees and thence over the open ground of Hill 538, but they are Japanese so that means they are built tough enough to take punishment and keep on keeping on. They have a pair of MMG and those infernal knee MTRs as well as a few LMG and even a DC.
Since the Japanese setup far back on Bd. 35, while I am limited to setting up on Bd. 2 the first Turn will really just be movement for the Attackers. Thus, despite the game going for 5.5 turns, they are actually going to use up 1-2 of those turns getting into position for the attack on the Hill. Once the attack hits I can imagine that it is going to be bloody for the both of us, my ELR 2 units are not going to be able to take much punishment, despite the plethora of Fortifications available to me. His men are really going to want to run the gauntlet as quickly as possible to keep their losses down and to ensure that they can get into H-2-H CC ASAP.
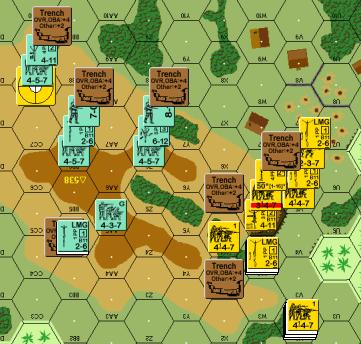
Dutch Setup
I have decided to use the ‘fear’ factor of having both my Pillboxes in HIP terrain, this will give him some concern as Chris will not know where they are nor what they contain. Unfortunately even in PTO terrain Fortifications that are not in Concealment terrain are placed on-map… and there is little useful Concealment Terrain available on the hill.
All my units start concealed
2S3 (HIP) Pillbox (CA: S2/T2) 437 – Hardly the ideal unit for this location, but it is a sacrificial ambush
2W5 Trench 437
2X3 Trench (HIP), 2x 437 – First line of Hill Defence
2X5 Trench
2Z6 Trench HMG 457, 8-1
2BB4 Trench 437 – First line of Hill Defence
2BB6 Trench LMG 457, 7-0
2CC8 Trench MMG 457
2EE4 (HIP) Pillbox (CA: DD3/DD4) LMG 457 – For a Firelane ambush
This appears to be a reasonable defence, there is little of the hill that I cannot cover and I have essentially got 4 layers of defence that he has to penetrate:
1. The HIP Pillboxes
2. The Level 1 defenders
3. The main Level 2 plateau defenders
4. The final location on 2CC8
Against the Japanese this defence in depth is essential as simply breaking them is not going to do much to stop them. I have also managed to locate my defence so I can neutralise his Knee-MTR and also stop him doing a Banzai charge – if he cannot see me he cannot attack/charge me, but in doing so I am really limiting my defence to each separate layer as only layer 3 & 4 are mutually supporting.
Japanese Setup
The Japanese have setup right in the middle of the board in 5 large stacks, they are apparently not going to weight their attack towards either flank.
The Game
TURN 1
The first Movement Phase send his forces over towards the North; 2 leader-guided stacks head to the far North of the board, the rest remain mostly central but still North of the 35Y7 lake. I have no shots to take.
My men are satisfied with their setup, so we take no actions in our turn.
TURN 2
The Japanese push on towards the hill and I drop my concealment from 2W5 to fire… but completely forget that Jungle is a Level 2 Obstacle – what a n00bish thing to do! This is the problem with playing 4 ETO games and 1 PTO game at the same time! Chris is sending his men right down the Northern edge of the board but he has not moved through my Pillbox’s (2W5) LOS at all. Unfortunately he blunders into the Pillbox in Advance Phase and despite scoring an Ambush I am unable to hurt the Japanese at all.
My men (2X3) fire at some of his as they climb up the hill and are able to kill a MMG crew but do no other damage. We make no moves and are content to again sit and wait for him to come to us. His fire is generally inefficient, but he does manage to disrupt one of my Green MMC in the contact foxhole and he is eliminated thanks to No Quarter; the other one bugs out in Advance Phase. I also lose a HS in the Pillbox, but with a HS remaining I can hope to slow down his moves a tiny bit.
Dutch Losses: 227, 437
Japanese Losses: 228
TURN 3
The Japanese keep pushing hard up against the hill. This is their 3rd movement phase and I think they would have preferred to be a little more up the hill than they are… I am able to break a HS with a 437’s SFF and this is great as it means I have blocked off a useful hill entry-point with 2FP +0 RF which then goes on to claim a Japanese HS and a 10-0 through a wounding result [Edit: all I can say is that I am glad I wasn’t the one who made THOSE DRs]. I fire at him and score another break on a HS who had moved close, but the next shot (at a bit more distance) ends up HOB-ing a LMG 447 and with Japanese that usually only means one thing: Berserk! The Berserker charges my W5 foxhole and I am able to eliminate him with a K/2 result! Luck is not on the Japanese side until he moves a stack (50mm MTR 447, MMG 228, 9-0) next to my so-far successful 437 who takes the FPF shot; the NMC fails to do any damage to him but breaks me forcing the Rout. I should have Routed with the other 437 here (X4), he is H-2-H attacked by a 447 and killed despite there being no Ambush.
The new turn opens up and finally I have some shots worth taking as he has occupied the W5 Trench which is in range and LOS of my HMG: my first shot is a beauty, it Wounds his 9-0 enough to KIA him but only manages to Pin the 50mm 447 and the MMG 228 is totally safe. But after this shot I open up with everything and eventually am able to kill the crew and strip the 447… this game was always going to be a dice-rolling contest and at this moment the dice are rolling my way. I unHIP the EE4 pillbox unit and send him up the hill to bolster the defence, it is unlikely that any Japanese will attempt to edge around the hill via the road anymore.
Dutch Losses: 2x 437
Japanese Losses: 228 (crew), 237, 447 10-0, 9-0 (447 stripped)
Level 2 Hexes in Japanese Possession: 1/12

TURN 4
Things are still not going the IJA way… he tries for SMOKE (which would be crucial in the context of this game) and fails, then he tries for WP and also fails. He then tries to fire a HE shot and also misses with that! It was terrible luck and to make matters worse my HMG scores a 1MC on this same unit and his MC DR is a 6,6 – this is a CR and an ELR strip, the HMG makes short work of him for the full KIA due to a lack of other targets.
Suddenly the Japanese are all over the hill jump-off points and there is even a leader with LOS to a unit which puts me in danger of a Banzai Charge. But again the dice don’t desert me and with my MMG I not only manage to score ROF but also get a k/2 which is about the only thing which could cause a full 447 to CR & ELR down to a broken HS! The next shot with the MMG manages (with a 4FP +2 shot) to strip the 2x 447 who had made it into the W5 trench. I have just one major weapon left to shoot with now and that is my HMG; he fires at the 9-1, 50mm MTR 447, MMG 237 stack in the 2V6 Jungle hex… and hits… the leader Wounds and dies… there is almost no chance of a win for the Japanese now as they have lost all 3 leaders to incredibly poor luck.
In Movement Phase my men actually start to counter-attack with a few loose Green units and by doing this I can roll up his Eastern flank. I have left my 1st-line Units and MGs up on the hill though to form interlocking fire for when he does attempt to take the crests. However things do take a bit of a turn for the worse when he finally manages to not only hit a unit (my HMG Trench no less) but also ELR breaks the leader and MMC and then does the same for the MMG Trench! I have gone from an almost unassailable position to being in quite some danger of losing from just 2 shots and 3 MCs. I pull my men back to LOS blind-spots and wait for him to come rushing up the hill to me.
Dutch Losses: 2
Japanese Losses: 237, 347 9-1
Level 2 Hexes in Japanese Possession: 1/12
TURN 5
The game has completely turned. His dice do not fail him once, in fact the only time they roll high is for the single MC I have to take (an ELR failure for a HS) thus the complete collapse of my most-important defenders due to last-turn’s pin-point shooting gives him a free run of the majority of the board.
I pull back, no point exposing myself to unnecessary fire, I can pop up for next turn and hope to brave the blizzard of fire from his men how have claimed my MGs and Foxholes. Of course the only guy who does get exposed to fire gets smashed (CRed, ELRed and Disrupted) by a 2FP shot as the non-stop DR-fest continues
Dutch Losses: 227
Japanese Losses: 2
Level 2 Hexes in Japanese Possession: 5/12
TURN 6
The Japanese manage to SR a 237 and then with the very first shot of the Prep Fire Phase score a 1KIA to wipe out the sole defender standing between him and victory as this guy would have been able to absorb most of the movement coming towards the last guy… Luckily it is not entirely up to his Dice, otherwise the game would have ended almost immediately; a Pin result manages to stop a DC hero being formed and thus saves me from annihilation, though he has 3x 2FP shots and this naturally results in my MMC being lost. He Advances into CC and kills the sole leader in this hex.
However, in all the one-sided devastation Chris forgot a vital point.. the VC state that all Level 2 Hill hexes must be Controlled (A26.1–.11) by the Japanese at game end… and he doesn’t control them all, in his mad rush to wipe me out he ignored a few hexes and even if he had realised his mistake by the Advance Phase then his Movement Phase ensured that he had no chance of taking 2CC6!
Level 2 Hexes in Japanese Possession: 11/12
The Japanese fail to take all Level 2 hexes by games end
ALLIED VICTORY
Conclusion
This game was very close to being a complete waste of time. Not only due to the amazingly one-sided DRs (first one way and then the other) , but also due to the nature of the scenario.
By Turn 3 the game was all but over for the Japanese, they had lost their leaders and a number of HS and crew, they were staring down the barrel of a defeat to the point where I was actually able to counter-attack…
… and then the dice suddenly turned around. From Turn 4 until almost the end of the game the Japanese did not miss once (though one of those hits was with a dud MTR shell) and I did not pass a single MC… not one… Within a single Player Turn I lost my HMG position and my MMG position, my best leader and an entire flank and from that point on a certain Japanese defeat turned into a certain Japanese victory. In the 5th and the 6th turn only miracle hits would have stopped me from clogging movement up with Broken guys… and those miracle hits miraculously hit… it was all very frustrating.
Still…
By it’s very nature this scenario is always going to be a dice rolling competition since the Japanese have to more fast if they want to grab all the hill locations and this means exposing themselves to the Dutch FP. The real strength of the Japanese will be their ability to fail MCs and keep moving, and keep moving they must…
The ‘ace up the sleeve’ of the Japanese is the ability to Banzai Charge and the Dutch MUST do all they can to stop this possibility while the Japanese MUST do all they can to try to bring one about – but that really is the limit of the tactical options available to either player. In the end it will always come down to who rolls the most constantly good dice and that does not make for an interesting few hours worth of play.
I really cannot recommend this scenario at all.