J69 – THE ARMY AT THE EDGE OF THE WORLD
JP defending as the French
Legion attacking as the Japanese
INTITIAL THOUGHTS
I feel that this is a dog of a scenario but only time will tell. The French have to defend a hill-top base and attack a road with a total of 13.5 squads (5 are green!!) while the Japanese have to either clear the road or take the hill top fortress (on hill 621 bd 2 – don’t we all know and love that board!!) and clear the road and they have 19 squads (12 are 2nd line) to achieve this. Why on earth the Japanese player would even think about taking the level 3 fortified buildings on the hill top is beyond me…They can easily just take the road in a meeting engagement (I start at least 5 hexes from it) and wait for my SW on the hill-top to breakdown and get the win, lets face facts, the Japanese are the best defenders in ASL as they don’t break until their 3rd MC. The road itself is in a valley between boards 2 (where 11 of my squads start along with 2 MTR’s, 2 MMG’s and a LMG) and board 15 where I have 2.5 squads and a LMG.
To make matters worse A19.131 ammo shortage is in effect which means my LMG’s should breakdown by turn 3, my Mortars by turn 4 and my MMG’s by turn 4.5 – and it’s a 7.5 turn game – wonderful…. Oh, and by the way, a 6,6 MC roll on anyone will ELR, CR and ELR again due to the ammo shortage. It just gets better…
SETUP AND PLAN
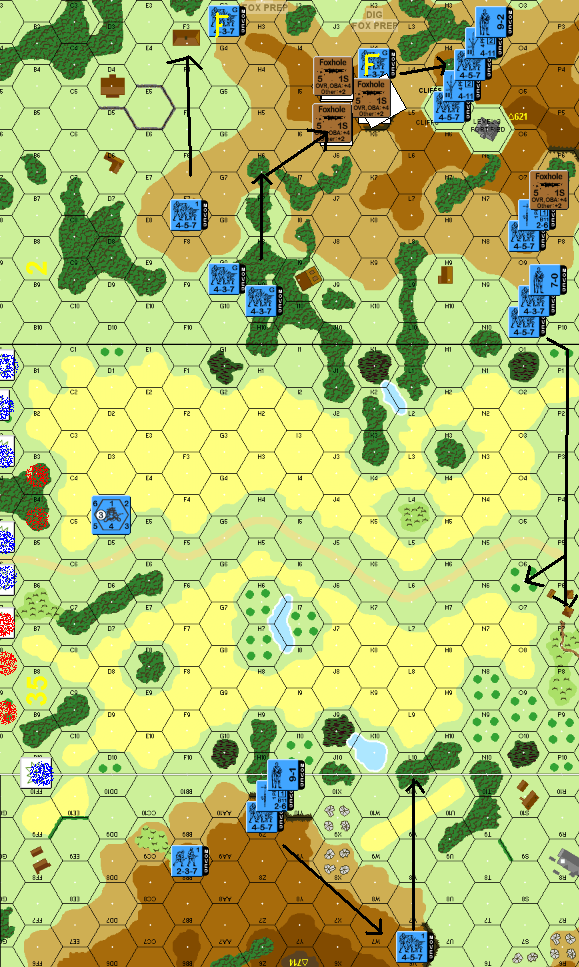
Obviously I have to try and take one hex of the road so I shall send 2 squads and a leader from board 2 (O10) to the only building adjacent the road, a wooden one in 35P6. A single squad from the other side of the valley at 15V6 will CX and join them covering their left flank. To stop him from getting to this little outpost I have a 60mm MTR at level 3 2J4 and an 81mm MTR at level 3 2K5 (both in foxholes). My pair of MMG’s and –2 leader are in the fortress at level 3 2M5 although one of these will move to the other fortress hex 2N5 in my turn, I just want a decent fire group for turn 1 as he enters, these guys are crucial to the game and need to make him take losses but with a –1 to their breakdown I am going to have to choose my shots carefully.
My LMG’s are located in Level 2 208 in a foxhole to give support fire to the guys holding the road as it can sweep the grain fields in the valley and it can also blast any level 2 hex along the front of hill 621 should he attack the fortress. The other LMG is at 15Z9 level 2 to defend the northern hill and fire into the valley while supporting the roadside building garrison as well, these guys will pull back to 15V6 if he puts pressure on them – I am worried that he will take the hill and then use it as a base to attack the roadside building. Obviously he will send a few troops at hill 621 to force me into holding it with a large number of troops and so the rest of my units are defending hill 621 and the fire support units. To defend the MTR’s and flank of hill 621 I have squads in 2G9, 2H9, 2F7, 2G3 and 2K4; the first 3 can fire at him as he enters and then play hide and seek or they can launch a nuisance raid on the road to divert some of his troops. The last pair of these squads are tasked to dig foxholes with the 1st to defend the flank and the 2nd as a rallying point should he get to the 2K5 ridge. (The K4 guy will then go to M4 and can move into the fortress if required – he will be my reserve in effect) My last fox is in 2J5 with my last leader to rally my forward picket line as they break or (preferably) fall back and I can then use that foxhole as a defensive line for my MTR’s while rallying troops behind the hill at K4.
He has 2 knee mortars, 2 MMG’s 3 LMG’s and a DC as his SW, I think he will keep the DC to create a DC hero to attack a vital target and draw fire so his mortars are my 1st priority, these puppies can fire smoke at up to 10 hexes and I don’t want my support base shrouded in smoke so all fire will be aimed at the mortars, then the MMG’s and finally the DC toting squad although this guy may move up the target list if it gets too close (obviously leaders moving with a negative TEM modifier are a juicy target too as that will stop him from doing banzai charges) but on his first turn I want to get residual fire on as many of the row ‘A’ hexes as possible to make everyone that enters take a RF shot…..
Like I said: this feels like a dog of a scenario and I think the game will be won or lost on turn 1, it all depends on whether the French MMG’s roll a ‘2’ or ‘3’ which would reduce the size of his troops and put the game on an even keel but there is an equal chance they will roll an ‘11’ or ‘12’ which would be a disaster for the French – it just seems too much like a craps shoot. I don’t like the multiple victory conditions as I feel holding the hill against 19 squads would be hard enough but according to Legion ROAR has this at 25-23 for the French so it seems fair but only time will tell.
The only thing in my favour is that a majority of his troops are 2nd line and with their 3 FP they are unlikely to try and CC my guys which gives me a chance at them especially as PTO is not in effect so neither of us will have the +1 ambush jungle dr mod and they are not stealthy. Their 3FP also means they will have to be adjacent to each other to make a 6FP fire attack so I only need a few stripping results to seriously reduce his combat effectiveness.
SETUP AND MOVEMENT
LEGEND


Proposed Movement
MTR TARGETS (BOTH TYPES) TURN 1
1FP RESIDUAL FIRE DURING HIS ENTRY ON TURN 1
DIG FOXHOLES HERE.
TURN 1
His first squad entered at 35A10 and got stripped by my guys on the board 15 hill top, a 2nd squad survived the RF but the third striped too. Sadly a pair of 1st line squads, a 9-0 leader and a MMG toting crew snuck through from 35A8 where I did not have LOS or, to be precise, I was saving my MMG’s for a MTR squad which paid off as the next guy to enter was 4-4-7 carrying a Mortar and he promptly died from a 2FP-4 shot with my MMG retaining ROF which is vital in this 1st turn. Another 4-4-7 entered and tried to pick up the dropped Mortar but was CR’ed and pinned by the same MMG – this time losing ROF so I left a 1FP residual to deter any more attempts. A 4-4-7 got fired at and missed by my 60mm mortar – that’s 2 of my long range weapons used but a squad in 2F7 fired at long range and scored a 1MC which it obligingly failed for a stripping, the unit continued to move and I fired my LMG in 2O8 at long range but it broke down (the 1st of 3 breakdowns for the game and it never repaired or malfed out…) Another 4-4-7 went CX to charge down the road and it was CR’ed by my 2nd MMG. A 2nd line squad entered at 35A2 and my 81 mm MTR fired but the shell was a dud, however I had rof and an acquired, that squad was later striped by some long range infantry firepower. Another 2nd line squad entered at my 81mm MTR’s acquired hex and I fired again but rolled boxcars which took the mortar out of the game, this is a serious loss, I would rather lose a MMG. (Curses I wanted it’s smoke capability…) Another 2nd line squad got stripped as it entered at 35A1. the rest of his units entered safely and by turns end he had 3 distinct attacks coming; 1 towards hill 621 (9 squads and an 8-0 as well as his DC) another down the centre of the board to secure the road (6 squads, the 2 crews and all his SW along with a 10-0 and a 9-0) and a 3rd attacking hill 714 (3 squads).
I had no more defensive and his advance fire was minimal and did no damage.
During my turn he found the dropped mortar which would not be too hard to do as it was in the centre of a ring of 15 dead Japanese. I successfully dug both my fox holes which will free my squads up next turn which is very handy. I fired both my MMG’s and –2 leader at a big stack and rolled boxcars again (3rd in 2 fire phases..) RS resulted in one being used as a door stop. I managed to get a strip result on an already stripped 2nd line squad reducing it to a HS and my mortar missed. That was all my firing. I pulled my troops back a few hexes so he cant see them, I want to make him take losses from my guys on the hill tops to whittle his force down before I counter attack or make a do or die stand.
My troops on hill 714 all pulled back from the crest to escape his defensive fire, even the 15W7 squad stayed on the hill instead of continuing the original plan as I think I will need him to hold the hill a while. My 7-0 and 2 squads rushed out and took the 35P6 building leaving the 1st line squad as forward picket and the leader and green squad in the building. All my troops in front of hill 621 pulled back with one going to the newly dug foxhole and the other 2 moving up into the trees. The crew from the now useless 81mm MTR went into the 60mm MTR hex to take over that MTR and free up the squad which went into the 2K5 foxhole in advance. While my 8-0 leader went to his newly dug rallying point in 2K4. His defensive saw him re-assemble his heavy weapons and little else. I advanced the hill 714 guys back to the crest and did a little shuffling of troops here and there. Overall I am happy with turn 1, although I have lost a MMG 81mm MTR and have a LMG malfed he has lost 2 squads dead and 4 more striped.
TURN 2
My crew managed to find the 60mm MTR that was dropped during the shuffle and he elected not to fire in prep. It wasn’t long before the stripping continued when he moved the 9-0, a crew and a 4-4-7 with the squad failing a MC from the hill 714 troops. The same guys SFF at the same lot and the leader failed the resultant NMC and died!! The stripped 447 failed the LLMC and was reduced to a HS while the crew pinned. (Nice shooting!!) I managed to strip another squad near hill 621 but that was all with some high numbers ruining the negative mods he had for moving. He charged down the road and has squads only 5 hexes from my forward picket at 35P6 while he slipped into the trees at the base of hill 621. In my defensive my 35P6 green squad rolled a 6,6 when firing and due to ammo shortage he broke – he was the only broken Frenchman for the 1st 3.5 turns!! His advancing fire was negligible.
My prep fire saw my MMG score a 1MC on his 10-0 leader 447 squad and crew with MMG – they all rolled a ‘10’ for 2 stripping’s and a wound. (there is a lesson there for anyone thinking of playing this scenario…) I sent the 2 squads that dug the foxholes around the back of hill 621 with a view to reinforcing 35P6 and pulled back the troops on hill 714 out of his LOS. In advance I sent the squad in 2O8 forward a hex (dropping the LMG) and another squad advanced into the foxhole.
TURN 3
I picked up the dropped LMG in rally (with a dr ’1’ – should have kept it as it would be working with that dr…) but failed to rally my broken green squad. He had no prep due to a lack of viable targets and so we went straight to movement – the turkey shoot continues! Which was not to be; all my fire missed with my mortar firing a dud and a 1st line squad on 714 elr’ing from ammo shortage – great, an entire fire phase and I end up causing damage to myself!! He has now got 2 squads holding the right flank of hill 621 so I guess he is worried that I might charge for the road and at hill 714 he is on the level 1 plateau with all his guys concealed (I can see what is going to happen next…) at the base of 621 he seems unsure of what to do, he is concealed but if he AM’s into the level 1 trees he loses concealment (and cant AM anyway). A few of the hill 621 troops peeled off and joined in the push towards my lone squad that advanced back into the 35P6 wooden building.
In my turn I did not rally the broken guy nor repair the LMG. He now seems ready to do a banzai charge at 35P6 building with the wounded 10-0 being adjacent to a striped 447 which has a squad and a half squad adjacent on each side, I chose to fire my MMG and –2 leader at the squad adjacent to the leader, if I can kill it then he cant banzai as the other 2 squads are not next to the 10-0. I rolled snake eyes to KIA the squad and remove that threat and I still had ROF which I used against a mortar toting squad that had crept a little too close for my liking but missed. My 60mm MTR took a shot at the same guy (a 1st line HS) and it ELR’ed and broke (phew…) but that was all as a run of ‘9’s ruined my prep but disaster has been averted. I decided to do a little feint to see if I could spoil his attack and sent the hill 714 HS on an end-around run where it went off the hill and started up row ‘A’ to threaten to take the road – I also advanced a concealed 1st line squad into the brush in 15BB8 to give the 2 striped squads in 15CC9 something to think about. I also threatened the squad in a containing role on the right of hill 621. His defensive was ineffective with one of his MMG’s malfing (it would be destroyed in rally in a few turns).
TURN 4
In rally he had a broken HS turn berserk and my green squad finally rallied which was just in the nick of time as he has got a few more squads heading towards 35P6. His prep saw him get a CH against my concealed 1st line squad in the brush at 15BB8 and he broke then broke again from the squad fire that was another 1,1 (that is 3 snake eyes out of 5 rolls anymore of that and this game will be blown wide open.) The berserker charged at 35P6 and my 2 shots did no damage but he did not have enough MF’s to enter the hex. A HS joined the berserk guy and survived the RF. A striped squad then moved up too and I rolled a ‘3’ as SFF which CR’ed him and he obligingly failed the MC to break. The SAN I created by rolling the ‘3’ was hot with a ‘1’ and it broke a squad of mine on hill 621 – 3 squads have broken this game and only one has been from his fire. He AM’ed his stripped squads adjacent to my broken HS in 15BB8 and I fired my only troops on the hill at the 1st guy scoring a 1MC – things look grim for my guy but he rolled a 6,6 to CR, ELR and break. The other guy was pinned by my SFF. He took that opportunity to move a squad adjacent to the 9-1 and squad for some CC action and I am happy for him to do it: he is 3FP and CX I am 4FP with a –1 leader, it’s a risk but worth it. He AM’ed a stripped squad adjacent to the dropped mortar within range of my fortifications and I will have to fire at him in defensive assuming nothing else threatens me. A HS got K/ from a snake eyes from one of my squads at hill 621 and he did little else there, it seems like he does not know how to get up the hill or is hoping my MMG runs out of ammo (should be anytime soon).
My defensive was ineffective and in his advancing fire he scored a 1MC against the 15BB8 guy and he died but this shot spawned a sniper ‘2’ which pinned the Jap squad trying to get the dropped mortar so I have an extra turn before I have to worry about him as he cant advance into the mortars hex. In his advance he sent the HS into CC at 35P6 (2-1 ? he is getting desperate, I can feel it!) he also tried to advance the berserker there but I know the berserk rules off by heart as I have just finished watching loads of my Russians charging HMG’s in red barricades. The CX striped squad also went into CC against my 9-1 and squad on hill 714. CC: We both failed to get an ambush in 35P6, he went H to H but rolled a ‘10’ and missed while I killed him. At hill 714 he went H to h and rolled another ‘10’ and I also killed that squad.
In my prep I fired my first 6FP shot of the game, it was from my MMG and its squad along with the –2 leader, I fired at his wounded 10-0 and a MMG crew and rolled a ‘5’ which went down to a K/2 the leader died and the crew striped. The MMG had ROF and so I fired long range (mandatory fire direction too) at a MTR that had got to level 2 of hill 714 just to let him know he is in my LOS and even 1FP –2 shots can be deadly. At hill 621 I am so confident of holding the 2 or 3 squads at the base of the hill I sent another squad across to reinforce 35P6 9 I already have 5 squads supporting that area although none can get to the building which is being held by the original squad due to the open ground. I also want to send my 9-1 and squad from 714 straight up the board to take the road and sew even more confusion into his attack so I 1st sent my HS on row ‘A’ up the row to try and draw his mortar fire (I unconcealed him so he could not get a free LOS check – nifty move I thought..) he fired a 1FP –2 and scored a NMC which I passed with a snake eyes but then rolled an 11 to surrender – curses, No Quarter is not in effect this early in the war. Not wanting to risk the 9-1 I decided to send him over to help out at 35P6 but stupidly advanced him into some trees in the LOS of the mortar – I feel it was my only mistake of the game. His defensive broke one of my guys trying to reinforce 35P6 but it spawned a hot SAN ‘1’ which found the concealed 8-0 leader at the base of hill 621 with one of his squads stripping from the LLMC – the actual RS was 3x 3’s so another ‘1’ could have done more damage but I was happy with that result as that means no banzai charge to distract me. In my advance I advanced out of 35P6 into CC with the berserk HS and killed him for no loss.
TURN 5
As stated earlier I had inadvertently advanced into trees (15T9) in the LOS of his mortar and it scored an airburst which broke the squad – he can smell blood, I have 2 leaders down there and my only squad is broken with only a green squad way up in 35P8 to help them. A striped squad on hill 714 tried to get to the 9-1 but the 1FP long range shot with –4 from my MMG produced a K/2 and it CR’ed and pinned. He finally got that squad into the dropped mortar hex but rolled a ‘6’ on the search dr. he sent a 2nd line squad across the grain to try and get my guy defending the 35P6 building while it was in the adjacent orchard (where it had CC’ed the berserker) but some first and SFF shots reduced it to a 1FP HS in no time. He also sent a squad adjacent to my broken guy in 15T9. I routed out to the stone building at 15R8 and my 7-0 also voluntarily broke and joined them.
In my turn he finally found the dropped mortar and in my prep I fired at him 6FP –2 from my MMG in the fortified building rolled a 3,6 for a NMC which looked like he would be able to smoke me out next turn BUT he rolled 6,6 and CR’ed, ELR’ed and broke. (another phew…) at this point he surrendered and I took it as it was a foregone conclusion by this time.
FINAL THOUGHTS
This was a fun little game, not too tense but enjoyable none the less, I was not a fan of the way Legion played it, especially how he used his mortars, he did not realise how the mild breeze would affect the game, I was always scared he would pop smoke in 2F7 and 2K7 which would be blown right across the front of my heavy weapons LOS but he never tried, instead taking the more dangerous option of trying to get within 10 hexes for a shot at the fortified building which puts him in normal range of the MMG and long range of its squad.
If any of you are going to play this (and I recommend you do – I am now a convert!!) try running all of your troops up and over hill 714, set up your MMG’s on it (Z9 and Y9 look good) and get your mortars to positions where they can fire at 2F7 and 2K7 for smoke. That will force him to send his French into the grain to try and take the road and you can attack them with your MMG’s while your squads attack from hill 714 – it takes much of the French firepower out of the game and eliminates that annoying platoon on the hill. If you are playing as the French- get as much firepower on to the entry hexes as possible!! Make sure you can hit every hex from 2A10 down to 15GG10 even 1 residual fire power can stripe a squad as it enters.