J112 – PRELUDE TO DYING
Legion defending as the Partisans
JP attacking as the Croatians
ROAR (C:P – 7:4) – 20th Sept, 2007
Played in 3 Sessions of Live VASL (7 Hours)
We are on to the final game of our Croatian 1st Light Infantry Parachute Battalion series and the map alone on this one is daunting! This game covers the final desperate actions of the war for this Battalion as they attempt to find someone to surrender to who won’t turn them over to the Partisans or the Soviets; historically they were unsuccessful, so lets hope (for my Partisan’s sake) that ASL imitates life.
Initial Thoughts
This game is a simultaneous setup and it uses the heavily congested Bds 36 & 41. There are dry streams and mudflats and like all these battles No Quarter is in effect.
I have a decent force this time, with a platoon of 447s and an under-strength company of 337s. I even have a 9-1 leader for a bit of fire direction. My Men have a few MMG, LMG and MTR as well as a couple’a dummy counters to play with.
I get reinforcement on Turn 2 and Turn 3 but they are only a leader, a MMC and a LMG each time. The twist with the reinforcements is that they enter behind the Croatian lines and might end up as either cheap CVP or as effective FTR killers.
The Croatians have an under strength company worth of forces, but a platoon of those are 537s. They also have only 3 leaders with 2 of those having -1 modifiers. Like my men he has 2x MMG, 2x LMG and 2x MTR as well as some dummies. He also gets reinforcements which arrive on Turn 1 & 2. Despite the Croatians being the attackers they get 2x Squad equivalents to setup as HIP
To achieve victory the Croatians must exit either 20 Exit VP (from 48 available; of which 15 enter as reinforcements) or amass 15 CVP more than the Partisans. There are 7.5 turns available with the Croatians getting the final Movement Phase. This time they might have to hustle a little more as they must cover 12 hexes in that time, much of which is 2MP-4MP terrain.
Partisan Setup
Obviously I have to cover against all expected lines of attack. I have decided to be brave and put my MMG and MTRs in fairly forward positions; the MTRs are on the Northern flank and the MMGs are centrally located; they are both on hill tops. I have set my LMGs down in the valleys in the central part of the map to give me some flexibility and to stop him making too good a use of the Dry Stream Gullies
Due to the nature of the terrain JP has a lot of options when it comes to a decision about the line of attack he wants to take, but once that decision is made he is going to find it hard to switch to the North or the South. My men have a similar problem with switching laterally to stop his attack, but at least I shall have the chance to see where he is attacking, and I also have the use of the roads that run along the North-South axis.
36C3 2x 337 – Covering the North Flank
36E2 2s Foxhole, 50mm MTR 228, 337 – Covering the North Flank. Level 2 Hill
36H4 LMG 447 – Covering the Northern Valley
36H9 447 – Last minute protection, will be digging Foxholes
36K3 2s Foxhole, 2x 228, MMG, 50mm MTR, 9-1 – Covering the North Flank and Centre. Level 2 Hill
36O4 3x dummies
36Q6 2x 337 – Covering the Centre. On road to re-locate
36R5 LMG 447, 7-0 – Covering the Centre
36U4 1s Foxhole, MMG 228, 8-0 – Covering the South Flank with 36V4 foxhole position
36V4 1s Foxhole
36Y2 2x 337 – Holding Central Woods
36Z5 3x dummies – On road to move with illusion of strength
36BB8 447 – Last minute protection, will be digging Foxholes
36EE2 2x 337 – Holding Southern Flank
While it is a strung-out defence I think that I can benefit enough from the terrain to have at least a turn with which I can re-arrange my defence to meet any Schwerepunkt. Obviously I am going to have some troubles moving my high PP SW should the attack come down an opposite flank, but in general, should my troops not be able to make it across in time to counter his attack they will pull back to defend the Exit Area (36F10-BB10).
The terrain might end up being my friend more than anything else. It will slow him right down and channel his attack – if JP has a weakness it is that he does allow terrain to dictate his movement. He is a defender by nature and thus always seeks to use the terrain to advantage. This is an obviously tactic for defender or attacker, but sometimes an attacker need to bust out and make a run for it and that is something JP shows himself as being loath to do (and I am prone to do too much!).
My reinforcements are going to make things very interesting… knowing JP he will set some units back to ensure their quick and painful deaths – but holding units back to deal with this will make it harder for him to get the necessary Exit VP (20 Exit VP is a large number).
This looks to be an interesting game, slightly pro-Croatian, but still interesting non-the-less.
Croatian Setup
JP has setup with an obvious view to attacking through the 36Y1 Woods and thence (i assume) down the 36 AA1-W10 Gully system.
He has put a number of forces in Stone Buildings on the 41Z7 hill-top.. and I am willing to wager those are the MMG positions.
The Game
TURN 1
His forces are heavily stacked towards the South and it is obvious that he is not going to use much subtlety in this game… not that he needs too, the odds are now very heavily stacked in his favour. He does bring in his reinforcing units along the 41Y1 road and they get smashed by a lucky long-rang MMG shot, but he also scored some luck as he stripped my dummies on the 36Z5 bridge; this is unfortunate as he is going to be moving down this Southern Valley and the dummies might have made him more careful. JP is doing his typical cautious defensive-advance. If he knew how weak my forces were here even he might be tempted to just rush in! At least he revealed the first of his HIPs (MMG 227, 9-1) when he Advances to a better position than his initial setup one; in fact, this position (44AA9) allows him great LOS all over the plateau where my MMG and foxholes are setup (36U4).
I start trying to flood guys over to the South to cover the attack, but the forest roads and hill are going to make it difficult – I will be able to trickle them in at best. He reveals his other HIP (MMG, 227 and 8-1 in 41V7) but the MMG immediately malfunctions with no effect on the game. He reveals his last HIP (Lt MTR in 41N8 with a 227 HS) and this SW also immediately malfunctions with no effect on the game. In Advancing Fire I manage to CR the MTR HS.
He immediately SRs a MMC from the reinforcements I hit last turn and then whips out another low DR to score a KIA on a 337 who was attempting to climb the MMG ridge overlooking the Southern valley (I shall call this the Northern Ridge, it is centred on 36V4). He starts to move through the gullies in the Southern Valley (this is around 36Z3) as he used most of his CX opportunities last turn to get deep into the 36Y1 Woods. He is moving EVERYTHING though this Southern Valley, with the exception of the MMG unit on overwatch from the 41 V7/AA9 positions.
His MMG is eliminated when the poorly trained Croats forget their instruction manual but I cannot get too excited as my vitally important MMG on the Northern ridge also malfunctions this turn after causing no damage to his attackers what-so-ever. I am moving more and more men through the Central Valley towards the Northern Ridge overlooking the Southern Valley but the terrain is just slowing me down to much. I leave both MTR positions as-is, they are too heavy to move far enough to be of value this game and they have effective LOS against the Northern Ridge’s Woods and against any units that might switch their axis of attack. My moves are really compromised though by a run of low Croatians DRs that manage to hit targets they should have missed whilst I fail every MC. The end result of this turn is that he has managed to inch further forward while all the units I sent over to slow him down have been hit hard. He did lose an LMG to malfunction, but this is only a small mercy in what is looking like a very difficult situation.
This turn starts off with JPs lucky hits causing more MCs – and when I get a small glimmer of hope thanks to a HoB roll I have my chances smashed further when one of my few leaders goes Berserk taking a 337 with him… this guy will have to run an absolute gauntlet of FP to reach a target thereby ensuring I lose one of the 2x MMC I have on the Northern Ridge as well as the only leader… sigh… He decides to try and stop them before they run and naturally scores a slew of ROF and low DRs with his remaining MTR unit to cause the 10ML 337 to CR. Later a 2FP -1 attack manages to hit (as usual) one of my men close to the Ridge and the MC comes up 6,6, this Partisan unit is eliminated when the 2FP -1 attack hits again to cause a NMC. Then a bit of light appears at the end of the tunnel. JP moves a big juicy stack along the Gully Adjacent to a 447, he had mis-understood the nature of the Gully’s LOS and my shot breaks the entire stack; I have a chance to really grab a lot of CVP here and also to make it hard for him to get enough men to exit.
To kill the broken stack all I need to do is face and pass a single attack; I have Prep Fire opportunities that make this possible but my dice are rolling high (like it is a surprise) and I am unable to stop my 447 from facing a 12FP -1 attack as he moves in for the kill – JP nearly gaks the attack roll, it is a NMC, but a 50% chance of passing really means a guaranteed fail for my men and I am left with a broken unit. I have a last gasp chance to gain something from his mistake by moving a LMG 447, 7-0 from their Northern Ridge foxhole but the excellent MMG position (now at 41Z7) is a 4FP -3 shot and the results of that are predictable; to add insult to injury he also scores a Hot SAN which breaks another unit rushing in to reinforce the Northern Ridge. I do kill a 2CVP MTR crew but lose another leader in CC way over on the Southern side of the board. This southern edge battle has seen a few 337 hold off his forces (though probably through his choice of attack path); I am taking hits but not losses. I have sent on my Turn 2 reinforcements to attack through this area but the difficult terrain and masses of Croatian troopers is slowing me down here too.
Partisan Losses: 237, 2x 127, 2x 337, 447, 8-0(wnd) (3x dummy)
CVP Gained: 4
Croatian Losses: 227, 247, 227 (crew), MMG
CVP Gained: 10
This has been a very difficult battle right from the outset and even without the disastrous DRs that have plagued the defenders it is hard to see how they can hope to hold off such a powerful Croatian attack.
We have stopped here due to time constraints and will re-start ASAP.
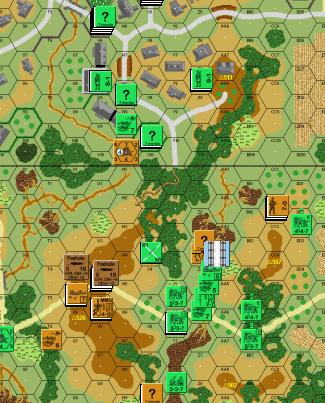
At the mid-point of the game the Croatians are pushing towards the exit zone (at bottom of the picture) through the Southern Valley against a very patchy Partisan defence. Though light on troops at the moment they have not much stopping them from bringing all their forces down to score the win from either Exit VP or CVP gain. The Partisan must send their reinforcements across from the Left side of the picture, which puts them right in the firing line of the brilliant MMG position at 41Z7.
TURN 3-4
Back for more of this game (I am not looking forward to it much)
The new session of play starts off where the old one ended… JP fires everything he has and managed to continually score low FP hits which cause MCs and PTCs which my men fail. In fact, there has not been a single position of mine on the Northern ridge which has not been totalled – he is truly getting DRs for attack right at the exact moments he needs them. I have moved 6 units up the road to the Northern Ridge and only a single one of those units has made it unscathed (and that was only because he had lost ROF with the MMG of Death); if the other MMG had not immediately malfunctioned and been removed in Turn 2 this game would be over by now!
JP continues to slowly move through the Valley, he has an eternity of time and I have at best about 2-3 attacks per Fire Phase with which to stop him. I have moved a HS into the Gully in an attempt to collect the 3x MMC & leader who are still Broken under the Bridge, but he just pulls men back to protect them making my job all that much harder; he is actually able to pull men back AWAY from the Exit edge, such is the commanding position he is in!
In my Turn score a minor victory when I Self-Rally a 337 on the Ridge, but I am ready to surrender now…
The game actually goes on for another turn but all there is to tell you is that I roll high for Attacks and Morale Checks (assuming I don’t die out-right) and he rolls low for Attacks and Morale Checks (if he even needs to roll them at all). He manoeuvres his man to the South of the Southern Ridge of the Valley, but only because he has so many turns left to move his huge force off of the map (he has CXed another 5MMC though the 36Y1 Woods).
There is nothing I can do to stop him and he is only wasting time to enjoy his victory by picking off my broken men littering the landscape.
Partisan Losses: 237, 127, 7-0 (3x dummy)
CVP Gained: 7
Croatian Losses: 247, 8-1
CVP Gained: 13
The Partisans Surrendered
ALLIED VICTORY
Conclusion
All of these “Journal 7 – Croatian 1st Light Infantry Parachute Battalion” scenarios have had a very ‘Partisan’ feel. There have been a lot of poorly armed and led troops fighting it out on large and expansive maps. It worked on ‘J108 – Danica Air‘ and worked (though not as well) in ‘J109 – Break for Hungary‘ but did not work well in this scenario.
The map was beautiful, it was rough and dense with terrain that made it a real pleasure to fight on… but the simultaneous setup and the force numbers just made it far too hard for the Partisans to defend in such rugged terrain.
I don’t know why these 3 scenarios seem to think that similar numbers of 337s can hold off 447s (with increased broken Morale)! Especially in such wide expansive terrain. JP was often able to constantly keep his men out of my range thus relegating me to 1FP +1 shots while he pecked away at me with 4FP +1 shot… this is just not balanced and the initiative flow of the scenario was such that it is often the Croatians who are able to dictate the terms of the fights.
It might have been more even if the Croatians had setup first, prior to the Partisans – or if the simultaneous setup stayed but the Partisans got to move first – but to have 17 Partisans have to defend the whole width of the board against 14 Croats who could choose any number of places to smash through the Partisan lines is nigh on impossible. I am willing to wager that the few Partisan players who have won this game have basically bet on a solid defence that has luckily managed to mirror the Croatian’s direction of attack.
I might suggest that any Partisan player setup his MMG and MTR right in the centre of the map, as well as the majority of your force. There is not point thinking about how and where to stop the enemy; the Croatians are going to decide all with their setup so you might as well be better positioned to alter your unit’s locations and thus have a chance to stopping them after they have made their initial gains.
I did not enjoy this game very much… it was a lovely map and a good idea but it was too wide open for easy VASL play. The light nature of the forces made for limited action and the imbalance made that action un-enjoyable.