J42 – GREBBE END
Legion defending as the Dutch
Jonathon Fry attacking as the Germans
ROAR (D:G – 52:65) – 16th October, 2007
Played with 34 VASL Logfiles (Oct-Nov, 2007)
I am playing another game vs Jonathon Fry. This one he chose from a list of scenarios I presented to him; it is from Journal 3 which seems to be well-blessed with small but excellent scenarios. He chose to play the Germans, something that I am happy about as I quite enjoy playing the Allied Minor forces.
Initial Thoughts
Attacking this small Dutch village, or is it more of a farmhouse and assorted out-buildings, the Germans must try to take 4 of the 7 buildings away from the Defenders. To achieve this task the Germans have a pair of Armoured cars and an undersized Company of 1st and 2nd line troops. To stop them the Dutch only have a mixed bag of 1st-line and Green troops, though they do have an 9-2 officer and a HMG.
Both sides setup on-map which is only a half-board with some overlays to transform it from the usual look of Bd. 32. The Dutch get to begin in the village itself, which makes the +2/+3 TEM of the buildings available to them right from the outset… but the board is very heavily wooded thus stopping the Defenders from getting any good shots except from up close. In fact 2 of the buildings that the Germans will have available to take are Adjacent to Woods which gives some options in the attack.
Dutch Setup
Because the Germans can choose to attack from a number of different direction (at least with their Infantry) I have chosen a defence that lets me to cover most of the buildings while still giving me room to manoeuvre. I want to try and stop him before he gets to the village, but this is really a hard task on such a small map and with him setting up so close. Instead I shall have to make him eat up time as he moves closer against a strong defensive hedgehog, he will have to move as Assault Moves if he wants to keep his concealment.
All my units start off concealed
C4 2x 437, 8-0
F4 2x 457, HMG, LMG, 8-0
F6 437, 2x dummies
G3 1S Foxhole, LMG 457
I2 2S Foxhole, 2x 437
I3 1S Foxhole, LMG 457
There are some problems with this setup. I have not got much to stop him getting close enough to overwhelm me with men, but the trade-off is that otherwise I would have had to setup too far forward, and thus possibly even in his LOS.
I don’t have much that can stand up to his AC, but by the placement of my LMG and HMG I can ensure that when he does emerge from the Woods-Road hex into my LOS I have the best chance of a side shot. If he does try to VBM Sleaze-Freeze me then I shall at least have multiple shots with MG from outside the hex.
German Setup
Jon has setup pretty-much in a line from O1-O6
O1: 2x 467, LMG, 7-0
O2: MMG 467, 50mm MTR 237
O3: 467
O4: 2x 447, 9-1
O5: 2x 447, LMG
O6: PSW 231 (6-rad)
P1: 2x 467, 8-1
P6: PSW 231 (6-rad)
This does allow him to attack with some strength along the Eastern edge of the board, which is what I expected, as well as allowing him to easily move off through a separate axis of attack (say West or South-West) if the opportunity presents itself. It appears that he is going to be mostly conforming to the J5-O3 Road though as far as the more central part of his force is concerned.
The Game
TURN 1
His attack is entirely weighted to the East, this is great for me as it allows me to move my rear-most units to places where they will most be needed. His initial moves were also quite tentative which will give me plenty of space in which to move, though he is obviously planning on quickly crushing my two foxholes in the Eastern Woods (I2 & I3) . His AC overstacked in K3; with their 0AF at front this does give me a better chance of scoring a result with an MG attack. I choose not to fire in Defensive though, it is better to keep the Concealment I have for now. Jon fires with the MA of the AC to gain some Acquisition, and the very first shot of his game leads to a malfunction in one of the 20L MA!
For my turn I decide to try and kill one of the AFV but just like Jon my first shot of this game is a Malfunction (to an LMG). My men start to move, since he has continued to confine his attack to the Eastern-most edge of the battlefield I have a lot of latitude to prepare for meeting him; I feel confident already that I can win this game now. The Germans blast away but the Dutch are too well hidden and the only result of their fire is to malfunction their 50mm MTR (that is 3 malfunctions in 3 fire phases!). By the end of Advance Phase I have not only presented the Germans with a strong defence facing their likely route forward, but have also managed to send some units (1x 457, 1x dummy) to threaten their flank and even rear if they keep advancing forward.
TURN 2
This game is so up and down. The Germans move forward and their first Adjacent moving stack cops an 8FP +0 shot that ends up scoring 2 HOB rolls! One of them causes a Berserk leader (he takes a MMC with him into CC and promptly gets wounded and dies) and the other calls up a Hero. He starts to get aggressive with his moves (as he needs to do) and this causes a 9-1, 2x 447 to blunder into my HMGs LOS, unfortunately the best I can manage is a 1MC with no ROF – fortunately his MC rolls are rubbish and with the help of my I3 foxhole I am able to leave the stack broken and one of the MMC is KIA. Things continue to go poorly for the Dutch in the Eastern Forests as the second of their three LMGs malfunctions. I lose another defensive position when I fail a MC but then I manage to make up my losses big time when Green units facing the Berzerker-led CC ends up killing 2x 467!
The dice continue to be whimsical. I score a 1MC with my HMG on 2x 447 – ANOTHER HOB result is rolled this time Battle Hardening the 447 and creating a Hero too… then the very next shot is another 1MC and the just Battle Hardened Squad suffers an ELR failure and CR from a Fate DR! My moves are to put pressure on the broken Germans by flanking them through the central part of the forest and this part of the plan goes well, my defence in the Eastern forest is crumbling too fast though. Through FTR I am able to mop up some more of the attackers and send yet others running way off into their initial jump-off zones. The CC is resolved with the lone Hero being killed.
German Losses: 3x 447, 2x 467, 8-1 Hero

The German attack through the Eastern forest met with terrible luck.
Meanwhile the Dutch have worked their way behind the enemy flanks where they are causing havoc in the backlines.
(Foxholes placed below units for clarity’s sake)
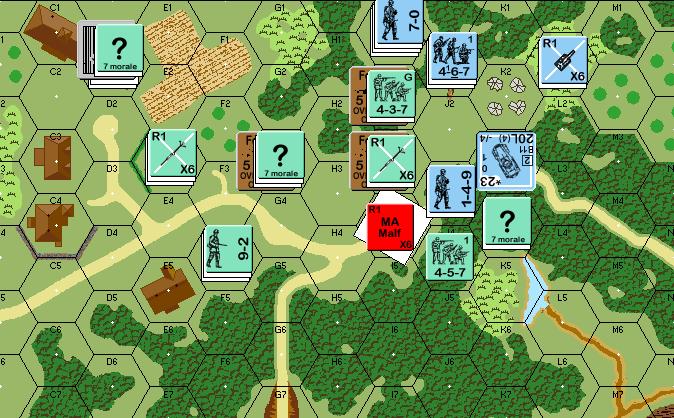
TURN 3
The Germans finally get some revenge with a whole stack blasting my 2x 437 (I2) who were just flushed with CC success; one is Disrupted, the other is broken but both are eliminated through No Quarter. The Germans get aggressive with the AFVs and drive them into my back lines; there I am able to attempt a street-fight against the non-MA one, but fail. Against the other I use my HMG and score a Possible Shock. Unfortunately my Defensive Fire did not score the extraordinary dice it needed to save my Green troops from FTR and we are getting closer to being back on level terms again
This turn gets off to a poor start with both Malfunctioned LMGs being eliminated in Rally Phase by poor repair rolls. Jon, on the other hand, is able to repair his MTR and rally his 9-1 leader and HOB Battle Harden the broken 447, sigh… In Prep my HMG again targets his AC, but it only able to Shock him again for NE, I fire again for a Deliberate Immobilisation attempt and roll high enough to not only lose ROF but to also completely miss the 10MTH +1 shot! My next shot then malfunctions my last LMG (I have lost 3 of them now, 2 permanently!). I skulk while closing in on him from the Centre with my only mobile units (1x 457, 1x dummy). He shoots and misses, I shoot and hit which kills his last Hero and also breaks a HS… I can actually start to get behind his men now. I am worried about the AC in my front lines, but not worried enough to try to CC them.
Dutch Losses: 2x 437 2x LMG
German Losses: Hero
TURN 4
The last Dutch LMG (which was also malfunctioned) is removed thanks to my 3rd straight ‘6’ on a repair DR! At least his Shocked AFV ends up as an Unconfirmed Kill. He is very cautious in his movements now, I have managed to surround him with FP and he cannot afford to move to aggressively lest he fails an MC and ends up as FTR. My first shot manages to break 2x 467 (ELRing one of them too!); this now gives him some real headaches! I fire at the Unconfirmed Kill AC but only manage to shock him AGAIN! My HMG opens up and instead of shooting the AC first he shoots the 7-0 leader – and scores a 1,1; sure it eliminated the 7-0, but a CH against an Armoured Car would have been much better! As it is, the HMG is able to kill the AC after a few ROF shots and one would think that puts this game out of reach of the Germans now. The Dutch have a man-power superiority and have a tactical superiority too due to the Germans being hemmed in against the Eastern Edge of the battle.
The Dutch are now on the offensive and they flood back to hem in the broken Germans as much as possible. We rush forward and fail to take any hits (there are few Germans left to fight). Routing Germans are either sent packing or eliminated thanks to No Quarter and we manage to surround the area that the 2 remaining Good Order German Squads have to pass through.
German Losses: 447, 467, 7-0 PSW 231 (6-rad) (w. Crew)
TURN 5
With last-gasp attempt to break the Dutch resolve the Germans open fire with all they have, but their shots against defenders in high-TEM locations is futile. Returning the favour the Dutch are able to break their opponents will through sheer mass of Fire Power causing the last 2x 467 to be lost for FTR. It is here that the Germans bow to the inevitable and Surrender.
German Losses: 2x 467
The Germans Surrender
DUTCH VICTORY
Conclusion
His attack gave me the initiative and locked him into a single line of assault that made it easy for me to prepare for him but nothing prepared me for the DRs of this game.
This game really was ruled by some very strange DRs; multiple HOB, all the Dutch LMG Malfunctioning and then being eliminated in consecutive dr, almost half of the shots against one of the AC resulted in Shock. It really was a strange game and despite feeling extremely confident once I saw the German setup it all nearly fell apart on initial contact with the enemy as the DRs started to go all over the place.
I guess the only thing that one can say is that the dice did not favour either of us exclusively; they hindered and helped us both at different times but certainly I went from being 80% confident of a win at game start to only 50% confident after the first DRs were made.
As for the confidence I was feeling, that was due to the Germans setting up for an attack in a narrow area. I really don’t think the Eastern forest is the best place for the Germans to put the majority of their forces, it is too crowded with limited options for manoeuvre and that means that the Dutch have plenty of chances to stop them or at least slow them down. I would send some forces through here, to pin the defenders down, but the majority of my attackers would be coming through the Central forest.
This game is decided by the Germans taking 4 buildings. To take 2 of them through the central forest the Attackers need only Advance into CC from the Adjacent Woods. From the Eastern forest the Germans have to move across open terrain (though with Hindrances from Orchards in some cases) to get to their targets.
Another error in Jon’s game was the lack of using the AFV-Bypass-Sleaze to lock up the defenders, this is really a scenario that demands this tactic be used – though some players don’t necessarily like to use it. If he had moved his AC into my HMG’s hex I would have been in a much worse position, again this would have tied up Defenders to allow the Germans to get in close enough for the Advancing Fire attack prior to CC.
I don’t think our playing did this scenario justice. It looks to me to be a great little game for a few spare hours with an interesting mix of units, well worth the time to pull out the pieces and boards!