A BRIDGE TOO FAR
CGIII
Legion playing British
19EVE
After the 19PM game I was faced with a bit of a dilemma. I wanted to attack, to use my OBA and try to limit his build-up of reinforcements but a quick scan of the Ammo Shortage tables showed I couldn’t risk an attack at this point; the mods would have been too much. Yet the fates intervened, and for some reason JP decided to attack again. I guess he is figuring his ELR is so low that he might at well keep the push going… I am hoping I can show him the error of his ways!
Remnants
MMC 648 x31, 648 (Engineers) x5, 648 (Commando) x10, 458 x14
HS/Crew 338 (Engineers), 338 x2, 248 x5, 228 x31
Leaders 10-3, 10-2, 9-2 x3, 9-1 x5, 8-1 x8, 7-0
SW HMG x3, MMG x5, LMG x28
PIAT x12, Lt MTR x5, FT x3, DC x8
Guns 76* MTR x11, 57L AT x7
Vehicles Carrier A x4
Captured LMG x3, PSK x1
I have managed to maintain a sizable force as well as recapturing the few SW I have lost. I have recovered or scrounged most of the SW available from the German’s losses and my LMG pool has been greatly increased by scrounging the many Carriers I have converted into Burnt Out roadblocks.
Reinforcements
(Rolled 8)
80mm OBA
160FPP
SAN +1
With 8 points to spend and so little choice I bought the obvious. The OBA is essential as with it I have a form of attack that can hit his troop concentrations and not cause me to expose units of my own.
My fortifications were a 6FP AP/ 2FP AT minefield (F4), 5x trenches, 4x fortifications (building another ‘Flak Tower’) and the rest a combination of HIPs and dummies.
The Enemy
I suspect that the Germans will have bought more infantry to fill the holes in his ranks, though the engineers he lost are going to be expensive to replace. He will probably be a little more reticent about leading off with AFVs; his losses last game were a big shock (to us both) so I think it will be the poor bloody infantry peering into cellars and houses trying to find the AT Guns…
I will not be surprised to see a test on the Bridge defences, though he might be waiting to reduce the Block J/L/Blockhouse defenders first.
Block E might also get some action at last, I have a 10-3 there whom he would love to squash with a Panzer, but I think he might find the combination of fortified buildings (stopping CC attacks), PIAT, AT Guns, MTRs, FT and DCs a bit of a trial!
Game Start Block Control
Yellow – No Control Points
Blue – Water
Black – German Controlled
Red – British Controlled
Purple – Uncontrolled
Objectives
I shall be withdrawing a fair percentage of my forces this game, heading back to Block H with FTs, DCs and squads to bolster the defences here… this will mean leaving some MTR and AT guns behind, but I hope to make their loss worth it
I am not sure if I can keep any Block off him should he decide to force me out with all his reinforcements… but I can make him pay in blood and iron.
THE GAME
TURN 1
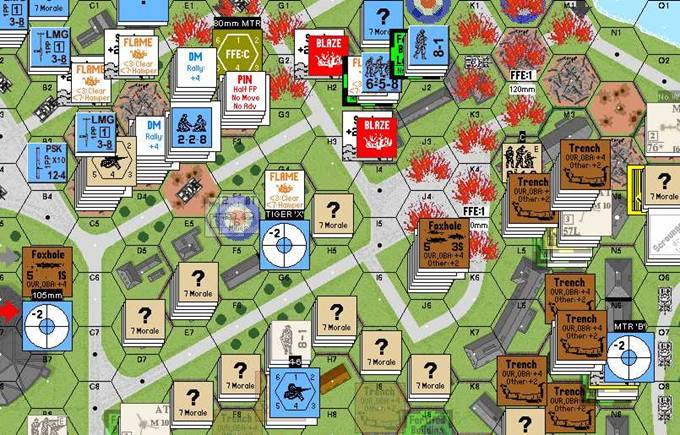
Man, does JP start the game with a BLAST! Bringing down pre-reg 150mm and Harassing Fire 80mm OBA on Block F – wow. This totally guts my defences here due to good rolls for him and shocking MCs for me as well starting a Flame in a hex with a DC I had Set. Pity he did not back himself up with the reinforcements that I am sure will follow.
He lets off half his ammo reserves trying to clear out the (mostly dummy) units from Block D, managing to miss with most of his shots… in the end I lose 3 dummy stacks – one of them illegally from a non-MTR WP attack ‘hitting’ an non-LOS unit. Grrrr… Block P’s Z14 cops it from assorted AFVs, Guns and stacks… I wonder if he is going to attack through the Block N/R corridor, duh! He also blasts as much rubble as he can in Block R trying to find HIPs. He has little in the way of movement possibilities as he has used most of his units for Prep Fire. An AFV thrust comes down the Block N/U road led by a Panther, I have a PIAT and AT gun waiting in Block Orchard… but will it be enough? I do not do any Defensive apart from placing my OBA SR (on target in Block B). I am only going to survive this if I use my ? counters to the fullest.
My Rout Phase is able to miraculously salvage the units from Block F, but I am going to be placing this Block in danger as he will be able to move in without any resistance apart from a HS and Squad in each of the fortified locations (I2, J1). What is worse is that this also might convince him to move his dreaded 150mm to Block H – that would NOT be good.
My turn opens up with the 80mm OBA hitting Block C (F2) and immobilising a PzIV, cool! I have no other shots… gotta keep him on his toes, make him unsure. He can slam me with OBA but that will still only cover a small area of the map, the rest of the time I want him to be wondering where the next HIP is, or what is under the ? counter.
I run some units from Block P back towards Block H through Block K, there is plenty of cover there and their precious load of DCs, PIATs and a FT (as well as the 9-1 leader with them) will be a much needed addition to the final stand. I send a scrounged Carrier A down to the Block E/I road (E19) where it will act as another roadblock.
With so many units to shoot with the most amazing thing is the almost complete lack of success. He managed to break the remaining 1.5 MMC in Block F, and this opens the door to him, though his OBA managed to start a Flame that will severely modify the appearance of this future battleground. A Tiger crew and MTR crew suddenly discover that they should have brought ammo to the battle, whilst a 10-3 and a 9-2 take wounds from SAN results!
SANs always happen when he shoots to try to flush out my HIPs and thus why I like to make him worried!
British losses this turn (1CVP)
328
TURN 2
A expected, reinforcements come on to Block F… my plan was good, a line of Fortifications to stop him, but I did not count on the phenomenal OBA, his dice rolls were not bad, but with 150mm OBA even average DRs are going to hit hard!
His atrocious run of Gun and SW DRs continue with an 81mm MTR (HH3), 50L AT Gun (II6) all going US and a 105ART missing its WP roll with its first attack (JJ13). There are no less than 5 boxcars – though most of them are no effect as they are OBA on empty locations. He does get an OBA CH on a PIAT totting crew, scoring a 7KIA!
The DRs must be contagious. A HS with a German LMG breaks it with his first shot, promptly getting surrounded and eliminated in Advancing Fire. However, I am finally able to make amends, with 80mm MTR being corrected to the street between Blocks A and C (C2), it falls with devastating effects on HTs here turning 3 into Burning Wrecks! JP is using a lot of DCs and moving slowly, at this pace he will take Block F, but not R.
My turn 2 starts with the utter rout of my forces in Block F. I have lost this block, though I can try to re-take it in the last turns of the game, when his OBA is not quite so prevalent. The whole Block will be burnt out though with 4 Flames already present. I drop OBA, which is about my only offensive capability, again trying to take out the 150mm ART (F2) and manage to do some damage… in the end, due to a combination of SAN and artillery the corpses of 2HS and 2 ldrs (including the previously wounded 10-2) litter the battlefield, the 150mm crew is broken and a HMG crew is reduced through fate!
JPs OBA continues to cause me pain: I lose my last unit in Block F, a HS, and have another MMC and crew broken (L4 trench)… I am having atrocious luck with my 8ML troops – I later have a unit CR-ed in Block N from such awful DRs (Y5) causing him and his mate to risk interdiction to rout away to Block O thereby giving up Block N. But the upside of this is my SAN, I just cannot miss, and with 5 SAN and so many attacks by the Germans I am cutting through his leaders at an amazing rate!
German losses this turn (20CVP)
10-2 (wnd), 9-1 (wnd), 8-0 x2
237, 236
SPW 250/10, 2x SPW 251/1
British losses this turn (4CVP)
648
248, 228
PIAT
The Battle in the North West
TURN 3
The Germans easily claim Block M, they just walk into it – I had to pull troops back to force the extra chit draw for OBA and that means I cannot cover his movements to Block F and M. Even with the extra chit JP still drops OBA, he manages to break another HS but also drop 80mm on to his own units in Block F – they survive unfortunately. The rest of the Prep continues in the current JP tradition of rubbish DRs interspersed with weapon breakdowns and running out of WP/SMOKE.
Movement doesn’t start off any better with a FT engineer and leader rushing too close to units in Block D (E6) the 30FP with +3 rolls snake-eyes and another leader bites the dust the squad is reduced to a HS in Defensive Fire. A crew and 548 are broken as he rushes to try and claim Block B. He continues to solidify his claim on Block N with troops and AFVs building up quickly, but movement in Block R is slow and cautious for him… pity he is not aware he is really only facing dummies!
In Advancing Fire I again suffer the MC blues, with 3 of 4 MCs being 8+ causing the loss of 2 HS (though they at least become WW for the next game). He is rushing through Block N and I am in trouble in Block O too… looks like I am gonna get swamped there.
The British turn is an example in contrasts with good for me (a vital PIAT toting DM MMC rallies – Q2) and bad for him (105ART removed for breakdown – JJ13).
It gets worse when the OBA in Block C Shock’s a Tiger! Cool! I skulk around the place in my Movement phase, again trying to give up as little territory as possible whilst still holding my men in concealment. I am also moving Known troops away from his OBA concentrations so that I will, at the least, force a second chit draw. The OBA, when it falls, barely misses a HIP stack (H6) and starts the long list of MC failures when it slams into a trench (I8), which is turned into Shellholes (B2.1). By the end of the turn, through a combination of incredibly top or bottom ended DRs I have a vast amount of my protective ? lost, including having an AT Gun and MTR revealed (J5) just begging to be OBA-ed.
Not happy at all…
German losses this turn (7CVP)
8-0
338, 236, 228
105 ART
British losses this turn (2CVP)
458
TURN 4
Grrr… More small German attacks causing NMCs that 8ML troops with -1 leaders cannot pass… it is very frustrating to see one’s troops be so brittle, especially when these troops are holding off the flanking move through the orchards from Block N to Block H, I might be forced to expose my HIP AT Gun here. On top of that his Shocked Tiger is able to return to GO… Bah! His Prep Fire attacks are otherwise generally useless and he wastes his OBA on empty hexes for some reason … phew!
A WP shot into Block D starts a Flame (F5), which is not good for me due to the LOS cover buildings here provide. Flames also appear in Block H (H6, H7).
He is still trying to grab Block B, this time rushing a stack from Block C under the cover of SMOKE grenades. I take this opportunity to expose the position of an AT Gun (D8) and risk the HE9 shot only to totally miss – a feat that is recreated by a whole swathe of Defensive Fire attempts…
I manage to score another OBA mission; a total miracle considering that we have 3 missions on board with 3 black chits apiece – it finishes off a conscript who was CR-ed in the last Rout Phase when he was forced to run through OBA to cross a street. Prep Fire phase sees me taking a few chances when I open up with a HIP crew adjacent to 3x 838, naturally I miss terribly. I end up un-HIP-ing the AT Gun in Block P (Y15) for an attack on his FT MMC, but again miss losing HE in the process. Most of my shots are ineffectual, though mostly from poor shot opportunities due to the desperate situation I find myself in. I did end up breaking a few units though, and each break is basically an ELR failure too for the Germans, yet both AT Guns that fired lost HE in the process.
Unfortunately the some does not run true for the Germans, with a 150mm OBA CH and 3(!) identical RS rolls means that my MTR, AT Gun and foxhole (J5) is eradicated…this also means that this area is no longer a Block. My luck, which has been neutral to slightly positive in the CG thus far, has taken the most dramatic nosedive I have ever seen… all in just 2 turns! Another building hex is rubbled from the same OBA and this is a disappointment too, as each building lost is LOS cover also destroyed. The rest of his shots make up for this bad luck with the most consistent run of misses I have seen since my last turn.
Blazes start in 2 more locations (F5, H7) and a Flame spreads also (I1) – looking worse and worse for the gutsy British defenders
German losses this turn (2CVP)
426
British losses this turn (10CVP)
458
2x 228
76*MTR, 57L AT
TURN 5
I must admit that my chances of holding on are pretty limited now… I have been cut down by a combination of numbers, quality tactical use of OBA and just plain old crappy DRs! I think that the time for capitulation is close at hand… Even though my numbers of troops remain high, my LOS protection is getting removed by his massive 150mm OBA and as I pull back to Block H to make a last stand his OBA will be more important and more unstoppable – just like in the real battle the Germans can use their OBA advantage to destroy the British defences so that the troops can mop up the shell-shocked defenders.
OBA is falling right into Block H now, and even the NMCs are breaking my troops, at least they are safe in this Block (so long as I can rout them away from the OBA). My defenders in Block P are ripe for the picking, with a NMC boxcars reducing me just 1.5MMC of Good-Order defenders. Hopefully he will move cautiously (as he usually does in attack) and ‘save this Block for the next game’. ANOTHER dummy stack is removed illegally, this time due to non-LOS due to orchards (LOS is always a difficulty in VASL log-file games) and that releases units for an assault, or at least a united front against Block O. On top of all that he is charging towards Block D… hoping to grab it and really seal my fate! He performs a bizarre manoeuvre with a Tiger, driving it forward into Block D, popping off a set of MA and MG shots and then backing it out of there – suddenly realising the danger it was in!
My OBA creates a minor miracle (that is it actually affects someone) and how… a CH on his 150mm ART destroys it and its manning crew! Sweet… My men are cheered by the sight and sound of burning HE ammo and this inspires them to actually aim their guns at the enemy instead of over their heads… I break a FT carrying HS assaulting Block D and do the same to an engineer squad with a FT from my last ditch defending AT Gun in Block P. To keep the theme rolling I un-HIP my AT Gun in Block Orchard (R2) and manage a first-shot Deliberate Immobilisation on his Panther (U1) – the crew bail and I have relieved a lot of my problems on this flank!
The joy is short-lived, again keeping in with the theme of the game as a StuG fires with a no-hope shot at a HS in a fortified building and manages an improbable CH! The rest is relatively painless but a Blaze starts in another Block H building and Flame spreads to the orchard (and AT/AP mined hex) in Block D.
OBA continues to fall but is useless, yet an AP shell manages to cause a CH in Block B which allows me to move a MMC LMG to the much safer (H4) corner building of this Block. A SAN kills another leader (7-0), this time in Block A and again an AT Gun (firing AP) is able to break a squad… and an aggressive 838 at that… is good!
Movement is the usual shuffling around… I have few attack options and must try to just plug the gaps. I am getting quite despondent about the whole affair…
His Defensive Fire opens with a bit of a reprieve from the OBA as he just lays down ARs and SRs… again drawing Blacks, neither of us has pulled a Red Chit yet – amazing. What is also amazing is the amount of MCs that I have failed… my 8ML units are breaking like Italians! An indication of how bad my MCs have been is that I have 3WW for the next game so far! In general though this turn wasn’t too bad… just a few HS lost and I managed to SAN a HS of his too… he is not going to be moving much deeper into the Blocks, being content to just take Block N and F this game it seems.
German losses this turn (6CVP)
7-0
236, 228
150mm ART
British losses this turn (3CVP)
648, 248
LMG
At this point I conceded the CG…
We started Turn 6 and again I was forced to just watch my defenders melt in front of the German FP… his OBA was working within my perimeter and I had few options in the way of attack left.
With the ELR so low and the Campaign Exhaustion DRM getting so high I was going to become even less effective with each game, and this would not have been enough to counter the depletion of the German reinforcements. Also, playing VASL log files would have forced us to take another year to get to the end of what was a pretty much foregone conclusion anyway… If we were playing FTF, and thus a CG-Date in a session I would have kept going, but not even a log-file a day could have made it worthwhile playing on.
My deepest Congratulations to JP, his use of OBA was masterful and hastened my decision. There was little I could complain about… Even though the DRs were pretty much stacked against me in this 19 EVE game, they had not been for most of the CG; in the end it was just numbers and time that defeated me…