BERLIN: RED VENGEANCE
28th PM
Legion attacking as the Russians
I have liked the thought of playing this CG since my last visit to Berlin a few years ago. I had wandered through the park in front of the Reichstag and marvelled at the obvious signs of battle that scarred buildings, statues and the Reichstag itself… it was really an awe-inspiring sight… Now that I have returned to Adelaide for a while I have been able to shake the VASL-logfile monkey off of my back and catch up with my mate JP… we are going to FTF this CG and see whether the SS can this time force the Russian’s May Day celebrations to be somewhat dampened!
Initial Thoughts
Stalin is planning a big birthday party for the Motherland and the icing on the cake for him is the claiming of the Reichstag… for this reason I have been tasked with getting my men into that formidable building and claiming it… it is no easy task. First I have to get across the Spree River in the face of Panzers, SS and the -1 Bridge TEM.
For this CGS (CG Scenario) I am going to set a conservative aim… I want to control the North side of the Spree, if possible I want to be able to deny him access to the bridge hexes too, but that will be a bonus. I have little to worry about in terms of losses.. I have plenty of infantry, AFV and other toys to buy… and a lot of points with which to buy them. So just like a true Soviet commander, I am not worried about losses to men, I just want to find out what he has got and make sure I can set up for the following games.
Russian OOB
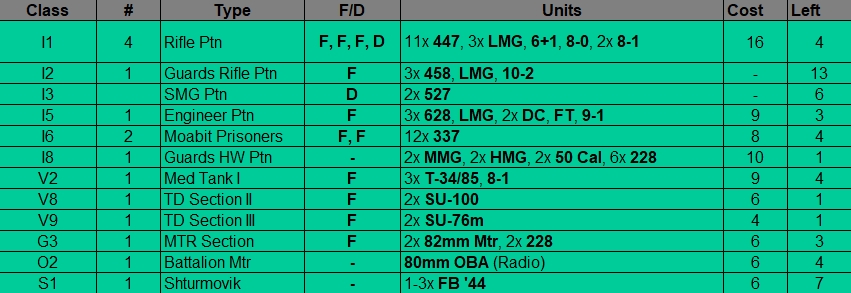
Russian Attack Chits Remaining: 7
The SS have 3
A bit of a mixed bag here. I don’t think that AFVs are going to be much use to me yet, I shall have to manoeuvre them up to a firing location first and that will make them vulnerable to his Guns… I do not doubt that JP will be trying to counter my AFV threat, he will expect me to lead with them. Usually I would, but the terrain here cries out for infantry.
The OBA and the Shturmovik are to remind him that I have these options, to force him to spread out a little more than he would like… they are both unpredictable but they are also a threat that cannot be ignored. I am not sure how the Air Support will go… I have never had them face such formidable AA fire before. I will be happy if I can just take out a Panzer or a few infantry with them; after that I shall know what I am facing and can factor it in accordingly!
I did not buy any AFV with SMOKE capability, this might prove to be a mistake, for that reason I have purchased the Mtrs and OBA. Also many of the buildings are roof-less, this might mean a bit of a surprise for him if he didn’t read the rules properly!
Russian Plans
I have low expectations for this game.
1. I want to make sure I have access to the bridges. I don’t necessarily feel that I have to take them, but I need to be able to direct fire onto them in case I decide to fight the Night game. His Engineers can start on the bridge and they will make great targets!
2. I want control of the Eastern Bank, I am not so fussed about the West bank, that can come later.
Otherwise, I definitely want to find his 88 AA locations and to spot all the units that are immobile for the CG and I want to hurt him if possible. I have not played on this map before so I don’t know what to expect. I see this CGS as just setting up for the ones to follow so I am focussing on terrain control.
While the 3 bridges are obviously important defensive positions for the Germans to focus their fire on the assaulting Russians, the Russian player should also focus on tying up as many defenders as possible on each bridge so that the main weight of the attack can hit only a third of the defending force.
SS Setup
A quick perusal of the buy charts for the SS show that there is not likely to be too much facing me down, but he has terrain on his side. I only have a few options as far as attacking is concerned. I could swim across the river, but otherwise I am condemned to trying to claim the bridges but this is something I don’t even want to attempt just yet.
His set up seems to be quite light on the East of the Hohenzollern Canal (henceforth known as the East Bank) which is great as this is the area that I need to control. It provides plenty of Stone Building cover facing the open ground into which he is going to have to place his AA guns and AFVs. From here I can set up HIP 50 Cals and Radios; to hunt them down he is going to have to rely on luck. The open road in front of this prime water-front property is also perfect for the placement of my AFVs later in the game, they are within short range of the Reichstag and can happily blast away at any defenders.
In front of the Moltke Bridge he seems to have set up a bit of a strong-point – not a bad idea. I know that there is a lot of open ground to cover from the Moltke to the Reichstag, but there are also a lot of buildings along the South bank of the Spree here that are not only great positions to attack from but are also valuable LVPs (Location Victory Points). Whoever gains the most LVP wins the CGS and this ‘win’ assists in buying goodies for the next game. The SS don’t have too many points so they want as much help with the random buy DR as possible. Wins are what he needs. The North of the Moltke Bridge is to be called the West Bank.
South of the Spree he appears to have bought a number of dug-in AFVs. Most likely Panthers; those 75LL guns would be perfect for dug-in positions. I am certain he has bought the AA Guns, he would be mad not to – and he only gets the one chance. He does not appear to have bought any mines. The large clusters of units on both the Marschall and Kronprinzen Bridges suggest he bought the Engineers and their DCs… good luck buddy!
The Game
West Bank – The Moltke Bridge Attack
I have put about 40% of my men here with a pair of HMGs and a MMG. I am also using a SU-76m, SU-100 and T-34/85 for support along with one of the 82mm Mtrs. This bridge is not overly important at this stage of the game and while I hope to be able to reduce the defenders here I shall not be too fussed if I don’t.
My movement on-board is slow and awkward, about the only position I am able to clearly make is for the SU-76m, he sits at H3 for most of the game and takes pot-shots at the Russian defenders in LOS. Though there will be more about him later.
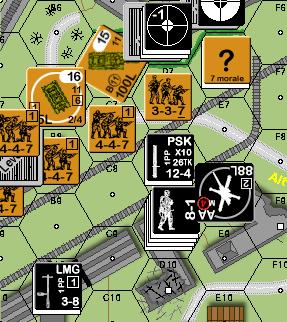
My men move with the simple idea of getting a HMG and MMG as well as the 3x LMG squads into the F5 building. I rush a number of Moabits forward to ascertain his defences and they quickly start Disrupting when a 658 LMG opens up from the B8 building. This SS unit pulls back to the D11 factory where he stays for the rest of the game. Only the assistance of the T-34/85 helping a pair of 447s secures the B8 building. The tank cannot move any closer though as an 88L in the fortified E8 hex has made sure that to come into LOS over the railway embankments is suicide.
JP has this area saturated with an 82mm Mtr firing from a roof-less location (L10), an LMG (M8), another 88 AA in a fortified location (N8), a dug-in Panther (F13) and a dug-in Pz IVH (N12). I could not move adjacent to the railway tracks here for fear of instant death!
It would be bad enough if luck wasn’t also against me… My first attack (2x 447, 458, 3x LMG, 9-1 = 16FP +2) rolls a ’12’ and malfunctions 2x LMG… both of which roll ‘6’ in subsequent Rally Phases and are destroyed! I set up my 82 Mtr (G4) and fire away but miss with no ROF (missing with no ROF is a common theme for me in this game) – in return I am immediately hit and the crew is broken by a CH… later they manage to rally, come back and find the Mtr, they fire -miss, no ROF – and then are immediately hit and KIA by another CH!
I had set up a HMG in the J4 building, and he scores a Pin on the CE Panther (P7) but then spends the rest of the game scuttling back and forth between J4 & K3 to avoid the constant Aqr from various Guns and AFVs. I also had a HMG, MMG and 8-1 in the top floor of the F5 building, but they did not cause a single MC – not one – and also had to spend a lot of time scuttling back and forth to avoid the attention of the 88s and 75s that littered this area. It was only later in the game that this was enlivened a little by the malfunctioning of the MMG… *sigh*
On the positive side… hmmm… there wasn’t much…
It was about Turn 4 when things started to change. One of his precious 88s (N8) malfunctioned and then was eliminated in the next Rally Phase – this alone was enough for me and made my losses thus far worth it. Then he had a turn where instead of hitting – no matter what the odds… he missed – no matter what the odds. This allowed me to set up a bit of a FG (with 4x 447 in A8 (0/1), B8, C7) to give him a bit of a scare. He had also escaped the crew of his 82mm MTR to avoid the SU-100 and T-34/85 who had both zeroed in on his position which again allowed me some space to move and breath. This Mtr was in a great position as it interdicted anything moving on the opposite side of the railway embankment to his troops.
As the game was about to wind up I made a mass rush at his positions which consisted of a 658 ‘shrek in a foxhole under wire (D8), a 658 LMG and 436 LMG with an 8-1 (D9), the 88 AA in the fortified E8 and the annoying 658 LMG holding the factory from B10.
For once my rush worked… he couldn’t hit anything, (in part through poor shot choice), my luck had changed! I engaged the Panzerschreck toting 658 in CC and was able to suicide the till-now dormant SU-76m into the 88s hex where his burning wreck (he had survived numerous shots till now) allowed my SU-100 and T-34/85 to surround the factory 658 who was in CC with another 447… but this is where the luck ended. The SS won both CC with ease and though I managed to break the 658 in the factory the game ended before I was able to move my sole remaining 447 here into one of the hexes to claim some of this vital terrain.
All-in-all the battle was a disappointment. He had a great defensive position, no doubt about that, but I was also happy to see him set up with so much strength here, away from where I consider the real battle to be. However, I lost a lot more men and material than I need to because of shocking DRs. It was just the usual constant mass of super-high rolls for me and super-low rolls for him. If it weren’t for that then I would be most pleased with this state of affairs.
Force Remnants
AFV: T-34/85, SU-100
Guns: 82mm Mtr
SW: 2x HMG, LMG, DC
Ldr: 9-1, 8-1
MMC: 5x 447; 328, 226; 3x 228
Moabit: 3x 337
EAST BANK – Attacking the Marschall and Kronprinzen Bridges
I consider this to be the best place for the Russians to step-off their attack against the Reichstag. An attacking force here need only take one of the 2 bridges this bank offers to be right on the door-step, though obviously the Marschall bridge is the best option as it has the most cover to utilise in the attack. I decided right from the outset that this was going to be the focus of my offensive.
My men entered the board and started their cautious way into the buildings here. JP had a number of units in the row-houses (Z7) to the North of the Kronprinzen Bridge so I wanted to negate them first. I sent a SU-76m to deal with another unit in the buildings at the end of Marien Strasse (CC9-MM7) but I didn’t see the lovely LOS from a distant dug-in Pz IVH (T12) and this AFV was a burning wreck from the first shot! Other than this I moved cautiously, perhaps more-so than I needed to, but this area is where I wanted to preserve my men for the next games.
Surprisingly JP just pulled right out of the East bank… it took him some time to Set his DCs but once he had some down (Marschall Bridge) he just moved out all of his forces. Within no time at all I had claimed all the buildings here and that was pretty much the end of that.
I managed to get a Moabit MMC across the Kronprizen Bridge, though he didn’t last long. However, by the end of the game I had a single HS in the OG next to the bridge, and this qualifies it as a Strategic Location there-by giving me control of half of the bridge and shutting down the other half due to the no-man’s land.
On the Marschall bridge I managed to get a 527 onto one of the hexes (EE16) but he succumbed to a AC OVR, followed up by a pair of assaulting Volksgrenadier conscripts (if only I had not sacrificed my T-34/85 needlessly (see lesson #2 below)). That bridge is firmly in the SS’s control… and is likely to have a number of SS Engineer MMC on it next game!
I have 4 stories to learn from:
1. I got impatient with the lack of options I had to shoot without being punished by multiple attacks so in a fit of frustration I moved a SU-100 into a building (X6) where he was promptly Bogged. From here I lasted 3 Fire Phases as he became the target of an 88L AA, a Panther and a 75L armed-AC. They couldn’t hit me and I couldn’t hit them – eventually numbers prevailed and my lovely 100L gun carrier was toasted… *sigh*. It was just foolishness on my behalf though. It was totally unnecessary because even if I had killed the 88 gun crew they would have re-manned it next game. Lesson learned: take out the AFVs… they cost CPP to be replace.
2. I saw the opportunity to take some 85mm shots at the the SS Engineers who had plastered the Marschall Bridge with explosives. The only problem was a solitary conscript HS adjacent to my AFV; no worries, conscripts are useless! My T-34/85 cleans up a PSW 234/1 and then eats a PF… oh dear! It could have been worse, for some reason JP decided to not attempt to fire it in Prep Fire and wait for Advancing Fire so at least I got the AC and its 75L gun… but Lesson learned: PF are bad, especially when the commander is willing to risk the back-blast. Mind you it didn’t work out so well for him when a 658 tried the same trick and ended up CR
3. I mis-used the OBA… I bought it to cover the bridges in SMOKE, instead I wasted it on some useless HE attacks.
4. I REALLY messed up my Air Support. If I had attacked almost anywhere other than my chosen target (T12 AFV ) I would have been fine and might have claimed a panzer or two, but I desperately wanted to clear the Kronprinzen Bridge as I felt that I might have been able to attack in relative safety if that Pz IV was gone. Big mistake! Instead of putting the fear of death in him I might have actually created a sense of confidence in his ability to handle aircraft… bah!
Force Remnants
AFV: T-34/85, 8-1AL
Guns: 82mm Mtr
SW: 2x 50 Cal, MMG, 2x LMG, DC, FT
Ldr: 10-2, 8-1, 8-0, 6+1
MMC: 2x 628, 458, 4x 447, 527; 248, 327 4x 228
Moabit: 4x 337, 127
Control Zones at end CGS
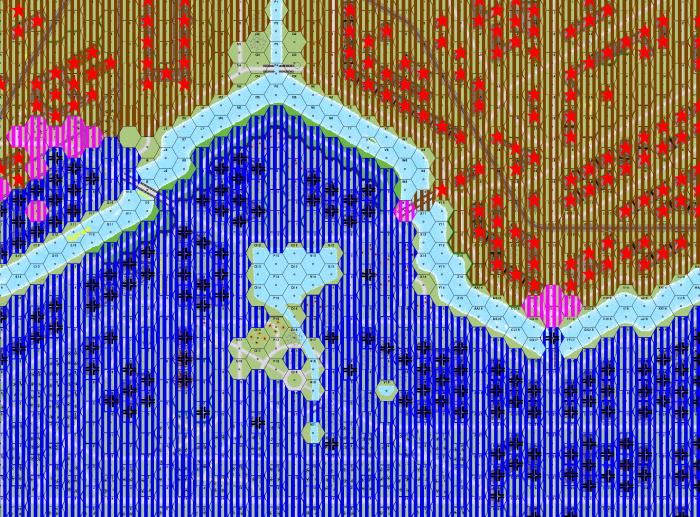
Brown – Russian
Blue – SS
Purple – No-Man’s Land
Victory Points Score
CVP
SS: 34
Russian: 9
LVP
LVP are gained for control of Stone Buildings with certain buildings (Kroll Opera House – H19, Himmler’s House – K13 and the Reichstag) being worth more points. A reading of rule CG29 suggests that extra LVP are added for Stone Buildings taken from the enemy, this number has been noted with a preceding ‘+’ sign. This value is calculated every CGS end and added to the CVP gained to determine the CGS winner.
SS: 468
Russian: 236 + 34
The SS have the most CVP+LVP
SS CGS VICTORY
Conclusion
There is no doubt about it, I had a shocking run with the DRs. I couldn’t hit, JP couldn’t miss. I couldn’t pass MCs (I went 4 turns before I passed my first MC), the SS (even the conscripts) couldn’t fail! It was terrible to watch and always makes one think ‘what if…’. As an indication of the way the dice went, I had 14 SAN rolls from Turns 3-5, quite impressive when you consider my SAN was 3 and he rolled mostly 4’s for his attacks or MCs!
However despite my disappointment at the unnecessary losses I suffered while watching my attacks bounce off his forces I am quite satisfied with the game. I took the territory I wanted at less than the cost I was willing to pay for both banks. I was stopped by his strong-point in front of the Moltke Bridge, but these units are isolated and the 88 here is insignificant as far as the rest of the map is concerned – it is in a fortified building, so it ain’t going anywhere, I can reduce it at my leisure and he is going to have to tie down forces to protect it or sacrifice it. I agree with JP when he says he mistakenly focussed on the Moltke Bridge, this is a big mistake I think. Tactically this bridge is not as important as the East Bank’s bridges. If he had set up the quite brilliant and nasty defence of the Moltke in front of the Marschall or the Kronprinzen then I would not be very happy at all.
I lost quite some forces to Breakdowns, 3 of my 5 LMGs and a MMG (the post-game ‘repair’ rolls are murder) but he has lost at least one 88 AA to malfunction with the other having only a 33% chance of being repaired and that is better than I could have hoped for. Getting rid of the 88s is my #1 priority, then I shall focus on the pesky but similarly immobile dug-in AFVs.
I was surprised how many Moabit 337s survived. They really didn’t last long at all, though as I previously mentioned not a single one of them survived even a NMC until late in the game (turn 5) and most of them were immediately Disrupted, but, disruption is not death. Only the ones CR-ed were actually eliminated, and since they cost me no CVP I will happily buy and use them again. Let’s face it, they have guns and can CC. They cannot be totally ignored.
Before I touch on some of the excellent defensive measures I had to face I would like to also point out that I made a number of mistakes. It took me too long to set up widely spread-out FGs. When I finally did manage to do that in Turn 6 I very nearly reduced the Moltke Bridge defences. I did not buy SMOKE capable AFVs, a very foolish thing to do and most importantly I did not have a specific plan of attack. This is partially the way I play and partially slackness, the Russians DO need to have a plan of attack, there is too much territory to get lost in before you get to those bridge bottlenecks.
JP is a planner and his defence shows it – in both its positive and negative qualities. The dug-in locations he chose were excellent. With Pz IVs at N12 and T12 he has total command of the respective bridges and some tricky little LOS into the entry streets. The Pz V at P7 is also very well placed though it will prove to be irrelevant sooner than later – even if it survives. I liked his buys too; the AC section is quite nifty, though did not get value for money with his Engineers.
The biggest criticism I have is that the 88s and the dug-ins were brilliantly placed for enemy attacking the bridge, but after even a single bridge has been taken or the Eastern Entry rules comes into play then the value of these units will drop dramatically.
It was a frustrating game for me (thanks to the dice gods) but any comments by my opponent about ‘failing PELR’ must be taken with a grain of salt.
This game has only just started!