BERLIN: RED VENGEANCE
29th PM
JP defending as the SS
Well, last game was a slaughter fest and if we have another like it we will each end up with very little, if any, troops. Obviously he will try to force the bridges again so that he can lose another game and get the 30AM entry turn when he can come in on the Eastern edge. However, if he seriously wants to take the bridges then he will have to change his tactics, by now he has realised that it only needs a couple of squads to lay down residual fire on the bridge to stop him. To me that means he will either lead with his tanks, drop smoke on the bridges and AM across or declare a human wave. Or, of course, a combination of any of those mentioned.
With these threats in mind I bought: a module of 88mm OBA, an MG section, a Hitler Youth platoon and 1 PzKw IV platoon. I also spent 6 points on fortifications getting (for my 60FPP); 3 wire (36), 15 points worth of HIP and 9 concealment counters.
The MMG’s start on board and, even if they are depleted have a good chance of only losing 1 MG. The Tanks had a –1 to the depletion DR (I was going to buy AT guns as they setup on map and can be HIP but as they have a +1 depletion DRM; I thought that the extra 1 CPP was worth the extra cost for the tanks and their better DR Mods.)
As it turned out all 3 groups were full, which is the first time that has happened for me in this CG.
I am not a fan of OBA in CG’s as it costs a lot and can red chit out pretty quickly if you are unlucky but given the fact he only has 3 avenues of attack I think they will do well to close one down and it was devastating last time, so I am sure he will not try to push through it when it is down. I will, however, try not to use it thus keeping it for another day, but, if one bridge looks like falling then I will have no option.
THE SETUP
Last game we stood toe-to-toe and both took a toll but this game I am going to try a different tactic. (I am getting more of a feel for the game, how much he can buy, where the good LOS’s are etc) To counter the three perceived threats I have placed Wire on the exit of the Moltke bridge to stop any human waves, likewise I also have extra wire at EE18 which will stop him from getting into the buildings on my side of the Marschall bridge and another at EE22 as I am setting that area up to be a strong point for later games. My HIP’s are all in great positions that are not obvious either. I have not got any men exposed near the Kronprinzen or Marschall bridges so he cannot start the turn with a Human Wave and I have enough units with LOS to the Moltke bridge to stop any attack cold.
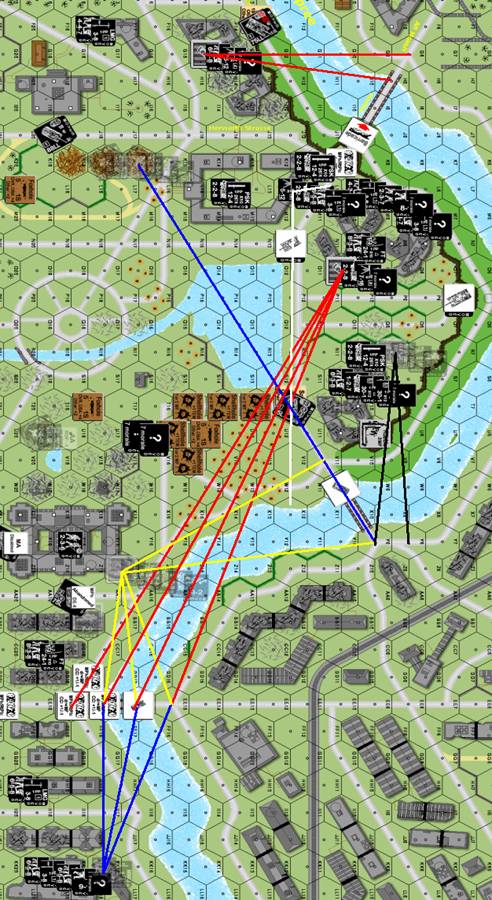
My 88AA is in K17 where it can fire at the exit to the Kronprinzen Bridge and my JgPz VG is in J18 where it can fire at the exit to the Moltke bridge – just in case he uses his Katyushas on the guys defending that bridge or quickly move to a position that can lay fire on the exits to either the Moltke or Kronprinzen Bridges. (This position changed during setup from the one in the picture below where he was in J19). If he uses SMOKE to cross then I will use the cover it gives me to counterattack him like last game; I have an engineer with 2 DC’s and another engineer with FT in between the exits to Moltke and Kronprinzen Bridges for this task. I am not concerned about armour crossing the Marschall bridge as its weight limit is down to 10 tons which means only a T70 can cross safely.
HIP PLACEMENT
658, HMG, 8-1 leader, level 1 R9 – with U9 now rubbled this hex has clear LOS to Y9, the entrance to the Kronprinzen Bridge and will only be used if the south bank exit for this bridge is covered in SMOKE, if the entrance is also covered in SMOKE then the extra +1 MF per hex means he wont get far anyway.
88L AA, HMG 2x crews K16 – this hex looks straight down the Kronprinzen Bridge but is far enough away to render his direct fire ordnance useless due to the Russian’s bad range. The HMG can also lay out a fire lane right down to the wreck on the bridge at W10.
HMG, MMG, 2x Crew, 9-2 ldr level 1 Z17 – finally I have a death star of my own!!! These guys can pour fire into either Kronprinzen or Marschall bridges (entrance or exit) or just kill any one that isn’t wearing a nice field grey. This building has a level 2 and 3 so I am hoping he will fire at those levels rather than the less obvious lower levels.
7-0, Field phone level 1 BB18 – the obvious spot for my observer is in the ‘Stag so this out of the way Rowhouse should be safe and it has LOS to the entrance and exit of both Kronprinzen and Marschall Bridges.
658 MMG, KK17 – this spot has LOS to the entrance and first 2 hexes of the Marschall bridge, however, once revealed they will have to get out of any deathstars reach so I will reveal only if absolutely necessary and then move them out next turn.
SOME OTHER REALLY NIFTY LOCATIONS
HMG, Crew, level 1 O10 – this hex can, amazingly, see nearly all the shellholes in the field at the end of Kronn. bridge and even hit the entry and exit hex of the Marshall bridge way down in EE15 and 18. A simple AM and advance would put it in a position to fire on the exit of the Moltke bridge as well.
838 FT CC19 – this guy can not be seen from across the river but if he manages to cross the Marschall bridge and tries to take refuge in any of the buildings near the exit (CC18, DD19,DD20) he can FT them point blank back to the motherland.
658, LMG level 1 and an MMG, Crew ground floor L12 – the upstairs guys can fire at the exit of the Moltke bridge or fire at the open ground near the exit of Kronprinzen Bridge while the downstairs MMG can lay a fire lane across the open ground near the exit to the Kronprinzen Bridge or move upstairs or into K12 to fire at the exit of Moltke bridge.
658 MMG level 1 G14 – these guys can put fire on to the entrance and 1st hex of the Moltke bridge.
THE GAME PLAN
Use fire lanes or lay down residual fire, lots of them to help counter his SMOKE, obviously he will not want to expose his men to an HMG as that will allow them to lay out a fire lane (weird rule, you would think that when there is smoke barring an HMG’s visibility to the battlefield that would be when the HMG reverts to using its pre-registered fire lane…) but his SMOKE will not always hide him and I am confident that I will get shots especially as I have units with LOS to both entrances and exits of all 3 bridges.
If anyone gets across then counterattack them using the FT units at N10 and CC19. My Pz IV’s will enter as a mobile reinforcement and go where needed. My 447’s will enter on the West edge and retake the buildings there, then they will move across to defend the Moltke bridge while some of the Moltke’s defenders team up with my FT unit in N10 to counter attack any incursions from the Kronprinzen Bridge where I expect his main attack to come from. I have setup a small force at the eastern edge to clear out those buildings and then reinforce the Marschall Bridge.
My 20LL AA are HIP at K17 and U19 to defend the centre of the board area. (If he wants to do sighting TC’s vs units in buildings that are out of their range then I will happily take the mistaken attacks he will inevitably get). My PSW 234/4 is abandoned in AA18 as a wall for my troops to take cover from fire across the river when they have to pull back to the Reichstag in later games and the crew will try to enter the abandoned dug-in Pz IV in T12.
The full map is shown below with HIP etc in place but not the reinforcements, as well as all my MG LOS and Fire Lanes marked in pretty colours. As can be seen I have at least 2 units with LOS to the entrance and exit of every bridge so I can make him take some losses regardless of where his smoke starts. I will keep my 20L AA guns HIP until his Sturmoviks arrive so I can swat them out of the sky rather than letting him know where they are and be a nuisance through out the game.
TURN 1
He did not buy any Katyushas but made up for it with 128mm OBA with the pre-reg hex being the exit to the Moltke bridge. (Glad I put extra wire there!) A death star killed my crew near the exit and the OBA broke a few of my defenders. He had setup a Pike where it had LOS to my dug-in Panther and it too was soon burning merrily. He put lots of Opp. Fire on the rest of his troops obviously waiting for me to expose any HIPs. He started probing the Moltke and Kronprinzen Bridges and I exposed my K16 HMG which pinned one of his squads crossing the Kronprinzen Bridge. Later in defensive I area fired my K16 88LL at a death star he had in a building across the river to no avail. (I love the idea of area firing 88’s as they get an easy hit at long range and still have an 8FP +3 vs guys in buildings etc.) During his advance fire he scored a snake-eyes on a 6 +1 shot which CR’ed my crew on the 88 – a nice bit of luck for him that I didn’t need.
In my turn I rallied a few of the Moltke defenders that had been broken by his OBA and spent my movement phase avoiding his LOS. However it was obvious that his OBA was controlled by an off-board observer as it continued to find my men and KIAs 2 broken conscripts and ELRed a 447 squad. A deathstar near the Moltke bridge also ELRed a 447 squad and when an AT Gun in level 1 of Z9 (both levels were fortified) opened up on my newly arrived PzKw IVJ I knew that the Moltke guys would have their work cut out for them.
TURN 2
By this stage I had exposed a fair few of my surprises and quite honestly I had no choice otherwise he would have been across the bridges, once again the fire from the south bank was brutal. In his Prep he dropped MTR SMOKE on one of my 20L AA guns that had opened fire on his Lvl 1 AT gun and that AT gun immobilized my Moltke PzKw IVJ which the crew abandoned. During his movement he declared a Human Wave at the Moltke bridge and they charged across for no loss but got caught in the wire at the exit – my next turn could decide the fate of this bridge. Defensive fire was largely ineffective although I scored my first death when a squad of his died, it was in the same hex as the AT Gun but the crew survived the RS dr. I also decided to use my OBA as the situation was getting tight and I wanted to try and save my immobilised Pz IV.
It was my turn and I was feeling OK (worried, but OK). My Prep caused a crew on one of his HMGs to 6,6 its way to hell thanks to my OBA and I KIAed a Moabit prisoner on the Moltke bridge. I moved my other Pz IV to II19 to put one of his deathstars in its LOS, thereby forcing it to move so I could get at the squad that had crossed the river. The squad in question swam the river last game and should have been unarmed when it had swam (E6.4), but at that stage we were unaware of this. Anyway, Legion used rule A.2 “errors”, which, given the fact we only have one set of rules and he was the one that looked up swimming in the 1st place meant that he decided that they would be armed. Suffice to say I was not impressed with this, but you live and learn and next game I will double check every rule he looks up. This will slow the game down to a nice 16 hour day but, what else am I meant to do? [Legion’s response: maybe learn the rules too instead of expecting me to spoon feed them to you! Though I WAS wrong and that sucked]. I also moved my Reichstag deathstar to level 1 X18 where it has a magnificent LOS all the way to the exit of the Moltke bridge.
TURN 3
Quite a few 6,6’s rolled in his Prep, mainly by me doing MC’s though. I lost the abandoned vehicle crew and the crew for my 88L from boxcars and he malf’ed out a 75mm AT gun too. He pushed a load of troops across the Moltke bridge where my newly acquired Wire slowed them down enough for my deathstar in X18 to cause some tremendous damage to them. It caused the deaths of a 447, then a Moabit, then a K/2 result ELRed another 447 to a HS conscript. At this point he had enough and sent his Pike on a rampage breaching the barricade and driving on to the wire in an effort to destroy it, unfortunately for him he got bogged and the wire survived.
In my turn I sent a FT toting engineer adjacent to the Pike in Advance phase for the obvious reason. This is the climax of the Moltke battle and I know that a kill on the Pike here will stop that attack cold.
TURN 4
His OBA is still hurting me all over the board, he has an off-board observer so it has a much better LOS and is able to hit my men in most positions. My abandoned Pz IV died from a shock result it gained last turn but I also repaired my MA on my JgPz V. His Pike rotated and tried to fire at my FT but missed as did some point blank fire from the guys on the Wire. In my Defensive I toasted the Pike and he also lost a 9-2 leader and 2 squads that were under or on the wire. That seems to be the end of his Moltke attack and I am glad as it has been a close run thing.
TURN 5 AND 6
By now the fighting has become a pattern of sorts with me skulking around avoiding the LOS of his deathstars and only being in the front line during his turns. His Moltke attack had been stopped and his Marschall Bridge attack was under constant OBA so all was good. I had killed a few more of his troops when his 6+1 leader went berserk and took 2 squads with him, but all 3 died horribly. Then things went wrong. In the Defensive fire phase of turn 6 my OBA destroyed the roadblock at the exit to the Marschall bridge. Unfortunately the game went on for one more turn…
TURN 7
My OBA red-chitted out in his Prep and he took the opportunity to drive his SU-100 into a bypass-freeze sleaze of my troops in T11 as well as rushing a few more across to expand his toe hold on the other side of the river. I threw my DC at the SU-100 and scored a KIA in my Defensive but the damage was done and he finally had some men across at the right time of the game. Some of his guys also turned left into the open ground near the Reichstag to try and expand his perimeter.
In my turn I tried my best and put troops into T12 and U12 to cause a no-mans land at the bridge exit so he would not be able to send troops across in re-fit and I also put an 838 into CC with one of his squads in U10 to regain some land. The guy in T12 broke and routed out but the U12 guy survived. The game ended there and the 838 died in the subsequent CC (shame) worse still was the fact that he had a squad in V11 and, as MMC are S-LOC’s this gave him a small toehold on the Southside of the river that could be beefed up in the refit phase.
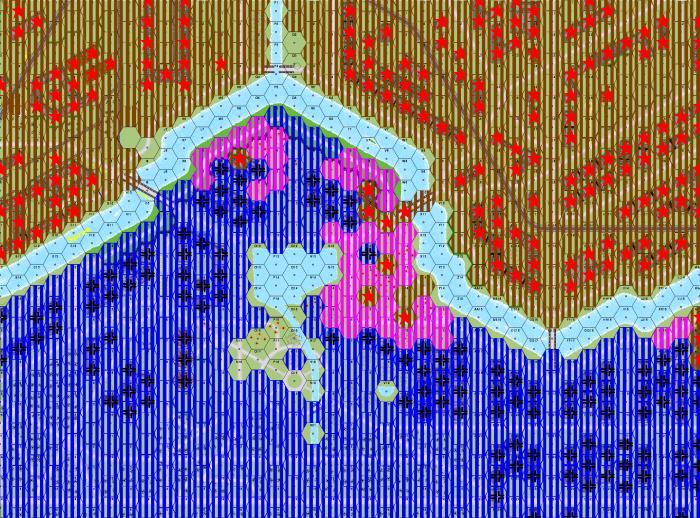
Brown – Russian
Blue – SS
Purple – No-Man’s Land