BERLIN: RED VENGEANCE
29th PM
Legion attacking as the Russians
Initial Thoughts
What to do? I have to weather (and lose) one more game to make sure I get my expanded entry zone…
The Map
The battleground is starting to get crowded with the debris of the hard fighting. Katyusha-caused shellholes litter some areas and there are more B/O Wrecks than you can poke a stick at. The SS are building fortifications faster than I can smash them apart
1S Foxholes: D7, L20, M3, O20, S21, T18, U14
Shellholes: T13, T14, T15, U15, V14
Rubbled Stone Locations: U9, DD14
Fortified Building locations: E8, N8, Y7, Z9 (0/1)
Wire: D7, EE17, EE20, EE24
Roadblock: V10/W10
Barricade: I9/J9
BO Wrecks: E8 (bypass with E7), H15, N12, P7, X6, EE18
Wreck: W10 (T-70), EE16 (T-70)
The Marschall Bridge has been Partially Destroyed and is now only able to hold 10 ton
Unclaimed SW:
U13 PSK
Weather
Moist conditions with No Wind. The sky is Clear.
CVP Scores
SS: CVP gained: 96
Russian: CVP gained: 66 [Russian ELR is -1]
SS Remnants
AFV: 2x JgPz V (1x MA Disabled), PSW 234/4 (MA Disabled)
Dug-in: PzKw VD (E13), PzKw IVH (T12, Abandoned))
Guns: 2x 20L FlaKvring AA
88L AA
SW: 2x HMG, 2x MMG, 6x LMG, 3x PSK, 2x DC, 2x FT
Ldr: 2x 9-1, 2x 8-1
MMC: 3x 838, 7x 658, 3X 436
237, 236
7x 228
The SS took quite some losses and will no doubt be buying to cover the gaps. He will have to know how close he came to losing the Kronprinzen Bridge and will be frantically buying troops to guard against this happening again. The 436s were kept around the Reichstag area last time to act as MG firers and he used a lot of crews to man PSKs but the massive crew losses he suffered are sure to make him think twice about doing that again.
Most importantly the SS lost a huge amount of Guns last game; they are down to a single 88L and no longer have any MTRs. They have a single mobile AFV with a functioning MA. I am certain he will try to fill this gap somewhat.
The 80mm OBA dropped on the Marschall Bridge area was hugely successful last game and he will be happy to purchase OBA again (don’t forget to check that the SS player made their ammo supply roll, it is usually depleted for them)
Russian Plans
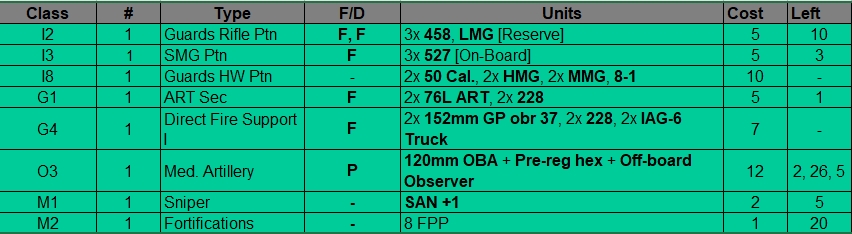
Russian OOB
Without a doubt one of the luckiest breaks I had was the re-mobilisation of my Immobilised IS-3; unfortunately I consequently suffered the loss of the other IS-3 due to the Gun being permanently disabled. Apart from that I am left with a baseline force similar to what I ended the last game with.
Force Remnants
AFV: IS-3 ‘Pike’, T-34/85, SU-100, 9-2AL, 8-1AL
Guns: 2x 82mm Mtr
SW: 2x 50 Cal, 2x HMG, MMG, 7x LMG
50mm MTR, 2x DC, FT
Ldr: 10-2, 4x 8-1, 8-0, 7-0, 2x 6+1 [7-0 battle hardened from 6+1 in refit phase]
MMC: 2x 628, 5x 458, 7x 447, 3X 426
328
6x 228
Moabit: 2x 337
Isolated Units
South-West Set-up Zone (D16) – Ammo Shortage
447 Hmm… run away…? Hope he has been forgotten? Die in a blaze of glory? Who knows…
South-East Set-up Zone (MM17) – Ammo Shortage
447 This guy is in deep trouble… I have a cellar defence option though.
Kronprinzen Set-up Zone (V17)
458 He wont be sitting still for long!
The Random Modifier gave me +2 CPP = 47 CPP – the balance provision modifier is about the only bonus from getting slaughtered turn after turn!
My OBA came with Plentiful Ammunition
The Russians declare an Attack. Attack Chits Remaining: 5 (SS:3)
Well… that last game hurt, there is no doubt about that… to pay so much blood for no gain in territory was really harsh. I did, however, learn some useful lessons and I hope that this turn’s buys will profit from that.
1. There is little point in attacking unless you are sure of getting through! My plan for this game is cynical but it is based on the unfortunate discovery from the last game that to gain access to the East (or West) edges on the other side of the Spree is useless – my men will start off Isolated and will die quickly for no effect! The balance provision makes it clear that I shall get the East edge opened up for free if I lose this next game. So I will happily lose it! Since he can gain 20 LVP just for taking back the buildings on the South of the Spree I can afford to kill 19 CVP of his men before I have to pull back! I am not planning to do any major attack this turn, though I might (if circumstances make it possible) do a Human Wave if I can see any obvious gaps in his defence.
2. The Russian AFVs are pretty useless. Any CG player knows that especially when territorial gain is the aim that AFVs are pretty toys, but it is infantry that has to do the work, this is doubly true for this CG as the Russians. My AFVs have been hitting less than 30% of the time. Sure my big guns scare his troops away, only a single Aqr counter achieves that, but I am losing too many CVP and CPP buying marginally effective toys. I might just save the points I have been spending on the AFVs for later in the game when I have him bottled up in the Reichstag and he is trying to break-through from the West edge.
3. Russian Guns are fun. Although they lasted only a short time I learned a valuable lesson from my 100L AT Guns – setting them up in Fortified buildings keeps them alive long enough to kill anything brave enough to take them on [EXC: Bad luck]. The additional bonus of these Guns is their better B# than AFV mounted Guns and sometimes their ROF is better too (76L ART with 2ROF and as effective as a 76L AT – sweet!)
4. The Heavy Weapon Platoons are lethal! Buy them… buy them all! Stick them together in 2x SW stacks and watch the SS run or die. My most effective location in the last game consisted of a 50cal. + MMG with a 10-2, they weren’t attacked once and yet forced the SS to keep their heads down. This single location’s personal kill tally was a major part of my entire CVP so far. I have bought another of the Guards Platoons and will be buying the other 2 non-Guards platoons as soon as I can.
5. The OBA is lethal. My 70mm OBA was pretty-much restricted to laying down SMOKE to protect the rush on the Kronprinzen Bridge, it was useful, but the depth of his flanking fire was too hard to stop and in the end I stopped my own shots anyway. JP bought vanilla 80mm OBA and was able to take out an AFV and a 100L AT Gun as well as a few squaddies. The OBA is fun… the OBA kills things… the OBA makes people think twice before moving anywhere they can be hit… Buy OBA with as much FP as you can afford and use it on anything you don’t like.
Russian Plans
My plan is to sit back and do nothing… I want to get through this game with as few losses as possible. All I want is to have the CG12 Balance Provision brought in so that I can enter from the East and on the South of the Spree. To be honest, if you are up against a half-decent SS player (and JP is as cunning as they come) I don’t see why you should do anything but sit back and let yourself lose 3 games in a row. It is nigh on impossible to cross the bridges without massive losses. Just enter after 3 losses for free!
If his setup seems light enough around any particular bridge I will be setting up with the idea of an immediate Human Wave. If it fails, then it fails. If it doesn’t then I might start the next game with a bonus set-up zone. My priority will be taking Moltke and then Kronprinzen Bridge.
SS Setup
JP set up his men with a definite bias towards defending the Moltke Bridge. In fact about half of his force is around this area. I can see a ‘new’ AFV, but since he has all his AFVs from last game on-board then this one must be a dummy. He has also bought enough ? counters to cover almost his entire force, not a bad move at all.
His forces protecting the Marschall Bridge are all deep in the buildings, I have no LOS to any of them, he has learnt his lesson in the last game. He will find it hard to re-take my controlled area around here without exposing his forces to my men on the opposite bank though. Obviously he has an eye for the next game as he has bought up big on Wire counters. A strange move is the abandonment of an AC in my LOS between the Reichstag and the neighbouring buildings – an expensive way to create a bit of cover I think!
He appears to have left the Reichstag without any forces, an interesting move if this is true (and I doubt it is) as this building dominates the battlefield.
Around the Kronprinzen he has pretty much the same as last time. There appears to be a few MMC and no-doubt there will be an engineer there too. I shall be placing a few units to cover the Alsen Strasse, this will be to stop him moving units between the Kronprinzen and Moltke Bridges.
The Game
Yes, I know I shouldn’t have attacked, I know I should’ve just waited and saved my men for the bigger battles to come when the Marschall Bridge side is opened. But that is hardly in the spirit of the game… and it is boring too!
West Bank – The Moltke Bridge Attack
I immediately went on the attack. Despite the obvious bias in the SS setup here I felt that there were just a few units I had to worry about, the rest were essentially unable to defend against me until I got across the bridge and started to enter the buildings, this is due to the LOS obstruction caused by the various debris-filled hexes. My Pre-Reg OBA came down on target (L11) and started breaking units all around. I had placed my IS-3 over here and his first shot destroyed the dug-in Panther (F13) which had been a thorn in my side for too long. My biggest Death-Star on the board (50 Cal, 2x HMG, 10-2) was over here too and he started breaking and eliminating defenders with abandon. In the initial Turn of the game JP lost about 15CVP without loss to me. It was only when my men, lying in wait for the whistle call, jumped up to Human Wave across the nearly defenceless bridge, that things started to go astray.
In the end my attack on this bridge was foiled by 3 events:
1. JP had placed a Wire counter at the end of the bridge (K10), this Wire held up my human wave attackers long enough for the SS to react with…
2. The HIP MG nest in the Reichstag. JP had done his LOS planning exceptionally well – as always – from W18(1) in the Reichstag a HMG can fire all the way along the Moltke Bridge while being essentially free from another attack. This unit here almost single-handedly wiped out my Human Wave while they struggled with poor Wire passage DRs; mind you, in the process of doing this he left the entirety of the rest of the board almost completely uncovered!
3. When I Human Waved the first time I made it to the end of the bridge, at this point I had a single hex in the LOS of his functional JgPz V. This AFV fired and missed the first time, but the second time it hit and (naturally) my units did not pass their NMC. This stopped me from making another Human Wave, one that could have possibly led to my men getting off the Wire and out of the LOS of the horror stack in the Reichstag.
With my men stuck on the Wire and being cut to pieces from the Reichstag I was in terrible trouble – and that is how it stayed – in the end I lost not only 6 of the 7 units that I set out with, as well as 2 leaders, but I also lost my FT (captured by the enemy) and the IS-3 who was bogged as he attempted to blast a hole in the Wire – he was dispatched by an adjacent FT attack.
On a positive note, my OBA did exceptionally well, it ranged over the whole board, breaking and CRing units wherever it passed. The OBA broke the units manning 2 of his AA weapons (20L AA – K17, 88L AA – K16) and acted to constantly keep the Moltke Bridge defenders on their toes… I LOVE OBA!
My SAN +1 on the other hand did almost nothing. All of a sudden JP stopped rolling 4s and started rolling 3s BAH!
To tell the truth… unless I decided to not attack a bridge at all this game then this attack was something I would have tried again. It had a reasonable chance of being successful and ended up tying up a lot of German units that could have been used to easily repulse the more successful Kronprinzen attack. With my MG stack forcing him to keep his head down and also stopping any movement along the road perpendicular to the Spree it is not hard for the Russians to isolate German blocks. As it was I lost a lot of men for no gain. BUT, if it had worked then I would have ended up in a perfect position for the next game.
JP had bought a PzKw IVJ section and they came on-board to a very hot welcome. The AFV that entered the Moltke section was almost immediately immobilised, then the crew bailed out, and then the Panzer was shocked before finally being destroyed! While still alive this AFV acted as a magnet for both crews and fire. I ended up killing a number of AFV crews as they tried to re-enter this tank. He also bought a platoon of Hitler Youth, but they ended up being locked away in the C16 building, which they re-captured from my Ammo Shortage 447.
EAST BANK – The Marschall Bridge Attack
Basically nothing happened here. My isolated man in MM17 pulled back to take the road hex and then waited under concealment. I had one of my 12FP -1 stacks on the opposite bank watching over him and they were able to cover any possible approaches to my unit’s position. JP didn’t attack (except to re-take the KK17 building) so I just waited. As I had the roads covered with Fire Lane-capable units he was not able to move the platoon of SS that he had left here. I consider this to be a victory then. a single ammo-shortage 447 and some MGs holding up nearly a half of the Germans best forces. The only real movement he made was to put one of his brand-spanking new PzKw IVJ’s right in the LOS of a HIP 76L. This AFV was shocked and then eliminated.
My biggest regret here is that I did not leave at least a single unit to move onto the bridge and thus give myself a head-start on the next attack.
JP has bought up on his Wire fortifications in this area, he obviously wants to put up a serious defence against the hordes who will come rushing in from the now available MM15-MM24 board edge.
EAST BANK – Kronprinzen Bridges
Like the Moltke Bridge attack I had enough men lined up here for a Human Wave. Unlike the Moltke Bridge he did not expose anyone to my LOS and thus the men had to make their way across the bridge themselves. This turned out to be much easier than I thought it would be as he had left this area essentially un-guarded! I had 4 MG stacks of 12FP -1 covering this bridge. They were in various level 1 locations and were able to almost single-handedly cut down the various movements of crews as they tried to claim the 88L AA or the abandoned PzKw VJ over in the Moltke section.
In fact, so many men were covering the Moltke Bridge that I was able to practically waltz the men across the bridge with little difficulty – then it got difficult. Not only did he have 2x 658 (1x HMG) and an 838 in the vital T11 hex/building but he also brought his 80mm OBA down right on top of my men. Every attempt to crack this building suffered the usual result, they just melted under the heavy fire.
Finally, as the PELR of the German commander started to sink (he had also taken ferocious losses this game, especially to crews and AFVs) I made 3 important moves:
1. A SU-100L came onto the bridge and started to cover the men moving along here… the JgPz V that was brought in to counter my men and this AFV was killed immediately thanks to the lethal 100L Gun. German players are so used to their 18 front AF being practically invulnerable, but this SU-100 can go straight through it with a TK of 27! The SU-100 also was a constant target for the 80mm OBA and, unlike the last game, this time luck worked for me, rather than killing my tank the German’s own OBA destroyed the pesky roadblock inV11/W10.
2. A single conscript squad was able to make it all the way to the Reichstag! While JP had his killer MG group covering the Moltke Bridge there was no-one left to watch the open Kronprinzen area. For over half the game I was able to move around here unmolested except for the defenders in the T11 location, and they were more concerned with the various assaults on T11. In the end this conscript was able to claim almost the entirety of the open ground between the Kronprinzen and the Reichstag. He even had time to dig a foxhole (-1 entrenchment for Russians) to further extend my control! Only a final advance by one of JPs few remaining 228s was able to cut down the control zones, but if he shifts out then he hands back control to me, and if he doesn’t then JP is going to have to leave one of his Guns un-manned!
3. Unfortunately I really threw away a major chance in this game though. A 447, 7-0 had gone with the Reichstag rushing conscript, but as the SS commander’s ELR started to fail he got reckless and moved his defenders into my LOS. I was able to capitalise with a massed attack from almost every MG I had in this area and the SS defenders were broken one-by-one. There was only a single un-broken 228 covering the T11 and S10 buildings. Now was my chance. A rush by these units would be able to keep the broken defenders (hiding in the cellars) under DM and finally open up this whole area to my men. NOW was the chance. Carefully I counted out the move in my mind’s eye. Carefully I placed the CX counter on my men… and then with the first move I ran my men straight into the only hex that could be seen by the killer MG stack in the Reichstag! 12FP -3 with a DR of 3 left me heart-broken! Had I just thrown the game away?
Luckily (for me) this was not to be the end of it. In the final turn (the game had gone on to turn 7 by now) with the help of the valiant SU-100 commander who threw his own life away attempting to bypass freeze an 838 (only to become a burning wreck from an in-hex thrown DC and thus adding an extra +3 SMOKE DRM to the 838’s attacks – for this he will be given the Order of Lenin), I was able to push men into U9/10. And that is how it stayed. The SS commander’s PELR hit rock bottom, while I had finally created a set-up zone across the river! The 838 was eliminated in CC against a 628 of my own (Order of Lenin for these guys too) and the Blaze from the burning SU-100 took to the T11 building reducing it to rubble.
Control Zones at CGS end
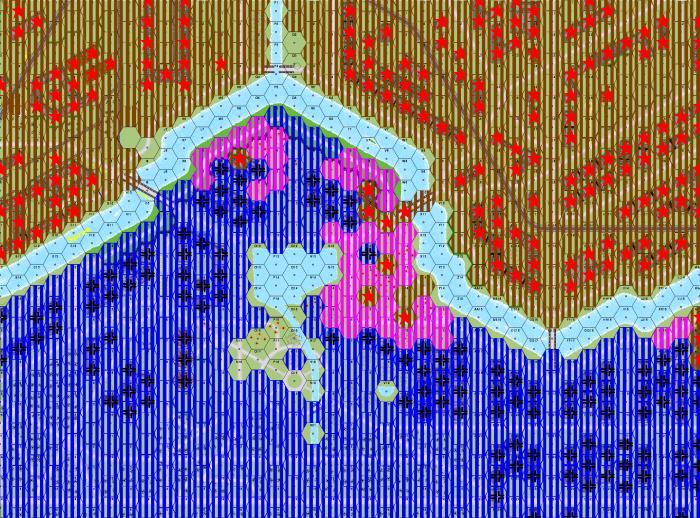
Brown – Russian
Blue – SS
Purple – No-Man’s Land
Victory Points Score
CVP
SS: CVP gained: 45 (141 total)
Russian: CVP gained: 40 (106 total)
LVP
SS: 418 + 18
Russian: 260
The SS have the most LVP
SS CGS VICTORY
AFTERMATH
We both took horrendous losses…
Force Remnants – Russian
AFV: T-34/85, 2x GAZ Truck, 8-1AL (Stun +1)
Guns: 2x 152mm ART, 76L ART, 82mm Mtr
SW: 4x 50 Cal, 4x HMG, 3x MMG, 9x LMG
50mm MTR, DC, PSK(g)
Ldr: 10-2, 5x 8-1, 7-0 [7-0 battle hardened from 6+1 in refit phase]
MMC: 628(e), 6x 458, 3x 527, 2x 426
237
13x 228
Isolated Units
Middle Set-up Zone (N8)
458 With no other Rout options this guy ended up in a Fortified Building location behind enemy lines!
South-West Set-up Zone (MM17)
447 Somehow he survived!
Kronprinzen Fields Set-up Zone (W15)
436 This single conscript and his foxholes are denying SS control of this field area
Again I took massive losses, although JP too has been severely hit, it was confined to mostly 228’s and AFVs; he only has a single AFV left and barely enough 228s to man his Guns. I, on the other hand, lost a horrible amount of infantry units, nearly 2 companies in all. To make matters worse I have also dropped another ELR level, not that it makes that much difference, my men are melting like ice-cream in the sun; they are still incapable of even passing a 8ML NMC. I also lost 2 AFVs; an SU-100 (great AFV-killer and cheaply replaced) and an IS-3 ‘Pike’ with my 9-2AL. I had 2 guns removed too; a 76L ART and an 82MM MTR.
About the only bright note is that I still have a large amount of good quality leaders. I also had made a mistake when I setup; I forgot to add to the mix my infantry reinforcements, this has left me with a core of units which I can use in the Northern Area for a separate attack to the one coming in from the South-East.
SS Remnants
AFV: JgPz V ( MA Disabled)
Guns: 2x 20L FlaKvring AA, 88L AA
SW: 4x HMG, 4x MMG, 6x LMG
2x PSK, 50mm LT Mtr, 2x DC, 2x FT, FT(r)
Ldr: 9-2, 9-1, 2x 8-1 (1x wnd), 7-0
MMC: 2x 838, 6x 658, 3x 447, 436
237
3x 228
Isolated Units
Middle Set-up Zone (N8)
228, PSK Holding me out of the open area in front of the Reichstag
The SS did not get away too easily either, they lost more of the precious Engineers and some lesser units too. I have hit his AFVs hard but that is no great victory, I think AFVs are over-rated in this CG. He also captured and kept my precious FT. Hmmm… I want that back!
CONCLUSION
Well.. another CG date completed and another meat-grinder. I have learnt a lot about this CG from this playing and each game my attack ideas get more and more refined. If it wasn’t for the fortuitous placement of the Moltke Wire (or if I had got a very lucky Wire entry dr) then I would have been able to claim some of the Moltke Bridge’s locations. As it was I claimed a good setup zone on the opposite bank of the Kronprinzen.
JP and I have differing ideas about the Kronprinzen Bridge. I think claiming it is essential, he thinks it is the least important Bridge to claim, but more on that later as the battle develops further.
Another thing that has become more apparent in this CG than any other we have played is the need to understand the firelane capability of the street layout on this map. This CG is perfect for anyone who has some skill with Fire Lanes, and in part my inability to crack the defences has been due to my inferiority in understanding FL’s use. JP on the other hand has found a map and a CG that perfectly suits his style of play! A number of times during this CG I have commented to my opponent how difficult it would be for a Russian player to cross those bridges if the German player has any experience with this CG. Having played it once I feel that I could lay down a defence that would make it close to impossible for anything but exceptional luck to get through, at least until the Marschall Bridge entry area opens up.
I cannot stress enough how important it is to pass this little thing called a Morale Check.. I keep telling my men that with 7ML there is a 50% chance that they will pass, but they refuse to listen. My MC rolls for the entire CG have been abysmal, with my 8ML units being the most obvious culprits. At least my attacks started to hit on a regular basis in this CGS.
I think JP got a bit of a shock this game with his AFV losses… as I mentioned earlier, unless one plays a few late-war German vs Soviet games then German players tend to assume that their front armour is enough to defeat anything… alas for them, this is not true. The SS wasted a lot of points this game on buying PzKw IVJ’s, AFVs whose only tactical value was to use up shots from my 76L ART and some MGs when I gunned down the various attempts to get crews back into the vehicles. I think JP also had a bit of a shock when he lost crew after crew, his 88L AA and 20L FlaKvring’s had their crews either shot or OBA-ed out of them in no time, for the majority of the game these weapons just sat there un-manned and as it is there is not going to be many crews left for him to man these Guns with unless he starts buying more Heavy Weapon reinforcements.
The other thing that struck me in this game was that despite my horrendous losses I still feel that I have a good show of claiming the Reichstag, especially now that I have not only opened up the Marschall Bridge map-side [edit: this is an error due to my lack of reading the rules… please see the 29th N game for an explanation], but also claimed an extremely important bridge. There have been times, especially when I had some horror runs with the dice, when I felt like giving the game away. When I saw JP’s morale plummet at the end of this game though, to the point where he was mentioning the word ‘surrender’, then I knew just how much damage he had taken too. Often in CGs it is too easy to focus on one’s own losses, to know how much damage you are taking without being aware of the enemy losses, however the Russian player has plenty of cheap units available to buy; the SS can also buy cheap units, but if they want effective units they have to pay through the nose. Also I have got reasonable value from my ‘toys’ (Guns, AFVs and Air Support) but the only real value JP got from his toys was from the Dug-in AFVs from the first game… the rest of the time it has been a waste of points. We have both gained a lot from the use of OBA!
So, gentle reader, the next possible game will be the 29th Night. Does the Russian decide to sit back and lick his wounds? Does the evil SS empire strike back? Who knows… only time will tell.