BERLIN: RED VENGEANCE
30th AM
JP defending as the SS
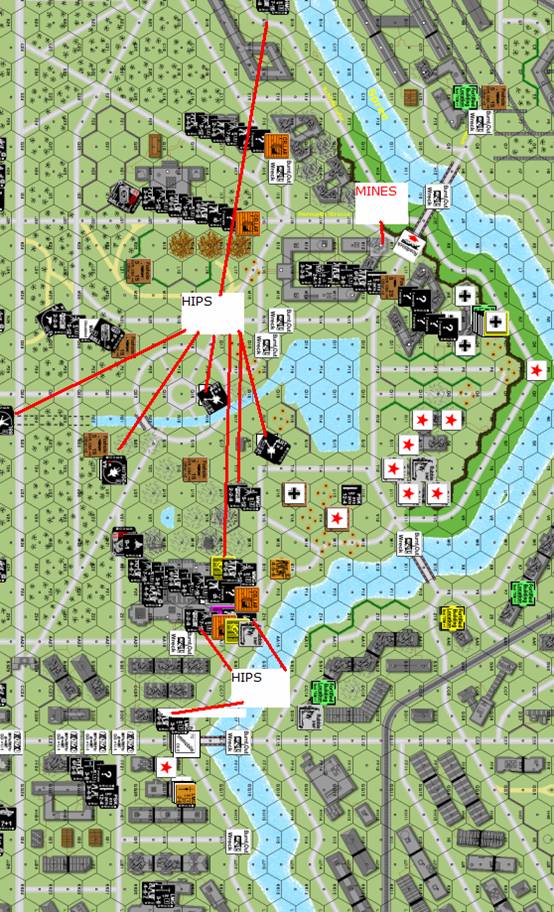
Well, he is now across the river and the tone of the game has changed, will he attack straight at the Reichstag? Or will he clear out some of the surrounding and supporting buildings? My plan is to force him to clear out the surrounding buildings by making them strong positions with good long range fire on to the area in front of the Reichstag, buildings such as F18 and H19 are ideal for this. If I can put enough firepower on that area he will have no choice but to come hunting for them but in order to get to them he must first clear out H13, L13 and K10 buildings.
So what did I buy? I bought 2 platoons of Hitler Youth (10pts – 1 was depleted). A Gestapo section (4pts) which was also depleted, on the subsequent rolls the +1 depleted drm meant that I only scored 2x 7+1 and their attending 2x 348 which, when combined will give me a badly needed 658. I also bought the G1 75mm LeFK Art pieces for their smoke capacity (3 pts) A MG section (7 pts) and a module of OBA (88mm at 7pts) as well as 3 pts worth of fortifications giving me 30FPP’s which were used as 10 concealment counters – 5 as dummies and 4 on units, a 6FP AP mine, a 2S foxhole and 13 HIP points. In the post game wrap up I lost my wounded 9-2 leader but gained one from the battle hardening, unfortunately, none of my squads hardened which hurts, as turning a 447 into a 658 is a great bonus not just for fire power and morale but also ELR which is starting to become an issue.
I have only dummy counters in K10 to give him the impression I am having a static defence. The K10 building also looks weak but I do have a few surprises there. 1st I have mines at K11 and I am sure he will not be aware that mines can be setup in a building hex, especially one with debris (B 28.44 and RB 1.3 – nice to remember huh? Will use that one later in this game for sure!). Second I have bought a 2S Foxhole that is in L13 and has a 2x 658, a PSK and an LMG for some good old fashioned point blank welcoming fire and they are supported by my engineer HS and FT in L14 which can put 12 FP std on any of the foxholes adjacent hexes. Obviously I would rather stop him from getting there and so I have a deathstar in level 1 on the ‘stag in a great hex (X20) – it comprises 2 squads each with a HMG and an LMG as well as a 9-2 leader for a nice 16FP -2 at anyone trying to cross the road in to that building.
The last few games have been controlled by him as his deathstars and OBA have forced me to keep my head down but this game I feel I have enough firepower to not necessarily take them out of the game but at least keep their heads down. I have 2x 75mm LeFK ART which are SMOKE capable and they are in Q17 and S15 with the intention of smoking his death stars which have lately been in AA11 and BB13 (both good positions that control a large area of the map) and I am sure he will have another somewhere in his new territory eg. R10 or S10. I also have my 88L AA way down in R25 where it can Area Fire at his death stars supporting the Moltke Bridge or R10/S10. My King Tigers are at; I20 to fire at his AA or BB deathstars, while the other is at W20 where it can fire at the R10/S10 guys. I also have my OBA leader and phone in the level 3 tower [edit: this was an error by JP, but it was not noticed till too late. The Reichstag towers are only level 2] of the Reichstag Z17 and he will drop arty on any of his MG stacks. There is no point using the OBA to stop him from sending reinforcements across the bridge anymore as he can always just send them across in the refit phase so I may as well use the OBA for something useful, besides, I got plenty of HIP’s for that…
My HIP are located at:
– 228 HMG in AA15 to put any of his troops trying to cross the Moltke bridge under fire and also to stop him taking the mined K11 hex which I perceive as being the weak link in the defence in that area.
– 228 MMG in U16 to to protect the vital but “too hot to hold” U14 foxhole and the open Reichstag area as well as anyone trying to get up close and personal with my 75’s.
– 658 MMG level 2 X17, these guys can get anyone trying to cross the Kronprinzen bridge, protect the open ground in front of the ‘stag or fire at EE15 which is the entry to the Marschall bridge.
– 658 LMG DD19 these guys are here to stop him from crossing the Marschall bridge until my reinforcements arrive from off board.
– 228 HMG cellar Z18, these guys are also to put fire on EE15 so my off-board reinforcements can clean up the Russian squad that is on my side of the river near the Marschall bridge and them take over the defence of the bridge exit.
– 7-0 LDR field phone Z17 level 3 to control the OBA – I have not yet used these towers on the ‘stag as I am not impressed with their escape paths so hopefully he will forget them.
So, the plan is simply this:
– His turn 1, my 3 deathstars stay hidden in their cellars to minimise the damage from any fire from him (direct or OBA) and I will rely on my HIP MG’s to take care of any rash charges across the open towards the ‘stag or Marschall bridge. It will take him at least one turn to realise that the guys in N10 and M10 are dummies and it will likewise take at least one turn for any bought reinforcements to reach any of the bridges.
– In my turn 2 I smoke his deathstars with my ART Guns and drop my OBA on any other worthy candidates while my 2 King Tigers and 88L AA take care of any left overs. Then my deathstars can advance up to level 1 of their respective buildings and take some form of dominance over the terrain, I truly believe that I can hold his men off provided I can negate his big kill stacks and the important bit will be to get this dominance over him before his reinforcements try to cross the bridge(s). Lets face facts, why would he risk losing them by crossing a bridge that is under fire when he could just wait until the game ends and cross the bridges in the refit phase? If I can win the battle of the death stars then I can stop his reinforcements from crossing the bridges and that means I will only be fighting the troops that are already across the bridge which is an acceptable number for me.
– The final setup is shown below, you will note that I have “shortened” my line by moving out of the N8 and N10 buildings, this has allowed me to gain a few extra squads. My reinforcements will move north of their start lines to reinforce their respective areas.
TURN 1
He did not roll for Air Support, OBA or Katyusha’s making this a battle of movement (his forte) I can not believe that I could be so lucky and am definitely not complaining. He advanced into the N9 and M10 buildings and eliminated my dummy counters, a scout that broke and routed into my HIP hex DD19 at the Marschall bridge forced me to expose the HIP and kill it in CC. Another unit had also CRed a conscript which disrupted on the subsequent MC.
In defensive fire I tried to get battery access but scored a red chit (I have scarce ammo so an 8/4 draw – the OBA for the Germans is designed to be sub-average). During my turn I fired my first ART piece at one of his D/stars and promptly lost SMOKE, ah well, no plan survives first contact with the enemy. At least I got battery access and have popped a SR on one of his D/stars. I bought my reinforcements on only to lose 1.5 squads to some long range fire, things are not going well for me. My deathstars popped up to level 1 (F18 and I19) and my Reichstag MG stack popped up to level 2 X20.
TURN 2
He did lots of Opp. Fire with his D/stars and got radio contact (I knew it was too good to be true!) but promptly scored a red chit. In my defensive my OBA killed a crew in one of his 5 MG stacks when it fated out and then I scored a CH on the building with his 152mm ART Gun in it, suffice to say, there is only a hole in the ground now as the whole building rubbled. One of my King tigers KIA’ed another one of his crews and my ‘stag kill stack KIA’ed a cheeky moabit that was trying to cross the Moltke Strasse.
My turn was a non-event, other than my second ART piece losing SMOKE too! (That is 4 MTR and 2 field ART pieces that have, between them, only placed one SMOKE counter for the entire CG!!) I did no damage and neither did he, except to FT his own truck in M11 hoping to create a burning wreck – something dodgy about destroying your own units especially when they have (inherent in this case) crews, but, nothing says he can’t either. I moved my King Tiger and 9-1 AL to AA17, now that he has not rolled for Air Support and the 152 mm gun has gone I have nothing to fear over there so may as well start hammering his D/stars and have some bow MG action on the Marschall bridge. He went for battery access and scored his second red chit!! Yeee Haaa!!
TURN 3
Ouch… In his prep he called down his Katyushas on the Reichstag – does this guy ever run out of fire power? The only hex to be spared was X17 where I still had a 658 and MMG HIP on level 2. Big chunks of the building got rubbled and, in one hex, all the way to the ground which cut my wire for my field phone so that is the end of my OBA. A ‘4’ result destroyed my King tiger and AL which hurt me lots as I was just starting to gain an ascendancy on him over there. The worse news was that my deathstar broke and now he would be able to cross into the L12 building (Himmler’s House). His other 152 mm ART also scored a CH on the Reichstag (Y17) which collapsed down to the ground floor and now that gun can see clear across the ‘stag to the rear wall (Y19) which will make my ‘stag defence in the future a lot tougher. The only ace up my sleeve was my HIP 658 and MMG in X17 (2) which watched a couple of squads enter the house as I was waiting for the FT toting engineer to cross the Moltke Strasse and, when it did he then broke it using the MMG. Less than a minute later, in a moment of insanity or total lack of awareness Legion sent a 628 across the Kronprinzen bridge and the squad fire power scored a KIA on that guy so a minor victory for me. Legion had his B:RV rules at his house so I was unaware that mines cost double after the initial scenario so my surprise in K11 was a non-event, Legion quite generously offered me the 6 fort points for use in the next game which I gladly accepted. The Katyusha barrage broke a few of my other squads etc but guys on the ground floor or cellar seemed fairly safe (+5 or +6 DRM) provided there was no rubbling. I also exposed a HIP crew MMG in U16 and broke the single squad that was in front of the ‘stag from last game, if I can kill him I might be able to expand my control zone in front of this area.
In my Prep a 6,6 reduced one of his 628 at Himmler’s House and my F18 and I19 guys killed the squad in front of the Reichstag giving me some breathing room next game. I was now ready to counter attack the 2 squads that had infiltrated across the Marschall bridge last game and AM’ed into position where I had LOS to them but none of his supporting troops could see me. His defensive saw a shock result on my PxJg V and the U16 crew died as did another crew trying to get back to its ART piece.
TURN 4
One of his broken HS engineers went berserk in rally and his Prep was marred by a string of 6,6’s with 2x HMG and an MMG malf-ing. He also KIA’ed my shocked PzJg V. The berserker ran at my last King Tiger and promptly died from the first shot at it, a mere MMG shot. I was able to break one of the infiltrators at the Marshall bridge. In my Prep I disrupted the last of the pesky infiltrators .The game was slowing down by this stage and he was not able to put much fire on the battlefield, I put at least 5 squads in the front line at the Marschall bridge re-taking the hexes he had taken last game. A few games ago they would all have died instantly. Sadly a snake eyes KIA’ed one of my 20L AA guns and its crew – this shot was from his 76L AT gun in level 1 Z9, the same gun that killed the PzJg V. I scored a second break on one of his infiltrators in Advance Fire and, in advance I decided to take the bull by the horns and with a shout of “fortune favours the brave” I advanced a squad from L14 into L13 for some good old fashioned CC. I scored a K result and he did no damage so we ended up in melee. He also has a FT guy in L12 so this counter attack may not last long…
TURN 5
The game has become quiet with both sides staying out of the LOS of the other’s deathstars, his FT toting engineer fired into the melee and pinned my squad for no damage to his melee’ing HS. In CC I killed the HS in melee and now have a choice, pull back or fire point blank at the FT guy…. As I said, fortune favours the brave and I prep fired at the FT guy for a break result, I charged a guy across Himmler’s House and re-took the L12 hex but suffered a double break and ELR for the hex. In my advance I sent my heroic CC’ing counter attacker into K12 and re-took another location. We discussed stopping the game at this point but with 2 disrupted enemy about to die near the Marschall bridge and 2.5 disrupted or broken enemy hiding in K11 I wanted to continue, that’s a sign of how well I was going! Unfortunately I rolled a ‘1’ and the game ended but I am not dissatisfied either.
THE WRAP UP
I actually lost more CVP’s than him but 12 of that was my King tiger and 9-1 AL and another 4 was my 20L AA gun whereas he only lost one gun with all the rest of the points being infantry. Overall I re-gained territory where I wanted to and with the exception of K11 (levels 0 and 1) and level 1 of K12 and L12 I held Himmler’s House which is what I wanted to do. Most importantly I have put the guys in Himmler’s house on low ammo [edit: not true, they are not Isolated] and have made no-mans land hexes in the Moltke Strasse so he will have to risk crossing that road again if he wants to continue the attack into that area.
SO WHO SURVIVED?
I ended the game with:
AFV: PzKw VI B
Guns: 20L FlaKvring AA, 2x 75 LeFK ART, 88L AA
SW: 5x HMG, 5x MMG, 6x LMG
2x PSK, 2x 50mm MTR, FT
Ldr: 9-2, 3x 8-1, 7-0, 2x 7+1 (Gestapo)
MMC: 9x 658, 6x 447, 436
338, 237
5x 228
None of my squads hardened unfortunately, but an 8-1 became a 9-1 and I also gained a LMG when I scrounged the PzJg V. That gives me 17 squad equivalents for the next game which is the most I have ever finished a game with throughout this CG as I have usually been averaging around 10 or 11 survivors so I am happy and feeling confident about the next game. He enters on the east edge next game and, although he has around 50 Pts of troops to buy. They will be spread across two fronts.
Brown – Russian
Blue – SS
Purple – No-Man’s Land