RILEY’S ROAD CG
19AM
Legion defending as the Germans
ROAR (C:G – 5:9) – 5th April, 2007
Played with Live VASL (7 sessions: 25 hours)
I have been wanting to play this CG for quite some time, but JP has had some reluctance. I am not sure if he was put off by the open terrain (he does much prefer city fights) or by the combined arms nature of the battle (he much prefers Infantry-heavy games) but eventually it was he who not only suggested we play this CG but also asked to play the Canadians.
With my trusty Journal 5 by my side I have looked over the map and the forces available to me and am ready to take this CG on. I know that the Canadians are attacking with a massive amount of force in the first few CG dates and that the German player must keep his Personal ELR (PELR) up to allow him to absorb the losses and then nip away at the Canadian edges with a series of local counter-attacks. This will be a new sort of CG for me too… I love combined arms and love to use AFV, but the open terrain is a scary prospect and I must admit that I am not at my best in these sort of circumstances.
German Initial OoB
There are no purchases for the initial CG game. The units are given by the setup instructions, though the Germans do have the ability to roll on the Leader Table.
One thing I loved from the last series of AARs that JP did for the Red Barricades CG was his naming of his forces, so that he knew how many had survived each day’s battle, and indeed the whole campaign, this is something I shall be doing in this CG.
Unit Designation
The Initial SSR limit the Germans setup area so these units are available for setup only within SSR defined areas.
Units A
20x 548, 8x 228
9-2, 8-1, 2x 8-0, 7-0 (rolled ‘4’ and ’11’)
2x HMG, 2x MMG, 6x LMG
2x PSK
Radio (80mm Bttn MTR – HE/SMOKE) – I may swap the Radio for a Field Phone
2x 88LL PaK43
2x 88LL PaK43/41
100FPP (2x Trench (14), 5x Foxhole (5), 12 AT Mines (48), 2x 6FP AP Mines (18), 1x Fort (10), 1x HS HIP (2) = 100)
German Attack Chits: 6
Canadian Attack Chits: 2
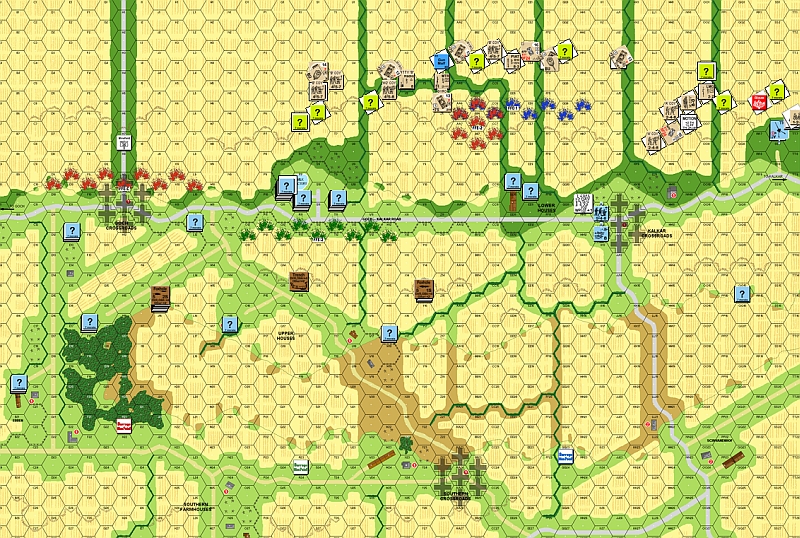
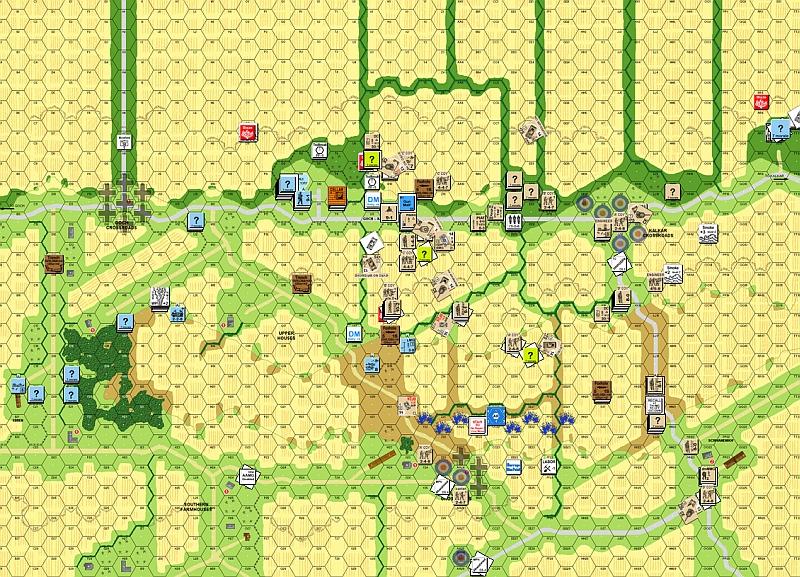
German Setup
Since the Canadians enter with a large percentage of their CG total available infantry (49%) it is important that I cause damage to him this game. We all know that it is infantry that wins CGs, so while he will be protecting his AFVs I shall be hunting for MMC. To win this CG through attrition the Germans need kill 1 Canadian MMC for every 1.5 MMC they lose; also I think (and most I have read concurs with me) that it will be hard to STOP the Canadians from taking most of the map in this game, this also makes standing and fighting to cause casualties a desirable option. With this in mind I have made the following setup:
EBBAN AREA
B19 LMG 548, 8-0
E19 PSK 238 HIP
F16 2x 548, 238
J15 2x 228, HMG, MMG, 9-2 2S Foxhole
This is my ‘fall-back’ position, though I really don’t think I shall have many unit survive the initial brown swarm. I hope to use the HIP PSK unit to kill an AFV and the rest are designed to hold him out of this important area. The 9-2 MG nest is going to be raking his exposed units with fire and will hopefully be a place from which I can score the kills I need to win this CG.
GOCH CROSSROAD AREA
D13 88LL Pak 43 228 Trench, HIP
E12 2x 548, 238
H7 1AT Mines
L11 2x 548
My flanks are going to be drawing a lot of his attention. Most players (myself included) will make the Milk Factory a major defence point, so why not slip some units around the sides to grab territory and cut Rout paths? I hope to answer this question for him with these positions. The 2x 548, 238 stacks are to make him fear leader & SW combos, the 1AT mines on the road are to slow him down and the AT Gun is to welcome him as he crosses the ridge.
UPPER HOUSE AREA
N16 548
R14 88LL Pak 43/41 228 Trench, HIP
W17 Field Phone 7-0 1S Foxhole
Y15 LMG 548
This is another fall-back area and another half-hearted defence of some LVP. The OBA Observer has a good field of LOS from here and the field-phone is to make sure I don’t suffer drop-out from OBA Missions. I will not be subtle with OBA, this can be a huge killer for me if I am lucky with it. The 88LL is again to give him a warm welcome as he crosses the ridge, it is also to ensure that units held up in the fight for the Milk Factory are going to suffer some more heat.
MILK FACTORY AREA
Q9 2AT Mines
Q10 88LL Pak 43 228 HIP
2x LMG 548
S8 2AT Mines, 6AP Mines
R10 2x LMG 548, 8-0
T10(C) 2x 228, HMG, MMG, 8-1
U10 2AT Mines
V9 2AT Mines
I don’t think subtlety will win the day here, I could HIP units but that would be a waste of points to spend on Mines. Mines are heavily placed around the Milk Factory as I want him to just go away and leave us alone… Unless I suffer some major bad luck here I should be able to give as good as I get, and that means a win for me if I can take an equal number of MMC with me as I go! I have placed some mines in the Orchards to make him fear HIP PSK HS should the Barrage trigger a DR.
LOWER HOUSE AREA
DD10 PSK 238
EE10 2x 548
HH10 548
II8 2AT Mines
One part of me wanted to just let him have this building, the other part said “make him burn!” – Awww… why not?
KALKAR CROSSROADS AREA
MM10 548
QQ15 548
SS7 88LL Pak 43/41 228 HIP, Fortified
TT6 1AT Mines, 6AP Mines
This is going to be interesting, either I am making an expensive mistake or I am building a cunning little death-trap… it all depends on his OBA luck and my shooting luck. The mines are to make him suffer as he tries to clear this position out, the AT Gun is to make sure he understands that this flank is not ‘open’.
(Note: I had made a mistake and setup a number of foxholes illegally, these were removed midgame and account for the discrepancies in the FFP tally)
THE GAME
Since it is a Canadian attack and I am not privy to his plans, I shall be writing this initial report based on my men’s defence against his attacks, thus the area covered by it will be decided by his intentions.
The locations discussed in this and all RR: CG AARs are to be found on the Map Names Page; this also has a picture of the area in question and the history of the terrain feature over the course of the CG.
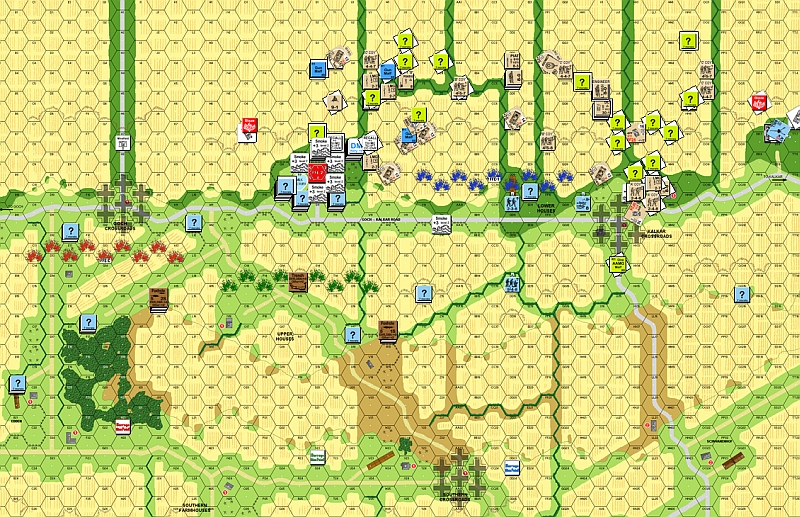
TURN 1
The Canadians have setup with a long line of AFV running from the area in front of the Milk Factory towards the East. They are not going to attack directly towards the Milk Factory with force, they are obviously intending to sweep along the Eastern Flank and then come at my main defence from the front side and rear. Unfortunately for him this will also put him right into the firing line of my Kolkar Crossroads 88LL.
Barrages are scheduled to come in at: Red Barrage D7-L7, Green Barrage N7-V7 (it errors to N9-V9) and Blue Barrage CC5-KK5 (it errors to AA4-II4). These Barrages are great for me… they are totally missing my main defences and failing to show all but a few of my mines… even more importantly the Blue Barrage is dropping right in front of a large portion of his forces and will be slowing them up on the first turn!
Canadian AFV with Riders swarm on board. I take an early hit when a BFF Wasp calls a 1MC on a 548 (MM10) and the MC is failed. On the other hand JP takes a few useless BFF shots and manages to whip out a 6,6 to mess up a Sherman V(a) MA. His AFV are moving as far as possible, they are avoiding the crest and slope lines to avoid the Bog rolls and are also staying in Motion. A few Riders dismount, they are mainly MTR carrying troops. His movement is only impeded by the traffic congestion and the Blue Barrage, this Barrage could turn out to be a huge help for me! When defensive comes I reveal the HIP 88LL PaK 43/41 and it immediately flames a Kangaroo (it has 1.5 MMC, a PIAT and a 7-0 leader! Score) but it fails to get ROF so I am forced to risk IF to swing the barrel around to attack the Sherman III(a) who has crept behind me (and is in the TT6 minefield) – to counter this JP has strangely decided to force its 457 riders to Bail Out into a 6FP minefield, they fail the Bail MC and surrender, I declare No Quarter to avoid having my AT Gun neutralised by having to Guard Prisoners. There is only one other shot available to me, it is with an 88LL PaK 43 and he has a brilliant LOS to most of the Canadians AFV who are stuck behind the Blue Barrage… it rolls a 6,6 for its first (and as it turns out, only To Hit DR of the game). JP fires with a few units for Area Acquisition, but we are still either too far apart or too much in motion for anything to be seriously threatening.
It is the German turn and they start off with a disaster when their Malfunctioned 88LL rolls a ‘6’ and is removed from the game without doing anything… this is infuriating, it was placed in the optimal position and his AFV were swanning around in front of his barrel begging to be blown away… Instead of being of some use it was actually a negative as one of my most potent positions has been neutralised and I have no way to replace it. Then the next setback befalls me, I call down my OBA and place it right in the middle of a mass of infantry and vehicles… there is only a pair of DRs that can stop me from actually hitting something, and one of those DRs is exactly what came up… the OBA falls impotently in the open fields in front of his Barrage so there is no chance it will even influence his movement. I blast away in Prep Fire and eliminate his Eastern Sherman… but JP rolls the CS number and the Crew manages to Bail Out, they land in the minefield and survive that too. With this AT Gun I again take a chance and rotate and IF for an Aqr on the nearby Kangaroo, but I miss (not much chance anyway). I have no other shots and few moves (mostly units coming out of cellars). JP fires away and his first is to land a WP shell on a Para Unit (HH10), this strips concealment, but I pass the MC with ease. The rest of his attacks are to mostly gain Aqr, he doesn’t fire with absolutely everything though, I think he rightfully fears the SAN of 4 and doesn’t want to risk losing MA though malfunction.
German Losses
88LL PaK43
Canadian Losses
457 (Passengers/Riders: 458, 248, PIAT, 7-0)
Kangaroo
Sherman III(a)

With their attack weighted to the East the Canadians enter the fray.
TURN 2
To start off the new Turn the Canadians call up some OBA and are successful but the SR falls in their own lines. Then he rolls for the Barrages but again they manage to miss anything of interest and just kills lots of small furry animals in the empty fields, at least the Blue Barrage moves forward and gives him some movement options. His Prep Fire is terrible, not only does he exhaust a number of unit’s WP options, but he also manages to roll 2 more 6,6 results to have another 2 Shermans suffer MA malfunctions.
The attack is starting to take some shape though. A massive thrust of Carriers and Wasps is heading straight for the Kalkar Crossroads and is likely to push on from there towards the Rear of the map; I have a 548 there who defends bravely but his shots all miss and when I take my first FPF shot in months I suffer a 8ML unit broken as a result! The Kangaroo sitting right in front of my 88LL AT in the East dives into the adjacent Blazing Wreck and thus avoids a horrible death from my 2ROF Gun which has failed to get ROF at all this game; at least I am able to change CA from yet another IF shot without suffering a malfunction. The attack towards the Milk Factory throws up a solitary AFV to the West of the Factory, this guy is right in the firing line of my Factory 88LL and he explodes in a ball of Flame… that shuts off any movement in THAT direction for him. However, movement here is slow and when he meets the first AT mines in the Milk Factory orchard he reverses out and then starts to disembark his men ASAP. In the more central attack towards the Lower House I take a shot with my PSK at a Sherman and have it removed immediately with a ’10’ result… that is 2 of my 6 AT weapons removed without a shot being fired.
Defensive Fire lets me correct my OBA and again for the error roll I roll the ONLY number capable of turning the attack into something useless. My MG stack on the hill near the Ebben Area is not useless though, he CRs a rider Engineer Squad (though they pass their MC) and breaks a 447… considering how few men he currently has available in the Milk Factory attack this is great. The Turn ends with another loss to JP when his AFV Crew attacks the 88LL AT Crew in the East… they choose H-2-H combat and die for their audacity.
The German turns are quite quick, and this one was no exception. I started off with my OBA and managed to score the mission so I converted it to a SR and dropped it right on the head of his Radio carrying officer; I want him dead. My Eastern 88LL fires and misses (with no ROF yet again) but then things get interesting. A 458 had jumped up the hill in an attempt to spot anything interesting in the area East of the Milk Factory, unfortunately for him this is near my Milk Factory MG nest and they fire with their 12FP to get a 2MC – and then JP rolls a 1,1… sigh, Fanatic and a Hero now. JP states “That it is all going so well for him”, a touch of hubris I wonder? The dice give their final answer when my nest goes on a ROF run which atomises the 458 AND the Hero and all is right in the universe again. The other MG nest (which has attracted the attention of a pair of Fireflies now) is able to break a 457 Rider and though he passes his Bail Out MC his 51mm MTR is lost in the process. My moves are minor… mostly just to send a unit to support the Centre from the Ebben area and the other is to escape one of the 548 from the Kalkar Crossroads area (he rallied this turn), also towards the centre of the map.
JPs defensive is not as intense as I thought it would be, though he now has 3 of his 16 Shermans with MA Malfunctions and another 2 are destroyed. His OBA drops SMOKE on the Milk Factory and then the Barrages work their worthless way across the map, again the Blue one falls short and will end up doing me more good than harm as it is really slowing up his ability to move through the centre of the map. He gains some AQR and looks like he is sizing some locations up for SMOKE fire.
German Losses
PSK
Canadian Losses:
127 (crew), 248, 458, Hero
51mm MTR
Sherman V(a) (127 Crew Survives)
The attackers own Barrage is providing to be more of a hindrance than the German defenders whose weapons are poorly maintained.
TURN 3
This turn starts off with the Canadians scoring another Hero and Hardening result through HoB… mind you, with the huge amount of men and material he is bound to get some swings in the dice and I can hardly complain much when he has had so many AFV lose their MA and quite a few SW have failed too. His OBA continues to fall as SMOKE on The Milk Factory which is really not helping me very much at all. The Barrages also continue to fall and the Red and Green Barrage flail away at empty space (they have literally managed to miss EVERYTHING in their path). The Blue Barrage again proves to be my friend by blocking the Goch-Kalkar Road and thus stopping his Carrier and Wasp force from coming at The Milk Factory from the East. Prep Fire sees him continue to blast away at the 9-2 led MG nest up on the hill; he gets a few useless hits with his 1ROF MA and then score a 1,1 CH with his Firefly only to pull out the traditional 6,6 which often follows snake-eyes, the next shot exhausts his HE.
In the Movement Phase his empty Kangaroos are Recalled and start to depart which cleans up the map clutter somewhat. He is intelligently sending a platoon of Carriers down past the Schwanenhof to swing around behind my defence while others attempt to take the Schwanenhof itself. To use the road and thus escape any Bog chances and to gain the most movement I am able to lay 1RF at a bottleneck point but all I can do vs. the Crew and Riders is get a solitary MC fail on an 8-0; he passes the Bail Out roll. In the central attack his AFV are starting to cross crest lines and thus are taking Bog rolls a-plenty, he also attempts a few ESB rolls until one fails and leaves a Sherman sitting in the open right in the LOS of my western-most AT Gun.
My OBA is able to fall in a target-rich environment at the base of the hill-line to the East of the Milk Factory. However, I yet AGAIN roll the ONLY DR possible to spare JP the brunt of my OBAs force and end up dropping it on my own troops – i have the 8-1 and the HMG 228 in the Milk Factory MG nest broken by my own OBA while he has 5 of his 8ML units sitting in the open fields hit by the same OBA… they all take a 2MC and 4 of the 5 pass and one of those passes is yet another HoB result… at least the ONLY fail was another 6,6 following the 1,1 and saw a CR, ELR break result. I unHip the Western AT Gun (D13) who fires and acquires a Sherman but neither kills it or gets ROF (not a single ROF shot from any of my AT Guns yet).
The turn plays out with me losing a 548 to FTR (at least I got one of these guys away from the Kalkar Crossroads area) while he suffers more MG breakdowns in Advancing Fire.
I get a bit of Rally luck with my broken 8-1 (who had run over to join the main defenders in the Milk Factory) HoB-ing to a 9-1. My OBA finally starts to do some damage with a Sherman being destroyed as well as a Squad. I am also able to kill another Sherman with the Goch Crossroads AT gun, but when I IF to get a 50/50 shot on another Sherman I again suffer a breakdown and see my 2nd AT Gun fail; I have taken 9 shots with my AT Guns without a single ROF and had 2 breakdowns.
Movement for me is to try to pull back to centralise my defence and to support the Milk Factory area, he takes plenty of shots but only manages to malfunction even more MGs – he now has a Sherman with it’s MA, CMG and BMG all malfunctioned only it’s AAMG is functional!
Defensive Fire Phase sees his Barrages do the same – Red and Green are impotent and Blue hold him up as usual – at least something is going my way. With the Fireflies down in front of the Milk Factory JP fires at the MG nest in the Ebben area and scores a CMG 1,1 and a MA 1,1 which is a CH… and even though it is only 1MCs my 9-2 leader breaks as well as one of the crew… his luck (and my bad luck) is starting to get really silly as this is the 3rd 1,1 result from only 5 shots at this vital position. My units in the Lower Houses takes a bunch of MCs which he miraculously passes until the very last shot… this time he fails and that should be it for him. I do have other units here though and they are able to Ambush kill a 457 in H2H and then withdraw back in to the building.
German Losses:
548
Canadian Losses:
237, 247, 2x 457
Sherman III(a)
Sherman V(a)
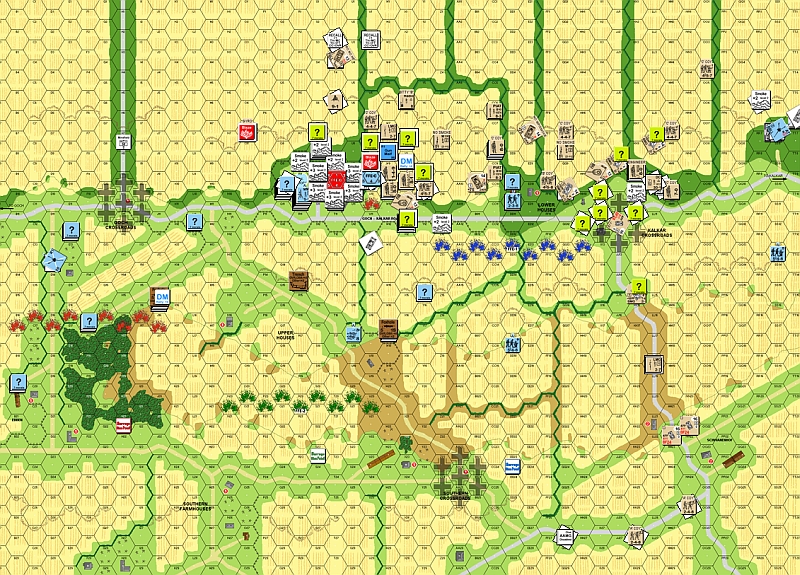
Smoke shrouds the Milk Factory but the attack is held up by mines.
A fast moving force of Carriers and Riders has penetrated the defensive line and is claiming territory in the German’s rear.
TURN 4
I do well with everything in Rally except for the essential 9-2 in the MG nest and the 228 with him. I am getting bled white here because even though all my troops are essential it is the REALLY important positions (AA Guns and this MG nest) that are attracting the worst kind of luck. His Barrages are useless as usual, but at last he is not being hampered by his own Barrage for once. He does not do any OBA this turn. Foxholes are now being dug to start to link together control zones and his ever-trusty low-rolling dice are not failing him now. However, he is still having terrible luck with WP and SMOKE as more units discover that they forgot to bring any of those types of rounds (they only have the Critical Hit-causing-German-seeking ones it seems).
In movement he is continuing to use his Wasp’s to gain BFF shots at my Lower House defenders (who are powerless to stop him as my dice are attracted to high numbers only), he CRs a HS but HoBs a 548 to a Fanatic with a Hero. He is also starting to push hard through the centre of the map towards the Upper Houses area with Wasps, Shermans, Kangaroos and riders; the infantry off-load to start to gobble up locations – I am able to hit an off-loading stack with a 1MC but as usual he passes these MCs with ease. Last turn my Eastern-most AA Gun placed an Aqr on the road that leads up to the Schwanenhof and this lone Aqr is really cramping his style. He decides to drop infantry and a Bail result causes yet another HOB result which sends some Engineers Berserk. he also tries to ESB and manages to Immobilise a Firefly on the road between the Kalkar Crossroads and the Schwanenhof! With the Barrages in the centre of the map finally getting out of the way he tries to move as many AFV and men as forward as possible but suffers a Bog result with a Sherman – we are both getting our fair share of bad luck, it is just that he can absorb the damage so much better than I. He has also moved his Fireflys from the valley to the North of the Milk Factory which might prove to be a mistake as this might allow me to rally the leader and crew in the MG nest.
As he was moving through the fields to the East of the milk Factory I placed a HMG Fire Lane which is able to break 2 leaders, one of them carrying a Radio, it also put a big damper on his moves for the turn. My newly Fanatic unit in the Lower Houses suffers a few shots, and eventually one of the 2-4FP +2 shots hits… a NMC for a Fanatic 8ML unit should be a shoo-in right? Yes? But not if it is my mine… he fails immediately and yet again a defence crumbles too cheaply through atrocious luck.
I do well when my 9-2 gets a rally HOB to harden into a 10-2, but there is the traditional 6,6 which follows and this kills a 228 in the vital MG nest – yet again bad luck strikes me down in the most vital area… I have lost both 228 in this MG nest to 6,6 rolls. To make things even worse I again roll a ‘6’ for my 88LL PaK 43/41 repair roll… that is 2 guns lost to me from failed repair rolls off of their first attempts. I am thinking it cannot get any worse, but I am proved wrong when my OBA pulls it’s second Red Chit (at 6B:2R) and thus I am again lost one of my pivotal Defensive options. Out of rage at the evil being done to me my Eastern AT gun starts to fire at the Squads approaching him and FINALLY he gets run of ROF… after he is finished both a 447 and a 457 are KIA and there is nothing left nearby to threaten me. JP is really starting to lose some infantry now and despite all the terrible luck I am having I am quite happy with how things are going game-wise. This is further enhanced when JP loses another 458 in Prep.
I have a solitary 548 in the Kalkar Crossroads area and he is just a single hex away from the edge of the map, if I can AM then I am going to be able to take him off-board and have him available for the next game. I AM with the thought that even with a few shots against me there is little that could go too wrong… yet again I have my faith in probability ruined as JP blasts away with 2FP-1 and 1FP -1 shots; they all hit and my 548s are passing their MCs with all the élan of 2nd-line Italian units, I am CRed to death. At least JP also draws a Red Chit for his 100mm OBA but his Red Barrage falls in amongst the men in the Ebben Area and I lose a HS from an airburst as JPs dice continue to run as hot as Hades. The rest of Defensive fire is the same-ol, same-ol; shots that SHOULD miss hit. While I can understand that when you have 6 units firing at a single target in a building one has to expect them to hit on occasion, it is just when the misses are the unusual results and the MCs of 8ML units are failed 70% of the time (as it was at this stage of the game) then there is a bit of dicing going on. This turn alone I lost 4CVP to 3’s or 12’s alone.
German Losses
228, 3x 238, 1x 548 (548 Captured)
88LL PaK 43/41
Canadian Losses
248, 447, 457, 458
7-0, 8-0
PIAT
DC
Sherman V(a)
The brave Paratroopers in the Lower Houses have delayed a sizable force but they now fall under the weight of the Canadian attack.
The Milk Factory is too formidable for the Canadians to consider attacking at the moment.
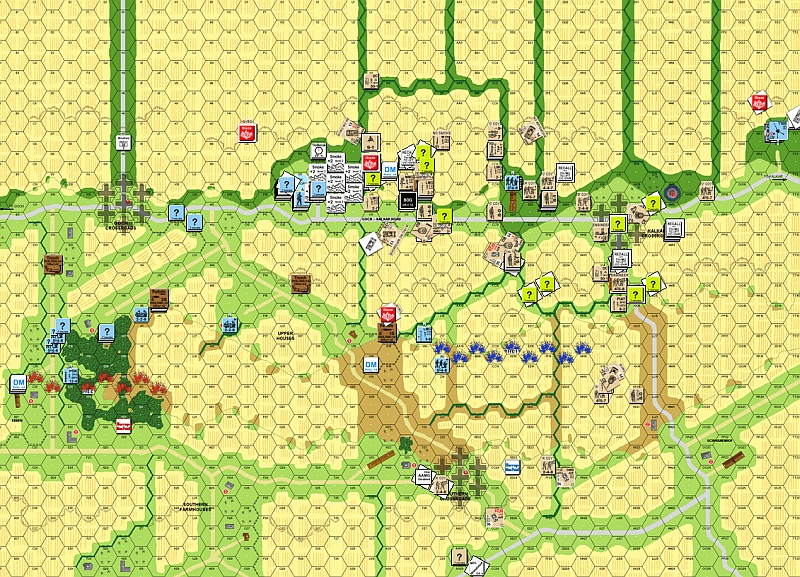
TURN 5
After a traumatic week at home I was looking forward to a nice relaxing game of ASL… how wrong I was!
JP starts a rally train with a ‘2’, ‘3’ and a ‘4’ – I hope that is the end of this sort of DR! The Red Barrage is lifted and he does not do any OBA. In Prep Fire he makes many SMOKE and WP attempts with the few AFV who are yet to exhaust their chances and all but one fail to have the ammo. The only one that hit was a WP shot on my MG foxhole, the 10-2 leader passes and with the foxhole benefit there is no chance of there being a fail… unless I roll a 6,6 – I roll a 6,6 and the crew dies from a 1,000,000 to one shot (that just happens to happen consistently thus far this game) – even JP is starting to feel bad about it all and he is used to the dice being all in his favour! So, yet again I have the most important position on the board neutralised by outrageous luck. Then he fires a 75mm shot at the sole remaining 548 in the Lower Houses area – the 12FP +0 shot comes up 1,1 = KIA. JP digs more foxholes and links more of his territory together.
JP continues to move around the rear of the battle and makes it as far as the Southern Farmhouses when he stops, no doubt to offload infantry and crew to claim this territory. He also moves units to the Schwanenhof and that will be easily claimed next turn too. Up in the middle I have a solitary 548 who can possibly hold off a few units, but even he falls to a 2FP BFF shot and a failed NMC, the middle of the map including the Upper Houses area is his to take. I have had to sit back with an eye to defending the Milk Factory so I cannot put units forward to interdict his movements to the East of the Factory as I cannot afford to have any of these defenders broken.
Rally for me comes to nothing. In Prep I let loose with the HMG & MMG combo in the Milk Factory and am able to break a 457, ROF allow me the chance to get another kill when my dear old friend 6,6 pops up AGAIN and I lose the HMG… this is really getting to be a little too much.
Apart from the Milk Factory everyone else is running for the Ebben area, but it is like death from small cuts… he has SO many units able to shoot on me that none of them can try to get very far, the few that do are cut down. My Advancing Fire give me a 16FP +2 shot against a broken unit and I score a 2MC – but JPs 8ML men are acting like 8ML men and he passes the MC. In Rout Phase I suffer a FTR and lose another 548 (from the Lower Houses) but I am able to get 2x LMG 548 into the cellar of the T10 building and that will make an attack against the Milk Factory a very messy proposition indeed.
German Losses
1x 228, 1x 238, 2x 548
With the exception of a small pocket in the East the Canadians now control the Centre and East of the battlefield.
TURN 6
Again rally goes well for the Canadians, though I also get some luck when a broken 8-0 gets HOB and Hardens to an 8-1. All the Barrages lift and JP drops SMOKE with his OBA in the Upper houses area, he is obviously making a move for the U17 LVP and wants to make sure that my Milk Factory AT Gun and MGs don’t influence the result of this. His few remaining SMOKE firing units waste their last chances and he digs more foxholes.
In all the back areas he takes as much territory as possible, he also easily grabs the U17 location and in doing so I lose another 548 as a prisoner. The rest of his moves are quite tame though, he is obviously not interested in pushing much further forward and content with his modest gains. The biggest moment of the turn came when he sent a Firefly up a slope and it ended up getting bogged… this turned out to be in the LOS of my Eastern edge AT Gun and I have a 50/50 chance of scoring a hit and thus the kill against his rear target facing, and if I don’t hit now then certainly in my turn – I roll… 6,6 and lose my 3rd AT gun! Sigh…
It is my Rally Phase and with 2 consecutive 6’s I lose my Milk Factory HMG and the Eastern Edge AT Gun, there is no denying this has been a dicing and a half – I have lost 3 AT Guns to their repair rolls coming up 6 first time. There are few Prep shots available to me and my movements are just to get units into safety… naturally despite AMing into +1 WP cover he still manages to whip out a NMC which a 228 fails… and this ignites a massive run of incredibly low DRs for attacks… but equally amazingly I manage to pass all of them. And that is where it ended.
German Losses
(548 Captured)
HMG
88LL PaK 43/41
The Butcher’s Bill
German Losses
2x 228, 5x 237, 4x 548 (2x 548 Captured) (9.5 MMC lost)
HMG
PSK
2x 88LL PaK 43/41
88LL PaK43
Post Game
Gained LMG(b) from scrounging
Canadian Losses
1x 237, 2x 247, 5x 248, 447, 4x 457, 3x 458 (12 MMC lost)
2x 7-0, 8-0
2x PIAT
51mm MTR
DC
Kangaroo
2x Sherman III(a)
3x Sherman V(a) (all AFV lost with Crew)
Post Game
Bogged Firefly Immobilised (W10)
Drops MMG (X13)
Escape Losses
458 ->247
457 -> 237
248 lost (added to game tally)
Harden 457 ->458
JJ13 Firefly remobilised
MA malfunction AFV repaired
German LVP Gained: 9
Canadian LVP Gained: 11
German to Canadian MMC Death Ratio: 9.5 : 12
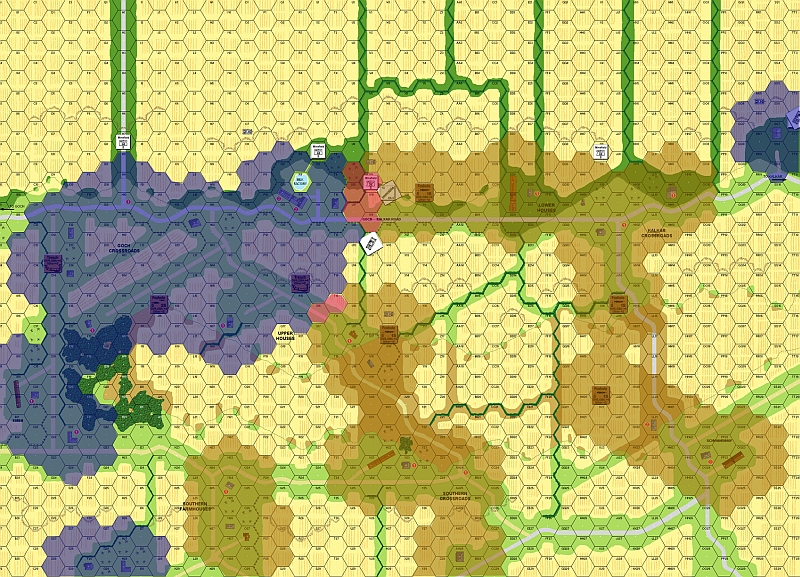
Map at game end with Control Zones marked out.
Blue – German
Brown – Canadian
Red – No-Man’s Land
The Germans have managed to hold most of the Eastern sector of the battle ground, which includes some interesting terrain for a defence against the hammer blow that is sure to come. The defenders have also managed to save a whole Company of Paratroopers, though they have lost almost all their AT capability and an important HMG (HMG are not easily come by in this CG).
The Canadians set limited aims for this battle and no doubt have a plan in mind as to how many LVP they need per turn to win, this probably accounts for their only taking the Central and Eastern parts of the map – there is no doubt that their main strategy was to bypass main pockets of resistance to grab territory and to isolate and eliminate the minor pockets.
End of Game Forces
German
12x 548
7-0, 8-0, 8-1, 9-1, 10-2
5x 228
5x LMG
2x MMG
HMG
PSK
88LL PaK43
Canadian
237, 2x 247, 2x 248 (1x Engineer)
4x 447, 11x 457, 18x 458 (2x Engineer)
7-0, 4x 8-0, 5x 8-1, 9-1, 10-2
4x 228
12x LMG, 4x MMG
7x PIAT
2x DC
3x 51mm MTR
Radio (100mm OBA)
2x Carrier A, Carrier C
3x Wasp
2x Sherman IIC(a) (1x Immobilised)
4x Sherman III(a)
3x Sherman V(a)
2x Sherman VC(a)
Conclusions
OK, lets get the nasty stuff out of the way first.
I got diced and even JP (who is so used to seeing me roll badly that he plans his strategy around it) would have a lot of trouble denying that. I failed 24 out of my 36 MCs (this is with minimum 8ML units), most of which were NMC. I had 24 SAN attempts and only got 3x Hot and 1x Warm. 2 of my 6 available AT weapons (a PSK and the most important 88LL AT in my setup) were eliminated without taking a shot due to malfunction. I had to roll for repair 5 times, 4 of those rolls were 6’s to eliminate the weapon, I didn’t succeed with a repair even once. My OBA did manage to kill an AFV and a MMC, but it also broke an 8-1 and a 228 of my own (who were in Stone Buildings) – each of the 4 times it fell it rolled the PERFECT dice to hit the least amount of targets! I got hammered by JPs attacks as usual, but I am willing to cut some slack here, he usually had 3-6 units able to fire upon me at any one time and with those sorts of odds eventually something has to hit!
JP suffered bad luck too. Every single AFV of his had run out of SMOKE and WP by the end of the game and the first few turns he had so many AFV with MA and MG malfunctions that it seemed like he had nothing left. However his numerical advantage, and the fact that he passed MCs like 8ML units should made it easy for him to overcome these obstacles.
In general there were a phenomenal amount of 1,1 and 6,6 DRs and an amazing amount of 1,1 with a 6,6 following.
So, if we accept that I got diced… how come he failed to take more ground? And how did he lose so many units?
Taking territory is not as easy as it seems, even with the opponent self-destructing his AT Guns. The ground is VERY slow to move across and this was made even worse with his own Barrages slowing him down; his main attack was stalled for at least 2 turns by the Blue Barrage and I would have to say that this Barrage was one of the most effective weapons I had in my favour! JP also chose to attack into the empty gaps, and this was very smart, his force is not as safe from the Germans as it appears and it made sense to grab the easy terrain without loss rather than attack the strong points.
However, I feel he could have, and possibly should have tried to push through all areas, at least to try and take the Goch Crossroads area even… but that is the difference in the way we play. I would have tried to smother the whole of the front line. No doubt JP has done the maths and feel with the forces available to him he can afford to let me have 9 LVP for free this tune… I am not sure I agree but he should find it easy to make a large dent in my LVP by the end of the next game.
His unit losses took us both by surprise I think as the first few turns saw his losses just rack up. With roughly 107 MMC available to the Canadians for the whole CG he has lost nearly 10% of that number already. I can afford to lose 1.5 MMC per Canadian killed and this game sees me at .79 MMC lost per kill, this is a huge win. When you consider the fact that most of the game I was without my ‘main’ weapons due to malfunction it is hard to not be satisfied with this result. Also when you consider that he will have to attack again next turn, and into the Milk Factory (which will be well-defended) as well as the Ebben area where I can reinforce easily (from the South) then we can expect to see some more Canadian losses… his reinforcements only trickle on and have to come all the way from the northern edge of the board, so for the first turns at least he will have to attack with what he has into my reinforcements and prepared defences… He will also have to leave units in each of the areas he has taken as he cannot be sure if my counter-attack will be to re-take territory or if it is to reinforce my hard-pressed defenders.
I think we both feel that this game ended up as a Strategic Draw… I lost far too many of my most important units without them having much influence (if any) on the game at all. He lost too many men and took too many losses for such limited aims. But, he does have control of the map now and that means I shall be the one slogging over open fields into the attack on defended positions.