EDSON’S RIDGE CG
12 NIGHT
JP playing US Marines
THOUGHTS
Both Legion and I are comparatively new to the PTO and we made a lot of mistakes in our first attempt at this game, indeed, we called it off after five turns and are now starting again. I was, however, getting the short end of the stick as this entry from the AAR shows:
At this point I was losing confidence, I had fired heaps at him and they just kept coming! Another Jap squad moved adjacent my trenches and got striped from the residual fire. Then he started another banzai charge and I knew my defence would not hold, they charged through his own arty and all my RF for a mere strip result and entered O15 which broke the defenders on the FPF roll.
In my Defensive Fire Phase my HIP leader in O15 decided to drop his arty on the adjacent O16 hex with the misguided but heroic concept of “taking a few of them with me!!” It broke my O15 leader and CR-ed his already stripped squad. In O16 it merely killed his broken HS while my broken squads passed. In O17 it CR-ed and broke his engineer squad.
I had to run away during Rout as my entire front line was ruptured. I lost 2.5 squads routing into the arty (his and mine). He had 2 squads stripped in Advance from the arty as well and, in close combat he killed the sole HS that was left manning the front.
The final cost was: US 3 squads dead and 3.5 squads broken and in the open, along with three broken leaders.
The Japs threw 2 leaders and 9 squads against my line and lost: 2 squads dead 5 squads CR-ed to HS and a leader. That was one of the most intense Defensive Fire Phases of all time and I wish it had been face to face instead of PBEM as I would have been on a high afterwards!!
I had learnt a lot about PTO night rules, Edson’s Ridge CG and the Japanese in general.
In the first game I tried to hold Hill 100 to deny him VPs but that turned out to be near impossible. With this new information my game plan has been modified a lot and instead of fighting to deny him VPs I now intend to let him have Hill 100 so I can keep as many men alive as possible and hold Hill 125. After all, this is a CG and they will be needed in the games to follow.
BUYS
I have setup far enough back to be able to buy troops as reserves and yet still have them in potent front line positions. Along with the scenario given troops I have also bought a Para-Marine Platoon (I2) and an MG Platoon (HW2) – both as reserves, as well as 2 Fortification sets in order to create a strong position with interlocking fields of fire.
Setup
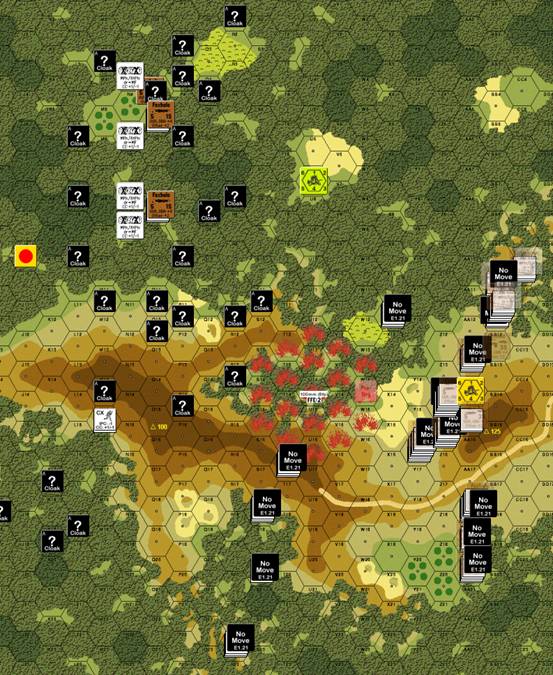
Using my 25% of troops HIP, fortifications HIP and the Reserves under cloaking counters I have been able to give a misleading impression of the strength of my Hill 125 defence:
The units are:
CC10 HIP 2x 558, 8-0, trench and wire.
BB10 2x 558’s and HIP trench and wire
BB11 558 and HIP 558, 2x 238, 2x MMG, 8-1 ldr, trench and wire
AA13 2x 558, 8-0 and HIP fox
Z14 Reserve Cloaked 558, 2x 238, 2x MMG, 8-1 ldr and HIP fox
AA15 HIP fox ldr and phone (with pre reg hex w14)
Z15 2x 238, 2x 60*MTR, 8-0 ldr and HIP fox
Y16 Reserve Cloaked 4x 238, 2x MMG, 60*MTR and HIP fox
AA18 2x 558, 2x 238, LMG, 8-0 ldr and HIP fox
AA19 558 MTR, HIP fox
AA20 Cloaked: 2x 558, LMG and HIP fox
All foxes are 3S for transforming into trenches and there are 2 spare 3 squad foxes in AA14 and AA12.
The trenches in BB10/11 and CC10 are under Wire to make it a lot harder for his troops to CC the units (and to suffer a +1/-1 CC drm if they do – B26.31)
The units in BB11 are setup to look the weakest as there seems to be only one squad there but they are actually the strongest position. It is a vital place as they are able to support BB10 whilst still able to put fire across the front (west) of Hill 125. The HIP CC10 guys are there to surprise him as he tries to take the BB10 position. As can be seen the pre-reg hex is W14 and I will make sure he knows it is, by dropping my SR on it early so that he is given the choice of attacking either
– Across Hill 100 where all my mortars have LOS
– Through the harassing fire of W14 (6FP–1).
– Or around the harassing fire and into the trap at BB10.
I also have a pair of dummy counters in the scenario ordered O4 fox as well as a HS in each of the O5 and O8 fox holes. Their job is to fire and therefore allow my troops the ability to fire starshells and gain freedom of movement before he reaches my front line as any good plan needs to have flexibility.
INSIDE SCARY MINDS!
Legion is a great player and uses the rules well in his tactics, however, when he attacks he tends to probe the entire line and push through whatever weak spot he can find rather than having a set plan. With this in mind I am hoping that he will fall into my trap at BB10 and suffer some big losses, my reasoning is as follows:
Last game I had my 25% HIP on my front line to surprise him and cause losses as he probed but this time they are as far away as possible. Legion knows I love springing little ambushes with HIP troops so I am hoping he will be a little bit cautious with his movement and attack, hopefully he wont attack the south of Hill 125 (Y16) as he will remember the big number of HIP I had in my front line last time and choose to go around towards BB10.
The harassing OBA will also help to convince him that the south of the hill is too strong. If I can punish his first probe I will make a sortie into the jungle to disrupt his movement and hopefully make his attacks arrive out of time with each other. I should then be able to re-enforce each piece of line as he assaults. – like I always say: a bad plan is better than no plan!
TURN 1
Five of his cloaking counters headed east to near D14 and will obviously outflank Hill 100 whilst another 3 headed north-east to the beginning of the Hill 100 ridgeline. The rest of his troops (all 21 cloaking counters) headed due north towards my two lonely and outnumbered half squads. I gained contact for my OBA in my turn and sat and waited.
TURN 2
He returned the file during movement to see what has happened!! We play by e-mail and the fact that he returned the file before finishing his movement shows to me that he thinks I have troops HIP on or around Hill 100. This is good for me because if he spends an extra turn looking for non-existent troops that reduces the amount of time he will be attacking Hill 125 which will take at least four turns for him to reach – now maybe five turns!
He keeps moving forward but is now breaking into distinct battle groups as they advance. I also placed a post on the GameSquad Website asking about the effects of a Japanese cloaking counter moving adjacent a HIP squad /fox /wire hex. This is for future reference when he gets to BB10 but I thought I would ask now to send him some misinformation about my setup – hopefully he will think that he is close to them.
In my turn the NVR blew out to six hexes due to a 6,4 and a subsequent dr of ‘5’. (no starshells/IRs yet). I decided to get my spotting round on board so he knows what area to avoid and I pulled a red chit first up, – I then made comment to him about “Whats the point of buying OBA etc.” – just to make him think I still have the scenario given OBA. Still, this is not a good omen for the game and NVR 6 will make life interesting for both of us.
TURN 3
He has cloaking counters running a zigzag pattern on Hill 100 looking for HIP and also AMed a couple of cloaking counters adjacent to my HSs in O5 and O8, I chose not to fire so that he does not know how weak I am. If the rest of his force use AM he will still be three turns away from my main line. Later in his movement I fired one of my HS in order to give starshell capabilities to my defence. He scored a jitter fire result that forced my other HS to fire and break concealment which was a shame as I was going to leave him concealed to hopefully allow him to CC the unit without causing an ambush thereby giving my leaders freedom of movement. The best laid plan never survives contact with the enemy I guess…
On the plus side I was able to get my spotting round onto U11 so I will pull it back a little bit next turn and convert into harassing fire in my next fire phase. As it turned out, he failed the ambush roll and, although I died for no loss I was able to make “freedom of movement” drs for my 2 best leaders in my turn; both of which were unsuccessful. I also dropped my OBA which was one hex off target and destroyed my dummy cloaking counter at T15.
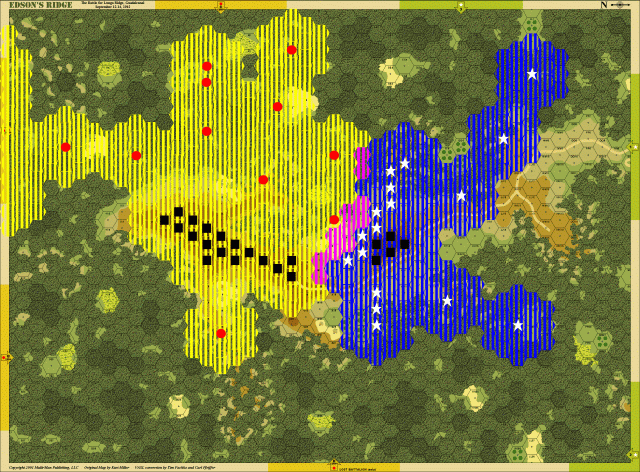
By the end of turn 3 the board looks like this:
Legion has chosen to use the stylish SS cloaking counters for his Japanese (I would too).
Under the foxholes in O5 and O8 are the decaying remains of my marine picket line and a concealed Japanese squad.
HALF TIME THOUGHTS
It will be at least 2 turns before he reaches my line and if my leaders can get freedom of movement then I will combine some half squads and redistribute the HW among the squads to further increase my FP. I am pleased with his cautious approach, at the start of his next Movement phase I will blast an illuminating round onto Hill 100 just to keep him from moving freely and to make him think there is a HIP there somewhere. I feel I dropped the OBA at the right time and he should spend time circling around it as a 6FP –1 is too dangerous for his troops to move through, the placement also gives the impression that the OBA is there to guard the flank of the T16 unit on Hill 100 – hopefully enforcing his thought that the hill is being defended. My only concern is whether that will channel too many IJA into my trap at BB10. Everything is going to plan, all I need is for the plan to work!!
TURN 4
The NVR dropped back to ‘3’ – not sure if that helps or hinders either, these things can sometimes be a double-edged sword. He has continued to move towards my lines and I think has realised that it all has been a big ruse. The question now becomes whether he will engage me with only two or three turns left in the game or sit back and call it quits for the night. In my turn I kept dropping my OBA in the same hexes and failed my “freedom of movement” drs for both leaders for the second time. He dropped OBA smoke on T16 in his defensive fire.
TURN 5
He was unable to gain starshells and so the OBA smoke kept dropping exactly where it was. His troops kept moving forward and he currently has cloaking counters adjacent to 3 of my dummy positions, all of which were removed in close combat. In my turn the NVR dropped down to ‘1’ which really annoys me!!! I gained freedom of movement for one of my leaders but chose to do nothing as my defence is set and all I need is for him to attack.
TURN 6
In Rally I recombined two HS into a squad and he lost his arty due to an inaccurate spotting round. I dropped OBA on the top of Hill 100 as well as blasting with everybody I had at a single squad on the crest. That squad was reduced to a broken HS. It looks like he is moving into my trap at BB10 and all is looking good for the next turn.
My turn was a non-event as he was unable to illuminate my hill and all I did was move my arty to S14 to keep both ridgelines of Hill 100 under OBA fire. The mission was a non-event as all it did was kill a dummy cloaking counter bringing up the rear(!?) of his attack – a strange place for a cloaking counter
[Legion’s Note: This ‘guy’ just got stuck up here from the initial attack on the Hilltop; due to the constant Illumination he couldn’t move far enough to actually get out of LOS!] and a sad waste of a KIA. I was able to move a squad to my control point FF18 as well as re-enforce my front line from my left flank.
TURN 7
What a disappointment! He has started to pull back and consolidate his lines! Which makes this the best written after action report for a non-event in the history of ASL. Fear not however, as I shall attack in my turn! Nothing else happened in his turn other than the fact that he lost his OBA from a 2nd red chit and I converted my FFE:C into a spotting round. He also exposed a control point at X9 and X13; the X13 control point would allow him to setup in LOS of a lot of my front line and I will need to attack it.
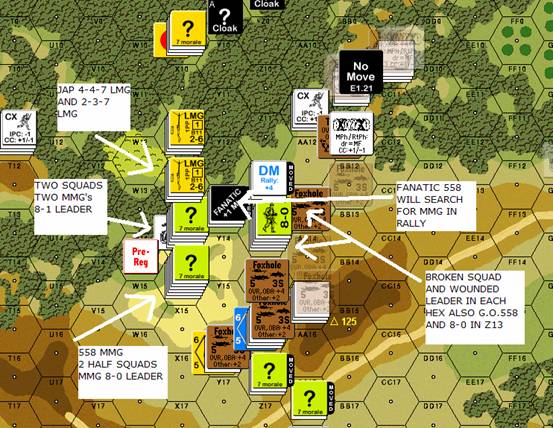
I needed to get the control point at X13 and my plan started well, I searched Z11 to find it a cloaking counter as suspected. The AA13 troops moved to Y12 and got seriously damaged with the leader ELRing and both squads breaking (although one squad battle hardened on a HOB roll when he final fired at them) as X11 exposed 2x 447 and 2 LMGs for 24FP. The squad, 2x HS, 2x MMGs and 8-1 leader from BB10 fared no better as X12 was 2 squads and 2 LMGs as well, although this time I was still concealed I took some damage from 2x 6,6s (wounded leader, dead HS) during the subsequent MCs. In his Final Fire he killed another HS and broke the last GO unit in the hex.
At this point I AMed my 2 squads and 2 MMG from Z14 into Y14 trying to draw some fire from X13 to no avail. I then got cute and sent a HS from Z15 to Y14 he then searched X13 to reveal a single squad and, although the HS died from search casualty X13 was now marked with a gunflash enabling my men to shoot at it. There was some minor posturing with other troops but none affected the attack. By the end of his Defensive Fire I had lost 3 HS and had 2 leaders ELRed and wounded.
In my Advancing Fire I stripped and ELRed one of his squads in X14 as well as striping the squad in X13. The X13 squad was killed in close combat when I gained a successful ambush against it.
By the end of turn 7 the area looked like this:
TURN 8
I am hoping he pulls back and licks his wounds, he was aware of his escape DRs last turn when he withdrew and if he does I will not pursue the matter and just try to gain the control point at GG12. In my Rally one of my broken squads went fanatic and created a hero – too little too late I feel.
Unfortunately he didn’t pull back as his Prep Fire devastated my troops at the critical X13 control point and in his movement he sent the X9/Y9/Z8 units into the fray to retake the control point and cause some more damage. My fanatic squad and MMG in Y13 went on a tear and CR-ed three of his squads (ELRing two of them along the way).
His Advance Fire Phase caused no significant damage although it did break the last man on the X13 control point and I lost a squad in close combat. He was able to advance a man onto the X13 CP and the game ended there.
FINAL THOUGHTS
I lost 2.5 squads to his 3.5 so I can consider that a major victory in troop terms although it did cost me a lot of territory and only time will tell if it was worth it. I am not sure whether I was unlucky or Legion can read me like a book but it just seemed that nothing went my way, my OBA scored a KIA on the rear-most unit of his attack and it was a dummy. My counter attack on X13 ran straight into 4 of his 6 LMG. And his turn 8 Prep Fire scoring an ace-deuce against my concealed troops at X13 destroyed any chance I had of holding the hex.
Regardless of the how and whys I am happy with the result I achieved, this is a CG and the more men you have at the end of turn 1 the more chance you have of winning.
THE WASH UP!
We were able to escape from the various no-mans land hexes without loss and I had two of my three wounded leaders recover. I also had a unit go HOB on his escape roll which created a hero so I will have two fanatics starting next game.