EDSON’S RIDGE CG
13 Day
JP playing US Marines
Buys
I rolled a ‘5’ so was able to buy 22 points of troops and chose to buy OBA and a pre-reg hex, 2 raider rifle platoons (one on board and one in reserve). A para-rifle platoon on board and one fortification point. I was forced to spend the extra points needed to put the troops on board due to lack of setup areas in reserve and also the need to have more mobility with my forces this game.
Thoughts
I have not played against the Japanese much and have found them to be fearsome attackers because they don’t break. However this is a double-edged sword as they are unable to break and rout away when defending. This fact combined with my assault fire bonus makes me certain that my best defence is to go on the offence. I feel that the jungle will be the safest place to be as he will not have LOS from either his air support or his OBA observer and so I have kept only a token force on hill 125.
Setup
He definitely has OBA and will probably buy air support too. With this in mind I have set up with a single squad in each of my hill 125 hexes, it makes me weak if he chooses to Banzai charge but I cant take the risk of a fighter bomber dropping a bomb into my trench or his OBA smoking out my big FG.
Therefore my setup is as follows:
– 3 squads each in both BB10 (+ 8-0) and CC10 for attacking through the jungle.
– 2 Fanatic squads each with a MMG and an 8-1 in BB11 to put fire across the face of hill 125 should he Banzai charge as well as covering the front of hill 100. These guys can also go into the jungle in support of the other 6 squads as they attack the Japanese flank.
– 2 squads, MMG, LMG, 8-1 in foxhole Z11; all are HIP – this position is adjacent to his setup area and I am hoping he will send some troops into it for TPF or they can also cover the face of hill 125 from the IJA rear as well as join in the flanking attacks.
– As was said earlier I have a single squad in every one of the six fox holes across 125 (but not on the level 4 hill hex) and have built an extra foxhole at X16 which holds 2 squads, 2 MMG and an 8-0 leader – there was no logical reason for him to have that area as a pre-reg hex so I am hoping they will help hold the line. If he drops SMOKE and Banzai charges either this hex, BB11 or Z11 should still have LOS to him. My OBA observer is also in this area and my pre reg hex is W14; where I will drop it as harassment fire until I find his OBA observer as the hexes U15 to X13 are the most likely positions for his arty observer.
– 6 squads are spread across the foxhole line AA18 – AA20 and 5 of these will attack hill 100 from the east, more as a feint in force than with any intent to kill.
– My reserves are in DD20 and GG20.
Turn 1
Well, that was ugly, his pre-reg hex on my hill top scored a KIA on one of my guys and broke another. He started moving two big assault forces east and west of the ridge in a northerly direction.
In my turn I sent my guys pouring out of my trench network and attacked a pair of single counters at AA8 and BB7. I had one guy broken but did no damage either and at turns end I retreated them away and placed my concealed 8-1, 2 squads and 2 MMG in CC8. I have purposely left a path for him to move in and threaten taking my trench network with the aim of having his troops move through or adjacent to my HIP in Z11. On the eastern side of hill 125 I had 2 squads broken from a WP hit which, it seems, was a +2 mc due to WP airburst – thank god they ran out of WP or he could have seriously compromised that area. (It turns out that the rule is written badly and should have been a –1. Legion was happy to let me rally the troops without DR and, as he was still a long way from my lines I did so for no damage to my game plan). Luckily I already have a blocking force of 2 squads and a LMG in Y22 so my guys will be rallied and back in business soon.
Turn 2
Legion will have nightmares about this turn for a long time, we played this turn on-line which means all the pain arrived in one hour instead of a few log files.
I had 4 squads on the ridge line CC8, DD7 and I was happy to see Legion attack them rather than head deeper into the board. He assault moved an engineer squad adjacent my line (BB7) and then spawned a DC hero that died in a TBF storm from 2 squads and a –1 leader. Then he moved a squad into CC7 which was stripped from my other 2 squads fire. During Final Fire these guys suffered two more stripping results and one was Pinned which hurt as he was adjacent a MMG squad; that unit died in my following Prep fire.
In the east he kept pushing up against my line and I have kept concealment and kept pulling back.
His OBA observer and an engineer squad had been found in hex U15 in my Defensive Fire Phase of Turn 1 and as he tried to move them out I scored a hit with a mortar and then rolled snake eyes to kill the squad. He then tried to move the leader and I scored a hit and added insult to injury by rolling another set of snakes eyes!
In my turn I re-set my lines but pushed to gain the vital X13 control point, his man had pulled back from that hex and in his Defensive fire that unit and a previously HIP MMG fired but did not even strip my concealment, so, in Advance I moved in, gained ambush and killed the MMG crew. (for those unfamiliar with the Japanese their M/HMGs are manned by crew and if infantry man them they lose ‘1’ off their ROF and have their -1B# lowered too). By the end of Turn two he had lost an engineer squad, a 9-0 leader, a 1st line squad and a crew as well as having a 1st line squad ELR to a 2nd line half squad and another ELR to a stripped 2nd line – all for no loss from me. (other than my OBA which rolled 6,6 for contact and then gacked itself with a ‘6’ on rally). I have also moved a single leader to AA11 as bait in the hope that he sends a squad over to try and kill him since my HIP squads in Z11 are getting impatient.
Turn 3
His Prep broke the squad and ldr that had joined the boys on the eastern side of Hill 125 but did nothing much else. During his movement he kept the pressure on in the east (this is the area I am most worried about) and moved a unit into the vacated U15 foxhole. I had a bit of luck when he moved a squad out of his U13 foxhole and I realised that I had LOS from the level 2 guys on 125; a CH from my mortar produced a Pin result and the unit was eventually eliminated in my defensive fire by mortar fire (it must have got ROF 6 times!).
In my turn my mortar scored another CH against concealed troops in U15 and wounded a leader and striped a HMG crew. (this mortar has fired 2 CH and had 2 effects DRs of snake eyes as well!! – to add insult to injury it rolled a 6,6 when the squad manning it fired their infantry firepower just proving that it is not what you roll but when you roll it!) For movement I advanced in the west, as I can see an opportunity to catch a unit near the kunai and I pulled back in the east. I also exposed my HIP by assault moving adjacent an enemy unit in X10 with the intention of CC later – he hadn’t taken the bait and walked into my ambush and I need the 2 squads on the board and fighting. Unfortunately his Defensive fire hurt me big time!! Although I was concealed and only taking 6FP +1 shots every squad failed and both leaders that had to take MC rolled 6,6s, all of a sudden my west flank folded and I had lost two leaders, a Squad and had four other squads broken. I am not too concerned as I still have 9 more squads in the jungle there but it was an annoyance and, obviously I will have to pull some of these squads across to protect the broken troops.
Turn 4
Fortunately one of my broken squads rallied and between him and my last good order squad in that area I should be able to protect my broken squads until my other troops arrive. He finally got his fighter bombers on board and kept the pressure up in the east CRing a squad with the arrival of his FT while a lucky 4+2 shot at the foxhole U15 caused another Japanese leaders death and CRed the crew manning the HMG.
In my turn I rallied all the guys that were broken in Turn 3 and got as many people as I could away from the tree line. My plan is to defend the hill from the edges of the jungle. Basically I will move one hex into the jungle where I am surrounded by jungle and therefore in a blind hex and in Advance I will move back to the tree line and cover the approaches to the hill. Unfortunately I left three squads in the foxholes along the hill and 1 was CRed and another broken by his three strafing runs. However, he did not drop bombs which is a good sign as these guys will rout into the jungle and be saved from him. I currently have a dozen squads in the jungle to the west and I am constantly trying to cause damage to his troops as I am sure his line (for want of a better word in the jungle) is close to breaking and I hope to kill more of his squads as they try to escape.
Half time thoughts
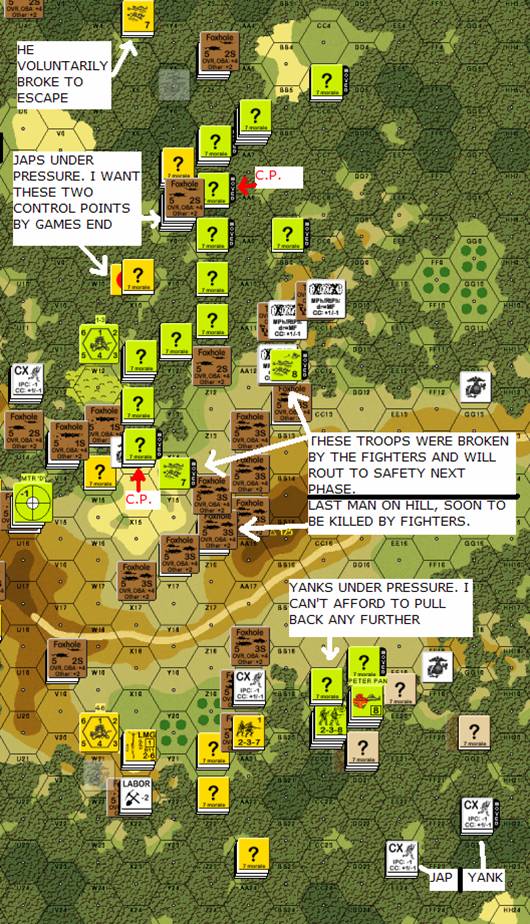
As can be seen from the map below the fighting has been up close and personal. We have both realised that to move adjacent an enemy while using Non-AM and being unconcealed is certain death/breaking/striping and we are both just assault moving adjacent or, better yet, advancing adjacent so the enemy has only one fire phase.
The position in the west is strong and I have moved from the trench line in BB10/11 to the positions I hold now – which means nothing if I don’t get the control points. I am pleased I have X13 as that limits his ability to start next game with a Banzai charge.
The major difference between the two armies is the ability to break. Provided I have good rout paths (the jungle is perfect) I can keep putting pressure on him. However every time he breaks he loses combat efficiency and he is slowly being whittled down. I estimate losses to be about 6 IJA squads and 4.5 US squads with both of us losing 2 leaders.
Turn 5
He did not do any Prep Fire choosing instead to charge at the unoccupied hill and, although I caused some damage breaking one HS and ELR/CRing a stripped squad he just had too many men charging in. However, he has not reached the level 4 hexes yet and I am already forming contingency plans, so I hope to make him take a few more losses before he gets it. The deciding factor in this game has been the fighter bombers and my inability to buy any fighters or HMG to counteract them. For future reference a pillbox on Hill 125 would be a good move in order to ensure a presence there or, if you have lost 19 CVP then a HMG unit and/or FB would work too.
Turn 6
This is a blood fest; we have both lost around 7 squads by now and the tally looks like increasing. I took a battering when he assault moved a FT adjacent my troops which in his advance fire killed 2.5 squads on the eastern side of the hill 125. I kept up the pressure in the west but have been unable to score any major results.
Turn 7
Legion has been really putting the pressure on and taking some chances which have hurt him; I have killed 2 HS and striped 2 more squads in my defensive fire but the hill area is wide open and apart from the 2 squads that are keeping his head down he has totally broken through my lines in the eastern section of the board.
I am praying for the game to end. (which it did, thankfully.)
Afterthoughts
What can I say? We traded squad for squad with both of us losing about a dozen but what actually won the territory was the fighter bombers. I had not lost 19 CPPs and so could not buy FB or even a unit with a HMG to defend the open ground with. When he rolled for FB in turn 1 I started advancing troops along the foxhole line to get them into the jungle and away before his planes arrived, I had to leave a few sacrificial squads to slow down his attack but the hill was his and, in retrospect, always will be unless the US lose lots of troops in 12N.
For anybody about to play this CG as the US my advice would be: fight hard and don’t retreat in the 12N game.
Either stop him cold or lose 19 CVP and get the good toys for the day scenario.
Overall I was pleased with the Yanks ability to maul the Japs in the daytime but neither side can afford to move adjacent the enemy in the jungle without being concealed and using assault movement.