EDISON’S RIDGE CG
13 Night I
Legion playing Japanese
Initial Thoughts
Well, lets face it, the CG is now only waiting on this game to decide it; if I can hold him off, then I think it is going to be enough to convince JP that this is Game Over. In fact I have settled on avoiding conflict with him at all, except for the last few turns maybe… this came about because, for some reason, JP decided to not take an Attack chit… I guess he needs to save the 2 he has for later, but since it is Night, and since the weather is likely to severely restrict NVR I am not sure that he can afford to sit there praying in his foxholes while I expand and hopefully envelop his perimeter…
OOB
Retained from last game
MMC: 2x 448, 348, 17x 447, 2x 347(1), 347 (2), 247
HS: 137Ldrs: 9-0, 8-0, 8+1
Lt. SW: 2x 50*Mtr, 8x LMG
Hvy SW: 228, 127, HMG, MMG, FT, DC
Although I lost a LOT of troops last turn prudent buying has allowed me to pretty much preserve the status quo. Unfortunately I had an MMG lost due to its inability to repair (Z1.5142). I also destroyed all the US Mtr I had captured; they are of limited value to me and I cannot afford letting them fall back into his hands anyway.
Buys
I rolled a 5, something that is a huge help as I can buy enough stuff now to really finish the job
What Cost Left Status
1 4(R) 7 F 4x 447, LMG, Lt Mtr, 9-1
I1 4(R) 6 F 4x 447, LMG, Lt Mtr
I1 6(O) 5 F 4x 447, LMG, 10-0
HW1 6(R) 3 F 2x MMG, HMG, 3x 228
G1 7(R) 1 – 2x70* INF, 2x 228
M1 1 2 – 15FPP
M4 2 4 – +1 SAN
This is the final Xmas shopping list. I have gone for a matched set of one on-board Infantry Platoon and one Reserve Platoon (same price as 2 platoons, but with one ready for defence and the other able to be used), with the rest as fillers. I can buy a G1 Section (2x 70* INF) without affecting the VP tally, and since I don’t really think that the VP requirement for the win is going to be a problem anyway I might buy more later. I will think carefully about getting the AT Section too if we manage to make it to the next Day game as I am sure he would consider getting AFVs. As my game is going to be more defensive from now on I am starting to stock up on the important things for this, HW platoons and Guns.
The Reserves will be set up on/around Hill 100. Hopefully they wont be needed, but if they are then they need as much LOS opportunity as possible and can still be of great service to me as rear-guards.
I did not buy the Barrage, although it would be perfect due to the tight setup area he has there is the drawback that it allows for Reserve activation if they are hit. Also it is a bit too hit and miss, so why spend the same amount of points as a Reserve Infantry platoon for a bunch of transient breaks… especially when my plan is to avoid fights as much as possible anyway (though NVR 3 means I shall be unable to avoid allowing him starshell opportunities as we are too closely bunched together).
Note I have not bought the Recon roll either, I think this is a waste of a CPP point!
THE ENEMY
With FPF barrages setup between CC5-DD0 and FF17-GG13 and masses of troops clustered around GG20 in the East (bottom of the hill) and BB8 in the West (top) it is not too difficult to see what the overt part of his plan is, to use the FPF to block my way across the extreme top of the board and also try to hold me off of a cheap encirclement of his BB8 forces.
The OH’s in JJ8 and LL4 have attracted some Reserve forces.
About the only place that we are in direct conflict is BB11/12 which are frontline hexes facing each other down.
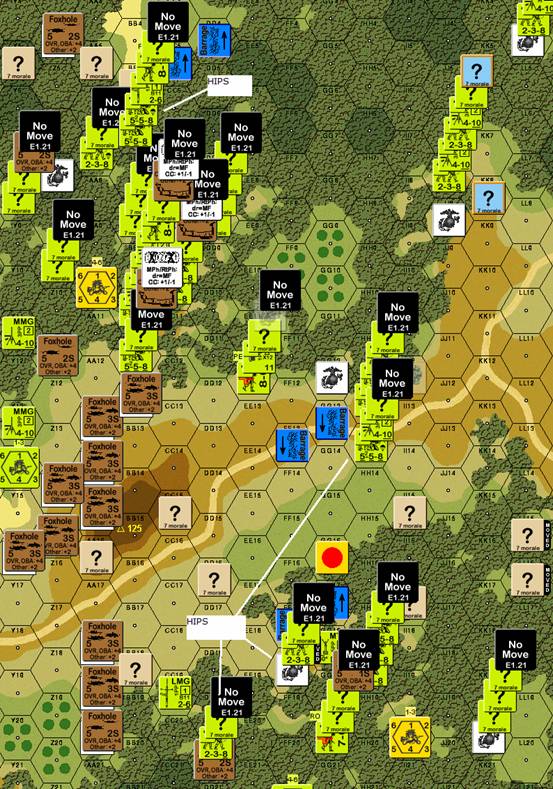
THE PLAN
I have nothing as neat or elegant as the last game’s plan… this one might get messy, or it might be a walk in the park. A lot of it depends on what happens with the starshells, and the OBA situation.
I have set 3 stripped MMC as OH grabbers in the East (bottom of the hill), they are starting from the Northern-most control zone (II16) and will rush to grab NN16 and MM12, both of which will put me deep behind his lines for the extra VP. In the West another pair of weakened MMC will rush for EE6 (left over from last game) and JJ5. These OH grabs will, especially if I am able to claim either of the current US Marine OHs in JJ8/LL4, end up leaving him encircled and all his units under Ammo Shortage for the next game! Once the FPF is placed then I will just bypass it and move on through anyway… or wait until it is exhausted
I have strong forces centred around Z4 (FT, 4x MMC, ldr); X9 (DC, 3x MMC, 2x LMG); AA19 (4x MMC, ldr); GG16 (4x 447, 2x LMG, ldr).
I have set up my HIP HMG to fire along the X18-DD15 lvl ridge of Hill 125, this a perfect Firelane and has Boresighted CC16. The HIP MMG, with a LTR MTR and HS is also HIP (W16) and is likewise Boresighted (AA14) and ready to lay a Firelane along the lvl1 hexes from Z14-CC13.
Hill 125 itself is maned by just 2x 447, 2x LMG, in foxholes and spread apart
My Reserves are all on Hill 100, though I have placed a single Inf Gun (U17) and a stack of MMC with a leader and HMG (U18) in locations where they should have LOS and the requisite 6 hex range to any US MMC attempting to gain Hill 125.
DD12 and EE13 have a HIP 2S foxhole with HIP 237s in each… these will be little surprises for later in the game, or insurance against any sneaky moves around my rear.
THE GAME
Turn 1
The CC5-DD0 FPF comes on down and does no damage but does restrict my movement along this flak… the only hexes that are empty and enterable (BB5-CC6) are adjacent to a US Front Line Hex (BB6)… and he would have been mad not to have put someone in there (he had put a 558, LMG as shots at a Dummy Cloaking Counter proved). My only other moves are a rush of Cloaked striped units towards the OH’s I have placed in MM12 and NN16.
I had given away no opportunities for loss of his No Move counters, so he had nothing to do, but by missing the rule CG5 he had illegally set up reinforcements to enter this turn… something that gave me a nice piece of intelligence and will allow me to plan for them in advance.
Turn 2
I am forced to still move slowly, his FPF barrages are effective enough to stop me moving though them in the jungle (4FP with -2 for 2 hexes), and I cannot afford to allow him to lose his No Move counters even a turn earlier than necessary. I have a number of HIP units (mainly HS and striped units) ready to pounce on a bunch of OHs, but again they would be in too much danger should I reveal them too soon; their strength is in their being HIP right on the front line. A few dummies are moving through his lines, he will have to pay at least a little attention to them, he knows I occasionally mix a few real units amongst obvious dummies. I see the biggest danger coming from the off-board reinforcements and the defences around the FF18 OH.
The actions of his turn are again severely limited by his lack of movement and fire options. An attempt to repair a LMG (malfunctioned with his first shot of the game) brings up a ‘6’ and that’s the end of that. He exposes also the BB11 unit (558) when it fires at my dummy in BB12. With roughly 17 units available for setup I now know the location of 2 of them.
Turn 3
My turn is more of the same… more ‘dancing’ as he calls it. The reinforcements will be coming on soon, and though they should take at least a turn before they can even arrive close enough to my units to affect them I am still accelerating my positioning. I want to place my men so that they are only a single AM away from their targets, that will allow me to use my CC superiority when the time comes.
He is still taking pot shots at cloaked units, but is yet to hit anyone.
Turn 4
The time has come (the walrus said)!
I have launched a massive attack all along his front lines with the intention of AM-ing into his positions. My thinking is that will a successful series of CC’s I shall be able to wipe out the bulge he has centred on the Z7 OH and thus dress my lines. I also want to start focusing on killing US soldiers. I have so many more reinforcements to come but his are limited, if I can gut his defenders keeping even a 1:1 troop loss parity then I shall be well ahead in this CG and may even force a surrender.
I advance onto a 558 Paramarine (BB6) only to find that he is not alone; there is a Marine Raider 558 and an 8-1 in the same hex as HIPs! A Hand-to-Hand attack manages to kill the valuable Marine Raider (stealthy) and the leader, but I lose the attacking 447 and 127 HS leaving his initial 558 Para-Marine perilously close to my Z4 Foxhole. The next attack (AA7) is a successful Ambush with a Paramarine HS being swamped by a pair of IJA 447s. The rest of the attacks (Y8 and Z9) reveal dummies.
At last the game is on and the reinforcements he has bought can enter too; 3 stacks move in from the North but only one of them utilises the SS9 road, the other 2 just wade through the jungle. With 2 leaders freed thanks to a Freedom of Movement roll he is able to manoeuvre his forces, mostly they pull back to within the area surrounding BB10. One of the 2 leaders tries to waltz through his own FPF barrage and ends up KIA! Unbelievable!
IJA Losses: 447, 127
US Marine Losses: 8-1, 8-0 (wnd), 558 (MR)
Turn 5
My turn is heralded with a mass of starshells lighting up the sky as the US defenders try to at least limit the IJA movement. Again I only use AM to get close the the enemy but the only CC that I manage to force is revealed to be 3 more dummy counters… he must be close to the bottom of his dummy barrel by now! If this is the case then maybe I should have been more aggressive this game, though as it stands I shall have a major buffer zone surrounding the all important Hill 125 with the only gaps likely to be at BB11 and BB10, this is assuming that I can take and hold the EE12 OH (GG12 would be a bonus!)
He makes a little bit of a challenge for the lower hill foxhole (BB12) but the 558 moving out of his trench to my empty foxhole is broken, though not before wresting control of this vital hex from me. There is a lot of musical chairs between the mass of units on this ridge, eventually BB10-11 are mixed up enough to totally confuse me as to the units hidden here. The main worry for me is the surrounding of a pair of 2nd line units of mine in NN12 by his reinforcements.
Turn 6
Unfortunately the unit I broke last turn is able to rout (through Wire no less) AND rally… dammit… that is an extra 5FP here that I don’t want to face.
Again I put the pressure on his defenders.
– I close in on the ?-ed units and OHs in the East, there is little resistance here and the lack of leaders is hurting him as all his units are under No Move and so deep in the jungle that they don’t have LOS to their toes, let alone my units! I close in on a 1S foxhole in GG20 and expect more dummies, I am surprised to run into a single wounded 7-0, but he is ambushed and dispatched immediately.
– As expected the NN12 units (2nd line HS and reduced Squad) are cut to pieces as they attempts to run the gauntlet of 4 separate attacking units/stacks. I am left with just a broken 127 after these attacks. But at least I have another HS still mobile enough to pull back and yet also stay close enough to his intended OH target.
– Around the vital BB10 ridge I am in a bit of a fix though, there are too many abrupt elevation changes between me and my target, the BB10-11 trenches. A Search roll for Wire and HIPs reveals one of his stacks is a dummy, this relieves units for the thrust to the lvl 2 hexes up here – each of which has an OH fortification with Wire. My cloaking counters are able to get to a position where I can cover a ?-ed CX-ing 447 as it moves adjacent to one of the necessary objectives; 2 cloaking counters hold a rare IJA leader, a pair of engineers (with DC and FT) and a 447 LMG. The FT especially will cause him some grief if he makes a move to attack my position! A lucky (for him) SAN result Pins one of the units detailed to attack the BB11 trench and it’s mass of men, the other 447, LMG in this hex is HOB to a Berserker when he AM’s up the hill, this forces him to charge into the valley of death; and lo and behold he passes though with just a CR, absorbing all the FP thrown at him including 2 FPFs! His attack even spawns a hot SAN for me which reveals a mass of dummies on an OH hex (KK20)! Once the berserker had absorbed all the FP it was safe move all the rest of the units I had on the hill, though with loss of cloaking or ?. This 247 berserker managed to take a full Marine Raider MMC and an 8-0 with him when he died for the Emperor… the IJA attacking in CC with Hand to Hand are ferocious indeed!
JP gets a little revenge for my outrageous CC results by stripping 2x 447’s to 347’s and another 447 is reduced to a HS. These results are a bother, not only due to their effect but also due to the location of these units in the very front lines adjacent to his vital trenches. At least a hot SAN results in one of those trench defenders being broken. However he made what could be a big mistake, he did not fire a starshell… my men are mostly out in the open and thus subject to illumination, his men are in the jungle and thus cannot be illuminated; a single starshell would have reduced a lot of my FP against the BB11 unit by half.
As it happens these shots are mostly useless but I do score a single 1MC which PINS a Marine Raider and calls a hot SAN… this SAN hits the same location again and CRs the freshly broken Para-Raider here. Another unit flukes a hit against the same BB11 hex and manages to break the Pinned 558 – great stuff! I also expose a 447 LMG who is adjacent to the BB10 hex, this attack manages another PIN and will put the fear of god in him as there is still a Cloaked unit in this hex and by now he must be used to my 2x 447 LMG stacks… that will have him guessing. The thing is, if he moves anywhere except to attack then he will lose the trenches up here and if he does attack in CC… I have a nice warm FT waiting for him!
His Advancing Fire manages to activate another SAN as he caps a routing HS; this SAN reveals (what I had expected) that the sole remaining ? counter in the East (HH18) is a nest of USMC vipers… no worries, was not planning to visit anyway… they will be isolated at the end of this game and thus under Ammo Shortage for the next. Mind you I was surprised to find out that there were 6(!) units in there, including 3 leaders! Wow! The odds were up for an 8-0, whose wounds were too much to take.
There is some compensation for him when a CX 9-1, 558 (MR) and a 458 are able to trek halfway across the board to remove the ? from a stripped 1st line 347 I had guarding a newly claimed OH (JJ5). This was a brilliant move from him and took me totally by surprise. I never expected him to be able to move so fast, but it was good use of a combination of bypass and the few open ground hexes available. Strangely enough, though he has 2 units and a leader ready to attack a single stripped 1st line unit here he just dodges them… weird… if the game ends now I get to keep that OH! Mind you he does reclaim CC10 by killing my stripped 447 here… looks like a flamethrower target if ever I’ve seen one.
IJA Losses: 2x 447, 3x 137
US Marine Losses: 2x 8-0, 7-0 (wnd), 558 (MR), 238 (PR)
Turn 7
Here we are again…
Prep Fire really brings it in for me with a lot of FP aimed at the remaining units in the gap in my line – he had pulled back from BB11 to BB10 but this allowed it to rest on a single DR for the attack and my DR are HOT at the moment… The FT managed to break and CR a 558 MR, the BB11 hex suffered mass breaks and has (apparently) reduced all resistance in this little salient. The remains of his men will be easy to mop up now.
It was at this point that JP accepted the inevitable and surrendered… It was game over with a Japanese victory, the Emperor will be pleased!
Final Thoughts
If ever there is a lesson for any beginner CG players to learn it is this… the results of the initial game can be crucial to the CG as a whole. JP has (like the Papa bear in ‘The Bernstein Bears’) sweat blood to show this lesson. From my point of view this game was lost from the initial setup, though I think this is a fairly easy mistake to make in this CG. Let us look at the reasons why.
The IJA
Unless one is experienced at playing the IJA then they are going to be in for a shock… the ability of these troops to suffer a break and keep on coming is formidable.
The difference is especially visible in CC, IJA attacking get Hand-to-Hand with a -1drm and this can mean that an inferior IJA FP is often still enough to kill a superior force. In this game for instance I had a single 1st line HS kill a full Marine Raider Squad and leader, and the odds were not that outrageous. To get a better idea of how to use (or defeat) these advantages I suggest “A Case for Infiltration” by Brian Youse (ASl Journal 3), “The Fine Art of Bushwackin” by David Olie (ASL Journal 4) and “The Jungle Isn’t Neutral: Up Close and Personal in the PTO” by Mark Pitcavage (ASL Journal 5). I read and re-read these articles before and during the game… they were a great help.
The Aircraft
Admittedly this was the first time we have used aircraft, but that was not a major problem, the rules are not difficult and again we had an excellent article, “Strafer Jones” by Matt Shostak and Chas Smith (ASl Journal 3), to refer to.
The major problem came with the fact that the US had no defence against them… JP had not fulfilled the obligations of the note at the base of the Z1.518 US Reinforcement Group Chart which requires the US to lose 19CVP before they have the majority of their reinforcements available – and this includes the cheaper US aircraft that could have challenged my air support or countered with attack of his own. A US player in this predicament is going to have to hide in the jungle or disperse his troops well.
19CVP loss cap
This is HUGE and ignored at the US player’s peril.
The US player should seek to lose these 19CVP before the 13D game, whilst also making sure that every CVP lost is at least matched by an IJA loss in men and time. By the end of the first game I had control of the entirety of Hill100… neither of us had lost many men, but that can be irrelevant in the context of this CG. In most CGs it is important to preserve the forces availble to your side, oin this situation it is almost the opposite! As it turned out the conservation of men was one of the 2 things that cost the US this campaign (the other was the terrain).
The Terrain
The map is nasty, and except for the few patches of hill poking above the jungle canopy the terrain essentially is the equivalent of NVR 1… Now considering that the majority of the CG is played at Night and G2.3 makes jungle hexes immune to illumination it is not difficult to see that the fog of war in the battle is equivalent to blind men wielding guns at 100 meters. The ability to control the hill might not be entirely about putting men on top of it (they cannot see jungle based enemy if illuminated). the best bet of any Hill defender is a mix of supporting jungle-based units (this means adjacent to each other, in entrenchments and behind or under Wire) and hill based units; these should be widely spread and MUST be in at least foxholes to protect against OBA.
A Word to the Wise
One thing that surprised me was that JP did not take advantage of G.4, which means that HIP units in jungle, kunai or bamboo need not reveal themselves against an enemy that enters their hex during the MPh. I think any defender in this CG should keep at least a few HS HIP so that as the enemy front line passes by they can jump out and run to grab rear OHs… at the very least the enemy is going to have to draw of units to hunt them down, at the best a bunch of enemy will be eliminated during the Escape Phase (Z1.506)
A Final Note
I think that to make this fair the more experienced player should take the US MC… the IJA are (I believe) better placed to win this CG and their natural talents can help compensate for poor use of them. On the other hand even small mistakes by the US player can have dramatic results.
I very much enjoyed the CG, I liked the feeling of it, and the map was a blast after the dense +3 buildings of ABtF, there are no subtle LOS angles here… LOS in most cases is 1 hex and then TEM is just +1, firefights were short, sharp and brutal and most were settled in CC anyway. The Japanese are a blast and I always get a kick out of playing them. Unfortunately JP did not enjoy it as much, which is understandable.