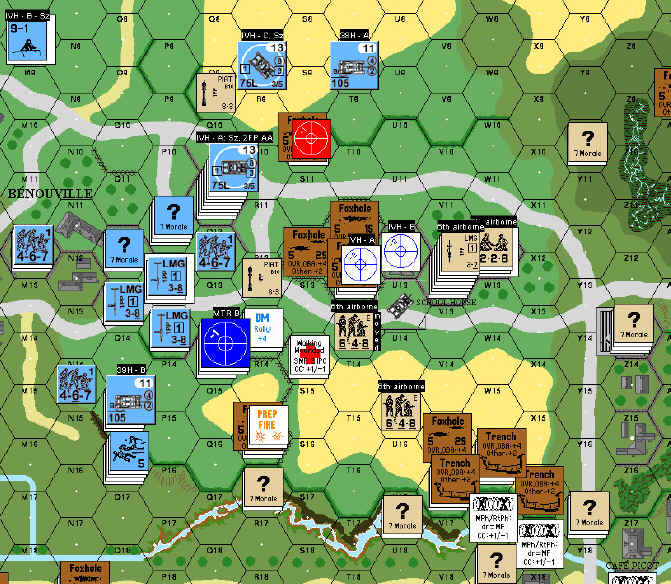
PEGASUS BRIDGE
CG I
Day I
Legion playing German
Exposed Fortifications
Wire: W17, X17, Z18
Trench: V16, W16, X16
Foxholes:
1S: D7, E5, G16, L18, M3, N18, O6, R15, S12, T11, AA9, BB7, CC12, EE14, EE18, GG15, HH17, II2, MM1, OO2, OO12, QQ4, RR2, SS4
2S: S10, T12, V15
HIP due to no LOS:
1S: E11 (I placed this here in case of a successful Civilian Information roll!)
Mines:
1AT: BB13, CC18
Unclaimed:
I16: Lt MTR(g)
Benouville Garrison
SetUp Area: Château
E14(2): 2x 447, HMG, MMG, 8-1
E15(2): 6+1 (wnd – will act as spotter for MTR in F14)
F14: 436 Lt MTR
G14: 37mm AA LKW (CA: H13/14)
G15: 447, 8-0
I11: 236, 248, 447
K9(0): 8-0
K10: 2x 467, 2x LMG
HIP K9(1): 468 MMG
SetUp Area: Château Grounds
(K14)K14: 447 LMG
SetUp Area: Château River Road
(L18)N18: 436
Le Port Hill Garrison
MM1: 447 LMG
OO2: 38H 735(f) (CA: NN2/OO3)
QQ4: 436, 447 LMG, 25-S 739(f) (CA: PP4/QQ5)
RR2: 7-0 (wnd)
SS4: 447 MMG, 7-0, 38H 735(f) (CA: RR4/SS5)
Reinforcements
I qualified for the extra dr due to excessive losses in the last game and rolled a 4 for a total of 36 points, this is very, very useful!
13 Pz Gren Coy Full 12x 447, MMG, 2x LMG, 9-2, 9-1
14 M. Tank Pltn Full 3x PzKpfw IVH, 9-1!
6 SPA Pltn II Full 2x GSW 39H(f)
1 Staff Car 2x Kfz1 (will leave these off map so I can shift entry area)
2 30FPP (SAN+1 and 20 spare points)
= 36 CPP
Well, a marked improvement on the last set of leaders! I really needed some more leaders and these DRs hit the spot big time. The only thing I missed out on was the HMG, but I have enough SW left lying around from my killstack getting smashed, so I can deal with that.
And apologies to JP here, but mate, I used your dice – I have accepted that mine are cursed.
Initial Objectives
Benouville
Yes… this is where the battle shall be fought… with fresh blood coming on the field and quite a few AFVs to bolster my attacking strength (lets see him skulk in buildings now!) I have a better chance to really take back most of the village…To be honest, if I cannot take it all I might be in trouble, as he might use his Ox and Bucks to push here in the next game whilst his reinforcements reduce my La Port defence.
To this end I have bought building busters in the shape of a pair of GSW 39H(f) these guys can stand at a distance and blast away at building, while being immune to the FP that rendered the AA Trucks useless or dead!
He has set up (it appears) way back, intending to make a stand at the Schoolhouse… I think my AFVs should be able to deal with these effectively as he will have to take -2 acquisitions as an indication that he must leave
La Port
Hold on a little longer please guys…
I have to hope he will pull troops away from here and therefore not try and take my territory again. The danger to him is in the Benouville area, he can swamp me here next turn when the reinforcements roll in from TT14, He is obviously aware of this as there appears to be few forces around here, I don’t think that there will be an attack on me here.
General
ATTACK!!!!!!
I have to keep pushing him; the end of the last game was a bit of a shock for him despite my own losses, as he does not often get squeezed like that! There is no doubt about his men’s strength, but with just 1 AT left he is at a distinct disadvantage… as long as I stay away from the bloody thing. Whatever goes I must also preserve the bulk of my AFV force, they will be the key in future games to allow my troops in close to him.
La Port is still a lost cause if he tries to attack me there, but with the amount of men he has I cannot see him risk losing Benouville for a bunch of stragglers on a hill – even if I lose those guys he will always have to face the possibility of me buying reinforcements to enter at KK1.
There is no doubt that I was out-played in the last game, and in the end it was just luck that opened the door (and slammed it on my fingers as well) for me, I need a little more focus and killer instinct this game. He too though must be feeling the pressure as he has pulled right back to defend the bridge… yup, its punishing time!
The Game
Turn 1
Here we go again!
Start off with some Prep, my wounded 6+1 (yes, he is now a 5+2) spots for the MTR at the foot of the Château (F14), they aim at the nearest foxhole (R15) and manage to acquire twice but no hits. The AA LKW likewise gets a –2 Aqr on his Schoolhouse foxhole (T12) but cannot even strip the ?.
I have no better luck in La Port with all 3 AFV shooting at the only units they can see (JJ10(1)) and each shot missing, not that there was much chance of a hit anyway!
Movement phase begins with the big land grab! I take territory (I12, K12, K13) with HSs and MMCs that started onboard, if he is going to leave it unattended, then I got to take it fast. My Lt. MTR(dm) MMC enters and heads for the Château (B12), to join the spotter and other MTR. I send on 2 stacks of 3x 467, one heading for cover in the Rue Haute area (G5) and the other along the Avenue De Caen (H8), a spare MMC follows behind (G8).
The AFVs rumble in and all but the first PzIVH, who took up a position out of possible HIP PIAT range next to my buildings at the top of the village proper (L8), are carrying riders. The first rider, a 467, broke when he had to bail out so that I could get the GSW 39H to its position (J8) to pound the foxhole above the Schoolhouse (S10). This forced me to be more conservative with the rest of the riders… I dropped some, including my new 9-2 leader and a MMG MMC into the broken unit’s hex (I9), the PzIVH that transported them stopped there too, but had enough points to re-start, ready to move next turn. The other GSW is heading past the Benouville forest side of the village (H10), to come up around the bottom of the Schoolhouse; his riders (9-1, 467 LMG) remain onboard. My last IVH (with the 9-1 AL) made his way cross-country to drop his riders (467 LMG) and stop (H7).
There was no Defensive Fire, and to tell the truth… I hate that…He has a plan, he has an ambush or defensive option…what is it…?
In Advancing Fire the acquisition fun begins; I claim a –1 on his wheat field foxhole from the GSW 39H (J8) and a PzIVH sights his lone outpost in Benouville (P11). There are no other fire attacks.
Advance grabs more territory (M12, L12, L13)
His turn begins well with my broken unit rallying immediately, thanks to the 9-2 with him (J9). And then I realise when I did the setup I made a mistake and put my 2x 447, HMG, MMG, 8-1 FGF on the ground floor of the Château (E14(0))! They will now have to run upstairs!
His Prep fire exposes the concealed AT nestled in the schoolhouse yard (V12), at the cost of my 37mm AA truck, but really it is no great loss! His moves bring a few troops towards Benouville from La Port (obviously not fearing an assault on La Port due to my lack of free CPP) but most of his units stand still.
I blast away, building up my acquisitions but not getting any hits apart from the MTR in the Château grounds (F14) causing a 1MC inspired PIN on his grain field foxhole (R15). No complaints here. The only time he is complacent like this is when he has ambushes planned or is concerned, and I think there is no doubt it is a case of both of these things! I am suspicious of the grain field above the school (Q8, R8/9) and the grain field side orchards in Benouville (N11, O11 and Q11), the road is the easiest entry point to the Schoolhouse and he is certain to have anti-tank HSs with PIAT somewhere here.
Turn 2
Now I have probably mentioned this before in these AARs but it should be noted that I just love AFV’s and OBA, they are lethal and they are fun. JP on the other hand is an infantry fanatic, he is never happier than when he has lots of MMC and ATs. Of course I think infantry are just annoying things that have to washed off the tank’s tracks after an over-run. Yet with this in mind I am going to switch my usual plans around a bit. Normally I charge in with the AFVs, take a few hits but generally try to secure my objective for the infantry to follow up and hold. This time I shall lead with the infantry and just keep the AFVs for support, and firepower to break down his points of resistance.
The reasons for this are simple; he has a strong defensive position around the schoolhouse that requires me to bring AFVs close to the orchards and grain in order to slam the defenders, and the AT is not able to hit me – a prime target one would think…
Sorry, mate, this time you were too obvious, a rare mistake, but viva la infanterie!
The territory grab continues with all of the valley buildings of Benouville, with the exception of a lone hut (O16) being returned to their rightful owners. A HS moves up to the first of the very suspicious orchard hexes (N10) but finds no one home. Although he has the HS covered by a menacing looking stack of counters in one of the last buildings at the end of Benouville (P11), he does not fire, so I am able to advance into the last orchard hex and clarify the lack of PIAT totting HSs here. I now have 2x PzIVH covering these defenders (one with the 9-1AL). The AL AFV (just moved to M8) can also cover the schoolhouse and one of the foxholes next to the schoolhouse – I have left his VCA and hence his BMG facing the grain field as insurance. To continue with this I also
move the 39H to fire down onto his schoolhouse positions (N7) – but discover I have messed up my positioning and can see little due to the bloody hedge (O8/P8). I am nervous getting this close to the grain, but I have infantry moving to cover my position and they will be in the grain field house (M6) by the end of the turn. My troops are gradually moving towards the centre of the village; I am of the opinion that I need to be able to swing either to stop rout from the schoolhouse or towards the river road.
He is complaining about the slow speed of my advance! A bit of a tough call considering that he has run so far away that even if I walked down the middle of the road singing the bloody British national bloody anthem it would still take me 2 turns to get to his first line of defence! He does not shoot at all and my Advancing Fire is useless except to gain some more acquisition.
My Advances however have left him in control of just 5 of the Stone Building hexes in Benouville (P11/12/13, O12 and R13) and I have yet to claim the last remaining building in the valley (O16).
A Weather dr gives a breeze from the SW, and this might be of some value for a possible SMOKE screen I have been thinking about…
He just pulls guys back (P10 to Q12, S11 to S12) and doesn’t go for the easy attacks… which I find interesting – but maybe the mass of ? coming at him looks more menacing than it is! He did try to move his AT to the far building in the Schoolhouse (W12), this would place my 9-1AL IVH in danger, if he was able to survive the move… this AFV gained acquisition on the foremost building (U12), as this is where he will have to run if he wants to keep cover.
I am again left with few targets, and most of those are almost impossible to hit, so I satisfy myself with shooting the grain field in the hope of hitting the HIP there, I only get 1 result though, in the first hex nearest the road (Q9) BUT this is the 1 result that counts… it is where he had his HIP HS PIAT and that unit is now broken. I am a little shocked, JP usually is incredibly cunning with his HIP anti-tank units, and my initial idea was to attack deeper in the grain to find them, as this location was too obvious but it was beyond the range of my 467! I finish him off with my 9-2 FG (2x 467, MMG, LMG – L7).
His Advancing Fire brings an ELR break to my point 467 LMG from the now revealed 9-2 stack (3x 648, LMG, PIAT – P11), they go down to a 447 and run away (O12 ® M12). The biggest move of his turn though is to not get this 9-2 stack out, but instead shift them to continue holding the village (P12); this gives me the problem of not being able to ignore them, whilst also giving him a huge possibility of losing a lot of units!
Turn 3
I am unable to rally the newly broken unit, but do move an officer over to his location (M12). Prep fire is limited, and only achieves more acquisition on the Schoolhouse (U12) and PINs the ‘lone foxhole’ (R15) from a ton of useless 50mm Lt MTR.
Movement is tricky though… I sent a 39H to cover the foxholes (O8)… but this makes it vulnerable due to his OT status. I think I am safe from more HIPs here, but to be sure I send the three top-most units towards the grain field, I also need them to draw some attention away from my main thrust through the village, though it would be nice if they grabbed some CPs too! I send the IVH from the centre of the village all the way up to the grain field (R8), when I can fire at the foxholes in the Schoolyard as well as cover the road against this 9-2 FGs escape. My other IVH was sent to cover the building his FG just vacated (
from P10), as well as to watch the grain field road in case he heads out AFV hunting!
I want him to have a crack at the AFV’s as I can cover them and he will have to expose himself first… to this end I send my 9-2 stack into the orchards (N10) to further cover possible places his 9-2 stack might enter. I finally send a HS to secure the distant wooden building in the valley (O16), followed by a unit to check the road for mines…this is so I can send my 39H down to cover the river road (ends up in N16). To further threaten this flank of his defence (and put the possibility of a breakout to claim the bridge and end the game on the cards) I further beef this area up with another 467 running down towards this side and a 9-1, 447 LMG enter the valley building (O16); these guys can either assault the foxhole in the grain field that my MTRs have been swatting at (R15) or lay an attack on the house up here that is certain to hold another HIP PIAT (P13).
JP gets some Defensive Fire success with the newly revealed 10-2 FG (2x 658, 2x LMG, PIAT) in the first foxhole of the schoolyard (S12) breaking a HS (Q11), and his 9-2 FG ELRing my MTR MMC (I15). What a big bully attacking these little guys with his big old leaders and FG’s!
My Advancing Fire is limited of course; I cannot move too close to him for fear of getting smashed and my forces are still too spread out… It takes so long to get from off board to the site of the battle! I do gain Aqr on the various places he has units, or might run to. It will be interesting to see if he stays or moves, as this turn is the last time he will have movement options of his own choice, I am getting too close and he cannot do too much damage to my AFVs (wonder why he has not shot at the CE 39H’s though?).
I make few advances, basically just a unit (O12) to make him either shoot at me with his 9-2 stack, or to give me an attack option as he runs away…
His turn starts very poorly, with his breaking of my unit adjacent to his 9-2 not being any compensation for the loss of that leader and the subsequent breaking of 2 of his MMC from the LLTC due to a SAN. This is a tragic loss and might force him to pull back especially as his 10-2 stack fired on my OT 39H and its PIN result did not phase me…
His movement is limited, just a few units coming to support Benouville… I am waiting for a chance to grab some territory in La Port. Will he move more out of there (he has moved some)?
Defensive fire brings more ineffective MTR down on the lone foxhole (R15) and some MTR on his 10-2 stacks in the schoolyard foxholes (S12 from H15). Finally I pop the ? on my Château MG stack (8-1, 2x 467, HMG, MMG – E14(2)), firing at the mess that was his 9-2 officers group; however, whenever I shoot 16FP I can guarantee that I will roll a 9+, and this time a 10 is no exception! My 105mm 39H fires and hits the 10-2 leaders stack (!) but again with 20FP of attack I roll a 10 and the 1MC only manages to break a solitary MMC (the one with the PIAT though)! Grrrr…However, my complaints are stifled by the lead IVH rotating his turret and blasting away at a 458 in one of the schoolyard foxholes (T11), the K/3 forcing this MMC to really rethink his anti-Nazi ideas.
Turn 4
The new turn brings new opportunities to the surprisingly buoyant German commander… this is the first time in the whole CG that I have some level of attack going, and the first time he has had to fall back through effort of my own!
I Prep Fire with the 9-1’s AFV at his collection of broken guys in the Schoolhouse (U12 – MMC, HS, LMG, PIAT) and miss, the MGs hit but for no effect. From the grain field another IVH blasts at the still ?-ed guys in the isolated but very important building (R13) but again with no effect. The MTRs lob away impotently, but my Château MG group manages to score a PIN on his lone defender in the building from where the 9-2 was taken out (P12).
Movement phase has no need for subterfuge… I have to charge in there and try to isolate his broken units and prepare a springboard for a grab on the Schoolhouse… Having said this though, I am aware of the general withdrawal from the La Port region, a very quiet sector of the battlefield! I wonder if it might not be an idea to make a grab for a building or two… though I might be pushing my luck!
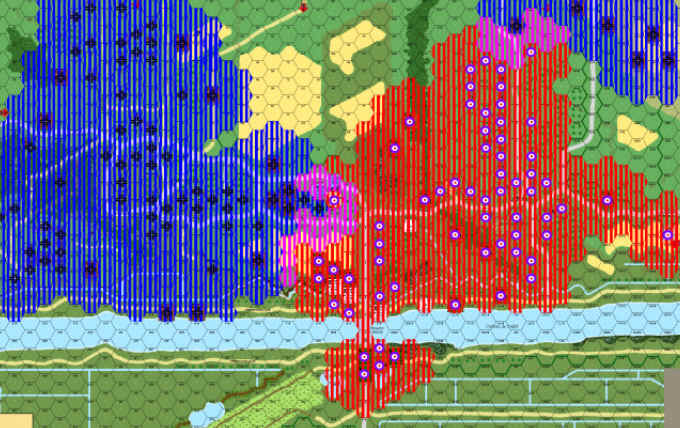
The movement is, as expected, rough and bloody, not helped by him scoring a DR of <5 almost every time he was firing with 2 or 4FP with –2 due to FFNAM/MO! It is futile to explain the movements so I have included a picture…
On the whole this turn, which should have been one of horror for him turned out to be not too bad, he claimed 3(?) MMC worth of kills and lost no men and just a little more territory… To be fair to the situation though, he is in a fair bit of trouble and I hope the blood of my men can be compensated by the virtual envelopment of his forces, any of his units that stands still will get hammered, and I cannot see him forming any defence likely to stop me taking the Schoolhouse by the end of this game. All my AFVs and my MG groups are in strong positions and barring breakdowns or extremely lucky suicidal attacks I have all the bases covered.
Surprisingly, showing good old British pluck (and no end of foolish bravado) JP decides to slug it out, not run away. There are some minor negative results of this… The grain field FG (HS – Q15, 458 LMG – R15) manages to break the infantry unit protecting my 39H (O15) BUT not the OT AFV crew. The 10-2 with a 648 LMG bravely decides to face down a IVH and my MG stack (Q11), he breaks the MG toting MMCs, but the HS lives on and seem most displeased.
Movement brings more shocks! First he is pulling troops a‘plenty out of La Port and bringing the over to plug the holes forming in Benouville… Then a lone 648 charges my other 36H (T8) in an attempt to get Japanese nationality as a Tank-Hunter Hero… a point-blank shot scores a CH and the 40FP –2 attack ensures good chances of a rapid rebirth (this move shocked me… and I really cannot work out why he did that, so very un-JP-like!).
My Château stack takes a pot shot at a 648 strolling through the grain, but fails to hit or get ROF, at least the rest of these boys make amends for this terrible display of shooting by eliminating the pesky grain field HS (Q15). My MTRs try to pick on a broken guy (Q14) sitting in the open, but 3x MTR firing about 8 shots total cannot do much. A 467 (N14) has to finish what the MTRs started and ends up reducing the enemy MMC.
The German 50mm MTR is absolute rubbish, doesn’t even have SMOKE! My advice to the German player in this game is to throw them at the Brits, or better still let him capture them so that he wastes the time and effort of shooting them!
I continue the tone of this latter part of the game by gunning down more broken units; finishing off the newly created HS (Q14) and the broken 658 hugging asphalt in the middle of the Benouville cross roads (R12).
For the first time in this CG I have killed more than I have lost and the CVP count stands at G:B, 8:11. I did fail to get the 10-2 and his unit but this is a minor problem, I have more shots next turn and unless he wants to break and run then he is sitting squarely in my sights.
In Advance Phase, he does advance, in the general direction of Mother England, a major withdrawal is in effect, though to be honest I think for once in this CG he has made a tactical blunder, he should have pulled back last turn. He has a mass of guys wading through the grain field below the Schoolhouse, and even the Genetically Modified stuff has not been known to stop bullets. In the Schoolhouse itself the 10-2 leader has pulled back to the first of the buildings, but I have 2 AFVs with –2 aqr on him now… things are not looking good for the Brits at all!
Turn 5
I manage to rally a MMC from the MG FG that he broke last turn, but apart from that (and the conscript who rallied in the valley house – O16) my options were limited… my men just die and don’t bother with the middleman! He rallies a pair of units in the middle Schoolhouse, and this is a bother as it means my guys entering the school this turn will face plenty FP!
Prep is nasty, while my AL cannot shoot straight with the MA, the MGs manage a hit and the 1MC breaks his 10-2, eliminates a HS and breaks the remaining MMC… no great surprise really, I had so much FP trained on this hex that SOMETHING had to get through… but being that it was the first unit who attacked I now have options with my other units. My MTRs lob away and the Château MG nest blasts at the guys in the open protecting the School, but his NMCs and 1MCs are passed with ease. My IVH overlooking the school grounds (Q11) blasts away and the MA actually hits his 648 target (U13), I cannot tell you how exciting it is to have an IVH whose sights are working – the MMC is broken by this and since the follow up CMG fire is enough to hit but does not
force him to fail the MC I decide to do something I rarely do, go IF – the shot hits again and the MMC is CR-ed. The 39H covering the grain field blasts away with 105mm of love at the pesky 458 LMG that had been holding the flank from his foxhole; a CH is scored and 40FP causes a 4MC, which is only JUST failed! On a whim I fire the other 39H (T8) at his forest foxhole 648 LMG (BB7), they are broken also. I have no complaints about these 39Hs they have been fantastic, even if they do not hit their fear factor alone should be enough to root out all but the most stubborn Brit infestation. My last Prep is with a 467 LMG (P12) at one of the few remaining units covering the foxholes leading up to the schoolhouse (U14)… this unit is broken and apart from the units in the buildings themselves and a lone WW in the grain (T14) I now have a clear run in!
My movement has a frustrating start with YET AGAIN a FP of 4 or less causing a KIA with the help of FFNAM/MO – I have lost units KIA in 5 attacks now like this! Still the rest of his shots are rubbish (with the exception of a SAN that takes out my leader in the Château). To add further pain to his game his AT finally ran out of HE when it took the shot I offered at the foxhole MMC. He is saved from the brink of disaster when I try and charge the building to isolate his broken leader and MMCs and get up close to the AT. I gamble against units that will have to FPF or only have 1FP left to shoot with (due to FF) and amazingly there is yet ANOTHER run of 4’s with –2 for FFNAM/MO and so I lose a leader and MMC with MMG.
I have lost 4x MMC in 6 separate attacks in the past 2 movement phases against units who have rolled 5x 4’s and 1x 3 DR’s with –2 FFNAM/MO… that is one way to ‘defend’ I guess. A pity, since if it were not for this miracle his position in the schoolhouse would have been untenable, now it looks as though I shall be very hard put to get even a foothold. I understand that the Pope is currently looking at canonising the Schoolhouse block due to “the miracle of the endless 4’s”
Finally, out of pure frustration really. I thrust a IVH from the upper grain field (R8) to the lower one (S14) – this guy fires in Advancing Fire at the unbroken WW adjacent to him and though the MC is passed he is finally made to pay for his run of low dice by getting a SAN hit on his 10-2 hex, the 10-2 is killed and there is much righteous rejoicing. After 5 ineffective shots (as pissy 2FP shots with +1 SHOULD mostly be!) I again score a hit and his WW again manages to pass with a 3… but 3 is the number of the beast and again…the beast bites! This is poetic justice of the highest order! The Sniper moves next door, wounding the leader, and breaking his PIAT toting MMC!
My Advances are, as usual, lacking subtlety… I have to get close, despite the carnage that it has brought me so far…If I can take the Schoolhouse, and also take out his final AT then I have a chance of winning this CG, even against the throw-away troops and tanks of the next 2 dates. So I got to mix it up nice and close…I now have the first hex of the school and facing me is only a HS (-1 acquired by a IVH), unless his leader manages to rally the broken PIAT MMC I cannot see how 2 crew, 1 AT, a wounded leader and elite HS can stop me!
His MMC rallies straight away though, and that means I am still facing that PIAT (none of the units routed). Some of the guy in the trench complex overlooking the bridge rallied, but they are the least of my concerns… I shall not be making a dash for the bridge; we are both too bloodied for that now.
His Prep fire is ineffective, though he does get hits, and the PIAT that is aimed at my IVH (S14 from V12) is such a close miss that we can hear the spring launcher creaking.
There is minor movement in the village around the bridge, and though he is no longer attempting to reinforce the schoolhouse he is trying to gain vantage points to stop me driving closer. Rain has started to fall though and that means we shall not be having long-range duels anymore.
The PIAT targeted IVH (S14) returns the favour and scores a hit with yet another 3, the 1MC that results kills the broken HS here, but the MMC and HS both survive unscathed, my ROF shot is a total miss. I fire the AFVs BMG and a few other MMCs at the WW (T14) until those legends FINALLY break and take an ELR drop in the process – there will be a few VC’s handed out after this battle – pity I cannot say the same for my underachieving Germans. To finally eliminate the pesky WW MMC I had to shoot 7 times with it only being the 9-2, 467 MMG that finished the story!
His advances are nothing major, a crew tries to escape the school and he pulls back from the 2nd school hex, a HS takes a risk trying to grab the bloodstained MMG (V11), while the MMC pulls back to defend the AT.
Turn 6
OK, lets get it on! There are a few rallies, and his HS does find my dropped MMG, this means he has to be broken at the least, just to make sure he doesn’t carry it away, nor use it as I try to storm his AT… though even without the FFNAM/MO that has been cutting me to shreds in the last turns I will still be lucky to survive the 12FP and PIAT + possible AT shot… let us see…
Prep starts poorly, with my IVH unable to get even a hit with his MA, or with the nerve-wracking IF from the same gun, its CMG manages to score a Pin though… My 9-2 HMG is called upon to break the HS. The other IVH in the grain (S14) shoots at his Lvl 1 stack (Z13) trying to cover the movement towards the school, but rain, the stone of the building, being buttoned up etc, etc all mean the shot misses wildly – I do NOT IF here!
Movement is the usual… CHARRRRGGGGEEE! I move my mass of men towards the final hex in the school… He opens up from his 1st level units in the bridge valley (Z13(1)) and manages to ELR a 447 LMG unit moving through the wreck (U13). A 1FP RF attack CRs a 467 LMG unit as it rushes towards CC glory (I cant blame HIM for this, it is a log game and I rolled the bloody thing), although he at least passed the 1MC this glory is short-lived as I got KIA-ed by ANOTHER 3 when I have FFNAM/MO.
My 9-1AL IVH goes for a roll around to the Benouville crossroads area (S13), this way it can bring its guns to bear on his pesky lvl 1 stack. Apart from that there is little to report, we have both been bled white by this game, and in the end I can only hope to attack his AT Crew and its 658 in CC with a 467 now the 247 is dead and since my Advancing fire was brought to you by the number 11!
I regretfully decline the surrender of his bold but suicidal HS with MY MMG (V11), and punctuate the point by implanting bullets into the skulls of these impetuous fellows. I rush into CC, and for some reason he decided to nap… I was able to slaughter the ambushed crew whilst they slept. My reason for taking on the crew, and not the 648 was that even if I died in CC I would have taken out the bothersome AT… And unfortunately it is the worst of both worlds, not only does he pull ANOTHER 4 out of his hat (Making that 6MMC I have lost in 3 turns to 3’s and 4’s…) to kill me in CC but I also roll the end of game roll… alas.
Aftermath
The escape rolls are made successfully for both sides
I have 10x 467 left after that bloodbath, as well as 2x 447, 4x 436, and a 247.
I also retain a HMG, 2x MMG, 4x LMG and 3x Lt MTR.
I captured 2x PIAT and 2x LMG.
I have a 9-2, 9-1 and 8-0 as well as ‘Wonder Leader’; the wounded 6+1 (read 5+2).
Most importantly I have retained all my AFV.
I have retaken all of Benouville, and all but 1 hex of the schoolhouse.
La Port saw no action and I retained all my units there.
Conclusion
A victory for me, though due to the shocking luck of the rolls for JP’s last 2 Defensive Fire Turns (almost every FFNAM/MO result was <5!) I have paid a heavy price. Yet, most importantly he has too. Part of his price was atrocious luck on my side, the SAN on the 9-2 was fair enough, he was the furthermost leader and I set my SAN out that far to capitalise on that, but the 10-2s loss was a major blow and while it certainly altered the balance of this game, it might also have further effects.
He was VERY fortunate that the game ended in Turn 6, another turn and it would be MY Schoolhouse. The tactical position of this Schoolhouse is crucial as it dominated the high ground and is the perfect place to hold off the masses of reinforcements that will be arriving… I do not think he will shift out from there, and that means taking loses as I shall spare no FP in taking that last hex in my first turn next game! It will be interesting to see whether he will try tactics similar to this game to try and stop me taking the last hex.
I must say that I was very surprised to see the kind of suicidal last stands that JP used in this game, I cannot think of a time that he has done this before… He is a methodical and careful player, not that I am saying he is stolid, not at all, but it is rare that he gives away easy hits… and this game he did that! The MMC that rushed the 36H (particles of him are still falling to earth) might have been anomaly but the ring of guys standing in knee high grain falling like victims of a firing squad really took me by surprise. I understand his position, that he needed to defend the school and the AT, but if positions were reversed, with the loss of the 10-2 and hence a lot of the defensive strength of the position I would have bugged out…
Positives of this game…
– The 39H’s! Man, those suckers are SWEET; a 20FP attack with no DR mod for a hit is something that cannot be ignored! To all German players think about investing in these sweethearts! The BIG thing to remember about these is they are OT, and I am not sure if JP picked up on that straight away, otherwise his 10-2 might have tried to take them out
– Naturally the IVHs are well worth the effort too, no doubt about that! And although they are expensive I will seriously consider buying more… though for the same CCP cost I can get 6x Marder Is with some small change left over!
– I shall not be buying any more AA Trucks!
– Tactically the situation is relatively plain. The thing that will be the major cause of a loss for him in this CG will be not understanding the value of the Château; allowing me to start in the Château last game has been the biggest help I have had. It dominates the grain field and Benouville and was a handy place to rally my troops last game…
Still all said and done, there is quite a sizable force waiting to come on, and he will want to test his Sherman’s front AF against the masses of the German Panzer arm! I would have to say that the advantage lies with me at this stage, though this is I think balanced by the quality of the British, they are just damn good troops.