PEGASUS BRIDGE
CG I
DAY II
Legion playing German
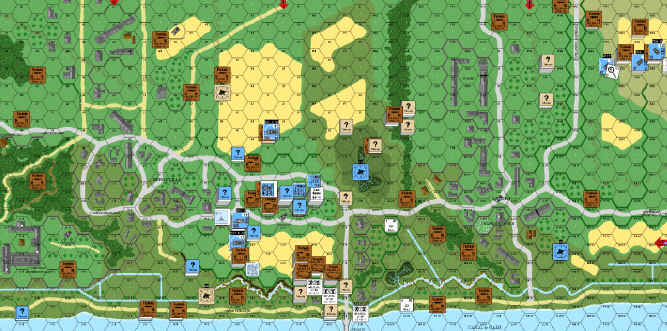
Exposed Fortifications
Wire: W17, X17, Z18
Mines: 1AT: BB13, CC18
Trench: V16, W16, X16
Foxholes
1S: D7, E5, E11, G16, L18, M3, N18, O6, Q5, R15, R17, T8, T11
1S: AA9, BB7, CC12, EE14, EE18, GG15, HH17, II2, MM1, OO2, OO12, QQ4, RR2, SS4
2S: S10, S12, T12, V15
HIP due to no LOS:
1S: B2
Unclaimed SW:
V11: MMG(g)
W11: LMG(g)
Benouville Garrison and the Counterattack
All the SW I gained from the Brits (2x PIAT and 2x LMG) were lost in the rolls for retention… alas…
D18: 467
L18: 447, 2x Lt. MTR
N18: 247, Lt. MTR
O16: 8-0, 467, LMG
Q12: 9-1, 2x 467, LMG, MMG
Q13: PzKpfw IVH (Sz, AAMG), 9-2AL
R9: 436
R13: GSW 39H(f), 467, LMG
R14: PzKpfw IVH (Sz)
R15: 467, LMG
S14: 6+1 (wnd)
T8: PzKpfw IVH (Sz), 467
T11: GSW 39H(f), 436
T12: 467
U12: 436, 467, MMG
V12: 436
HIP: S16: 436
U12: 467, HMG, 9-2
La Port Remnants
MM1: 7-0 (wnd)
OO2: 436
PP4: 35-S 739(f) (CA: OO5/PP5, TCA PP5/QQ5)
QQ4: 447, LMG
RR2: 7-0
RR4: 38H 735(f) (CA: QQ5/RR5)
SS4: 447, LMG, 38H 735(f) (CA: SS5/TT4)
HIP: RR4: 447, MMG
Reinforcements
I have only 30CPP to spend as the devastation I visited upon his forces stopped me from getting the extra dr but I have NO complaints about this!
13 Pz Gren Coy 12x 467, HMG, MMG, 2x LMG, Lt MTR, 10-2, 8-1, 7-0
5 Pz Gren Pltn 2x 468, 2x 467, MMG, LMG, 7-0
6 SPA Pltn II 2x GAW 39H(f), 9-1
5 TD Pltn II 3x Marder I
1 15FPP
Retained: 2x Kfz1
Obviously I am not going to miss a chance to buy more infantry. I lost more men in the last game than I had hoped, though this is really not a big problem as I would never have thought I could do as much damage to him as I did. Again I used his blessed dice and I here-by claim them as my own!
I chose to only get 1 Marder Pltn; they have poor anti-infantry capability with a 50% chance per shot of running out of HE! They are formidable against AFVs and with their high ROF I can hope that they can Aqr with AP before blasting away with HE. They also have SMOKE capability and I have been missing that.
I got more 39Hs; these AFV’s are beautiful and I just love the threat factor. They also fire HEAT with the same TK# as a PIAT.
The 9-1 AL is a huge bonus, and I really feel a bit guilty getting 2 great ldr DR’s in a single refit… but my leaders are suffering in this game and guilt is an emotion I can allow myself to feel IF I win the CG!
Initial Objectives
One thing that gets me a lot of the time is JPs use of his Prep Fire after my initial set-up. I am an aggressive defender and JP uses this against me by hammering my initial positions from his own set-up locations. At the same time I cannot wait around all day…
I am sure that JP will be counter attacking – what other options does he have? If he waits and defends I shall own the high ground, the school and will be able to weed him away from the trenches in the grain, if he attacks then it is a massive gamble, but maybe, just maybe, the strength and morale of his troops will help him regain the school complex.
At least this CG has shown 3 major things:
1. La Port and the II13 steeple (with its +2SAN should the Germans hold it) are a red herring for both sides. The Brits should have no difficulty taking this area, and too many men wasted here will slow down the real battle.
2. The Château is ESSENTIAL. It controls the high ground and most of Benouville. The British should make the taking of this building the #1 priority of their plan. After it is secured (1-2 HSs should be enough as the Germans in CG1 are under No Move counters) then they can worry about other sectors of the map.
3. The Schoolhouse is ESSENTIAL. If the battle is not contained in Benouville then it will move to the end of the village. The grain fields will effectively cover the flanks (for both sides) due to its slowing effect on movement and hindrance to fire. The W13 and V13 buildings however provide the perfect platform from which to mount an attack or to hold off masses of tea-crazed Poms whilst also being able to win the game due to being within 3 hexes of the road (Q9.51). So, all said and done my first priority is to reduce and take W12 (the units here are isolated and therefore under ammo shortage for the game) then to see what his plan is, and react to it…
Benouville
As I mentioned my main worry is how to set up for a reasonable and immediate attack without over-exposing myself.
I must admit to being rather confused about HIPs and AFVs as the FPP chart listed this as a possibility. I had placed a question on the GameSquad Rule Forum but did not receive a satisfactory answer. In the end I discovered the ruling for it myself. CG10 states that an AFV may not set up concealed within LOS of enemy units, and since HIP is a form of concealment I think this is pretty clear, alas.
The only real surprises I have are the MG stack with a HIP MHG and 9-2 in U12, these guys should be safe from initial fire whilst also having a chance of hitting the units in W12. My guy in D18 will use the obscure E6 rule to swim(!) across the river and start digging foxholes! It is time to open a second front!
La Port
Eek, run and hide or discover religion… at least I have options…
A mighty hammer will fall here, no doubt about THAT! This is due to the game winning provision of Q9.51. Any GO German unit within 3 hexes of the major road from TT12 to Z28 at the CG end will give me this game (if I don’t get the bridge first of course!) and the prime places to do this are from La Port and the schoolhouse. As he has throw-away troops and I have nothing of major value here there is not much need for subterfuge, a simple line of 447s with LMGs or a MMG run from QQ4 to SS4, the MMG in the middle is HIP to keep him guessing. The only defence I have for my flank is the 47mm AFV (guarding the road to force him to think about moving his own AFV’s along here and thus eating up time) and a conscript.
I want to slow him down, and naturally do as much damage as possible… he cannot afford to ignore me here, and I do not think I shall go down too quickly.
General
Oh, how I wish I could swap the German Lt MTR’s for a module of OBA like one can do with the US! I am seriously considering ditching the bloody useless things just so I can use the units that are baby-sitting them.
BTW I was just in Arnhem a few days ago, followed by an invite-only trip to the EXCELLENT panzer museum in Munster, Germany and whilst in these places I got to see a few of the Lt MTRs. I will confess to being confused as to why they are 5PP, even considering the ammo requirements, as they are tiny. I found it hard to take them seriously as a weapon – at least ASL got that part 100% right, maybe they were designed as toys for those boys too young to join the Hitler Youth (1-6yr olds).
I do not want to ‘win’ the CG this turn, at least not through attacking…unless he is going to just enter the village and have a snooze after wiping out my La Port guys. I imagine he will be content with hurting me with his new tanks and men, well aware that these reinforcements are gone anyway whilst my losses are permanent. I will consolidate my position after dealing with the pesky ATG and wait and see…
The Game
Turn 1
The British move first.
He has set-up with a heavy concentration of troops in the grain field as well as no small number of units in the valley and woods flanking La Port (possibly to try and flank me at the schoolhouse). There are few forces in La Port to deal with my last ditch defence, but who needs them when there are 15MMC and a Sherman coming on-board from right next door to my defensive position. There is only 1 Prep Fire, which is a relief, as this means he is not likely to do a major attack toward Benouville. This Prep breaks my 436 in his La Port foxhole (002).
My first DR of the game, the 47mm AFV gun firing at his Sherman with riders, is an 11. Oh, dear… is this the shape of things to come? Luckily a few weeks holiday have greatly lowered by ASL stress levels and restored my personal ELR – to tell the truth though, even a hit would have been pretty useless! I IF with HE from the same gun when he unloads infantry and get a hit! But the shot is wide (47mm = 4FP) and there is little joy.
He moves in only an estimated 6MMC and the Sherman to take the La Port hill, and I wonder if this is enough? The rest of his units are rushing towards the main battle along both the river road (TT17) and the Sword beach road (TT12). Defensive Fire Phase brings in my attacks on the recalcitrant schoolhouse
defenders (W12). I gain Aqr with my IVHs on foxholes in La Port’s woods (BB7) and the schoolhouse grain field (V15) as well as the excellent Lvl1 location in the bridge village (Z13 – just because I can’t see anything doesn’t mean its empty!). I do not fire the 39Hs; the B#11 is something I do not want to tempt too much! My MG FG in the school blasts away at the ATG position but misses badly; at least he knows what he is up against now.
With Advancing Fire phase being only a few wasted attacks on my 47mm AFV I am starting to breathe easier, until a CC attack on it from the CX PIAT toting 658 kills it – JP maintains his nearly 100% kill rate in CC with ease, bah!
The German turn is full of potential, but unfortunately much of it is wasted. The MGs led by the 9-2 fire away and again just miss by 1 with no ROF. My LMG MMC crouching in the foxhole (QQ4) next to the paras under the now-burning AFV (PP4) blast at PB and miss as well. I only get to lob 4MTR shells total from my 3 SW’s – so much for 3ROF weapons! I fire the IVHs to gain acquisition and do so, but the shot I take at the village buildings top floor (Z13(1)) is a lucky hit causing a NMC on the empty room – at least I know there is no one here to interdict my movements.
The movement phase starts with an attempt by my frog-squad to enter the river, but they fail the pre-swimming TC when they put their toes in the water and find it is too cold. I bring on the hoard of AFVs with riders… it certainly looks impressive, and if the DR’s go my way will be impressive! I am sending a Marder and 39H down towards the river, but the rest are going to the schoolhouse area. He does not take a shot with the ATG at any of the speeding AFVs as I have placed kamikaze Kfz1s on the road between the gun and targets, his chance to hit would be nigh on impossible. Defensive fire finally pops the lid on the defenders in the schoolhouse (W12 – 2x 658, LMG, PIAT, ATG) as they shoot at my MG stack. Unfortunately for JP the dicebot is not his friend today and his 6,6 results in a CR due to Ammo Shortage (the units in this hex started in isolation and are under Ammo Shortage for the remainder of this CG-Date). One of the 658’s becomes a very unhappy 447, and his attack is a miss. Then to make matters worse when his La Port MMC (PP4) tries to PIAT my 37mm AFV (RR4) he rolls a 10 and runs out of ammo here too! A disastrous turn even though there were only 2DR’s.
For Advancing Fire I start to gain more Aqrs on possible locations I shall want to hit but that is all I am able to do, I am not exposed, and now that his ATG hex’s units are stripped of their ? I can only hold my breath until my next fire phase… unless he is smart and tries to escape first.
I do some minor advances and no CC.
Turn 2
When it rains it pours, the PIAT is lost in a failed repair roll and the unit in the blazing wreck hex misses totally in Prep Fire.
For movement he stuffs around my La Port hedgehog, sending the Sherman up the hill to act as cover for some infantry units (and providing a target for a deliberate immobilisation attempt in the near future – though I will only get 1 or 2 shots before I am smoked!) The infantry here attempt to outflank my defence by moving up the hill from the village side.
More movement in Benouville comes in the form of the (not-surprising) retreat by the ATG, pushed by the other 2 MMC, from MY school! However, the exposure from pushing the gun (Hazardous Movement) gives one of my IVHs a shot, and that is a HIT; there is only a PIN result from this though! I am desperate to get these guys so fire away with the AFV’s MGs…a 1,1 is a 1KIA killing the crew.
My Defensive Fire Phase starts with the usual MTR firework display and with the usual result – nothing – though I do have one of them breakdown (same chance as that needed for a CH, so even money). I also have a hit on the pesky adjacent 658 that is hiding in the SMOKE of the burning AFV (PP4) but the 1MC is not enough to even raise their pulse. I try Deliberate Immobilisation on his Sherman but miss by 1, alas. I shoot at the MMCs under the AFV with my 447 LMG in the northernmost foxhole (SS4), but all I succeed in doing is burning out the barrel of the LMG.
Advancing Fire has a scary start with his Sherman managing a hit on one of my 37mm Killer AFVs (when you think tanks, don’t think French), but the To Kill DR was as unlucky as the To Hit DR was; a possible shock only, and even that was passed! The rest of his few shots were all misses. Wiping burning AFV from his eyes a 648 advances into CC against the first “to the last bullet” defender in the La Port hedgehog and, as usual, he manages the kill!
I go straight for the jugular with the Deliberate Immobilisation attack (at SS7 from SS4), but miss; a mistake that this AFV won’t make again as the Sherman easily destroys him in Defensive Fire! There is a bit of fight from the infantry under the AFV (SS4), they manage a lucky shot that Pins and Breaks the MMCs protecting the Sherman (SS7) and the SAN result from the leader’s pass is enough to kill another 8-0 (FF15). I pop the top on my HIP MMG (RR4) and score a CR on the adjacent 6th Airborne unit (QQ4) – these are the guys I need to kill, so I am happy with that. My other 37mm (RR4) AFV tries to shoot at these guys too but misses badly!
In Benouville a MTR finally gets a hit(!) revealing the Café Gondree unit to be a WW and causing my sniper to again take a pot-shot at his previous target, breaking a 648. The IVH (R14) barrelled in on the ATG (X12) fires again and hits, but slave labour made shells are not what they used to be and there is no result. I fire the MGs and again get a miracle hit, but more miracle DRs follow to give both MMCs here a passed MC AND make a Hero!
For movement I am quick to claim the schoolhouse (W12) to make up for the foxholes I am losing in La Port. The rest of it is trying to find places to park a multitude of AFV’s without placing them in the CA of the still dangerous ATG. My infantry are rushing forwards to cover the River Road and the schoolhouse area, as well as the upper Grain field. I have decided to face his Trenches down with a ring of good quality leaders and MGs, as well as a 39H and 2x IVHs (one with AL). The Lvl1 plateau of the Benouville area can be claimed as MINE!
The Defensive Fire does little damage, as all I lost was a 7-0 in the La Port field (RR2) when he wounds and then is eliminated due to No Quarter. My Advancing Fire is the usual attempt to gain Aqr with the newly arrived units (unfortunately leading to my 9-1ALs IVH (T12) suffering a MA malfunction).
Aftermath
There is no aftermath… unfortunately it was at this point that JP bowed to the inevitable, there would be no victory for the British this time.
Conclusions
There are times when a victory is hard fought and the savouring of it is a great joy, there are times that a game is lost, but closely with a sense of “what if”… unfortunately this is not the case as I do not feel that the result reflects the game. To be honest, I think I was out-played and yet I ‘won’.
When one takes into account the fact that almost all the losses that JP suffered until the middle of the Dawn game were from boxcars, snake-eyes or SAN results it becomes clear that his loss is reflected in something else. Without a doubt the lack of control of the Château cost JP this game. If the Château had been taken and if his ATG’s had not been removed from the game before they even really entered it then JP could have interdicted or at least slowed down the entry of my units, especially the AFV’s. He showed how well he was able to hold off numerically superior numbers of my troops in the battles for the Benouville forest and the initial buildings in the village… imagine if this had been the bulk of his forces!
I do not think that my “Cloaking Counter Sleaze” move of the Night II game was unfair, but still accept that it might not have been totally legal. It is certainly more historically accurate than the omnipotent knowledge that no matter what the Germans would not come storming out of Benouville.
The CG
In conclusion I would like to just say a word about the CG itself. While I am sure that the Night games are fun for neither the Germans nor the British, a smart British player would insist on playing them to make sure he could really kick the Germans back to just their entry areas.
The lack of choice for the British player is a double curse, as not only is he limited in his choice of how to deal with the German threat, but also the Germans can make plans to counteract the reinforcements before they even arrive.
In general I have found this CG to be interesting enough to have played all the way through, but am not sure I would pull it out again in a hurry. It is an excellent beginner CG as it lacks complexity in its reinforcements and utilises some CG-specific terrain (barbed wire fences etc). The map is complex enough to be exciting to play upon, though like all CG rules there is some ambiguity in the wording that I personally found frustrating.