PEGASUS BRIDGE
CG I
NIGHT III
JP playing British
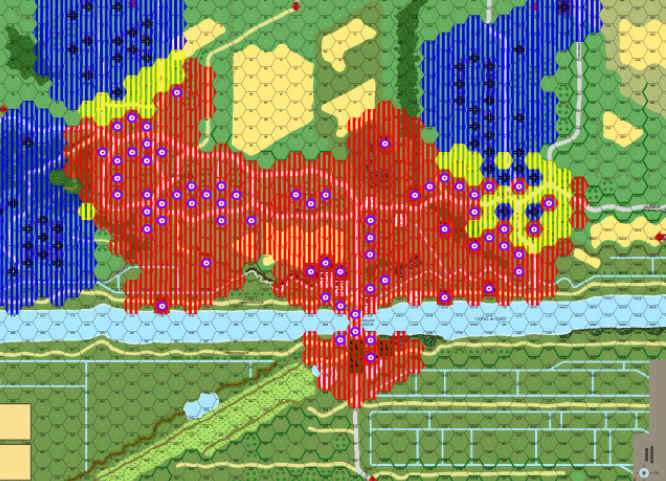
SETUP
Although I am the scenario attacker I don’t get the advantage of being cloaked, so I have spent my 20 FPP on dummy counters to act like cloaking counters/scouts and to keep him guessing. My plan for this attack is to clear out LE PORT (only 7.5 squads left there and 4 tanks) so I will be quite aggressive there, basically it will be a “search and destroy” mission (that’s “sweep and clear” in the Pentagon’s sanitized warfare dictionary).
Meanwhile another force will be attacking BENOUVILLE (he has 10 squads but, he has a 9-2 leader so I must be careful as he will obviously be the HIP) with the intention of gaining ground to allow me to defend at a distance from the bridge itself (I need the +3 for stone buildings as I can not have a viable defence from the wheat fields). I will be happy to advance only 4-5 hexes into Benouville and don’t really want to put my force at too much risk.
I have decided to do a multi-pronged attack on each. Against Benouville I will send 2 squads, a leader and 2 dummy counters as scouts along the road next to the canal (my eastern flank). I will also send a same sized force across the open terrain along the western flank (with one of the squads deployed into HS’s to make it seem bigger and therefore more of a threat) while seven squads, 3x LMG a 9-2 and 9-1 leader assault from the centre; they will also have 6 dummy counters (three stacks of two) as scouts. I will not attack in the centre until he has drawn troops off to counter my flanking attacks. (If he doesn’t react to the flanking attacks he is in danger of being isolated so he must guard against them) he only has 10 squads there so I feel I should be able to find a gap in such an extended front line.
Against Le Port I will send 2 squads, a PIAT, leader and 2 dummy counters along the dirt road next to the canal (my eastern flank) once again to draw off his troops from the main assault. Along the open ground on my western flank I will send 1 squad (deployed into HS’s), an LMG, a PIAT manned by a 7-0 leader and an 8-0 leader in one hex (although this is not a strong stack, it will be concealed so, from his perspective it will look like a serious threat as it will be 6 counters high!), their role is to draw off troops/tanks and take the stables to the west of town. They will be accompanied by another squad (once again, deployed into HS’s and concealed) and 2 dummy counters as scouts. In the centre I will have the remaining 9.5 squads, 4x LMG, 4x PIATS, a 10-2, a wounded 9-2, and an 8-1 leader as well as 6 dummy counters (in 3 stacks of two) as scouts. As with the other attack, I want to wait for him to draw troops off of his front line before assaulting (I will still have at least a HS conscript trapped upstairs in Z13 to finish off and maybe (but I doubt it) a 447 in AA17) so I will take a turn to ensure the enemy are all dead/gone and to make sure my troops are organized before assaulting.
The mainstay of both the attacks in the centre of both towns will be the –2 leader, 3x 648’s and the 3x LMG’s, which will give me 24FP with –2 for the leader against any of his units in both towns. These groups will still be 12FP against concealed units and 6FP against concealed units during my advance fire phase so they will be firing at anything in their LOS. Unlike the previous night turns I will roll for starshells during his turn for the centre assaults every time, as I have a quantitative and qualitative advantage so I want to engage him in a firefight and ensure he can’t pull back without being under fire.
TURN 1
I started out acceptably, I searched the hexes where his units had been isolated and it turned out the way I thought, the 447 in AA17 had shifted but the conscript HS trapped in level one of Z13 was still there. This turn was pretty much just movement although I lost a HS when it rolled a 6,6 on a 1MC whilst re-enforcing Z13 from Defensive Fire by the conscript HS. He also exposed a 447, LMG and 7-0 leader in the north of Benouville (Q12) and a 447, LMG at AA8 during my movement with some ineffective fire. During my Advancing Fire (got to love that assault fire bonus) I broke the 7-0 and pinned the 447 (would have preferred it to be the other way around!). In the Advance Phase I moved a dummy stack into the ditch at O18 and ambushed his ? counters there, they were just a dummy stack so all good. One of my 648’s also advanced onto a HIP 447 in S14 neither side got an ambush and in the CC phase I CR’ed him for no loss.
The attack in Le Port has started slowly, I had to move through the line of buildings Z13-Z17 and at this point do not have my dummy counters in front to scout the terrain so I will have to wait until turn 3 before I move through the centre and eastern flank.
However, my attack on the western flank (against the stables etc.) has moved well and is currently occupying AA9. During his turn he started pulling troops back at Benouville, which works well for me, as I only want 4-5 hexes of it anyway. While in Le Port he started sending troops to re-enforce his western flank (the stables area) so the feint is working and I still feel comfortable about my assault in the centre.
During my defensive fire my large FG’s fired at various empty hexes that were in LOS using spray fire (just to see if he has any more HIP’s) and he scored a SAN which exposed my dummy stack leading the attack towards the stables. The Le Port terrain favours him a lot as it rises up and, generally has trees or walls at the crest line so I feel I wont be able to get too far into the village (the extra +1 for moving into cover will slow me down as will not being cloaked) but I will definitely need to take the church at II13 (He knows I must take it to reduce his SAN so I feel there will be a HIP there). During his turn he moved a few units but there was no major action other than the death of his now reduced MMC in S14 during CC.
TURN 2
His Benouville troops had pulled back one hex and this allowed me to charge to an adjacent position in buildings etc. while my western and eastern flanks closed in on the area, there are 3 MMC there and I will be happy to kill them, that would make 4 MMC dead in Benouville and I think I will just advance a few more hexes and not really get too deeply involved unless a golden opportunity comes by to kill another.
In Le Port I was still advancing slowly up hill and had made no big gains, during CC I advanced upstairs in Z13 and CC’ed his conscript HS (I also gained an 8-1 leader through leader creation in same hex – very handy!) During his turn he tried to pull out of Benouville but, being attacked from 3 sides allowed my FG’s to cause some serious damage and it resulted in him having 1 broken squad and one squad killed as well as the broken leader, I will charge in next turn and clean the lot of them out. In Le Port he re-located a lot of troops preparing for my western flank assault and also pulled back his front line unit (447, LMG) unfortunately for him they moved to FF12 which was a level 1 illuminated road hex and my men in level 1 of Z13 had a long range shot with a -3! He was CR’ed and broken by the shot. I also continued my policy of blasting any hex that may contain HIP’s – you never know, I might get lucky.
By the end of this turn he had lost a total of 3 squads and had another 1.5 broken for the game so all is OK although I know I will have to speed up the Le Port attack next turn. As planned, all my troops across the entire Le Port front will be engaging at the same time so I am confident I can make a breakthrough somewhere. Hopefully it would have been worth the 2 turns spent manoeuvring into position.
TURN 3
I chose not to Prep Fire as I will be rushing his positions this turn, my 648 MMC and 8-0 on the dirt road near Le Port (the eastern flanking attack) are going to go CX and use the leader and road bonus to suddenly sprint from DD17 all the way to KK17. Basically I want to suddenly put troops in a position to threaten the centre of the town, charging down a road is a risk, although I will have a HS moving down the road ahead of them to scout the first 5 hexes, (I will also follow up with a 458 to cover them should he be there and break the ldr group). The fast charging group will be running into the unknown, but, his troops seem to be protecting the western side of the town as a counter-attack point I think – he is currently digging a foxhole in MM1 to link that area with the entry hex in KK1. I am of the opinion that he knows he can’t hold the eastern side of the town and, to my mind; it would be a waste of a valuable HIP to have an ambush there as the unit would not be able to reach the western side of the board due to my incursion in the centre of town. (Legion is not a gambler, he never has “throw away” attacks, and he always tries to conserve his units both in attack and defence.) The rest of the Le Port force will attack the foxhole in CC12, I think they are dummies because it is a good spot to fire from and if it was manned then he would have moved them to react to my attacks, he has had his MMG in that hex for every turn so far and I feel that he wants me to believe that it is there again but, I know he would have his MMG HIP (who wouldn’t?). I moved my western flank out to EE4 with the intention of advancing into FF4 (adjacent a ? in FF5 and a tank is further down the building in FF6).
In Benouville I moved to point blank range; I moved close to keep the pressure on him, I want to fire at his broken squad with my 9-1 and 3 MMC and have moved my big FG adjacent to one of his last operational squads in N12 (the other is in K15). During movement one of my dummy counters was exposed and lost when it tried to enter the vacant L13 so, he obviously has a HIP there; this was good and bad news… the good news was that I thought about running my 9-2 FG there but decided not to when I saw his starshells illuminate the open ground in front, and the bad news is that my eastern flanking attack will have to be content with what they have got, I wanted to advance and CC the K15 unit but I don’t want them to be in a melee as I cant re-enforce from the centre until I know what the HIP is, so they just moved forward a few hexes to the dirt road and will dig a foxhole to extend my front line. Meanwhile my 7-0 and 2 MMC moved up the road to O6, he has a ? in N6 but it is illuminated and O6 isn’t, which has allowed me to get adjacent with no return fire from him. Both of my western flank attacks have suddenly headed AWAY from the areas I want to take (I was going to swing them in to join the main assaults) but, his starshells made it dangerous to do so and it ended up being safer to do a major outflanking manoeuvre rather than closing with the town centres.
I still have not found his 9-2 and MMG yet but, once again he seems to be defending the area’s near his two entry hexes and, after all, it is the threat of a large FG being HIP that inhibits attackers, I quite often have HIP’s well behind my lines to make him cautious in attack, and, a good leader like a 9-2 should not be wasted in a hopeless situation like the one he is faced with. (As I said before, he likes to conserve his troops!!) So, I feel that they will not be near the area I need to take even though part of me wants the 9-2 to be there so I can eliminate him before he gets a good FG happening next turn, another part of me wants to take the town cheaply and easily.
The attack near the stables got pinned by his fire and I lost an 8-0 leader when it rolled 6,6 but the turn ended OK. During his turn he exposed the HIP in L13 (it was the 9-2, 447 and MMG!) and he ran away to J14, likewise in Le Port he kept pulling back. I had a few shots but with no great effect other than a long range shot at a 447 in J15 which rolled a 1,2 and ELR’ed the 447 and exposed and broke a HIP 447 in the same hex, this was good news as it was the last HIP and I could now run about without fear of a hidden FG ruining my night.
TURN 4
During the weather phase I rolled attacker info. And he exposed a HIP in Le Port, which was very handy for me as it was (once again) in a building I was going to take.
In Benouville I really put the pressure on him and started to take a lot of ground. My big 9-2 FG moved to cover the woods his 9-2 leader had moved into thus ensuring he would not try to counter-attack. Other units started taking large tracts of real estate and there was not much firing during this turn. My 7-0 attacking the stables retired back to the woods, while the rest of the Le Port attack force got up close and personal with the 2 conscripts he left behind to defend with. I have left a lot of troops guarding buildings to ensure he doesn’t do a suicide charge later to put a dent in my setup area.
During his turn 4 he rolled a decrease in the NVR so his one-man turret tanks are useless as they can only see the adjacent hex if they are CE and of course he cant fire if he is CE so, all good for me. His Prep Fire broke my 8-1 leader and one squad but during my defensive fire I was able to break and disrupt both of his conscripts and killed one of his tanks with a PIAT shot. He was not happy as he did not know the D2.12 rule about starting up not being a +2 movement DRM but, he couldn’t see me anyway (or fire, even if he went CE) so, although I don’t like surprising people with rules they don’t know and I offered to let it go and he was sporting enough to say “no” and I took the kill. Legion and I both have VERY short tempers when we play ASL but, at the end of the day we are both fair when it comes to ugly situations like these.
TURN 5
In my weather roll the rain increased to level 2 which gave me more confidence to run in the open. I am now mopping up Benouville and am happy with my gains for no loss; my setup area runs from L18-K14-I12-H9-I8-K8-M6 and back to my original start lines so I will not be attacking any more here. The final tally was a 7-0 and 4.5 of his squads dead as well as one 447 ELR’ed to a conscript and I have also captured an LMG.
In Le Port I took more buildings and positioned my troops to CC his broken conscripts I now have most of the buildings on row 11 and just want to take up to row 9 (and charge and kill any AFV’s that might be around) before I settle down for the Dawn turn.
During his turn, he got a starshell and exposed one of my squads in the open and, with his MMG getting multiple ROF etc. he was able to kill my heroic boys!! This was my fault as I was overconfident and advanced him into an open hex with nothing but the rain to protect him, although I am sure Legion will write something about it all being part of his brilliant trap. The game ended there, with the town of Le Port a very confused set-up area, as we own adjacent buildings in a number of areas.
AFTERMATH
This ended up being the reverse of my original plan, that is, the search and destroy was in Benouville and the careful advance was in Le Port. I paid a dear price for allowing him to get the buildings Z13/AA17 at the end of game 2 as it meant I had to setup in the wheat field and it took two turns to start getting into contact. However, I am happy with the final tally, I lost my wounded 9-2 to a sniper and an 8-0 as well as 2x 648’s of which I gained a walking wounded in the refit phase; while he lost an AFV, 8 squads a 7-0 and had a LMG captured as well as having a 7-0 wounded and 1 squad ELR’ed to a conscript.
I was very lucky on two counts, the starshells in Benouville blinded his troops for 2 turns in a row and the cheap exposure of his HIP’s as I had one revealed (but not exposed) by a dummy stack, another one was killed in CC, the third exposed and broken by fire at a Known Unit in its hex while the fourth was exposed with out so much as a MC. All in all, a good nights work but I will need to take a few more hexes of Le Port in the Dawn scenario before I can go on the defensive.