RED BARRICADES
CG III – THE BARRIKADY
Legion attacking as the Germans
October 17
Played with Live VASL (10 sessions: 40 hours)
At last JP and I are going to crank up the big one. This will be the first time playing this CG for us both and unlike many of the previous CGs we have played we are going to do this one ‘out of the box’; no pre-playing, no ‘familiarisation games’.
At the very start I shall have to say that I am very much looking forward to this game. JP allowed me to choose sides, I chose the Germans, that give JP the Defender, which suits his style of play, and gives me the Attacker, which suits my style of play. Most of our games are with me as the Germans too so this again puts us in familiar territory.
German Purchases
I was not unlucky with my initial purchases, though it was a closely rolled thing; 3 of the 6 DRs I made came down to within 1 of forcing me to start this game with Depleted units.
Obviously I have decided on a form of the Armoured Assault attack. The extra Pz IIIH’s are to crack open the defence on the way to the Chemist’s Shop and to engage units in the Factories. I shall be more than willing to trade AFVs for Russians MMC or to protect my German units; their CVP costs from losses will help me gain more CPP too
I have placed my Pre-Registered hexes in C10 and V5. I am planning to use the Pre-Registered C10 for a SMOKE mission, this will be to guard the entry of the units who will aim for the Railway Offices (BB12) and then, if that is successful, the Garages (BB17).
My aims for this game are:
1. Capture the Railway Offices and possibly the Garages – this is also a diversionary attack to pin down attention and men
2. Capture the Chemist’s Shop
3. Link these two areas by capturing buildings in the E5 area.
Russian Setup
Obviously JP bought up big with the Reserve units, there looks to be a lot of them on the map! He has placed no men on-board in the D0-D4-V4-V0 area, but there are sure to be HIPs and Mines.
He has put men to the West of Pribayatinskaya Street, these are to stop me getting to the Chemist’s Shop, there are units in the target building too, but not too many of them.
To the South of Skulpturnaya Street are a number of units, he is aware that the Railway Offices are going to be a target and has decided to defend them against my attack.
All-in-all it is pretty much what I expected; a fairly spread-out defence with a few men on Level 1 locations and on the Factory rooftops (must be 2x Lt MTRs, so that means just 2x Rifle Coy) to gain LOS and units placed to act as speed-bumps against any German massed attack. JP usually invests heavily in fortifications, especially mines and road-blocks, he loves to use both of them but I can see no evidence of fortifications at all, that is certainly a surprise. He has also probably bought a Militia Coy as Reserves, mindful of the effect that even poor quality men can have in large enough quantities – this was a lesson we both learned from our Berlin: Red Vengeance CG.
If I there is anything that stands out from this setup it is that he is risking a lot on a reasonably up-front line of defence. He will be unaware that I have bought Stukas to stop his reinforcing movements and the men he has in the factories are going to be pretty much out of the game due to the LOS obstacles and the distances between his men and my attack lines. He will only have about 3 Squad equivalents as HIP, though dug-in AFV and AT Guns will also be HIP, so what I see is pretty much what I face. By moving my men either as a bunch, or as a solid rushing wall of men and Half-tracks I should be able to break through where-ever I choose.
THE GAME
Objective #1 – Take the Railway Offices
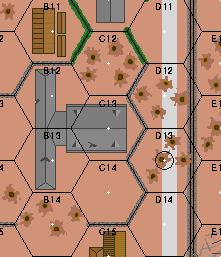
The Railway Offices
I get 2 SAN rolls within the first few minutes of the game as JPs dice go mad… luckily I only suffer a Pin result, unluckily the snipers miss. My men come on and gobble up territory under the cover of a SMOKE FFE.
JP kindles the Railway Offices and otherwise holds his ground here, my FFE shifts to really cover the whole of this part of the game with SMOKE, that will last until next turn which gives me enough cover to fully enter the board here.
I am forced to edge my way through a mass of Rubble due to the twisted mass slowing me down and the SMOKE from my own OBA which has also made it hard to move. I have shifted the main focus of my attack away from the Railway Offices (which are yet to Blaze) as I have a chance to make some gains by attacking through the now open Shipping Yard. He does have a number of units tied up here and that is something I am happy to keep doing, I don’t want him to shift those reinforcements to the other parts of the battle.
JP has shown his cunning nature by actually sending men across into this part of the battle, he is trying to gain a force superiority here and is probably hoping to make a limited counter-attack. The SMOKE is helping him as it is obscuring my shots as much as his. I am happy to see this all happen as I still have a stronger force than him here and the only place he can take men from is the actual shipping Docks themselves which allows me to exploit my opportunities there. In fact I might even consider sending the SPW 251/1 carried force (which are still being held in reserve off-board) across to this part of the battle instead. He is also being aggressive with his CC attacks; he sent a 527 into H-2-H CC with a 247, but the 247 managed to CR his enemy without loss despite being ambushed!
I luck out with one of the first DRs of the Turn and smash a stack that was stopping me from reinforcing the attack on the Shipping Depot, but as I move men across he gets some luck and Pins an 8-1 and LMG 548. The rest of the moves around here are essentially a stalemate. I finish off his HS in H-2-H CC with no loss but also have a HS fall foul to some mines in C11. The Railway Offices start to Blaze and if I can gain only a few more hexes then I shall have been able to expand my perimeter far enough to take it’s ruined Remains as my own. JP tries to call down OBA but draws a red-chit!
JP un-Hips a unit from the blazing Railway Offices and sends him off to join the fight at Skulpturnaya Street; it is really a stalemate here with neither of us strong enough to push the other out (I have a lot of forces but they are mostly dummies, he has at least 3x MMC with a 9-1 leader under concealment and a MMG in the Railway Platform).
My very first attack of the game is a 1,1 to break the strong defence here, then his 9-1 leader is killed by a SAN and the 2x 447 are either CC-ed to death (with another 1,1 leading to a Leader Creation DR = 7-0) or die for FTR. Movement had all but stopped here, but now a single HS stands between my (finally) overwhelming numbers and the target building – the building itself is very much a’blaze so it is more to solidify our gains and our entry zones that we continue in the attack. I am a bit worried about the HMG nest near the Northern Foundry Hall as it’s LOS can actually strike me all the way over here.
Again things move slowly over in this part of the battle and due to the terrible luck last turn with his OBA attack he now has the chance to get a unit behind my lines. To be honest I wont complain too much if he does as this means less men to join the real fight in the Shipping Docks and men left back here will be isolated for sure… that makes for easy picking next game. Gusts cause part of the Railway Offices to collapse while the rest of the building catches a’blaze. My men have been able to link up with this building and have thus completed their objective of securing this area. There are a few hexes and buildings that I would like to take (A14 and C14) but I am not going to push too hard for them in the current circumstances.
This becomes the quietest part of the battle as my men consolidate their positions and try to avoid losses while also grabbing as much extra territory as possible. We are trying to limit his counter-attack possibilities as this is the only part of the battleground where he evenly matches me in movement and attack capabilities.
He cannot counter-attack any more in this area as he has pulled everyone out to cover the Shipping Depot area. This allows me the option of shifting more men over to there or pushing harder down in this area. I was lucky to avoid damage from the sole defenders left here (assuming the Reserve units are Dummies) which is a MMG 447. But essentially I am in no rush here, preferring to sit back and slowly expand, if a chance comes I might grab it though!
This Turn (6) the battle around the Blazing buildings became the most contested area on the map. The Russians are holding on here as much as possible and I am eventually forced (by the revealing of 2x 426 in C15) to send more troops to the front rather than into the more open areas across the Railway Embankment. The battle is being waged at a snail’s pace, if either of us create a gap then the enemy will rush through. Both our OBA is also playing in and around this area.
JP does well here this turn, I am forced to Voluntarily Break a HS to stop him getting eliminated in CC and that puts him back in control of the area between the Blazing Railway Offices and the Railway Embankment. Luckily his attacks against me did not do so well and his Conscripts are being Disrupted quite rapidly by the ferocious German FP.
Things have really become a quagmire; I cannot push across the road to the Garages and he does not have the strength to push me back. We both drop OBA in this area to try to force the issue but the results are only some breaks for him and a HS KIA for me. By the time the game ends I have taken my initial objectives but nothing more.
OBJECTIVE COMPLETED
Objective #2 – Capture the Chemists Shop
The Chemist Shop
I get lucky, losing neither men nor AFV as I push against his early positions. I have managed to Sleaze-freeze a 447 in a position that will allow me to claim him easily; this AFV made it across Pribayatinskaya Street with ease, which was a surprise.
JP exposes an AT Gun in the heavily Fortified Commissar’s House and manages to score a hit (generating my 3rd SAN result off of 3 SAN in only 6 Russian shots!), this destroys the lone Pz IIIL. He takes more shots and starts exposing some more of his concealed units but they are ineffective in their attacks. My return fire is largely useless too, as the few units he doesn’t skulk away with are mostly missed with even large FP shots. Still, the door is slightly open in this area and I can attempt to move men through it. I am happy to have found the first AT gun already and to know that it is in a Fortified location and thus unable to be relocated (if it survives the game).
I drop OBA SMOKE on my Pre-Registered location (V5) which ensures that I shall have a little more freedom of movement. I send a mass of men through the Rubble and also across Leninskii Prospekt; the opposition on the River side of this road appears to be quite light. In between Leninskii Prospekt and Pribayatinskaya Street is a reasonably large Soviet force (9-0 Commissar, 2x 527, ATR 447) but despite generally bad luck with my Advancing Fire shots I am able to remove their Concealment which means they are going to have to move fast if they want to survive.
His Commissar does his job properly and is able to rally the 2 broken units JP suffered without having to shoot anyone… a pity really… My Stuka drops down to annihilate a MMG 447, but I am unable to destroy the MMG – at least I still have my Bombs left for a juicy target. With the Air Support’s attack over he is free to move the rest of his units and that means sending a few more over to defend the Chemist Shop area. As things stand he has had to withdraw past the V5-Y6 road but that still gives him plenty of strength to stop me with Street Fighting should I attempt to move HTs or AFVs down either road.
I drop 80mm OBA on the wooden buildings between Leninskii Prospekt and the Shore. I expose one of his Reserve Counters here to be a dummy and then claim many of the buildings with HS movement (even into the OBA itself). I also send a HS down to the Shore and start gobbling up terrain there too. I bring on 2x HT with Passengers and put them safely behind buildings to keep them away from his most bothersome AT Gun. My own SMOKE is stopping my overwhelming FP from carrying the day, though anyone who is exposed immediately suffers a break. I am able to grab a lot of territory and am using this time to get into position for my next Turn when the SMOKE clears.
My OBA falls in-place to hit another Reserve Cloaking Counter in this mass of Buildings; unfortunately the last Cloaked guy is a dummy while I lose a HS due to my own OBA – I have used up a black chit to grab unguarded buildings and the only forces killed were my own! The only real fighting (apart from his AT Gun firing and missing, and even attempting a very risky IF shot against the front armour of a Hull Down Pz IIIH with 9-1 AL) was around the U6 Rubble in the NE corner of the Factory Yards – I blasted away with nearly 5 different shots against only 2 units, even with a 20FP +0 shot, and all he suffered was a single unit exposed and thence Pinned! Then in CC he manages an Ambush and kills a 467 of mine… and even scores a 1,1 to keep his Concealment! JP has Kindled some of the Wooden Buildings between my forces and his in the Chemist’s Shop… that is nice of him, it saves me having to capture them now!
With some luck I was able to smash a lot of the defenders standing between me and the SPW 251/1’s waiting to attack the Chemist Shop. He lost 2x 447 KIA to successive attacks in my Prep Fire but then more than made up with it as my powerful Sturm Squads suffer CRs from 2FP shots and generally managed to fail almost every MC put to them. At least now I have strongly moved up to attack this last set of Wooden Buildings prior to the target building, and his men in them are either locked in Melee (1.5MMC) or must face the task of either running the FP gauntlet to the Stone building or standing, fighting and dying in place (9-0 Commissar, 2x MMC). I have a HS claiming Shore hexes and have also managed to take all the territory up to the road from the Chemist Shop to the Shore (Z8-EE7).
Poor luck sees a MTR shell land right into the fighting compartment of one of my HTs here… none of the crew escape, but it is not burning so at least I should be able to salvage a LMG from the wreckage. On the other hand things go poorly for the Russians too as I manage to get some luck of my own and see some of the (till now) hardy Soviets fail MCs. He has had to leave the Chemists Shop relatively exposed and though he does have a number of defenders in it they are in real danger of suffering from the OBA falling around them (5 Blacks in a row, including a Subsequent Draw) or the AFV lining up to Sleaze them in place.
With his men unable to hit much as I move this area it becomes a blood-bath. Knowing that he is going to be AFV Sleazed in place JP lays down a lot of spraying fire RF but his poor DRs and my men finally remembering how to pass MCs makes my attack on the Chemist’s Shop, and even a little beyond, a certain success. I have such an advantage here that I have been able to sneak a man into the Gun Construction Building and have also claimed locations in the Chemist’s Shop itself. I have placed his sole non-Broken men in Melee and have surrounded him with enough troops to ensure I will capture this building easily
!
JP takes out my 9-1’s Pz IIIH AL with Commissar’s House AT Gun… he has had TK rolls from either direct fire or CC on 7 AFV in this game (up to this point) and 6 of those DRs have managed to roll the 6 or less necessary for a result. As the Crew and leader scramble to safety they are gunned down by the Rallied Conscripts Encircled in the top floor of the Chemist’s Shop. The rest of this area is quiet with the exception of the elimination of the 447, 9-1 holding out in the Chemist’s Shop and the Stuka attack on his Commissar’s House AT Gun… This really is an amazing story, with the Bomb as yet undropped I decided to try and take out the AT Gun, I passed the TC and then managed to score a direct hit – with a 1,1 Critical Hit! The AT Gun and crew have been eliminated and the building Rubbled to the 1st Floor. There is now just a single 447 standing between me and the entirety of the map from Hexrow V-JJ! He has bolstered the lines in the Gun Construction Hall, but I should be able to take a large enough part of it even if there is just 1 more turn to play.
Even though his Commissar is able to rally the Conscripts here to bravely fight on their efforts are in vain. A Pz IIIL contemptuously smashes them before wheeling off to strike deep into the Russian lines, they are mopped up by the end of the turn. I rush men towards the Gun Construction Building and the area leading to the Commissar’s House and grab as much territory as possible. There is a single 447 who is a thorn in my side and this guy manages to kill a HS of mine and put more of my newly-taken territory at risk but he has potentially 3 MMC and a HT on his tail, so I hope to take him out ASAP.
OBJECTIVE COMPLETED
Despite this objective being completed my men push on to expand our control area and to attack the Gun Construction Building.
We have only a single 447 standing between total or partial control of the area between the shore, the Commissars House and the Factories and he is taken out with only the loss of a HT. This gives me free rein to grab as much as I can and I am able to even put a solitary unit in one of the Commissar house hexes as well as putting the Gun Tube Hall under threat as well – the game ends here though and this is as far as I am able to get.
The Commissar’s House
Objective #3 – Link East/West though Shipping Docks area
The Shipping Docks
The first turn goes well, a Pz IIIL comes on and goes HD behind the railway lines which gives him good LOS over much of the Russian front lines, the other Pz IIIL (with 8-1 AL) comes on with the Railway Office assault force and also covers Shipping Building #1 (F5).
JP AM’s to escape Stock Building #1 with his 2x 447 but a SAN result breaks 1 MMC and the Armour Leader’s Pz IIIL manages to score a 1KIA on the other MMC, this building looks open and thanks to the mass of SMOKE covering the Railway Office I should be able to grab it without loss. If I can take this building then I shall have access to the Shipping Depot; it is rich with Stone Buildings, Hindrances and appears lightly guarded, it also allows me to further cut off his men from escape.
As it appears that this is weakly held area I have decided to put more men into attacking here than originally intended. I send nearly 6 MMC into here and an MMG + 4x LMG as well as 3 leaders and 2x AFV and am able to cross the Railway Embankment with ease. His forces quickly pull back and I am able to claim Stock Building #1 – the MMG 467, 9-1 goes up to Level 1 where it has a good view over the Shipping Docks area.
JP pulls back all along here, he only leaves Broken units and Reserve units behind – I am actually left with more targets than I can hit especially since I have hardly managed ROF at all this game. Along the East-West road facing down my Entry Area he has a number of Stone Buildings with a few MMC in each, but I am currently attacking them with a 4:1 superiority in numbers in what I am calling ‘Objective #4’. When his men start to break here they are going to find themselves quickly surrounded, though he does have cover leading all the way to the Factories through which to Rout.
Things were a bit static here due to my uncertainty over 2x Reserve Cloaking Counters (H8 and I8) which are later revealed to be Dummies. I gobble up more terrain with my few mobile men but the terrain is expensive to move through and I cannot get too far. Still, I have done MUCH better here than I thought I would and I think that the Russians will later be wishing that they had defended this area better, because I could conceivably make it to the area close to the Northern Foundry Hall and that means a lot of this killing ground will be crossed before his defence is ‘factory-centred’.
I continue to fire at the forces in the Shipping Docks, but there are few targets and I expect to be able to easily claim the 3 central Stone buildings by the end of my next Movement Phase. He has some units in the G10 Stone Rubble field but if I can take that too then I can link up to the Railway Offices as well as whatever I can take/hold in the Northern Manufacturing Plant area. Importantly, a lot of the buildings that JP has easily given up are Level 1 buildings which also gives me some much needed LOS advantages.
This turn starts off well as I am able to smash a Squad standing between me and the last building holding out from his original defensive line (N5). I decide to Search rather than just romp into the building this time and although I lose a HS to Search Casualty dr I do manage to find the 527 hidden in the L5 cellar as well as 6FP or AP mines. Otherwise I again gobble up as much territory as possible, but I suffer a very serious setback when his OBA comes down on a mass of my units… I lose a 548 and 7-0 (his 6ML HS here passes a 2MC), previous to this they were hit with an 8FP -4 attack from a just revealed HMG 447, 9-2 in K10(1), but with 2x AFV staring him down he might have to choose between holding the MG nest position or living. Still, there is no denying the fact that my attack has suffered it’s first major blow and I might not be able to push any further South this way… but I should be able to hold the line.
I was not looking forward to the possibilities of his turn and things started off very poorly when he revealed his other HIP AT Gun – it blasted away at my PzKw IIIL with the 8-1 AL and finally managed to score a Possible Shock. The OBA also came down in this area and broke my most effective MMG position in the F6 building; all of a sudden I was left with just a single Pz IIIL and 2x 467 to hold this whole area! Luckily he had few men too, and even more luckily he attempted to shoot it out with his HMG position… this guy was wiped out by a 1,1 CH from the Adjacent Pz IIIL – this was the 1st of my 4x 1,1 attack rolls for this turn! The rest of his men skulked away leaving me with a strong chance of getting a foothold into the Northern Foundry Hall!

The Northern Foundry Hall
Prep Fire goes very poorly for me, and I am unable to rally any of my troops (across the map, let alone in this sector of it), but with movement this all changes. I make some very aggressive moves into the Northern Foundry Hall and am able to get a mobile AFV in there as well as surrounding it with a number of MMC; JPs men couldn’t hit the side of a barn door with their DRs and thus I end up with a fairly safe foothold inside this factory. I think I can confidently claim that the Shipping Docks have been taken for Folk and Fatherland. I was able to un-Possible Shock a Pz IIIL (with 8-1 AL) but it was immediately Immobilised as it tried to move off to enter the Factory. I also suffered a big blow when the AFV in the factory fired with his CMG and BMG and malfunctioned both! I have cleared out and taken the K10 building, but a Blaze has started in here and this will unfortunately consume this important level 1 Stone Building.
JP seems to have decided on trying to retake some of this area. He is obviously planning on the game ending in this Turn (Turn 5) and thus not giving me a chance to eliminate the men he has placed behind my lines here; a big mistake considering he doesn’t roll the required ‘1’ and thus the game continues. I have had poor luck with my Rallying which has helped him get to this place but I think I should be able to nip this little incursion off and regain control of this whole area. He does score big when he wipes out the 8-1 AL and his Panzer crew and then later Immobilises another Pz IIIH in the Northern Foundry Hall (L10) through CC – this turn alone JP has killed or Immobilised 3 Panzers and/or Crew. My attack on this Factory continues and he has not left many men behind to defend against further incursions (though he has moved all available men to Sewer entrances).
Finally I start to rally men, then I scoot a HT back to freeze the 527 he has placed way behind the lines in this area. The HT is able to pass his ESB for a few more points but is eliminated with CC Reaction Fire; so I lose another HT, but by doing this I am able to kill his squad and again claim this area in it’s totality. Things do swing a bit here though, I am able to claim some great CC kills, but JP gets some of my men in CC too and also smashes 2x 467 with a pair of OBA CH! My own OBA is able to do similarly with 2x 6,6 duds! One brave 467 rushes the AT Gun, it is forced to Intensive Fire which bursts the barrel, we take this location and also grab more locations in this factory. By the end of the turn we each hold half of the Northern Foundry Hall.
JP tries to counterattack in the Factory only to suffer a catastrophic loss when his 8-1 led stack is smashed by poor MCs (his leader is Wounded and ELR Broken too); this means I have taken the last AT Gun and now have almost a free rein in this building. His attempts to reinforce it have met with poor results as the only units he has left to move are mostly Conscripts and they don’t last long. When Rout Phrase comes along JP ends up bolting as far back as possible… with at least another turn to play he is almost certain to start ceding locations in the Southern Foundry Hall as well!
The Southern Foundry Hall
My men are an unstoppable force now, they run through the Northern Foundry Hall and have totally claimed it, killing a few HS in the process, they then move into the Southern Foundry Hall as well, though some great shooting by JPs strung-out defenders is enough to stop me from grabbing even more of that factory. The game ends at this point with the Russians unable to organise any further resistance, but I am likewise too exhausted to attack any further. This might be a crucial battleground in the next game.
OBJECTIVE COMPLETED
#4: Added Objective: Capture the Northern Manufacturing Hall
The Northern Manufacturing Hall
In Turn 2 I realised that the Central part of JPs defence was looking sparse, so I decided to act quickly and try to force my way through to gain the Northern Manufacturing Hall. I sent a platoon of Sturm Squads through the J2-N2 Debris Field but movement was very slow. I also send a PzKw IIIH adjacent to the Northern Manufacturing Hall. This was a risky move, it gave him opportunities to attack the AFV, but I wanted to present him with the dilemma of staying (and trying to kill the AFV) or going (and saving units) – thankfully JP decided to stay. He sent 3 Squads at the Panzer, I was able to break one but 2x 426 managed to enter CC and they Immobilised the Panzer (2x extra LMG for me!). In return I was able to kill a HS and hold them in Melee where I will be able to kill/capture them without too much trouble. As this part of the battle is absorbing a fair few of my men, and has the chance to be a major winner of territory for me I have decided to write this up separately from Turn 3.
I bring on one of my HT here and drop off a Squad next to the Northern Manufacturing Hall. I leave a HS in the HT and head off to join in the Chemist Shop attack, but JPs AT gun in the Commissar’s House manages to hit it despite the small-sized, in-motion HT being Hull-Down; I lose the HT, crew and HS passengers! In fact this turn brought some bad luck all along this line. I lost a 548 to a 1,2 DR from a HMG in the Chemist’s Shop but am otherwise able to really push right up against the buildings here – he has just a few un-activated Reserve units in the Northern Manufacturing Plant and a few stragglers left from his initial force. At least I wipe out the 1.5 Conscripts attacking my Immobilised PzKw IIIH and I also bring on another 4.5 MMC to attack through this area.
Things don’t get much better for me this turn, I miss with plenty of Defensive Fire and still have not had a decent run of ROF as JP just holds his ground and attempts to keep his Concealment for CC. Even when I do hit he again manages to pass his MCs! I had put a 548 into the N5 building but lose him when a HIP 527 Ambushes me in H-2-H CC – at least I take a HS with me. The units he has activated in the Northern Manufacturing Hall have proven to be a nasty 3x 527, 447, MMG, 8-1; this is not going to be easy to crack especially with 2.5 MMC now in the N5 building.
My attack doesn’t share the luck that the rest of my men did, most of my shots here missed entirely or the MCs were passed by the Russians, who are continuing to pass most MCs with ease. I am not able to take much more territory, though I have placed more men inside the N5 hex and will be able to hold this now (barring JPs usual exceptional luck coming into play). Otherwise I am facing down his factory and bringing my men in closer to hit him from all sides should the chance come. As it stands at this point in the game I have a single unit in the Northern Manufacturing Plant (2x DC 548) and enough covering the other hex to ensure that he thinks twice about coming any closer.
JP stands and fights and despite my killing a Routing HS there is little change in the positions of our troops until the Soviets again manage to sneak a stack (2x 527) into H-2-H CC vs one of my Sturm Squads – the Sturm dies in the Ambush and I lose my only foothold in this building. However a series of great shots by the Germans manages to settle the N5 building matter and it is all over here bar the mopping up of broken MMC. JP is going to have to face holding out in the Factory or leaving and preserving his forces as it is currently a salient sticking out from the Russian lines that provides little support past the Stone Walls.
My men blast away with all they have got, but 5 consecutive attacks are only able to break one of the two 527’s here; at least the other is Pinned. I tighten the noose around this area, cutting off Rout paths and wipe out the Broken defenders in the N5 building which means I have finally claimed it! by the end of the Turn I again have men in the Northern Manufacturing Hall and have tied up his sole 527 in CC. I have placed enough men around this building to make him think very carefully about whether he wants to shoot it out with me!
JP eases back with his men, though he does reinforce the CC with a single Conscript MMC (I think reinforcing battles like this is a big mistake for the Russians as it risks getting men cut off behind enemy lines – those men might be better used forming a solid line of defence). He still has a leader and a MMG defending this Factory but I should be able to take most of it now with my numerical and qualitative superiority of men.
Finally I am able to bring enough forces to bear on the lone hold-outs in this factory (MMG 447, 8-1) and when their 16FP attack fails to break my Sturm Squad I pile on in in Hand to Hand combat. I am able to kill both of his units, but I lose another precious 548 in the process; still, this building is secure now.
JP does not try to reinforce here anymore, that would be suicide and with the game going on for another turn this building is mine and the objective of capturing it is complete. Even more importantly, I now can release the units who fought here to other parts of the battle.
OBJECTIVE COMPLETED
The Gun Construction Building
The freedom to move allows me to gobble up so much more of the Gun Construction building than I would have thought possible… there is no resistance now and I am only limited by the amount of MF available to me. By the end of the turn i have taken half of this building.
The Butcher’s Bill
German Losses
1x 237, 1x 238, 1x 247, 6x 467, 9x 548 (16.5 MMC lost)
2x 7-0, 127 crew w. 8-1 AL 8-1 succumbed to wounds
4x SPW 251/1 (w. Crew)
Pz IIIH (w. Crew & 9-1 AL)
Pz IIIL (w. Crew)
Pz IIIL (w/o Crew)
Post Game
5x 467 Harden to 468.
9-2 Hardens to 10-2
Russian Losses
10x 426, 12x 527, 17x 447 (39 MMC lost)
8-1, 2x 9-1, 9-2, 9-0 Commissar, 2x 228 Crew 8-0 succumbed to wounds
2x 47LL AT
2x HMG
2x MMG, LMG
50mm MTR
Post Game
426 hardens to 447
9-0 hardens to 10-0
German CVP Gained: 96
Russian CVP Gained: 75
Stone Locations Controlled by the Germans: +107 (15 Locations destroyed)
CG Date won by Germans

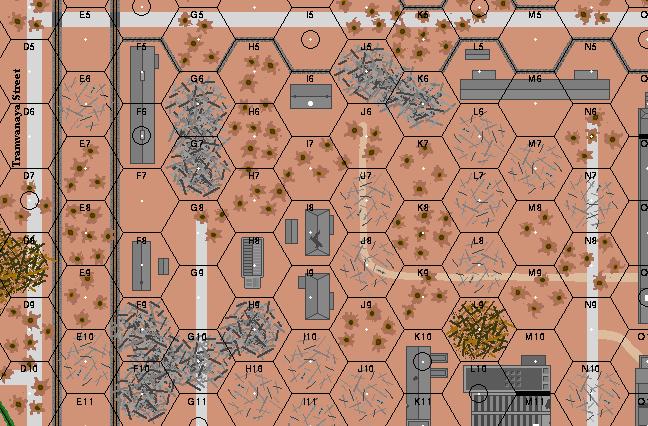
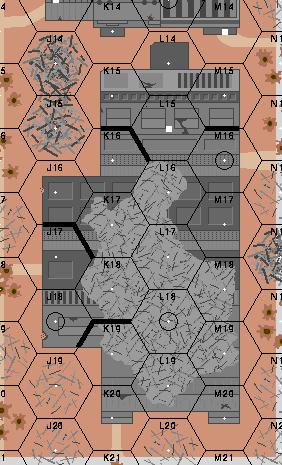
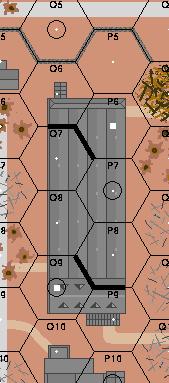
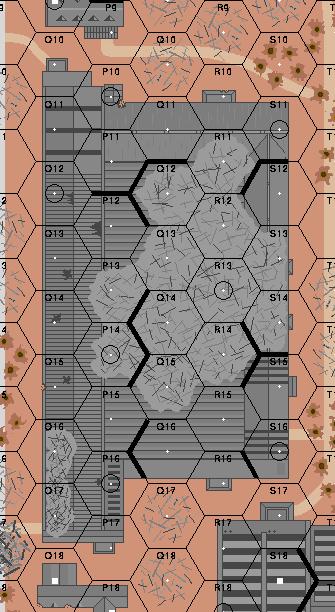
Map at game end with Perimeter marked out, Blazes to continue into the next game are also marked
The Map speaks for itself. By the end of the first game the Germans have managed to capture a third of the battlefield and half of the factories… this is a phenomenal result. In doing so I also managed to kill 2.4 Russian MMC for every German MMC lost, though the German Sturm Company paid a high price. I lost all but one of my 6 Pz IIIs, though I was able to scrounge LMGs from 3 of them. I was also able to scrounge LMGs from 2 of the 4 SPW 251/1 I lost.
I did very well in the Refit phase with Battle Hardening troops. Although I did not do so well with keeping captured SW, he ended up losing a lot of them (2x HMG, 2x MMG, 2x 45LL AT Guns, Lt MTR, 2x LMG, ATR) so I feel this is a decent trade-off.
In terms of territory gained this is where I am most happy… sure it is a lot to hold with my man-power, but it is a lot for him to try to take back… He is going to have to think hard about a counter-attack, but with less than a company of men left from this game all his CPP are going to have to be spent on non-Reserve on-map forces and that is going to be expensive. Unless he wants to waste an Attack chit on a battle he clearly doesn’t have the men for then he is going to have to setup in defence too, which gives me the option of attacking with great force in the location of my choosing.
End of Game Forces
German
127, 247, 238, 9x 467, 6x 468, 2x 548
7-0, 2x 8-1, 9-1, 9-2, 10-2 + 1x 8-1(wnd)
11x LMG (some scrounged from AFV)
3x MMG
2x HMG, ATR
2x 50mm MTR
2x DC
2x Pz IIIH (1x Immobilised)
Captured
LMG
ATR
Russian
226, 7x 426, 3x 447, 2x 527
7-0, 10-0
LMG
MMG
2x ATR
2x 50mm MTR
Conclusions
There is no doubt about it, this was a devastating game for the Russians. JP has a right to feel pleased for the losses he inflicted on me but in terms of territory alone he is going to be on the back foot for some time to come. I really cannot believe how deeply I was able to penetrate in this game. I am also happy that there are no real salients left exposed, my battle lines are reasonably tight and for that I am quite thankful.
As to why this happened… well, I cant really say… JP is an excellent player, if he couldn’t hold out my attack then I don’t think there are many who could have done much better.
– Could he have placed his men in the front lines more?
Maybe, but then when I punched a hole though the line nothing would have stopped me after that.
– Could he have used more fortifications?
Maybe, but they are easily bypassed.
– Should he have made his defence more factory centred?
This might have helped, his factories were reasonably unguarded, but if the game had ended on Turn 5 or even 6 I would not have got anywhere near as far into his back lines.
Without a doubt the end of game rolls really messed him up… his line had all but crumbled by Turn 5, but getting to Turn 7 after that was a disaster for the Russians
On the plus side, I lost a LOT more men that I had planned on… though my attack was designed to be like a wet towel, i.e. to wrap around the places of resistance and come at them from all sides, I still lost a lot of men to HIP CC attacks and also some good/bad luck. Still if he had pulled those men back sometimes instead of standing and fighting ion each case then he might have killed less Germans but also preserved more men and more territory.
Interesting Thoughts
JP did not reveal his Reserve units except when necessary – this preserves anonymity. And it is not a bad use for the Reserve Cloaking Counters. Why not keep some units under Cloaking even with targets nearby; wait until they move FFNAM/MO before you reveal and attack. I found myself being delayed on a number of times by units that later turned out to be Dummies but what if there were also some real units mixed in with them too?
He also used HIP to great effect in making hand-to-hand Ambushes. But does this achieve what he wants? Certainly losing a Russian HS or even Squad to kill a German is a good swap, but if he doesn’t get the kill he is in deep trouble. These are really only going to be any good for a single ‘attack to kill’. Still, it forced me to waste MF on Searches and also killed a HS through Search Casualties.
JP gave up territory to preserve men, but at times would stand and fight seemingly hopeless battles, thus giving me easy kills and thence more territory. He also focussed on killing AFV which I feel was a big mistake. This changed on Turn 3 when he started to fight and get into CC but again he seemed to try for CC against all tactical needs; there were times when he sought combat which had a reasonable chance of success, but failure meant that the doors was open for me to grab more ground. I think he focussed well on the ‘killing Germans’ part, but not too well on the ‘saving Russians’ tactic and in the end the losses he took allowed me (along with some lucky ‘end of game’ rolls) to take far more of the map than I could have dreamed possible.
My AFVs and HTs were invaluable for Sleaze-Freezing Russians; this was a tactic that was driving JP to distraction by the mid-point of the game. He lost a LOT of men to having their rout paths cut or to being frozen in place by an AFV in bypass. When they were stuck in place it was a simple matter to squash them with my over-whelming FP.
The Stuka was pretty useless, it accounted for a single 447 and the destruction of the 45LL in the Commissar’s House. Although the death of the 45LL was essential to my successes in this area it was pure bald-faced luck and not really the direct result of the Stuka… 2CPP was a lot to spend on so little result.
The Blazes that are going to be burning in the next game are a bit of a bother, they have already accounted for one of my Pz IIIL and will be the cause of the Northern Foundry Hall being Gutted at the end of the 18/11 Game. I can see that Blazes are going to be a BIG problem in this battle.