ASL17 – LOST OPPORTUNITIES
Legion defending as the US Paratroopers
Pierce Mason attacking as the Germans.
ROAR (91:81 – G:US) – 18th June, 2008
Played with 34 VASL Logfiles (Jun-Aug 2008)
I very much enjoyed the game of ASL12 I have recently completed. However my opponent was unable to put the time aside for another game so I asked for anyone who was interested in playing some of these Paratrooper scenarios to drop me a line. Pierce did immediately. He chose to play this scenario and I asked to play the US Paratroopers (I rarely play the US and need the experience).
Initial Thoughts
The last time I played this scenario I was quite drunk so I have few memories of it. I know I would have played the Germans though.
It is an interesting game with numerous poor quality Georgian conscripts in German uniforms attacking Elite US paratroopers who are dug-in to a village. The Germans must control 4 buildings on Bd.1 to win, and they win the instant they achieve this aim. If the Germans have <9 unbroken Squads in play they lose automatically. This really puts the pressure on the Germans as their best men are 447s, thus their Range is identical to the Paratroopers.
The attackers have a pair of French 35R 731(f) AFV and a Marder I, countering this is the usual Baz ’44 overkill and a 57L AT Gun. The 57L can cut through the Armour of the AFVs with ease and has an ROF of 3. The Germans are blessed with a HMG, 2x MMG and 4x LMG, the Paratroopers only get 2x MMG. Both sides have a Lt. MTR.
The game is 8 turns in length which definitely works in the Germans favour.
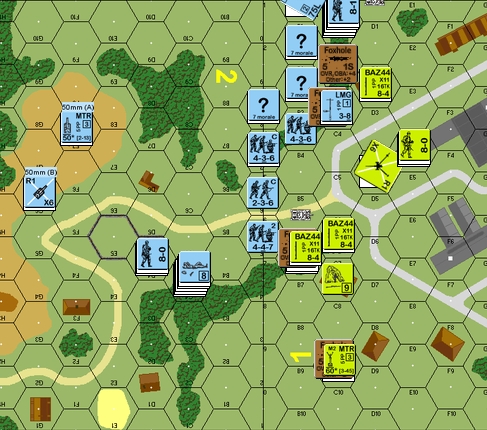
US Setup
With the victory conditions relying on him grabbing just 4 buildings I don’t have much of a chance to set up a deep defence; all he has to do is move 4 hexes onto Bd. 1 and he would have achieved the required VC! I will have to rely on my dummies (10x ?) and raw FP to force the issue. I also have to be very careful that he doesn’t try to flank me with a massed force as I would not have the time to respond before he grabs the buildings.
B6 1S Foxhole
C2 1S Foxhole, Baz ’44 747
C3 1S Foxhole
C7 2x 747, Baz ’44, MMG, 9-1
C9 1S Foxhole 60mm MTR 747 (HIP)
D2 2x 747, Baz ’44, MMG, 8-1
D4 57L AT 228 (HIP)
D8 Baz ’44 747
E4(2) 3x Dummy
F6 Baz ’44 747, 7-0
F6(2) 2x Dummy
It is really not the most subtle setup I can go for, but it is a balance between protection (he might decide to sit on the hills and hammer me for a few turns – I would!) and a strong defence (my best units are in Blind Spots and the most likely targets for his fire are Dummies). If he charges me I can hurt him, if he sits back then I have the option to move back and seek cover or to move forward and engage. The AT Gun is in the most obvious position and I am really only hoping that he will think I am not so simple-minded to put it there…
German Setup
The Germans have heavily weighted the attack to the Western edge of the battlefield with only a very few units to the East. As expected he has not exposed many units to my men and their possible attacks
The Game
TURN 1
His Marder fires with a successful SMOKE shot to allow his men to move forward into the the first band of woods with little interdiction. His MTR then opens up on the sole defender I have visible here (1C2) and strips his concealment before malfunctioning the SW. Then he opens up the the other MTR and it too scores a 6,6 – what terrible luck! German attackers cautiously start to move forward, they are hugging the tree line and not over-exposing themselves – so I don’t really take any shots either, I want to keep him guessing. I do expose a Baz 667 and the 8-1 in D2 to take a pop at a very adventurous tin-can, but the Baz shot goes wide. He sent the other tin-can down the central road for a small bit, I don’t shoot and he ducks into an LOS blind-spot; again, I want him to fear my HIP for at least this turn.
I open up at the tin-can with the Baz… and miss again! Arrggg… At least I am able to CR Break an MMG carrying 447 which might have saved the BAZ 747 in the 1C2 foxhole. My moves are mostly dummy AMs, though I also send another Baz 747 around to cover his central forces – this move might also encourage him to sneak some units down East into the LOS of my HIP MTR. His shooting is also atrocious which is a bit of a ‘get out of jail’ card for me. My Advances are to place concealed units in the tree line and thus I am hoping his MTR units do not repair! These Advances should give me chances to slow him right down, though he could still rush me with a fair chance of success
Germans: 248


The German attack builds slowly and suffers from equipment failure, the US defenders have a lot of FP at their disposal, but are greatly out-numbered.
TURN 2
A generally useless Prep Fire Phase causes me to suffer only a single loss when my western-most 747 is ELR broken by a 12FP shot; considering the number of attacks he made this is not a disappointment to me. He does reveal my MMG in the 1C3 foxhole but at the expense of a HS hit by a SAN result and with no shots to follow up on the result. He moves cautiously but also tries to get the tin-can behind my lines – I take a 3rd Baz shot and this time I succeed in getting the hit and kill. Defensive Fire is otherwise useless though he scores big when he manages to ELR break a 747 in my front lines. He edges forwards again whilst I rout the broken 2x HS back.
One of his MTR is rallied and that is a real bother as it forces me to reveal the HIP MTR who fires, hits but doesn’t even score a PTC. I fire with the sole remaining viable defender in the West and he misses as well as malfunctioning his MMG. I reveal a Baz to fire at his other tin can and despite only needing a ‘6’ for the hit, I miss with this guy too! No worries, with the 7FP IFP shot I take aim at a conscript sitting out in the open… and miss again! This is certainly playing to form with this turn being a clear case of ‘Lost Opportunities’. In movement I Dash across a street and the low DRs come with a vengeance; I have a 747 CRed, but he passes the MC as the leader with him Hardens through a 1,1 result. Soon after this result his last tin-can fires and Malfunctions his MA; useful but hardly going to turn the tide of the battle as this is where I have him best covered although he might rush it in for the VBM Freeze now. Unfortunately I manage to fail every other MC I face in the rest of the front-line as his massed FP manages to actually hit, and the high DRs keep on coming for me. His Marder uses up his last HE rounds, a small mercy, but things are really looking grim for the US right now – I have a single defender to the East and the West holding off his entire force and unless I get some units back in Rally (2x HS are not under DM, but their leader is non-DM broken too!) he can win this game next turn just by rushing me.
US Losses: 337
Germans: Pz 35R 731(f)
TURN 3
Gusts start and that removes the SMOKE threat, not that he has any targets to SMOKE out! My Rally does go well, with 8ML units and a -1 leader in a wooden building I am able to get both the MMC back in the East, though they are in a terrible position to try and stop his attackers. Up in the West of the battle I get the 8-1 back as well as both HS… this is a huge result and puts me back in with a small chance. The dicebot seems determined to drive this game to an early conclusion with a 4FP +3 shot managing to hit and strip my last dummies. His moves are all forward now, he can afford to try to crash through my lines as he knows I cannot hit all of his men and he has enough numbers in reserve to take a chance. His tin-can drives in front of my AT Gun, but I wait until Defensive Fire to shoot, I don’t have much of a HE chance, but if I can do some damage to his men with the gun too then I will be happy – also I want him to commit to the attack before I show my last HIP. The Defensive Fire phase starts poorly with my 60mm MTR AGAIN missing… The AT Gun hits but can only manage to Shock the AFV thanks to the superior turret armour, with the ROF I hit a stack of units hiding behind the AFV and manage to score a CH which cracks this flank’s attack right open, though it will only delay the inevitable I fear…
My MTR AGAIN proves it’s uselessness by scoring a 1MC with no ROF, his Conscript HS just shrugs off the MC though. My AT Gun hits the AFV and manages to score an ’11’ on the TK DR which is only an Immobilised result – his crew passes the TC; at least I manage to kill him with the next shot. The AT Gun also manages to K/ a Conscript MMC in the same hex but loses his ROF in the process. I try to IF but Malfunction the Gun as a result, I really don’t feel I had much of a choice in this matter as I have to try for the <9 un-broken MMC win this turn or I am dead. My last-stand position in the West blasts with everything it has, but the first shot goes hopelessly wild, the second (12FP +2/+1) manages to Disrupt a Conscript and ELR break a 447 which will also mess up his FG opportunities. US Movement with a Concealed 9-1, MMG 747 goes horribly wrong when the AM-ing units are NMC failed by a 4FP +1 shot which then opens up the Eastern flank to a large degree. His Defensive Fire is a mass of 12FP shots and they rip into my Defenders. The defence in the West consists of a single HS, the rest Surrender en masse (2x 337, 747, 8-0). I also capture a Conscript HS but declare No Quarter.
US Losses: 337 (Surrenders: 2x 337, 747, 8-0)
Germans: 236, 436, Pz 35R 731(f)
Taking advantage of some terrible US shooting the Germans swarm the defenders with their poor quality troops
TURN 4
This turn is likely to be my last I feel… things have totally fallen apart and I am not going to be able to stop him even if he just strolled all his units out in the open! I try to repair the AT Gun and score a ‘6’… ha, ha, it doesn’t rain it pours! He, on the other hand, manages to repair his other MTR. A MTR shot takes out one of my 747 defenders in the East and another falls to a number of failed shots before he finally hits with a 12FP attack; each defender broken just widens the gap he has to stroll through. My last unit in the West is also broken and as the dust settles from Prep Fire I am left with just a crew, a HS and a 747 with a MTR too far away from the battle to influence it. The MTR finally decides to not only hit a target but also gets a run of ROF that wipes out the HS manning the level 2 hill MTR; too little too late I am afraid! A 436 of his LCs away as I declared No Quarter last turn while I lose a 337 when he take the No Quarter option. I have lost my first building, but they are sure to fall pretty quickly now.
He loses a Conscript HS to a 6,6 Fate roll but gets a leader back up. I again get a bit of luck with a 747 SR attempt coming good, but it too late now. The newly Rallied 747 takes out an Adjacent Conscript HS. I fire my sole remaining Baz ’44 at 2 of his units in a Wooden Building and score a hit which breaks them both, but the resultant back blast also breaks my HS. I am able to break another 436 and I must be SO close to the 9 Squad win mark, but I am just going to fall short I ask Pierce to do a count and can you believe it? He has just 8.5 Squads… this is a US win!
US Losses: 337, 57L AT M1
Germans: 2x 236
Buildings Controlled: 1
The Germans have lost >9 Squads
US PARATROOPER VICTORY
Conclusion
Wow… talk about Lost Opportunities for the Germans.
This really was an unbelievable result as I was actually ready to surrender the game on Turn 3 and only played on for the AAR’s sake. My maths was totally wrong as to the remnants of the German forces since I expected Pierce to have ~11 Squads left when I asked him for the count. To be honest I felt throughout the game that I was getting crushed, it is only in re-examining this game through the AAR that I realise what really happened. So I don’t feel I won so much as Pierce lost the game by overly aggressive attacking while there were still so many turns left to play. Although it was my victory it has a very hollow feeling to it and I hope our next game will give my worthy opponent a chance to use his skills to push me as hard as he did in this one.
Turn 2 was where this game turned around. I had a terrible run of shots while the Germans could hardly miss, on top of that I failed almost every MC set for me in this turn leaving me with just 2 units to hold off his entire attack. However the Turn 3 rallies were very lucky and that stopped me from losing the game there and then. I was happy to see these Rally results and realistically it balanced out the terrible Prep Fire Phase and MCs I took in the previous turn but I also felt it cheated Pierce a bit. His attackers had played an intelligent game up to that point and had got the breakthrough they deserved. The game could have been over right there and then.
All the way through I was being pushed and pushed, not by aggression but through constant pressure, I hardly felt like I had much room to breathe and my defence was only based on shooting as much as I could out of the overwhelming number of attacker pressing down on me. All through this game I was commenting to my opponent on how poorly I was doing and on how tough this game is for the defender but now that the dust has settled I have no option but to change my initial negative opinion of it to a positive one… this really was a very interesting situation and I am sure that I would play it VERY differently if I were to have the opportunity again. The re-play value of this scenario is high and so was the enjoyment level – the poorest aspect of our game was my own tactical awareness. I won, but I don’t feel I deserved to.